Monthly Archives: July 2011

Time ramping in Final Cut Pro X: so easy I can do it

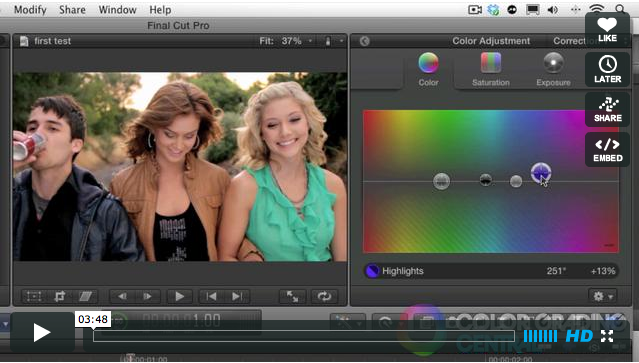
Time ramping. It’s been on my to-do list of “things to learn how to do in Final Cut” but never had time to face the fat tutorial. So this afternoon I thought I’d give it a shot in Final Cut Pro X, sans tutorial. It turns out to be ridiculously simple. Just click the magic wand icon (not kidding), select whether you want it to ramp up from 0 or down to 0, click, and you’re done.

This clip is all cut from time lapse footage that was shot slower than it should have been, so that it played back pretty jerky at 24p. I started out by slowing it to 50 percent using the incredible Optical Flow mode, which takes awhile to process, but the results are stunning, almost liquid. Then I sliced up the image and did some zooming on it to get the different close up views. Then I ramped the first clip from zero, and the last one to zero.

The difference between the old version of Final Cut and this new one is the difference between knowing you CAN do something, and actually doing it.

Final Cut Pro X: another favorite keyboard shortcut for browsing events

OK today I picked up another keyboard shortcut that I’m excited about.

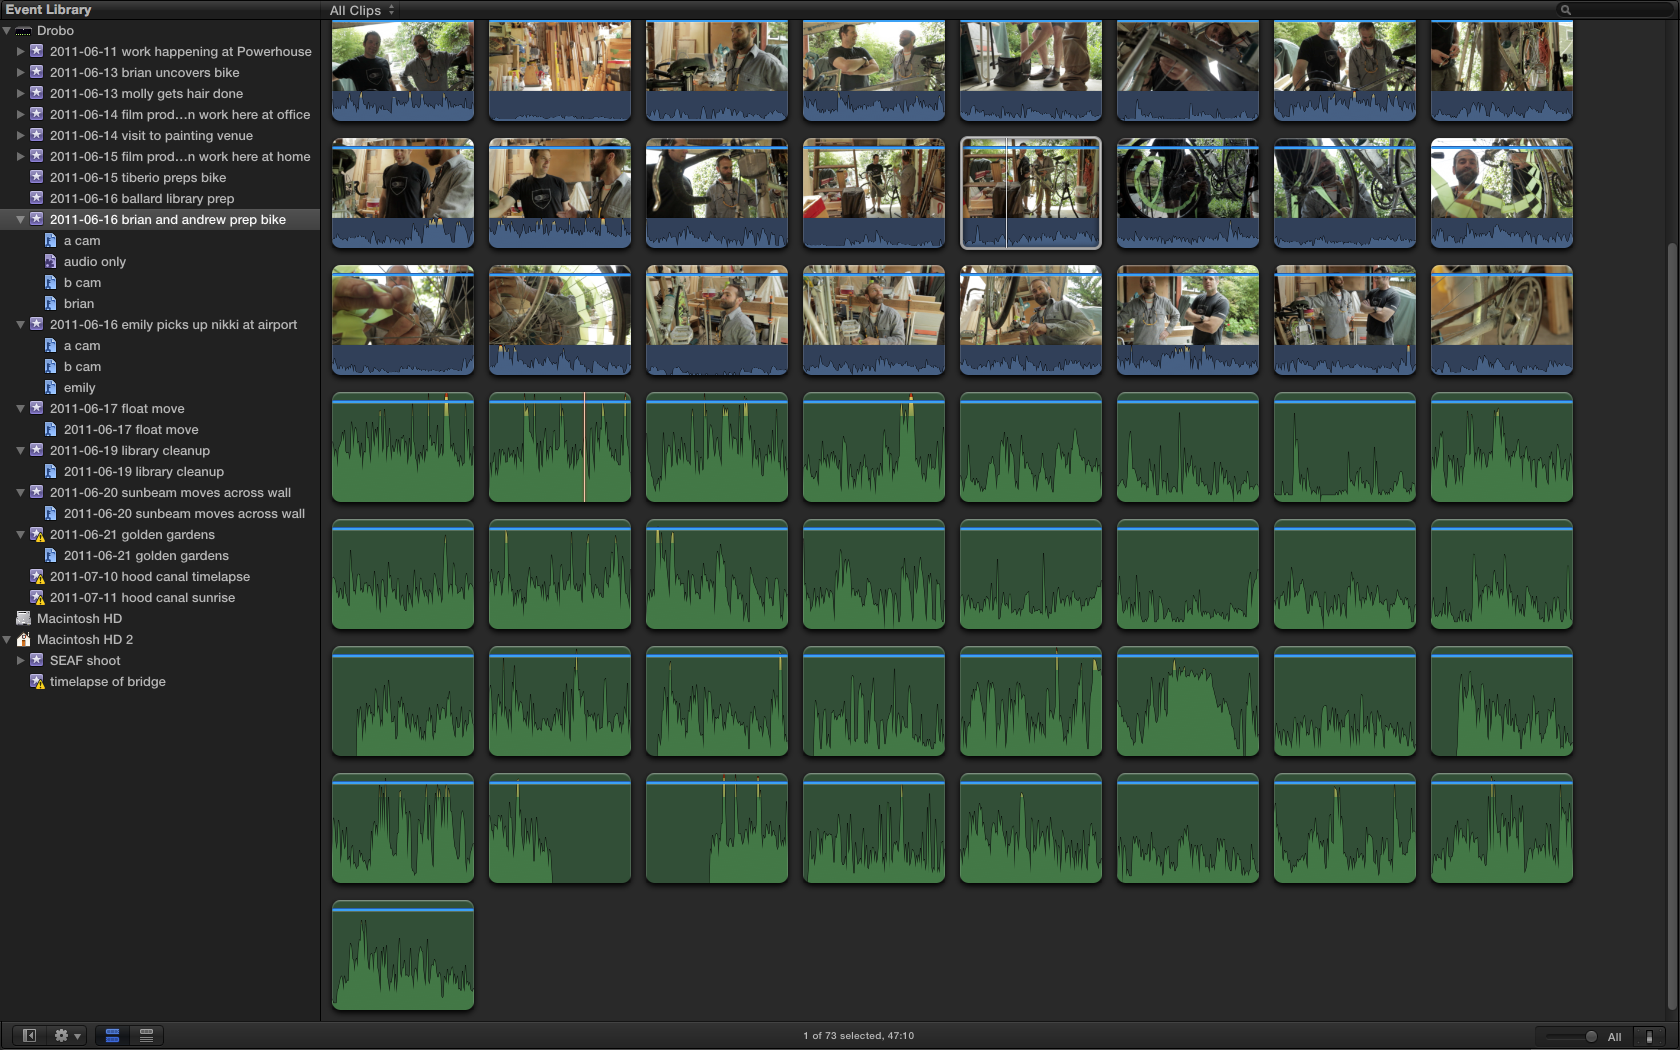
When reviewing an event in filmstrip view, the default is to show 5-second increments. This is fine if you’re making a selection on a specific clip, but what if you just want to see thumbnails of ALL the clips? I find myself switching the view back and forth a lot. The official FCPX keyboard shortcut to do this requires holding down the left side of your keyboard all at once: cmd-opt-shift-,. And it only works if your focus is on the event browser (rather than on the event index). Which means if you’re in the timeline, you have to cmd-shift-1 to toggle the event browser index off before the aforementioned shortcut will work.

Luckily, and this is what I’m excited about, there’s a far easier way to do this. When you’re in the even library, just press shift-z! Yup, the long-standing Final Cut shortcut for “view all” does what you’d expect on the event library, showing you thumbnails for all clips in a single keystroke. Love it.

The default view:

The shift-z view:

Final Cut Pro X's elegant solution for synchronized clips with multiple tracks of audio

On my current film, Beyond Naked, most of the audio we recorded was fairly straightforward, dual-mono, 2-channel recording: lav audio was recorded on the left channel, and shotgun mic on boom went on the right channel. Reference audio was recorded with on-camera mic, which we use to sync the clips in DualEyes. Then, we create Synchronized clips in FCPX by connecting the video with the audio, and we’re ready to roll.

But occasionally we faced a more complicated situation: phone conversations. During production we recorded these situations on a Zoom H4N in 4-track mode, which produces individual files for each side of the conversation. So in post, instead of one audio and one video file, we have to sync three files: 1 video to 2 audio clips. And of course, the audio won’t sync to the audio clip of the person on the other end of the line, because only her side of the conversation is in that file, leaving nothing to sync to.

I spent a few hours today figuring out how to do this in FCPX, and discovered that the clever engineers at Apple have built an extremely elegant method for doing this and storing it in the clip rather than in the project. How cool is that? Here’s how it works.

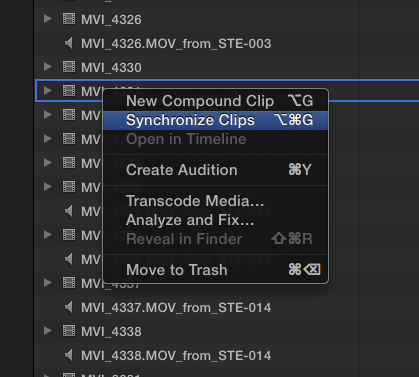
1. Select the video clip and the audio track that has the cleanly recorded version of the reference track. Right-click and select “Synchronize clips” or press cmd-opt-g.

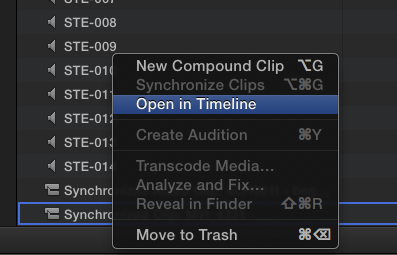
2. Right-click on the new synchronized clip, and select “Open in Timeline.”

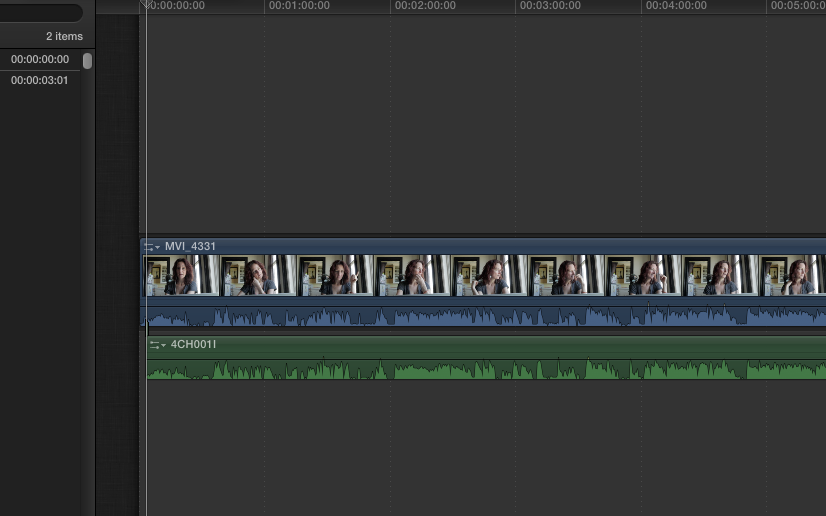
3. With the clip open in the timeline, select the third audio file. Align the playhead to the start of the first audio file. Press Q.

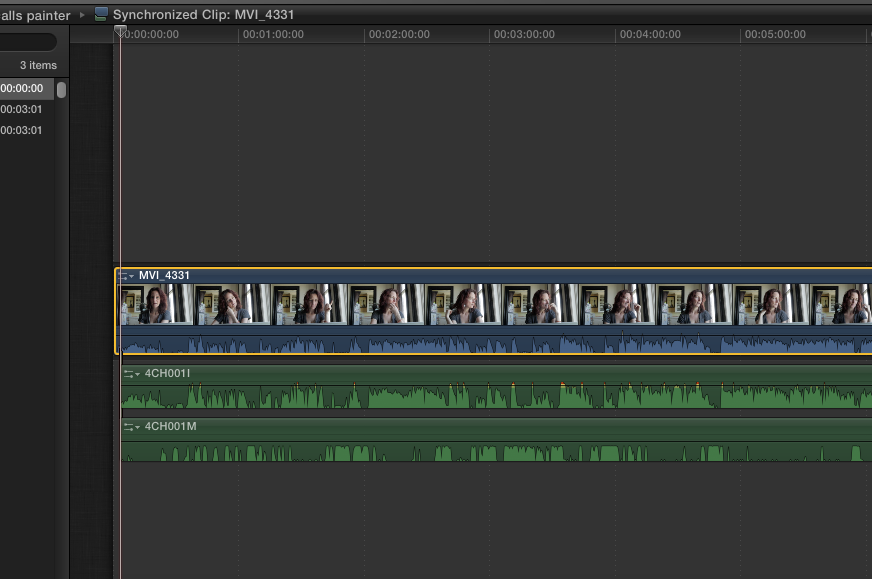
4. The audio clip is immediately connected below the second audio clip, and is in perfect sync, because the two clips are of precisely the same length.

4. Close the clip in the timeline by pressing the back arrow located in the upper left of the timeline. The additional audio clip is now stored with your synchronized clip.

What’s so incredibly sweet about this technique is that the you’ve just created a compound sync’d clip, all before you’ve even created a single project file. Everything happens in the event library on the CLIP! Test this out by selecting the clip and spotting it to the timeline by pressing e. it comes with all the sweet audio goodness, ready to roll and for further refinement such as mixing one channel louder than the other. In the prior version, stuff like this happened in the sequences, so you had to create a temporary or placeholder sequence just to prepare your clips for editing. I hated the confusion that caused me. With this, it’s all clean and simple, and stays where it belongs: clips are clips, and the timeline is the place where you edit those clips.

Proxies and Patience: prepping for the edit in Final Cut Pro X

Although Final Cut Pro X allows you to begin editing immediately while you ingest footage (an incredible feature), I’ve discovered that this really only works if you’re importing one event at a time. I’ve got 3 Tb of footage, all of which I’ve chosen to generate proxy files for to edit on (because my Drobo Pro isn’t fast enough to keep up with editing hi-rez files). I had hoped it would be possible to create multiple events and queue them up to import overnight, but no such luck. Every time we try this (on three different machines) FCPX will eventually freeze and/or crash. And the app forgets whatever it was transcoding when it crashes, requiring you to manually hunt down which files finished and which didn’t.

What this means in practice is that we have had to babysit importing our events, one or two at a time. Even with our four-core macs, creating proxy files for 3TB of video takes a long time. We’re still not finished, but the end is in sight. I’m looking forward to a more stable version of FCPX that will allow batch importing. But the current plodding pace is already a vast improvement over Final Cut Pro 7, which simply placed files into bins on import. This version creates thumbnails that are instantaneously skimmable, allow you me to see at a glance what I’m looking at. Also, when this organization process is complete, virtually all of the dual system audio will be connected, so that we’ll be editing with the good audio already in place AT THE CLIP LEVEL (not scattered in the blizzard of sequences that PluralEyes used to create on the old version).

Working with proxies is incredibly powerful in FCPX. You can sync audio to them, you can cut with them, you can even do basic color corrections on them, and everything will get applied to the original media when you’re ready for output. They speed things up tremendously if you’re connecting to your primary storage with Firewire 800, as I am. And, they look good. They are Apple Pro Res files, at 1/4 resolution of the original. So as long as you’re not playing them full screen, you can hardly tell the difference in the Viewer.

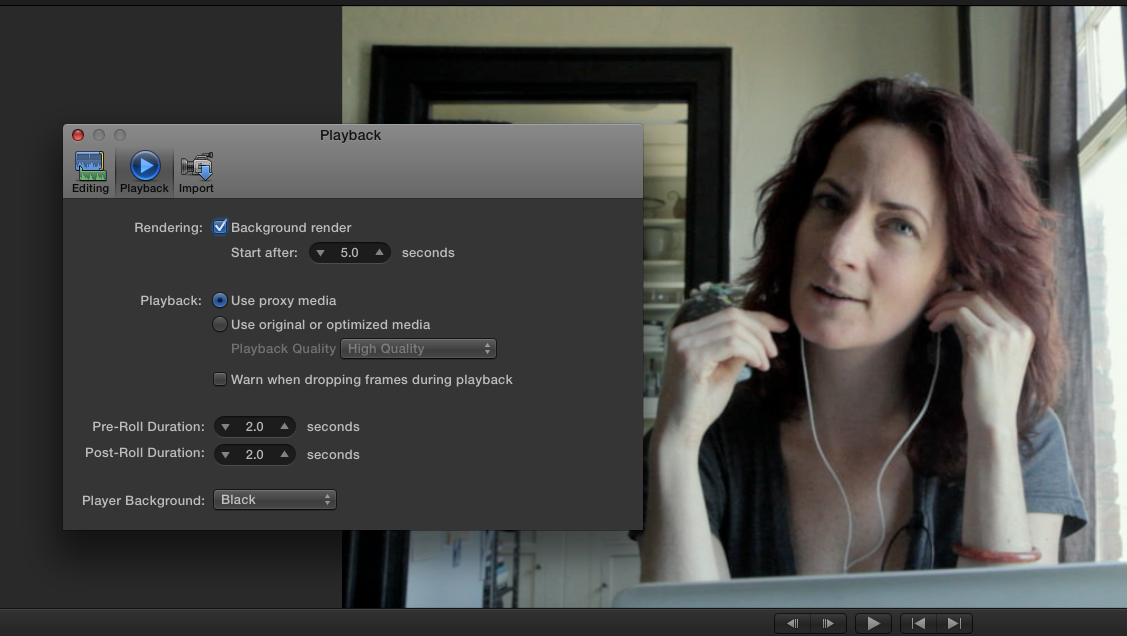
I was never able to figure out how to use proxy media on Final Cut 7, but with FCPX, using proxy media is dead simple (once you’ve waited for all the transcoding to finish): turn it on with a single click, located under the Preferences > Playback tab: “use proxy media.”

Tip: FCPX keyboard shortcut helps prep footage faster

I’m methodically prepping to edit (with the help of two very patient assistants) more than 3TB of footage and audio that will become Beyond Naked over the next five and a half months. I have several very specific tasks that I am doing to the footage as I bring it in: I’m changing the audio to dual-mono prior to linking it with video clips, I’m making several keyword assignments, and building a smart collection based on file type. All of which requires frequent switching between these views of the event library:

Browse View:

List View:

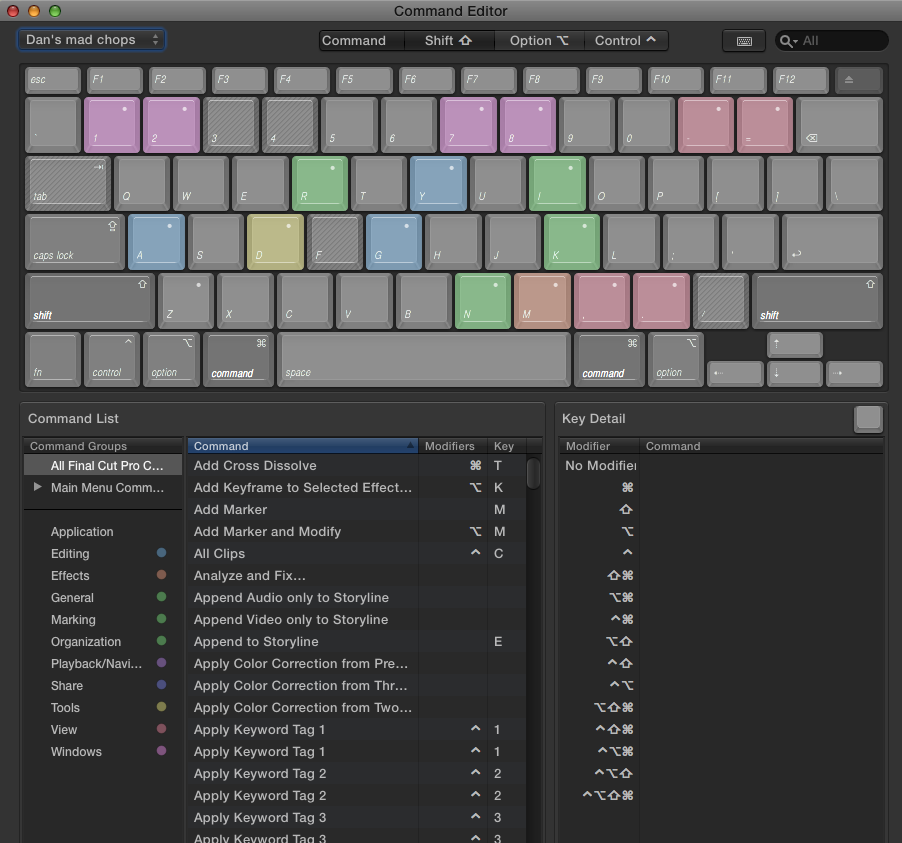
This evening I’m on the verge of dancing alone (with my cat Willow) in my editing suite, because I just discovered a keyboard shortcut that RULES: Cmd-opt-1 shows you the Event Library in browse view, and Cmd-opt-2 gives it to you in list view. Carpal tunnel syndrome, you may still get me some day, but not today. Thank you very much, whoever you are on the Apple development team. And, incidentally, I discovered this magical stroke by digging through the Command Editor in Final Cut Pro X, accessed by pressing Cmd-opt-k.

Final Cut Pro X Command Editor:

Last tip: the first time you open the Command Editor, make sure you save a copy right away, so you can begin assigning your own shortcuts for things like nudging the color-correction puck up and down and left and right one pixel at a time: by default many such commands have no shortcut key assignments, but you can find the action, and instantly assign any combination you like by pressing modifier keys, using the Command Editor.

DroboPro isci connection woes continue

I’ve had my replacement DroboPro humming along nicely for a few days, but today marks the end of all that happiness. This afternoon, the same thing began happening as before with this new unit: while I’m working, it’s somehow partly disconnecting or actually disconnecting, causing my apps to freeze. The funny thing is that the Drobo remains visible in the finder. All my apps freeze up and get the spinning beachball of death whenever I try to navigate into the file structure below one or two levels down.

I’m almost certain that this is an iscsi problem, because this never happens with firewire 800. But I hate using fw800; it’s too slow for me to edit hd video on.

Guess it might be time to get that new Thunderbolt drive sooner rather than later.

Final Cut Pro X crashes a lot…and why I don't care

Just a moment ago I wanted to search through all of the events on an entire disk for a particular video clip, so I clicked on the disk icon in the event browser. After a few moments spent trying to read all of the events into ram, FCPX crashed.

It’s not a totally rare occurrence. Final Cut Pro X crashes. A lot. But I don’t care. Why? Because when I start it back up again, it puts me right back where I left off. Same window layout, same everything. This amazing app doesn’t even have a save button: it just saves everything automatically, right up to the moment. So the only thing I lose from the crash is the few seconds it takes (on my iMac 27″ ssd-equiped 16-megs of ram speed racer) to reboot.

I look forward to a more stable FCPX, of course, but for now, if the price of admission to this dreamy, freakishly fast, multi-tasking wonder is a few moments every now and again of rebooting, it’s a price I’m willing to pay.

Tips for reconnecting offline media in Final Cut Pro X

If you ever get into a situation where you are trying to store your media outside of Final Cut Pro X’s event folder structure, and Final Cut keeps copying the original media into the Final Cut Events > Original Media folder (which happened to me after using FCPX’s Merge Events commend), here’s a workaround. What you CAN’T do is simply put an alias to the original media into your Final Cut Events folder – Final Cut is too savvy for that, and it won’t connect to the media.

The simple solution: create a new event (which you’ll delete momentarily), import the media you want with ALL options unchecked in the import dialog, and then immediately quit FCPX after the files appear in the event browser. You’ll see an alert warning you that all background tasks will be aborted if you quit. Quit anyway – you don’t need the render files it’s churning away on.

Then, in the Finder, open the Original Media folder of your new event, and drag all of the FCPX-created aliases into the Original Media folder for the event you’re trying to reconnect. Make sure FCPX is quit while doing this. Now delete the new event, and start FCPX.

Boom, all your original files are reconnected.

You can use proxy files to sync audio in Final Cut Pro X

Here’s a discovery I made today: if you’re working with an assistant editor, you can send a bunch of proxy files to the assistant, have them sync audio with the proxy files, and then when you get the files back, you can merge them into your event and they will connect to the high-res files. It’s pretty slick, and obviates the need to send out original or ProRes media. The proxy media that Final Cut Pro X creates is a 1/4 size version of the ProRes media, and it’s so good that I’m hard-pressed to tell the difference between original and proxy in the Viewer while I’m editing. Of course, if you play back full screen, you see the jaggies.

NOTE: I’m using DualEyes for the audio syncing, since PluralEyes doesn’t yet have a FCPX version. And FCPX’s built-in synchronize clip feature only works when you know which two clips to sync – so you need DualEyes if you’re batch-processing large numbers of clips at a time.

Here’s the workflow:

1. Create an event (Opt-n) and import some video and audio into it (cmd-shift-i). On the import dialog box, make sure you place a check next to “Create proxy media.” Wait until the proxy files have been created. Quit FCPX.

2. Now we have to do some work in the finder: make sure you have the external hard drive mounted that you want to copy the event onto, which you’ll be passing to the assistant or taking away to work on yourself. Also make sure it has a folder called Final Cut Events in the root. Then navigate to your Final Cut Events folder (in your Movies folder if you’re working off local hard drive, or in root level of an external drive). Find your event folder. Copy the folder and all subfolders EXCEPT one: don’t copy the Render files folder, and deselect all the video files in the Original Media folder, so that you copy only the original audio files. The whole point of proxy media is to save space and time, so you don’t want the hi-res files leaving your primary storage.

3. When the assistant gets the drive and opens FCPX, there will be a red alert displaying in the event, warning that the footage is offline. Don’t panic. Just press cmd-, or open preferences from the Final Cut Pro menu. Under Playback, select “use proxy media.” Now, everything is groovy: the proxy footage shows up, and your assistant can get to work, as follows.

4. Quit FCPX. In DualEyes, create a new project. Select the video files located on the Transcoded Meda > Proxy Media folder. Add the audio files located in Original Media. Run the sync (I always run with “try really hard” selected, because it always works better and is worth the extra waiting time). Files that match the length of your video clips will be added to the Proxy Media folder. Also a temp folder created by DualEyes. When the batch is finished, delete the temp folder, and move the new audio files over to the Original Media folder.

5. Now open FCPX. You’ll find all the new audio files added to your project. These will be named with both the video and audio clip they are associated with, so that you can tell immediately which file to synchronize by its name. Cmd-click on the video and the audio file to select both, then press opt-shift-G to synchronize the clips. FCPX creates a synchronized clip for each. At this point, the assistant can add keywords, create smart collections, and do whatever work is necessary on the files to send them back to the main project.

6. To bring the event back in, connect the external hard drive to your home system. Remove the event on the home system from the Final Cut Events folder, but don’t throw it away yet. Place the event coming from the assistant into the Final Cut Events Folder in its place (Final Cut should be closed while you do this). Grab the original media (or references to the original media) from the Original Media folder that you’ve parked on the home system, and move it to the Original Media folder on the incoming event. You can now throw away the old event, because the one from the assistant will replace it.

7. Start FCPX. Everything should read-in normally, and you’re good to go: the original files will now be used (provided the “use original or optimized media” is selected on the home system’s FCPX preferences).

It’s important to remember that in FCPX, you can’t modify the original media (or any other media, for that matter) outside of FCPX. It will render the media permanently offline inside of FCPX if you do, and you’ll have to re-import it. This is a problem that I hope is fixed in future versions.