Category Archives: Sound Bag

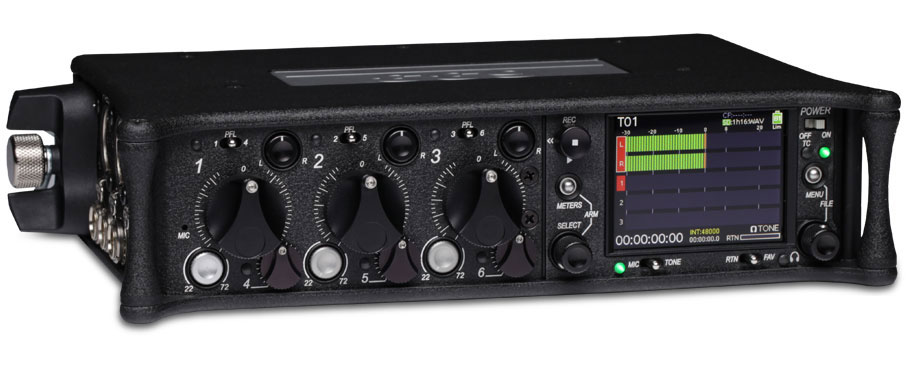
All I want for Christmas is a Sound Devices 633

Today Sound Devices announced the newest member of their mixer family: the Sound Devices 633. This isn’t just a mixer, though. The reason it commands my documentary filmmaking attention is the 10-track audio recorder the comes built into this small, extremely well-made package. And because it’s Sound Devices, you can bet it sounds as sweet as it looks.


(Wow, somebody in the marketing department at SD has been watching Apple product introduction videos, hey?)

So many small details make this look like a winner: four ways of powering it! You can put to Sony-style L-series batteries on the bottom, and if they die, the AA batteries inside will automatically take over. No need to switch manually from external to internal power, as I currently have to do on my Sound Devices Mix Pre. And if all sources die, it has an internal battery that will gracefully power you down so that you don’t lose the take entirely. Brilliant.

It accepts both SD and CF cards, and you can record to both simultaneously so that you can hand one card to the client or to editor while keeping your own at end of shoot. How cool is that?

Granted, this one is no impulse buy. At $3,095, it’s safe to say that only serious audio pros, or at least sound sticklers like me, will be entertaining a purchase. But who knows what’s next for Sound Devices? Maybe a recorder/mixer in this vein with 2-4 inputs, a 6-channel recorder, in the form factor of MixPre? For about $1,500? That would sure be something.

All I want for Christmas is a Sennheiser 8060

I can hardly believe what Santa brought me this year: a Sennheiser 8060. It’s a mic that I’ve coveted ever since it hit the market six months ago, becoming the instant industry standard shotgun mic for well-financed film and TV productions with it’s nearly $1,300 price tag. My productions aren’t exactly well financed, but after today, they’re going to sound like they are.

Because it’s more important for film to sound great than it is to look great, it can make sense to spend more on a microphone than on a camera. Will this microphone be worth the money? I’ll post a full review and comparison of this mic with my AT875 and Octava MK-012 after I’ve had a chance to use it awhile.

Rewire a Tekkeon battery to power MixPre and Zoom H4N

My biggest complaint about MixPre and Zoom H4N is that they are both battery hogs. I’m sick and tired of getting interrupted midway though shoots because my Zoom or Mixpre batteries need to be changed. I priced several industry-standard NP battery distribution systems, and they just seemed way overpriced, and frankly more than I need. Would it be possible for me to build a bomb-proof power distribution system with a Tekkeon My PowerAll MP3450i battery and inexpensive parts?

After about a week of ordering parts and teaching myself how to solder, I’m happy to say the answer is, definitively, yes. Including the cost of soldering iron and 3rd hand soldering clamp, I was able to build a power distribution system that will power my audio bag all day and then some, for $205.00. Here’s what it looks like, and how to make it.

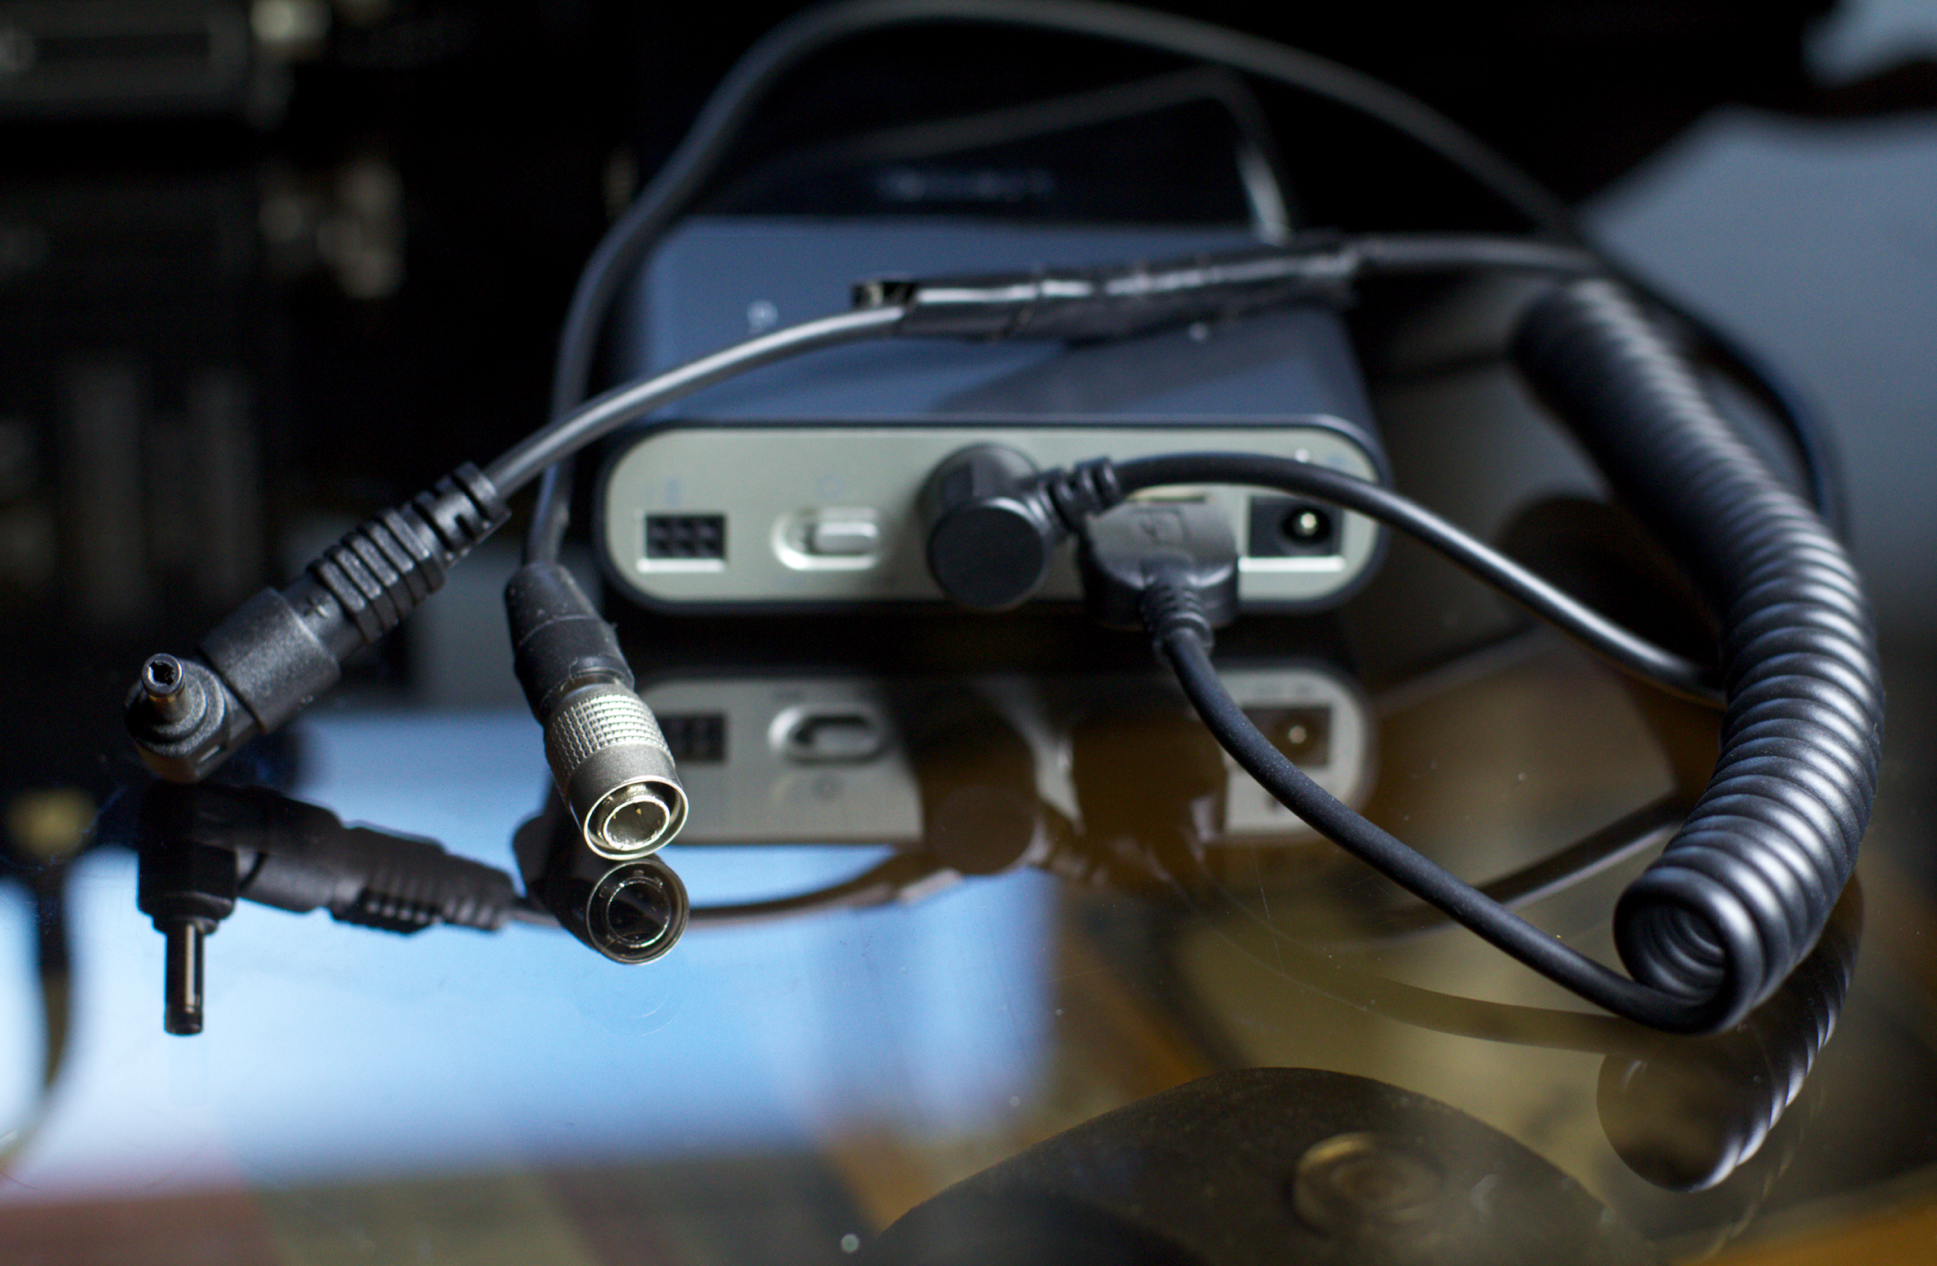
The battery and the DIY cables:

Ready to roll all day long:

Parts list:

The Tekkeon has two DC outputs: one is a variable voltage cable that supplies between 5 and 19 volts (set via a dip switch on the battery). The other is a USB out that provides 5 volts no matter what the rest of the battery is set to. The Zoom requires 5 volts, so it’s the obvious choice. This was theoretically the simplest cable – I ordered this one only and it was supposed to come with everything to immediately connect up to the Zoom, but they shipped me a unit with a tip that wouldn’t work with the Zoom. I was able to splice the correct connector by cutting off the tip of the Tekkeon power cable that I also ordered (see below), and putting on the appropriate tip, which Tekkeon sells in this pack of connectors. Just splice and solder the red and black wires together, and ignore the white and green usb data wires.

I didn’t want to perform surgery on the Tekkeon power cable that came with the unit, because I sometimes want to power my LED light with it. So I ordered one of the fine right-angle connectors from Tekkeon, which present a lower profile in the audio bag when plugged in. I cut the tip off it (which I put to work as outlined above), and got ready for the most challenging scene in this DIY drama: mating with the Hirose 4-pin male connector required by the MixPre.

First, you have to uncouple the Hirose connector, and remove the 4-pin connector that you must solder to. It unscrews from inside the main unit – I used a pair of needle nose pliers to get it turning, and then it came out by hand. Others recommend plugging it into your MixPre, which gives you a better grip to unscrew from. Here’s a picture that shows the Hirose broken down into it’s component parts, ready for soldering.

Soldering the Hirose 4-pin connector is not a trivial undertaking. The pins are very tiny, and my hands are the opposite of nimble. So a third hand device was mandatory for me, which I found for about $10 on Amazon, including a magnifying glass for extra credit. The magnifying glass turned out to be mostly useless, but the alligator clips were essential to holding everything in place during my many soldering attempts. The trick: pre-tin the cups and the wires, so that things bond quickly as soon as they’re hot. But first, which wires go where?

Knowing that the MixPre will simply ignore power that is the wrong polarity, I set about soldering different combinations until I found the right one. It took me 5 tries before I found the winning combo: #4 pin to positive (red), and both white AND black get soldered to the #1 pin. As I was grinding my way through the ordeal, some solder dripped onto the #2 pin while I was soldering the two cables to #1 pin, connecting the #2 and #1 pins with the both the black and white wires. So bit of a cluster there. Anyway, it works. (I think the #2 pin is ignored in this wiring scenario).

Oh, there’s one more thing. Once I had everything soldered up correctly, I realized I’d forgotten to slide the rubber jacket and screw-in body of the Hirose connector onto the cable BEFORE I started soldering. Which of course meant I had to redo everything. Don’t do that.

There’s some discussion in the forms about what voltage is ideal to set the battery to provide to the MixPre, which will accept anything from 5-18 volts. I chose 9 volts and it works great. The lights are much brighter on the MixPre when it’s powered this way, and it seems to power mics a bit hotter with 9 volts than it does with the internal AA batteries.

As a bonus, I discovered that both the Zoom and MixPre fail over to internal batteries automatically without interruption if the Tekkeon is accidentally switched off, runs out of battery, or if their cables come loose. Sweet.

Thanks to following websites for help: TaperJ on Tappersection.com has great advice on wiring Hirose connectors. Also thanks to instructables.com for advice on how to solder wire correctly.

Zoom H1 battery & sound problem – Samson we have a problem here

I’ve recently noticed that my Zoom H1 drains the battery, even when it’s not turned on. But I just figured it was me, and worked around the problem by only putting batteries into the unit when I needed to use it. Then, this weekend, I was doing some sound tests, and inadvertently discovered an even more serious problem with my Zoom H1. As I was recording, I was listening very carefully to the noise floor of the device, and noticed a strange pulsing sound. It was worst with an external mic (like my Tram TR50 lav used to record the sample below). But in fact, I couldn’t get a clean recording out of it no matter what I tried, even with the built-in mics.

Here’s what it sounds like (pay close attention to the silence at beginning and end of clip).

Sounds like a helicopter hovering in the distance, with the woop-woop-woop of rotor blades cutting through what should be silence.

That was enough to send me to Google in search of an answer, and sure enough, I found a few conversations about the issue, but nothing definitive. So I emailed Samson, the maker of the Zoom H1, and and this morning, I got back this definitive email:

We are aware of an issue affecting a limited number of H1’s. If you are within the United States, please call customer service at 1-800-372-6766, 9am-5pm M-F EST.

They will issue a return authorization number and arrange to have a new, tested replacement sent to you.

This kind of customer service rocks: not only do they acknowledge the problem, but they immediately arrange for a swift resolution. Go Samson.

Zoom H4N MixPre audio recording comparison

If you’re a DSLR video shooter using the Zoom H4N, you’ve probably heard the Sound Devices MixPre can take your audio recording to the next level. But what, exactly, does the “next level” sound like? I recently purchased a MixPre, and I’ve been asked by a couple readers of my blog to post sample audio. And that’s what I’ve got for you today.

Here are three recordings which test the following scenarios:

AT875 mic -> MixPre -> H4N line-in with -10db M-Audio attenuation pad (recording level on Zoom H4N set to 19)

AT875 mic -> MixPre -> H4N line-in with -25db Pink Noise attenuation cable (recording level on Zoom H4N set to 27)

AT875 mic -> H4N sans mixer (recording level set to 82)

NOTE: It’s necessary to use attenuation of some kind between the Tape Out on the MixPre and the Zoom H4N’s line-in, because the signal the MixPre sends to the Zoom is too hot otherwise, and will cause the Zoom to clip before the MixPre’s limiter’s kick in. I blogged about this previously here.

The recording environment: my finished basement, which is very quiet and covered in carpet. It was a windy day today, though, so you can occasionally hear neighbor’s wind chimes in the background. For this test, I read the first paragraph of a Paul Bowles short story, so it’s your basic male dialog.

Equipment: AT875R mic on stand, 10″ away from my mouth; Sound Devices MixPre; Zoom H4N (with latest firmware update).

Hypothesis: It shouldn’t really make any difference whether you use a -10db pad or a -25db cable – you just have to raise the recording level a bit when using the -25 cable. But I am wondering whether the -25db cable sample will be noisier because of need to crank up recording level on Zoom H4N. It shouldn’t be, because I’m told that plugging into the line-in on the Zoom bypasses the preamps on the Zoom completely. Finally, the Zoom H4N should be noisier without the MixPre in front of it, because the preamps on the consumer Zoom H4N are said to be crappy by comparison with the professional Sound Devices MixPre.

After reviewing the results, here’s my thoughts:

As expected, the MixPre does improve the quality of the audio recording compared with recording directly into Zoom H4N. There is less hiss, and the sound is richer. Still, the Zoom H4N all by itself is not bad. And to my surprise, the -25db Pink Noise cable seems to have less noise than the -10db pad, although I think that’s down to relative recording levels being different (although I tried to make them the same – the audio waveforms are taller on the -10 pad file). As I’ve posted previously, I far prefer the Pink Noise cable over the -10 M-Audio pad, because of it’s ergonomically angled 3.5mm jack, which allows it to lay flat in my sound bag.

So these test results do nothing to change my preference: recording audio with MixPre in front of my Zoom H4N, connected with Pink Noise -25db cable.

Of course, sound is a very subjective thing. What do your ears tell you?

Connecting Zoom H4N to Sound Devices MixPre – Part II

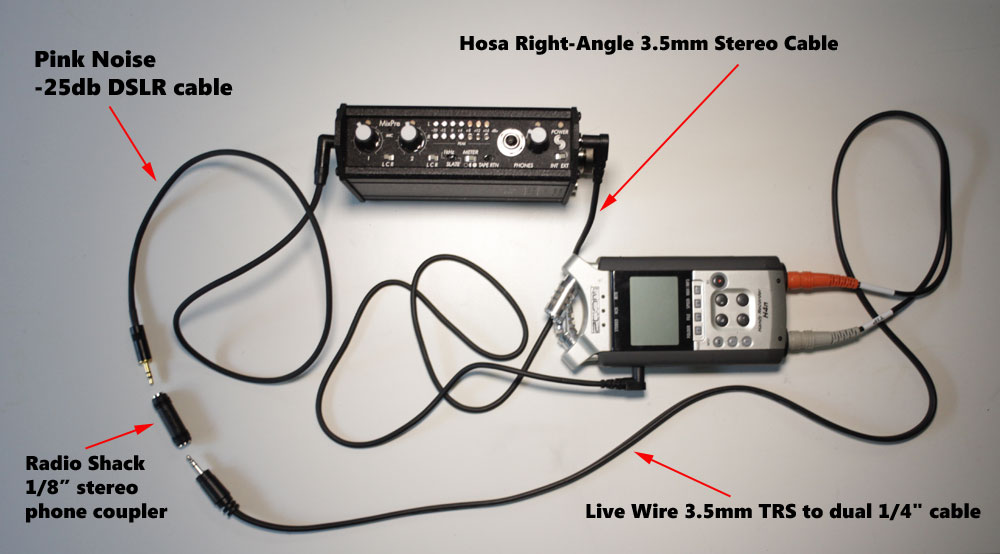
In part 1 of this post, I outlined the problem of connecting the Zoom H4N to Sound Devices MixPre. In a nutshell, the signal the MixPre sends via it’s Tape Out is too hot for the Zoom’s line in. I posted a workaround that allowed us to get by, and a proper solution using a -10db inline pad. Since then, sound recordist Lisa Cooper and I have been using this combination on an almost daily basis shooting a documentary called Beyond Naked. And we’ve hit on an even better solution that truly kicks ass and makes us smile. Here it is:

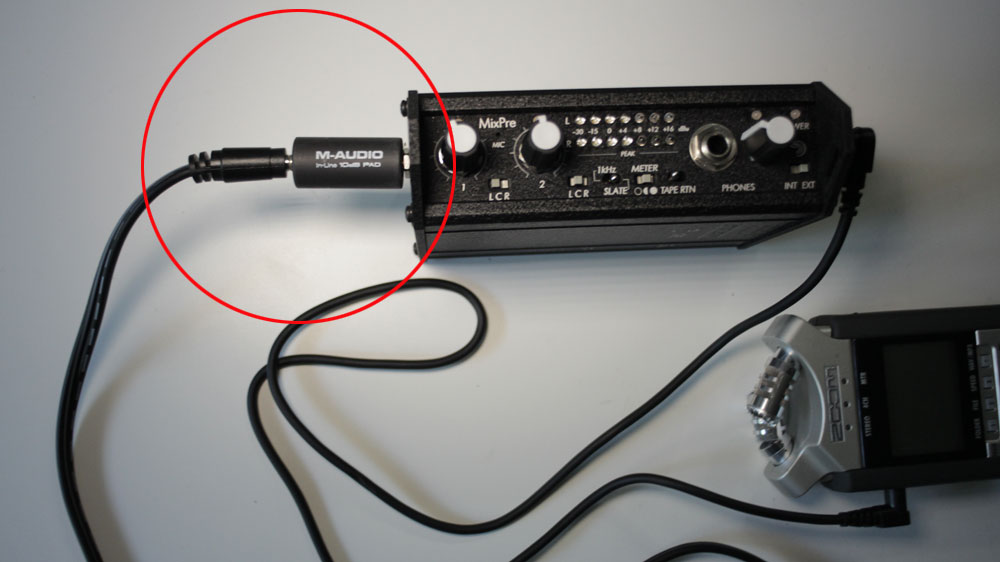
The problem with these lightweight 3.5mm jacks is that, when we used ones that go straight in, they tend to stick out and get knocked around in the sound bag (see photo below):

Because it’s coupled with the -10db pad at the critical connecting point, it tends to lever itself loose, causing static, or worse, it could break off or damage the internal jack on the MixPre. The right-angle connector, on the other hand, lies flat, which gives everything a safe, low profile in the sound bag.

The Pink Noise cable is the way to go. Because it’s -25db, you have to set the recording level on the Zoom H4N a bit higher. We’ve found the best setting is 28. (The best setting is 20 with the M-Audio -10 pad). Any higher, and it’ll start to clip on the Zoom before the MixPre limiters kick in. The best thing about the Pink Noise cable, besides the fact that it makes the tape out signal usable, is that it has a right-angle connector that allows it to connect to the MixPre without sticking out.

Here’s the parts list:

Hosa Right-Angle 3.5mm to Right-Angle 3.5mm Stereo Cable ($3.99 at B&H Photo)

1/8″ Stereo Phone Coupler ($3.99 at Radio Shack)

Pink Noise -25db DSLR Cable ($54 direct from Pink Noise Systems in UK)

Live Wire 3.5mm TRS to dual 1/4″ cable ($8.99 at Guitar Center)

If you order the Pink Noise cable, make sure you email and ask to have the VAT tax dropped (you don’t have to pay it if you’re ordering from US). They have great customer service if you ask, but you’ll get overcharged if you simply place the order via the web form, since there is no option to not pay VAT on their order form.

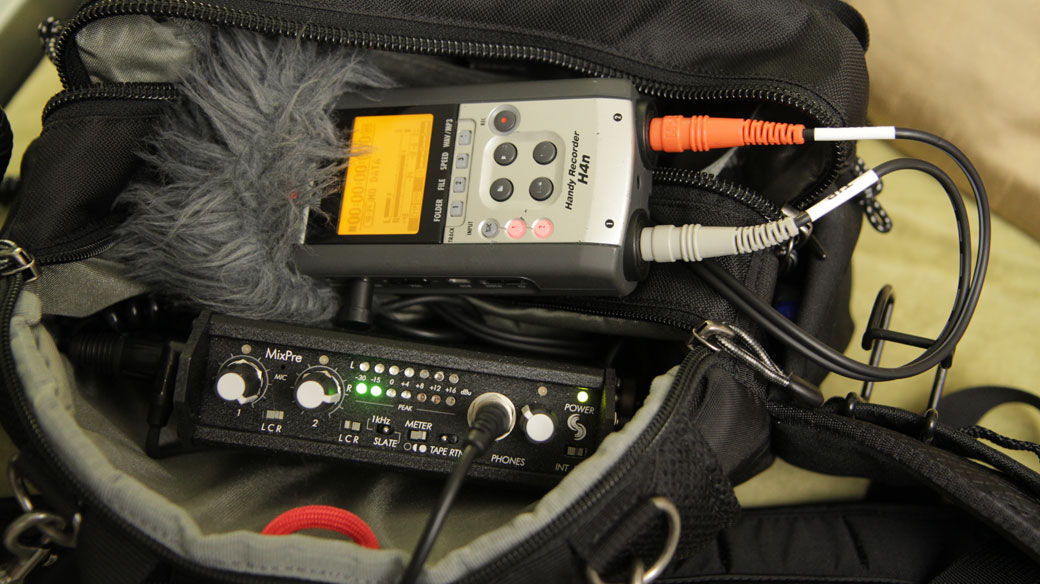
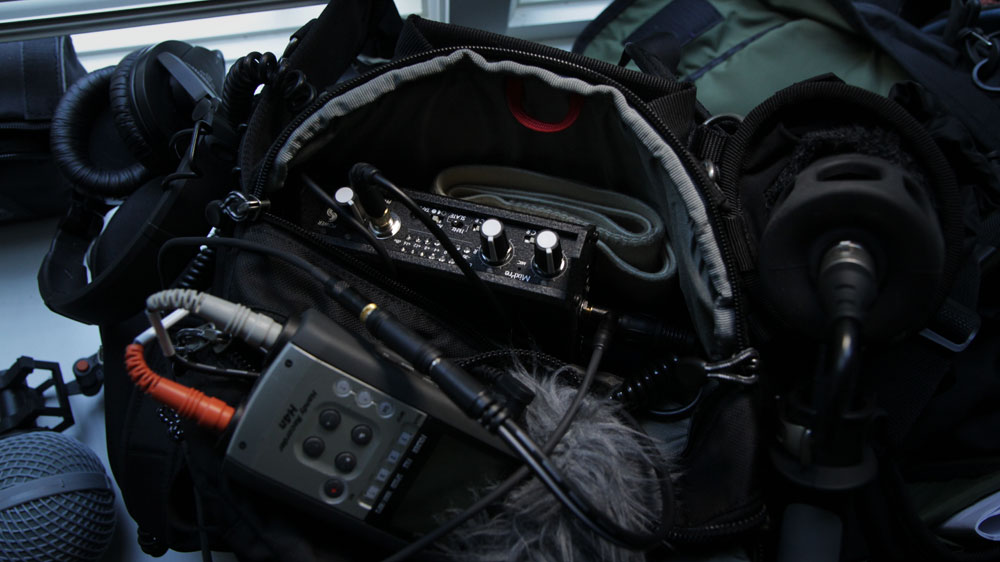
And finally, here’s why it’s such a big deal to have the right-angle connectors: because sound bags in real life look like this! Cable management is very important to getting the job done.

Zoom H4N with Sound Devices Mixpre: how to properly connect the two for pristine audio

Up until now, using the Zoom H4N as a standalone recorder with good mics has worked fine for me. But I’ve evolved into a stickler for good audio, and I’m fortunate to be working with an outstanding sound recordist, Lisa Cooper. Together we are finally bumping up against the limitations of using the H4N for recording: it’s hard to read the meters on the Zoom when it’s in a sound bag (where the levels are located on the wrong side to be visible); the H4N pre-amps are somewhat noisy; the limiter sucks, and you can’t quickly send signal from left to right channels or both without digging through several layers of menus. Not to mention that when powering a 48v phantom power mic, such as my Octava MK012, the batteries drain in just a few minutes. When I read Kurt Lancaster’s rave about the MixPre in his new book, DSLR Cinema, I decided it was time to ante up.

It turns out that, even in online discussion forums, there’s scant clear information about how to correctly cable the Zoom H4N to the Sound Devices Mixpre for optimum recording (that is: recording that is as hot as possible, but that won’t clip on the recorder before it hits the limiter on the MixPre). I had to wade through at least a dozen different forum conversations before I finally found most of the advice I needed. I found the rest of it today during a trip to Guitar Center in Seattle. So I’m documenting the right steps here for anyone else who is ready to reach for pristine audio while keeping the trusty Zoom H4N in your sound bag.

So here’s the scoop. You can’t just plug normal cables from the mixpre into the zoom at default settings, because the signal coming out of the professional-grade mixpre is too hot for the consumer-grade Zoom to handle. But, with the right cable and a tiny jewler phillips head screw driver, you can make it work acceptably, and by adding an in-line attenuator that costs less than $25, you can make it work perfectly. More about that in a minute. But first, the cables.

There are two options for cabling the mixpre to the zoom: You can run either from the tape out, in which case you’ll need trs-to-dual phono jacks, or, you can buy two xlr female-to-phono cables. But there’s a problem with both: The signal that is output from each of these is different, and neither is quite right for the Zoom’s line-in.

While you COULD just run xlr female-to-xlr male from mixpre to zoom, you don’t want to do that. Doing so enables the noisy preamps on the Zoom, and you damn sure don’t want that after making that big investment in the mixpre’s vastly superior, quieter preamps. You need to use phono jacks for plugging into the Zoom to bypass the preamps. (A tip for those of you who know as little about audio circuitry as possible, like me: phono jacks are those 1/4″ jacks that look like old-school headphone jacks. They plug into the same hole on the bottom of the Zoom H4N that your XLR cables do – but into the middle instead of the three pronged connector that surrounds it.)

But wait, there’s more. If you do connect the MixPre to the Zoom as described above using the xlr-to-phono option, you will need to add 15-20 db of attenuation to get the correct level into the Zoom. To achieve this, you need to buy an inline attenuator, preferably a selectable attenuator, that lets you dial in how much attenuation to apply. And, you would need to by two of them if you want to send signal to both channels independently, which you almost certainly will want to do. So, lots of stuff to buy with this option, and it’s not cheap at $45 a pop for each attenuator. And why would you want to add all that extra weight and awkwardness to your lean, mean sound bag anyway? No, you want to use the following option instead.

The way to go is by running this 3.5mm TRS to dual 1/4″ cable from the MixPre’s tape out -> line in on Zoom. This ALMOST works out of the box when you plug it in. But there’s a big problem lurking: even when you dial down the recording level on the Zoom to 1 or lower, the audio signal will clip on the Zoom before the limiter kicks in on the MixPre. Incidentally, you don’t want to dial your recording level to .9 anything below 1, trust me – I tested it and got horrible results every time. And you also don’t want to turn down the level of the tape out on the MixPre – I tried that and it still clipped on the Zoom no matter how low I turned it down.

The quick solution is to get a jewler’s phillips head screwdriver and turn the factory setting on the MixPre’s limiter 1/4 turn to the left. By default these are set at their highest gain on the MixPre. Turning the screw to the left activates the limiter at a lower gain level.

With this configuration, I found a workable setting was to set both recoding inputs on the Zoom to 5. The tradeoff is that it’s now slightly harder to monitor recording levels on the MixPre, because the LEDs, which normally go three steps into red before clipping, now clip at the second light. So you have to ride your levels down a little further into the green and use less of your LEDs than is ideal when watching your levels while recording.

The better solution is to purchase an in-line attenuator for the 3.5mm cable, which will allow you to keep the limiter set at it’s default value, while sending a signal that is reduced by 10db to the Zoom. Then, you can up the recording level on the Zoom to compensate until it’s dialed in perfectly.

I could find only one option for a -10db TRS attenuator that will get the job done for around $25. I’m sure somebody else makes them – if you’re aware of other options, please let me know. I’d like to find something clean and simple like the Pink Noise cable made in the UK, but with less attenuation than the 25db that it has.

Incidentally, the sound bag I’m using, the Think Tank Wired Up 10 with optional mic drop in, really deserves a separate review of it’s own, which I’ll post another day. It’s killer.

UPDATE: After using the M-Audio -10db pad almost daily for a few weeks, we’ve identified a problem with this approach, and an even better solution. Check out Part II of this article for the full scoop.