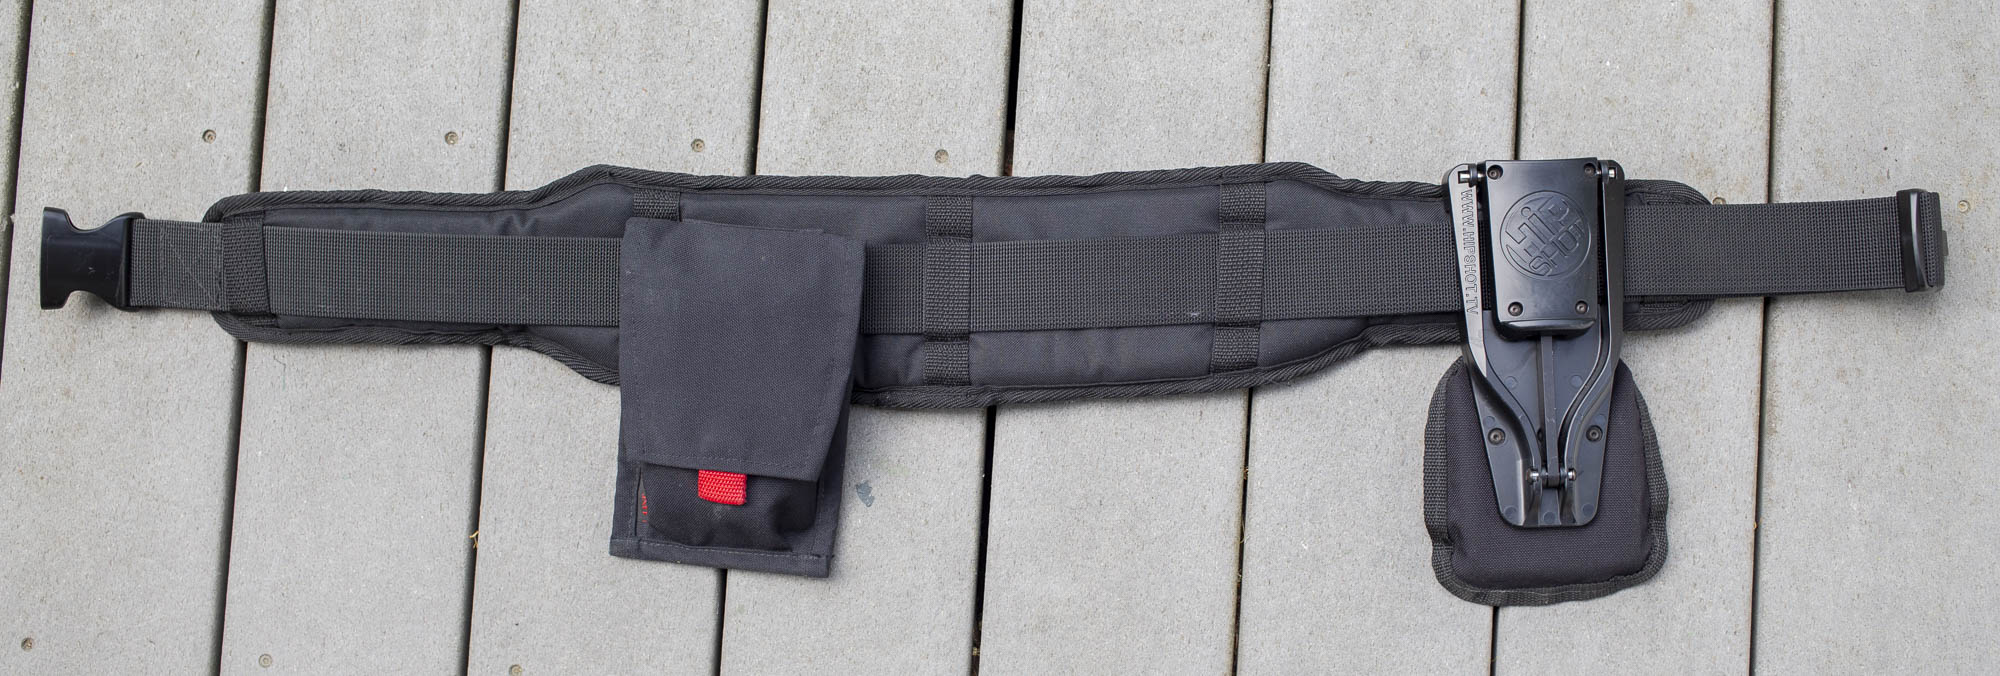
As my Sony FS5 seems to grow in size every day, I’ve found that it’s getting harder to shoot handheld. And that’s a shame, because that’s what this little camera is born to do. But when you add a Shogun for recording raw, a Teradek Serve Pro for clients, and a battery plate to keep it all running, it’s a lot to bear.
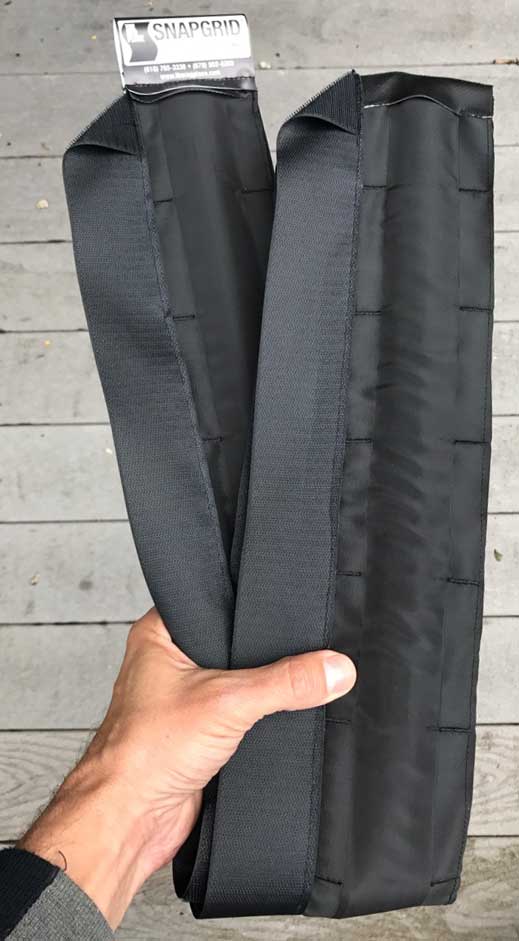
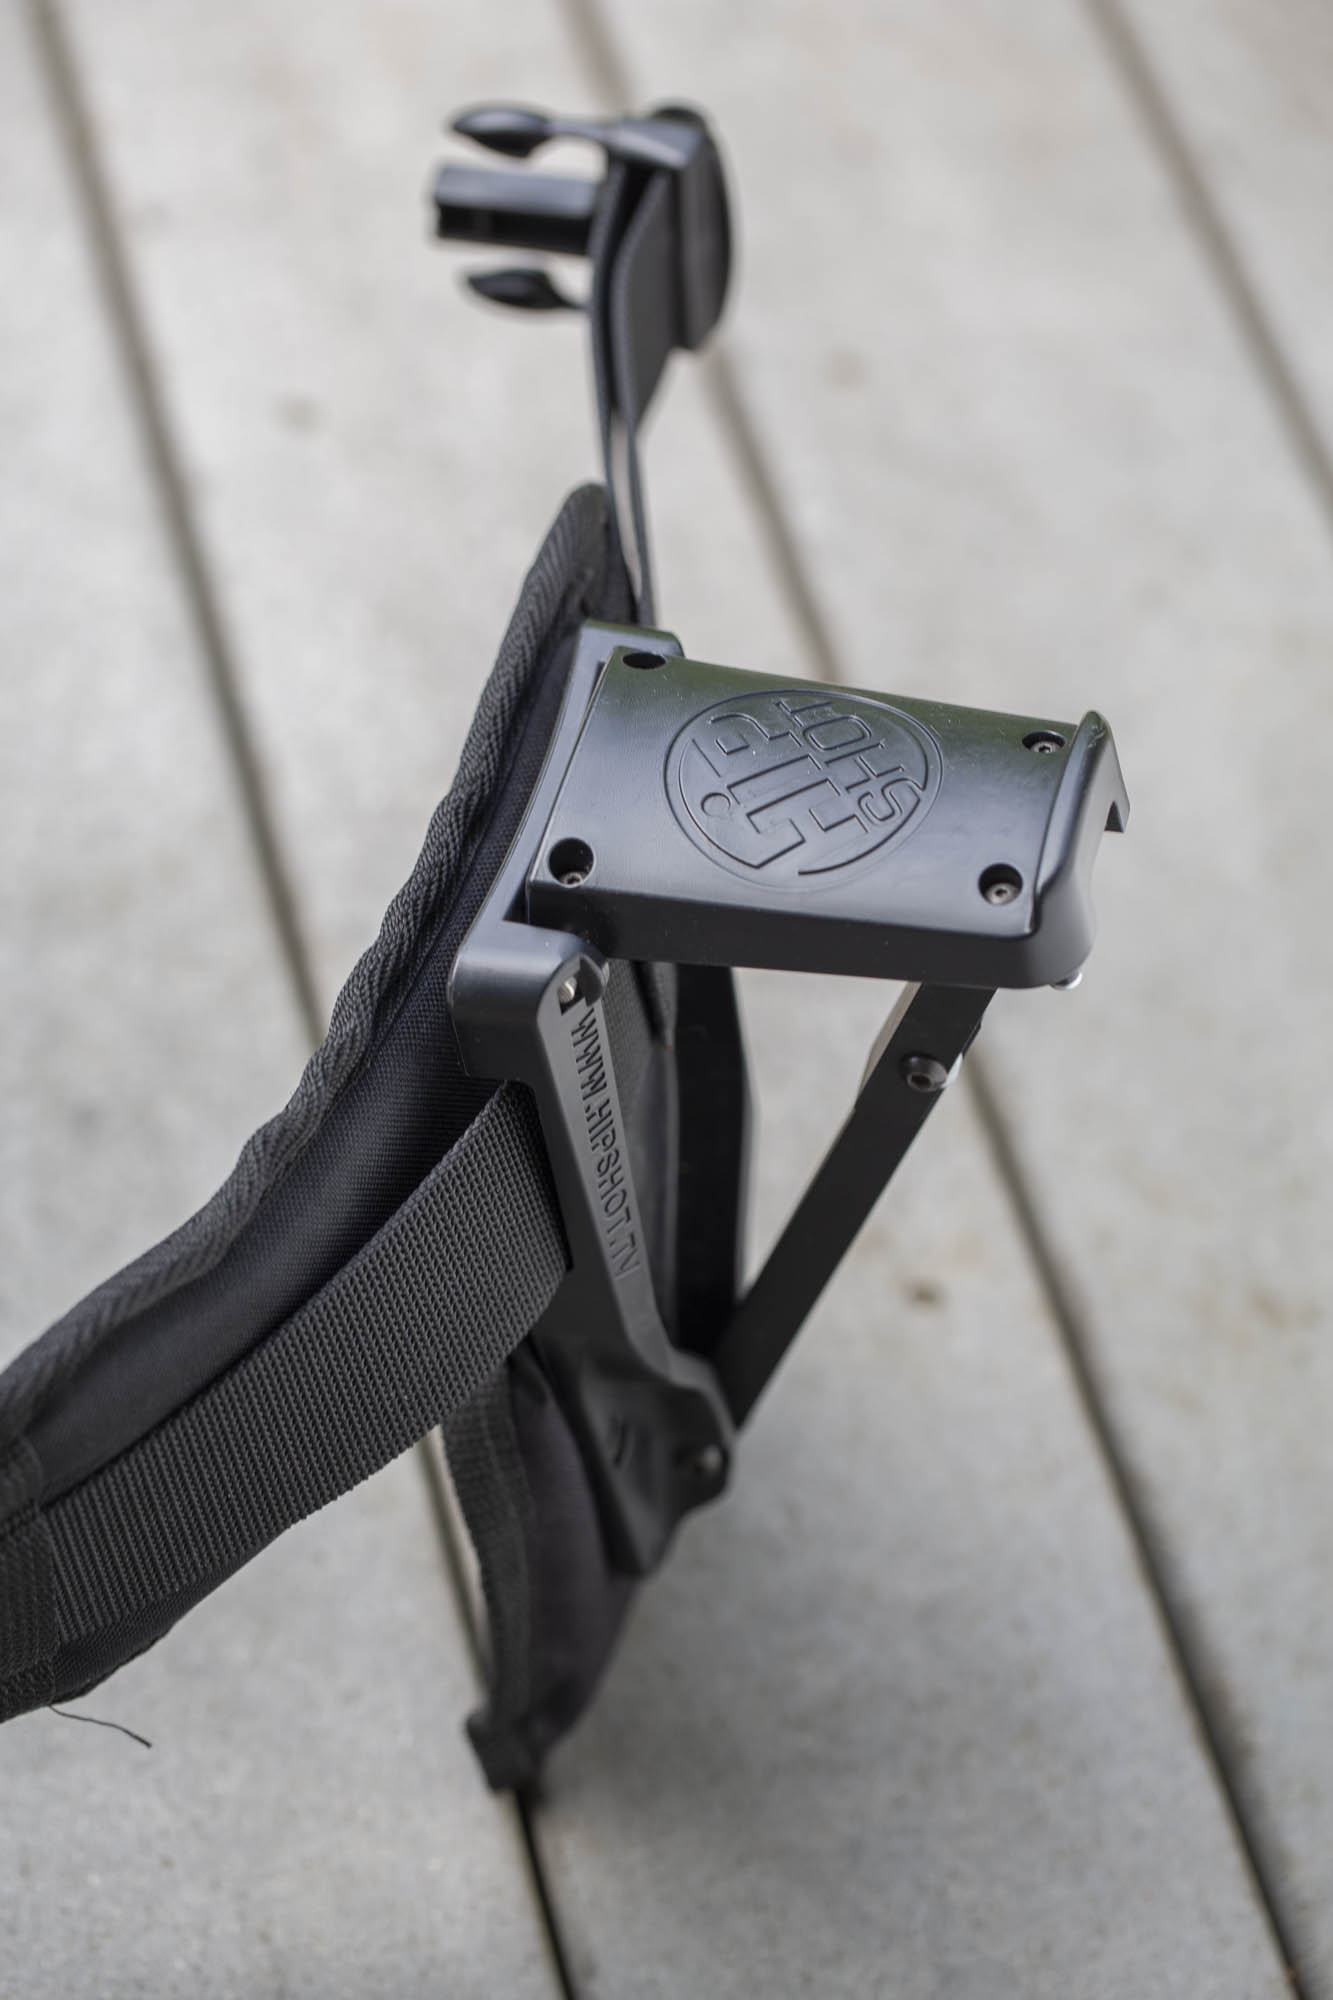
Fold-away platform securely holds camera
Yet there’s still nothing like going handheld when you have to work quickly. And it turns out there’s a tool that supports that style of working. It’s called Hipshot in the LA area. It’s designed to transfer the weight of the camera to your hips, which are better suited to load bearing than your arms and back.
I find that using the Hipshot, I’m able to work for long periods without a break, with minimal effort. It takes a little practice to get used to moving, stopping, positioning the camera, and rolling, all from the hip. You can’t get traveling shots this way – not smooth at all when you start walking.
How does it compare to a shoulder rig? Since I’m a tallish guy, I find that a shoulder mounted camera is rarely a good thing. Looking down on the world just isn’t that interesting of a perspective. The Hipshot gets the camera down where I more typically want it: so I can slightly angle upward at the action, making the shots more immersive.
It’s particularly great for shooting things that are happening on a tabletop, or seated activities.
The belt is NOT cheap, nor is it cheaply made. It’s a cool $385 bucks, but my back has already thanked me for spending every penny. I look at it as a lifetime investment.
I’ve configured mine with an AC pouch that contains:
Wide-grip flat screw driver
Leatherman tool
Lumu Power color light meter (plugs into iPhone)
Lens cloth
Focus marking pen
Pencil spirit level
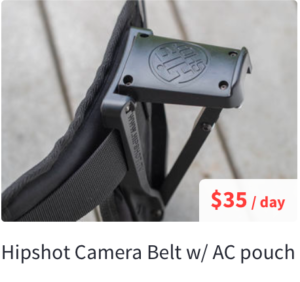
If you’re in the Seattle area and want to try before you buy, you’re in luck. This belt, including AC pouch and all contents, is available for rent on ShareGrid for $35/day.
How do you support your camera when shooting b-roll handheld?
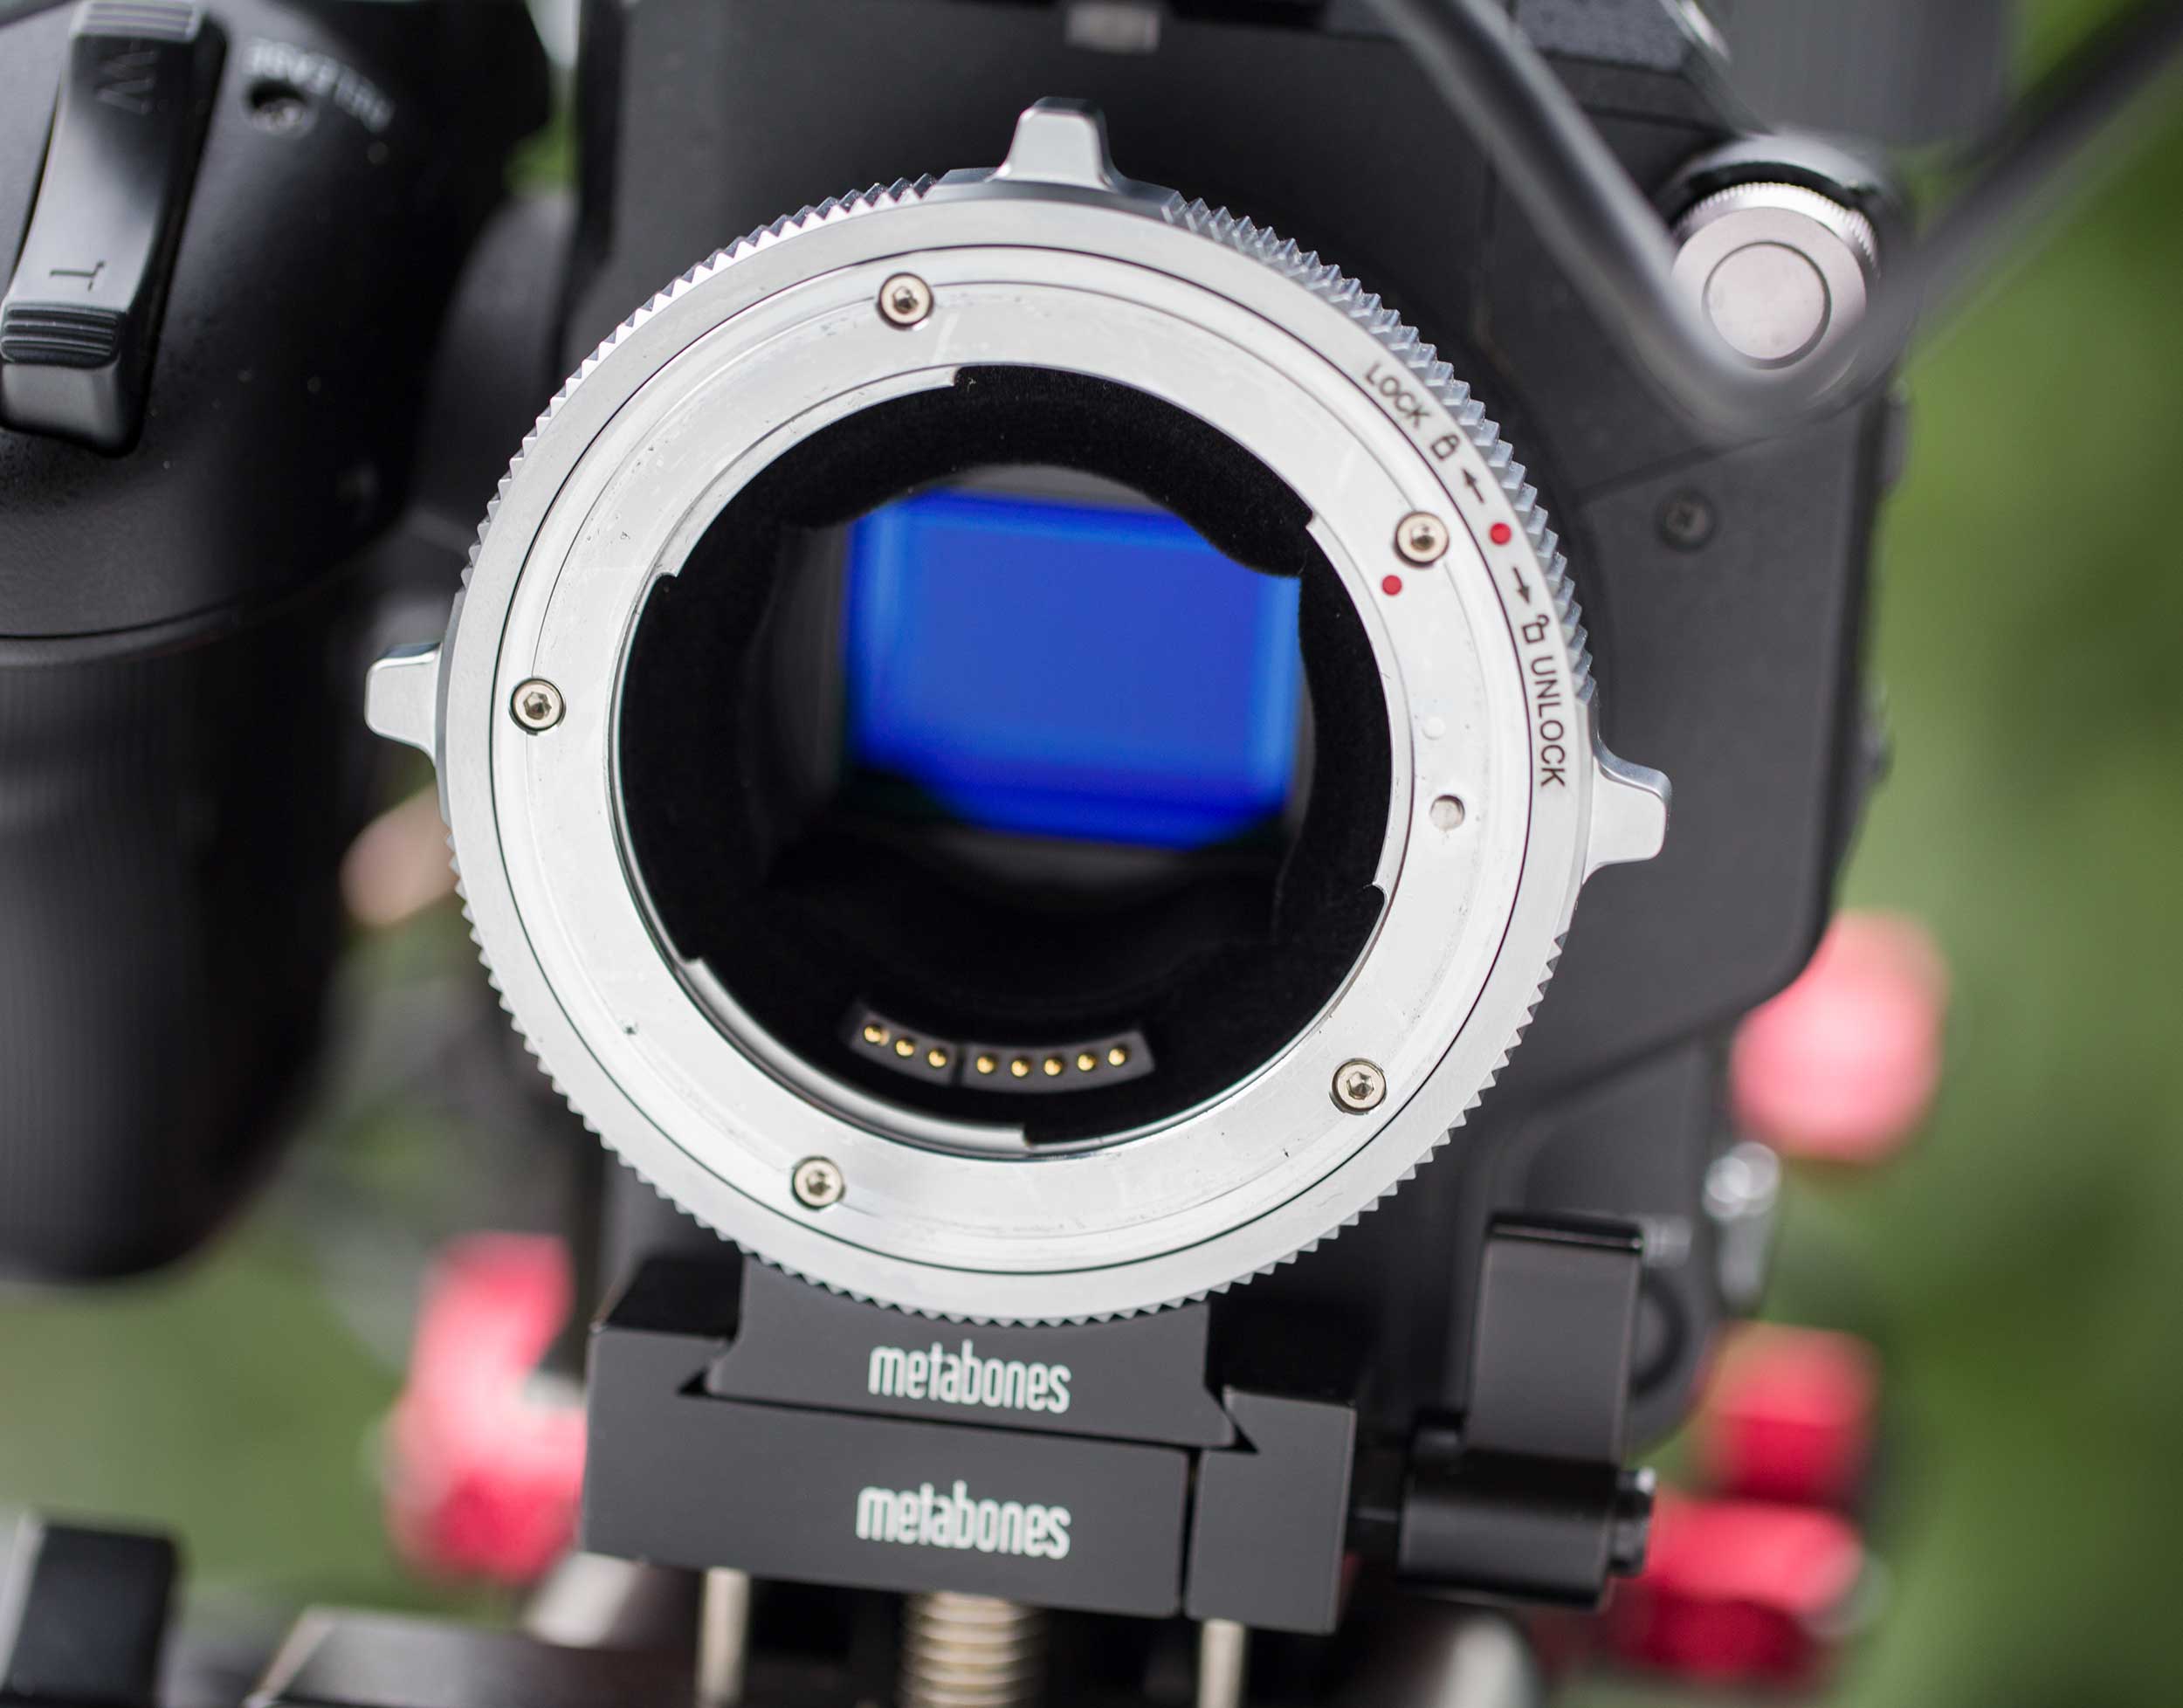
When I heard about the new Metabones cine adapters, I got a little excited. I bought the original Metabones adapters for the same reasons many cinematographers do: they allow me to use Canon EF lenses on a Sony video camera. And they have worked well, except for one thing: they are wiggly. I’m too poor to shoot regularly with PL glass, so until now I’ve had to just deal with this limitation. So when I heard about the new Metabones cine adapters, I was eager to find out whether the new adapter was a PL mount for the rest of us.
But first, let’s understand the problem. The original Metabones adapters always added some play between the Sony lens mount and the EF lens. So when you grab the lens to focus or zoom it, this causes a bit of movement caused by rotation of the lens in the adapter, and potentially, from the adapter itself rotating on the other end, in the Sony mount.
This may not seem like a big deal, but it means that the beginning of each focus pull or zoom isn’t solid in the frame. If you’re trying to focus while shooting – a common scenario – this means a few frames at the beginning of the focus pull aren’t usable, because of this unwanted lens movement. Image stabilization helps, but doesn’t completely eliminate the problem.
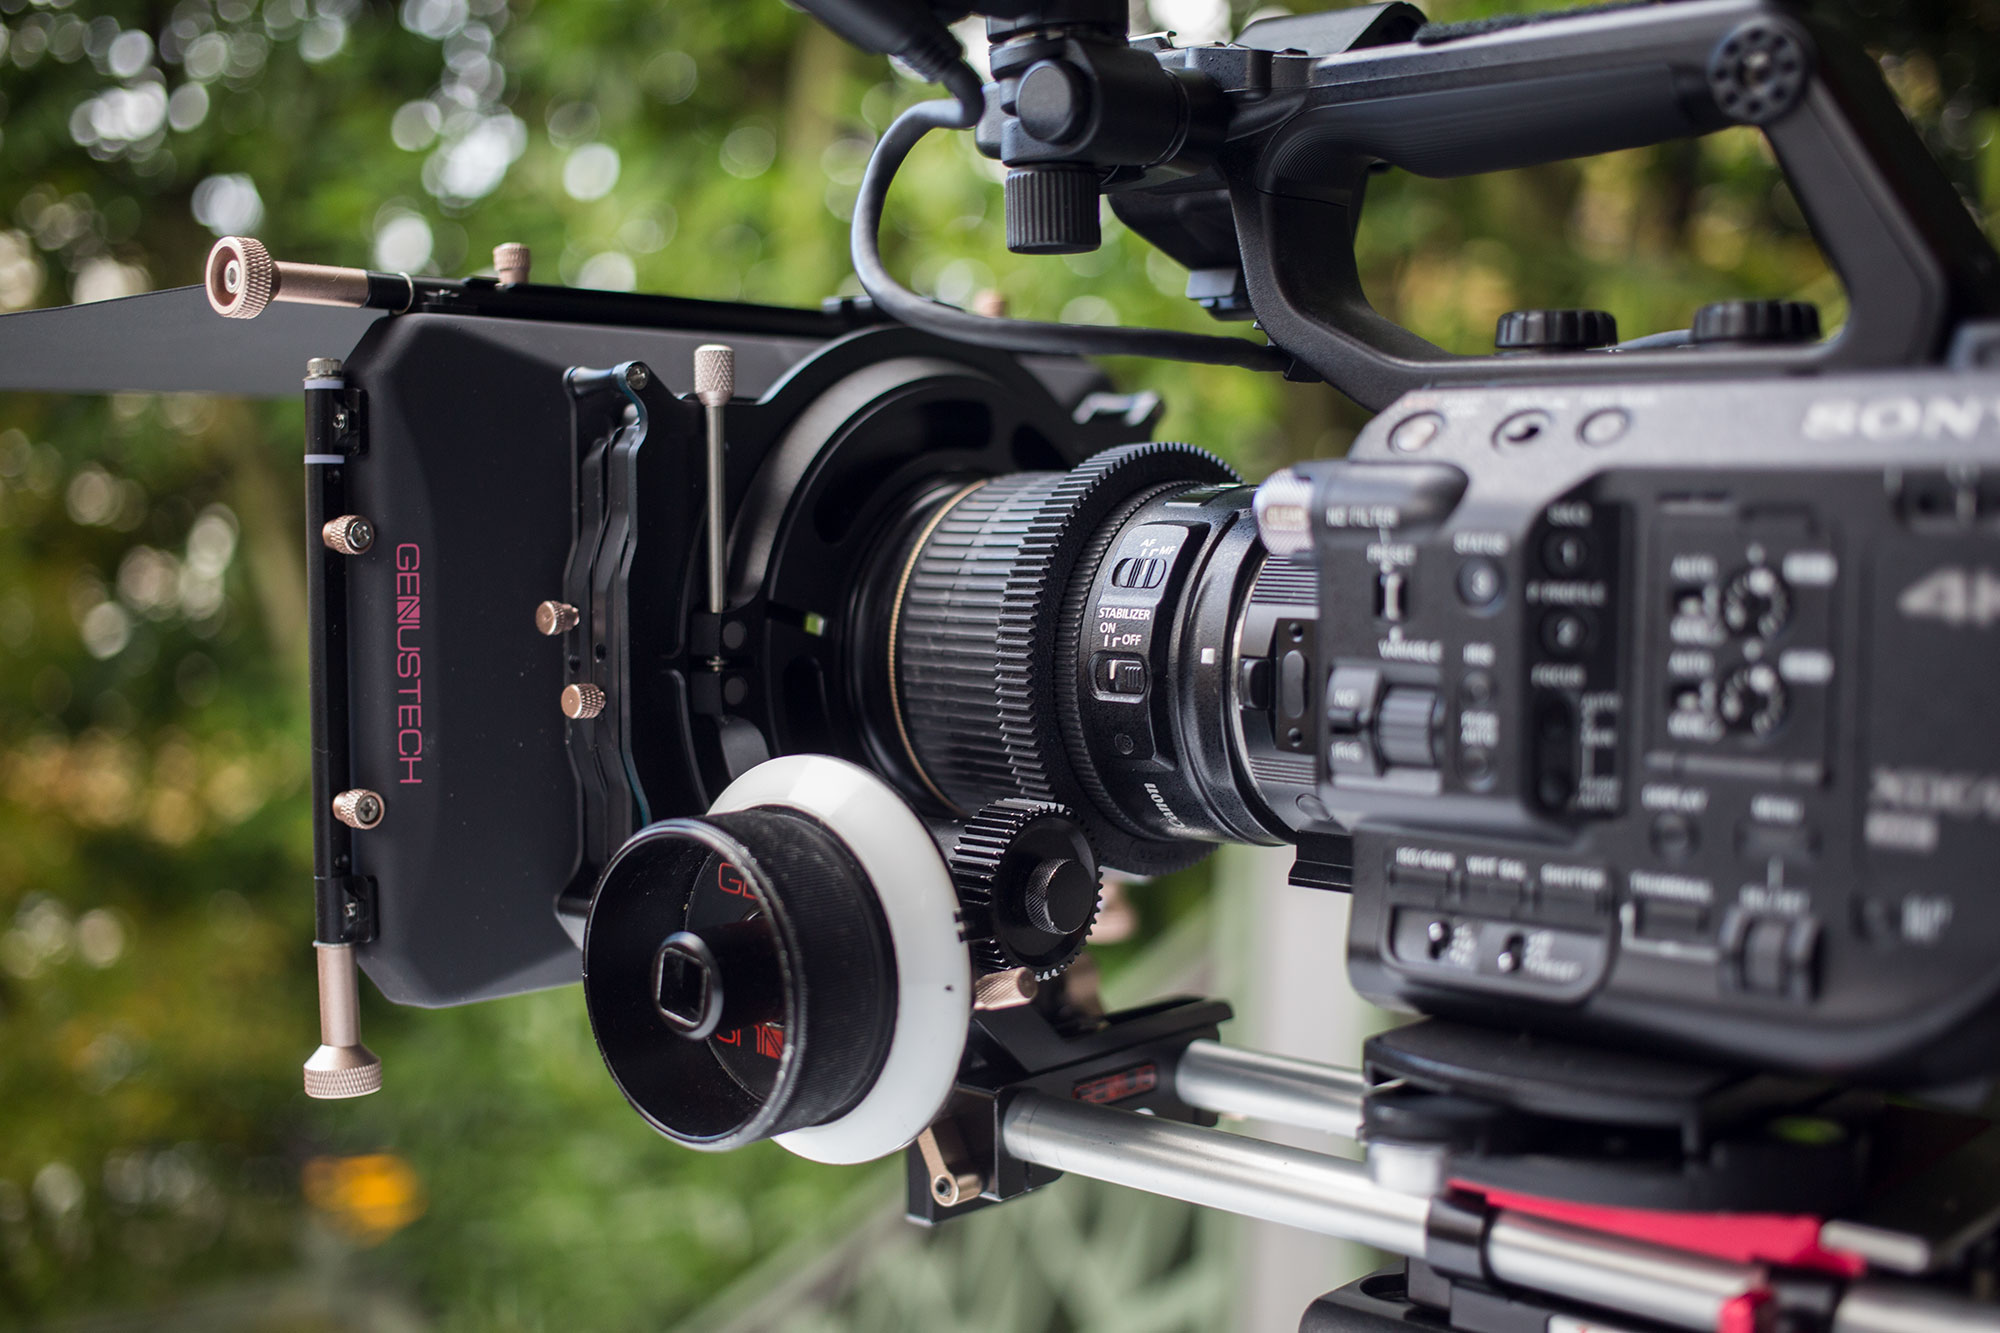
PL-mount style lens support
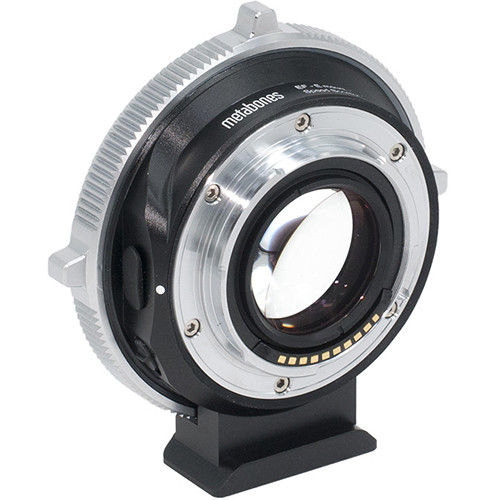
Enter the Metabones Canon EF/EF-S Lens to Sony E Mount T CINE Smart Adapter (Fifth Generation). This is a much beefier device that holds your still lenses in the same iron grip as a PL mount adapter holds a cine lens. And after using them for a few weeks, I can cut to the chase and say, without reservation, that they are amazing. They truly represent a massive improvement. But they take a little getting used to.
Lenses are mounted by rotating the ring around the lens, without rotating the lens
Lens changes are different with Metabones Cine adapters
Cine-style Speedbooster
Instead of twisting the the lens into place, you simply place the lens into the collar, check to be sure it’s seated properly, and then rotate the ring of the adapter to lock it into place. This is a little strange at first, because twisting a lens into it’s mount is basically muscle memory for most camera people who come from a still photography background, like me.
You also have to be a little careful how far you rotate the collar. On newer Canon glass, I’ve found you can rotate all the way, just twist until it stops, and you’re good. But with older lenses such as my Zeiss CY glass with Leitax adapters, it’s important to just rotate until it feels secure, and stop before it’s too tight. Otherwise you can over tighten them and could possibly damage the electronic contacts on the cine adapter.
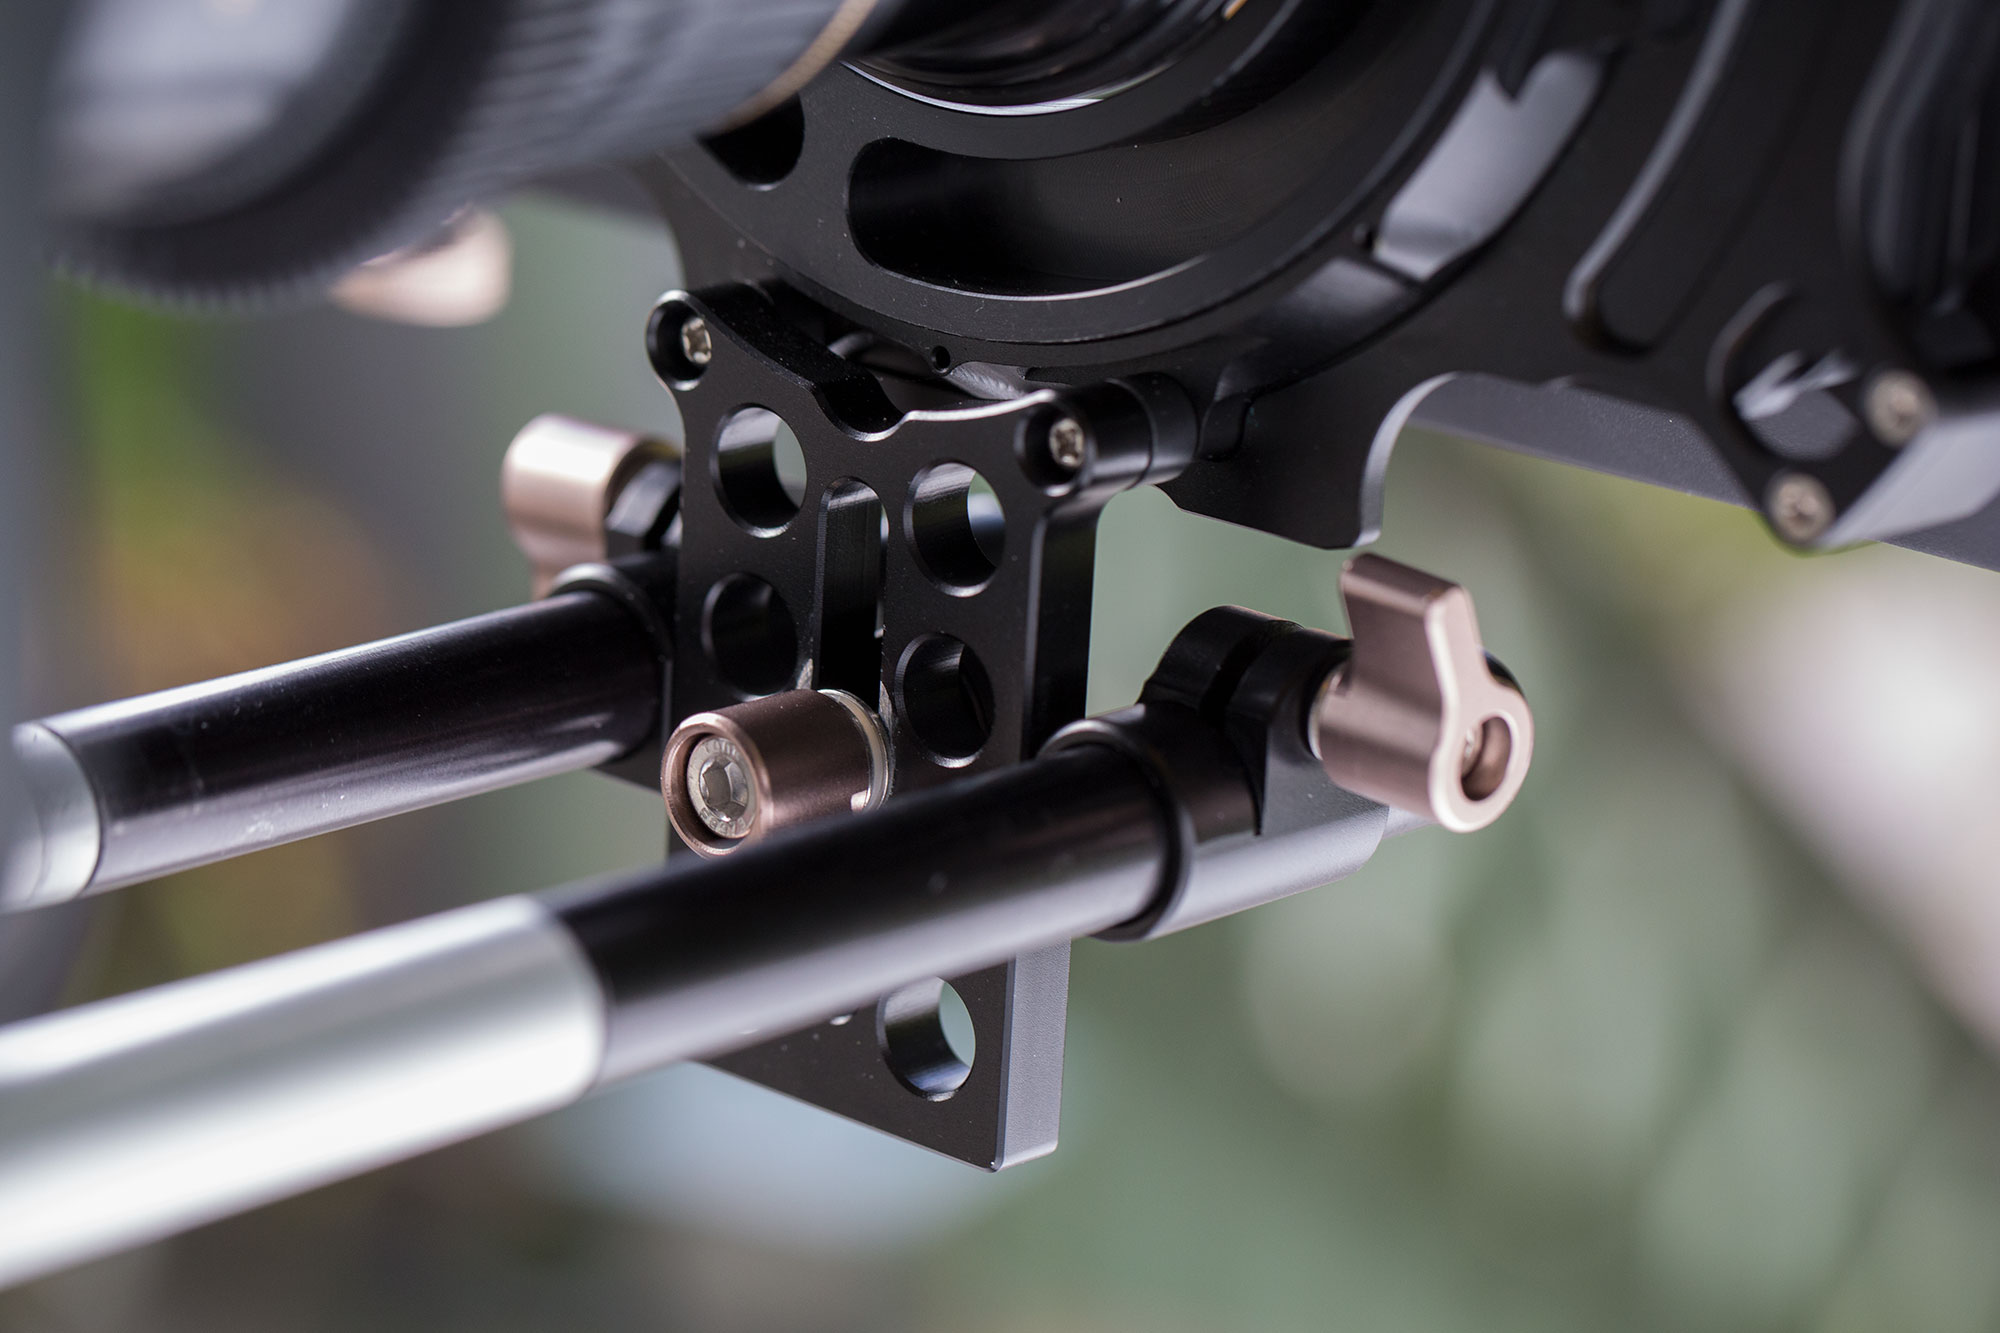
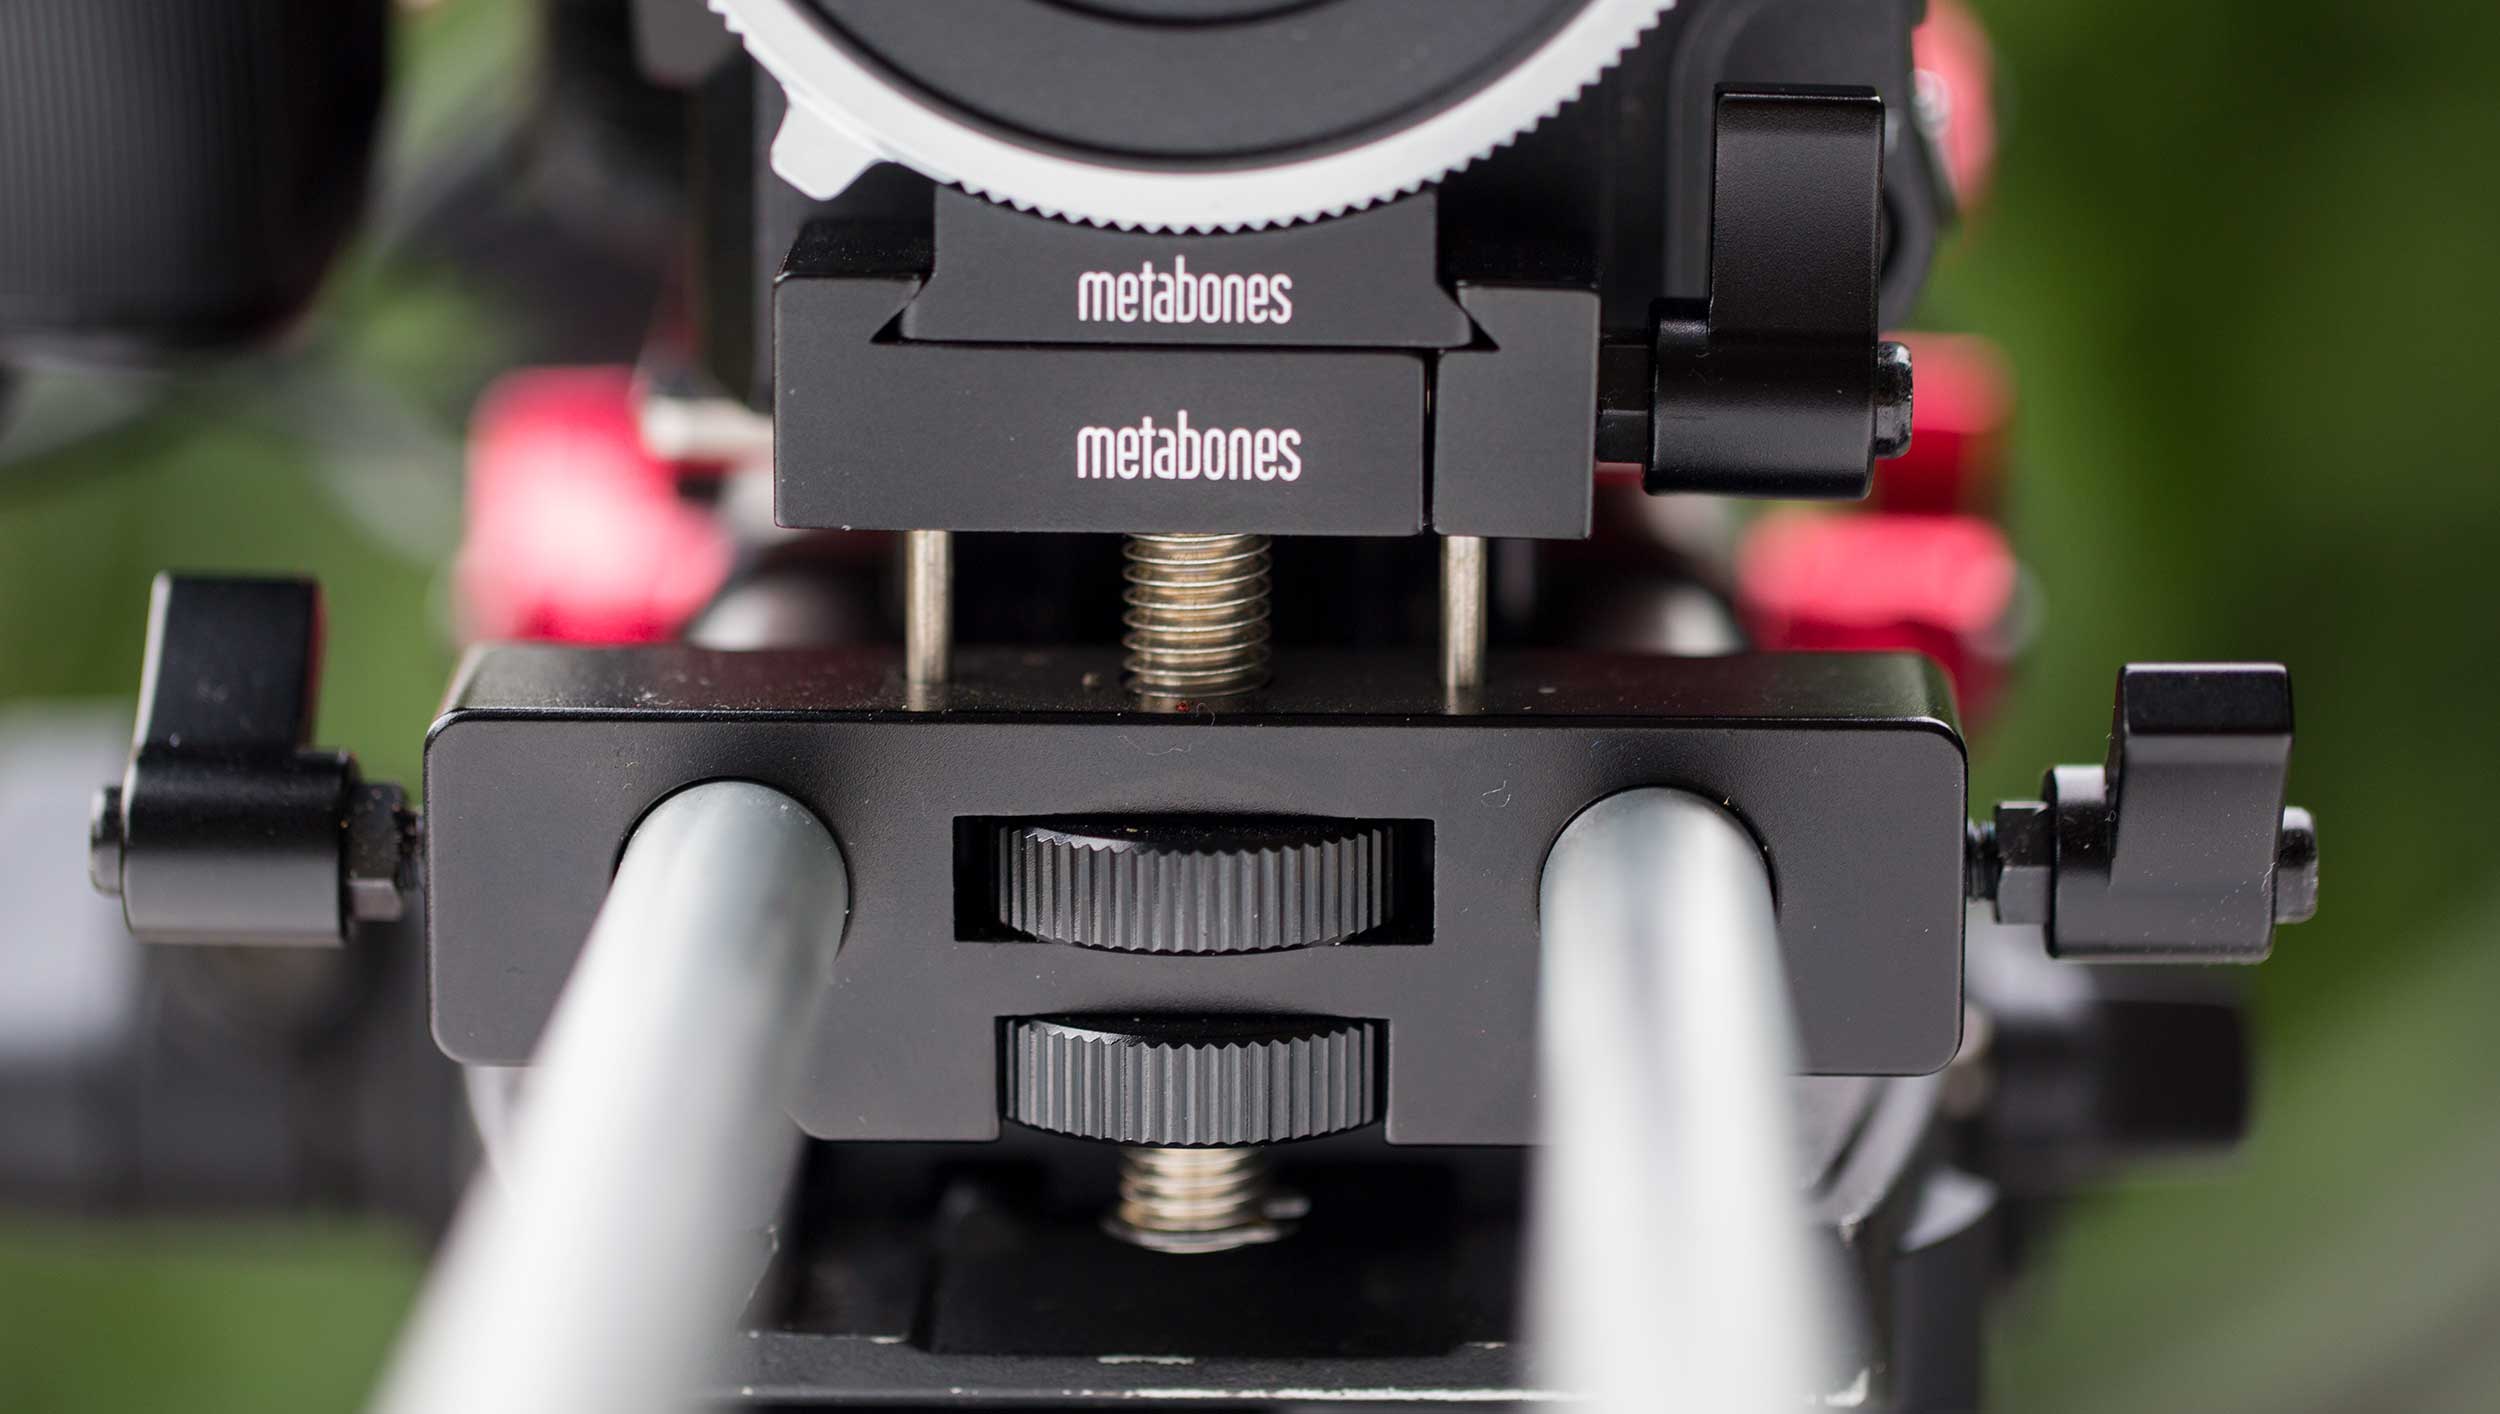
The Metabones rod support eliminates all wiggle between the adapter and the camera mount for longer lenses
Metabones rod support for longer lenses
If you’re pulling focus with anything longer than 100mm, the weak link in terms of lens wiggle becomes the Sony mount itself. To solve for this, Metabones has developed a clever solution, the 15mm Rod Lens Adapter Support. This thing is amazing. It is designed specifically to grip the bottom of Metabones adapters, and will work with both Cine and older adapter versions. It locks shit down, completely eliminating any lens movement between the camera and the adapter. Further, you can swap adapters relatively quickly, using several knobs.
There are two minor downsides to using the Metabones adapter support. First, it’s quite heavy. This is great for dampening vibration and for grip, but not so great if you want to have a light run-n-gun rig. Although personally, I’ll trade the bit of extra weight for the extra support in a heartbeat. Secondly, clamping the support to the rods squeezes the rods apart a little, making it tougher to fit another rod-mounted accessory, in my case a follow focus unit, to the same rods. You can do it, but you have to muscle it.
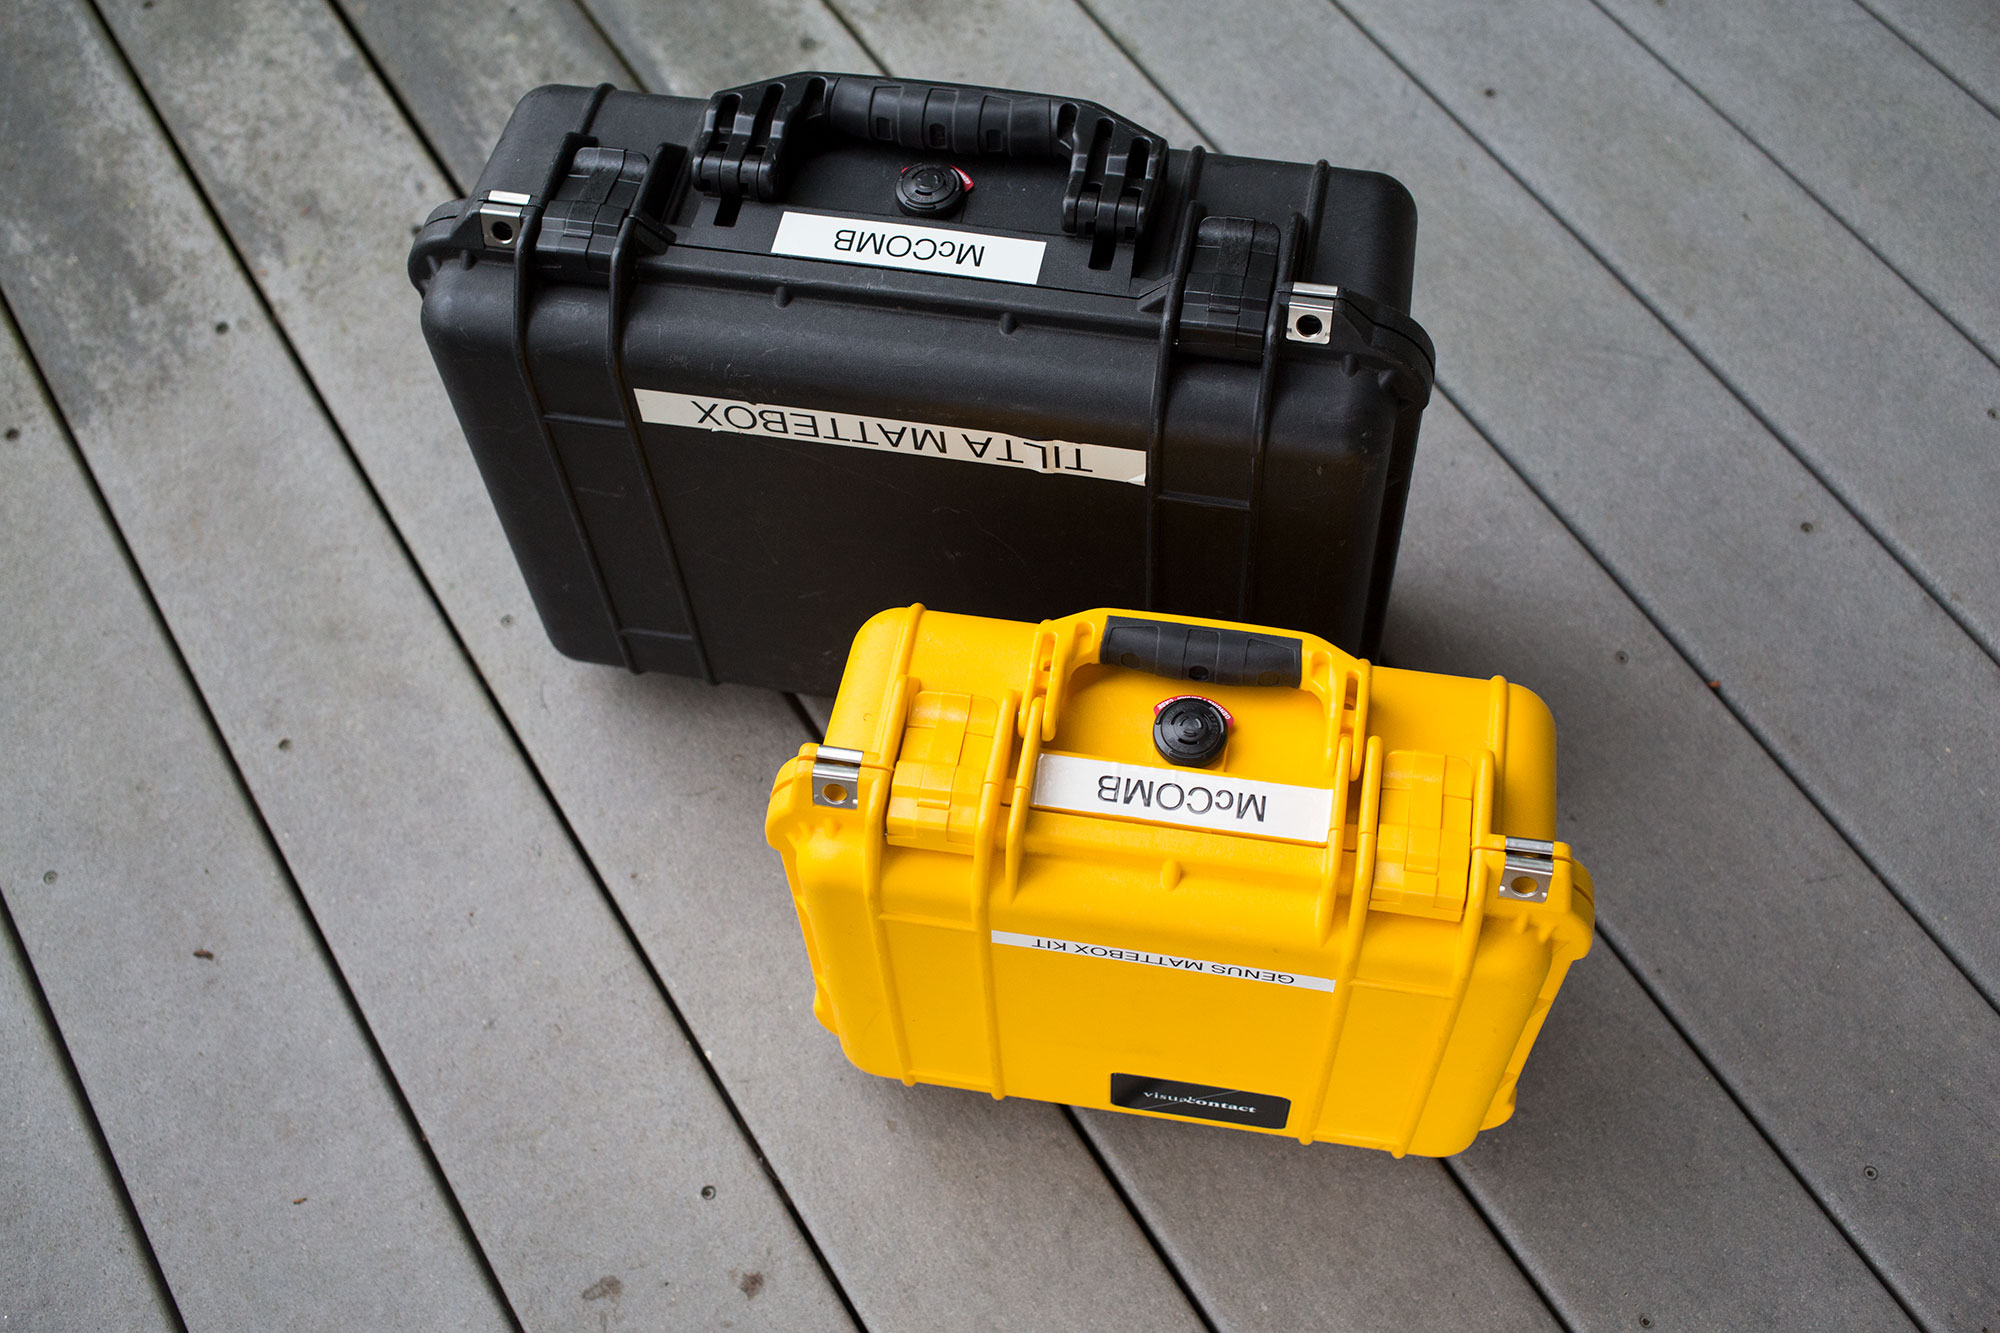
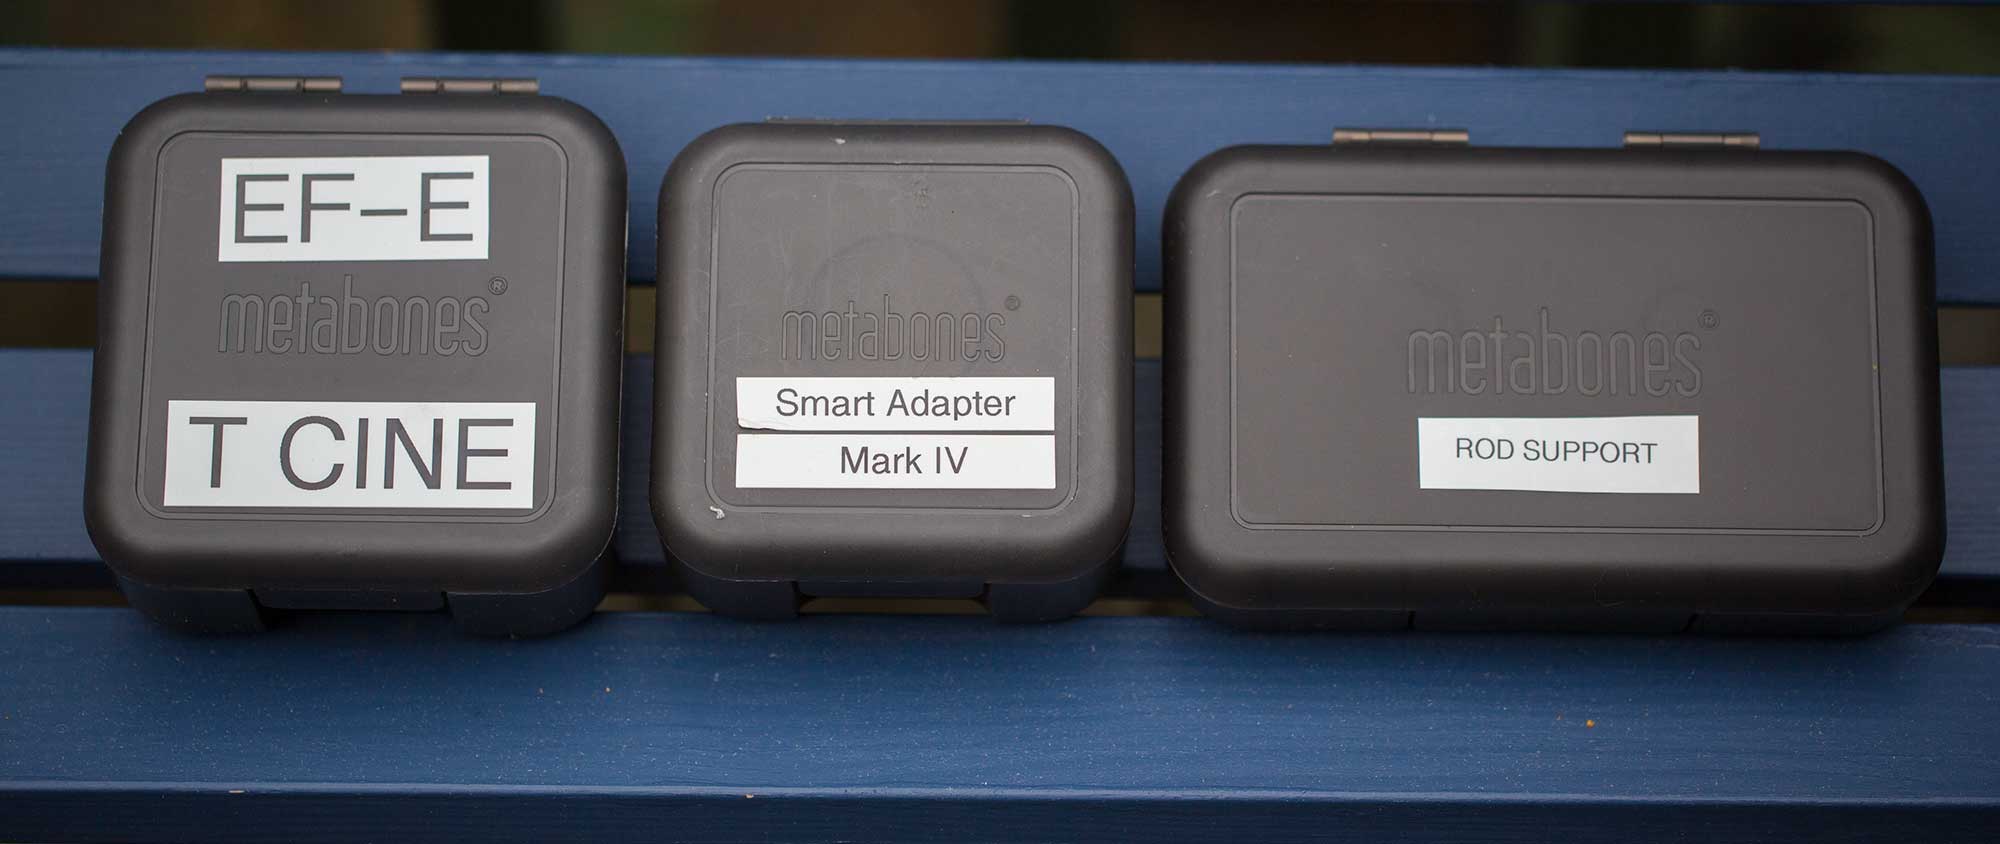
Size comparison of Metabones adapter and support cases
Larger adapters = larger cases
Metabones adapters come with nice plastic cases. The Cine adapters are substantially larger than the previous versions, and come with larger cases as a result. The adapter support comes with an even bigger plastic case, too big to transport easily in my camera case. But the adapter support is made out of solid metal, so I don’t find it needs to be transported in a case anyway.
Now that I’ve gotten used to the Metabones Cine adapters, I can’t imagine using Canon EF lenses on my Sony FS5 without them. The Metabones Cine-style adapters bring all of the advantages of PL mount lenses to EF lens owners. For that, they’ve earned a permanent place on the front of my Sony camera. And I’m glad to see that both Canon and Sony appear to be moving toward making cameras with positive locking mounts built in, like the Sony FS5 mkII. Until all cameras are built that way, the Metabones Cine adapters are a brilliant solution.
When Lumu Power launched their Kickstarter campaign for a light meter of the future in late 2015, the idea of a hardware-based iPhone color meter was pretty revolutionary. Sure, there are plenty of “ballpark” software based meters for iPhone, but a serious light meter that accurately measure color temperature? For that you need hardware that’s a little beyond of my pay grade. And even if I could afford it, do I really need one more gadget?
But the promise of a fully loaded color meter in a tiny hemisphere, for a couple hundred bucks, felt like a breakthrough. A total of 1,705 backers pledged $318,877 to make it happen, and I was one of them. A year and a half later, the Lumu Power is a reality. That’s a long wait, for sure. Was it worth it?
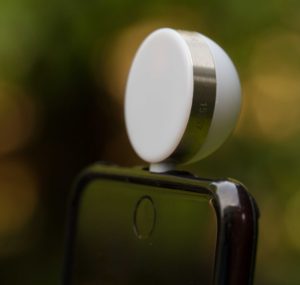
Turn it on
To turn on the Lumi Power, plug it into your iPhone. A second later, a screen automatically comes up announcing that it’s connected. Swipe right on that, and the app opens. Rotate the phone so that the Lumu Power is on top, and you’re good to go.
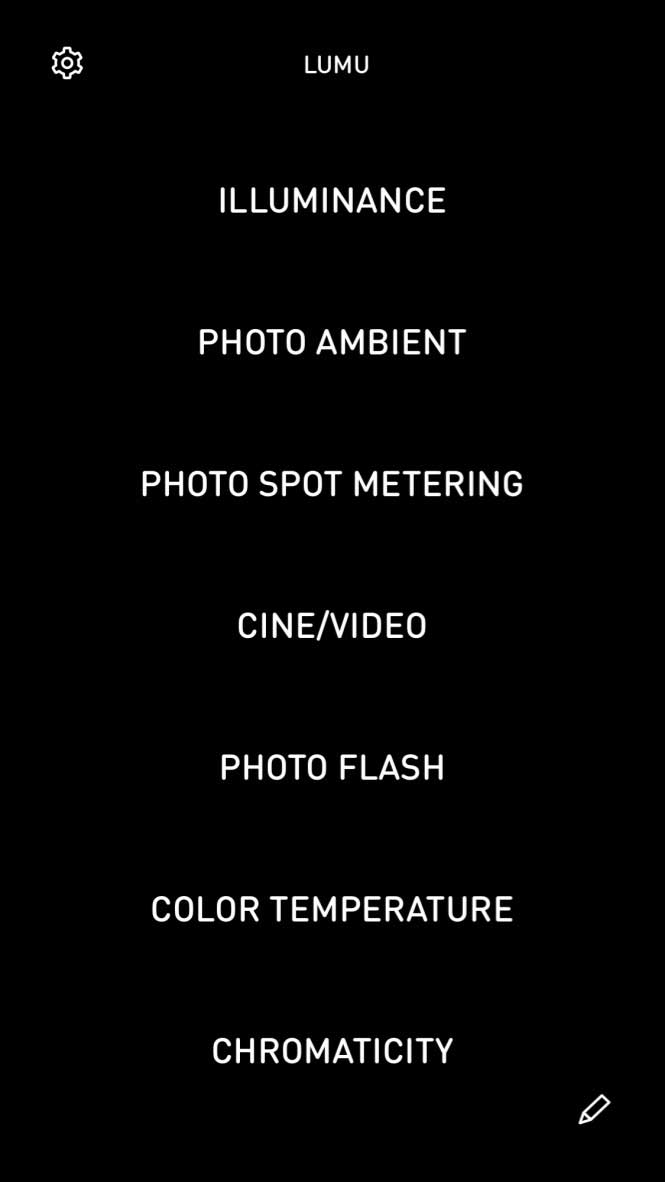
The interface is simple as can be – a list of text options that give you just about everything you could want to know about the light you are working with.
Illuminance. How bright is the light hitting the flat side of the hemisphere? Options are foot candles or Lux. You can also optionally display how far under or over the result is from the correct EV.
Photo Ambient. Traditional ambient light meter mode. Using hemisphere side, displays aperture, shutter and ISO values. You can enter aperture and ISO values. You can also change the default 1/3 stop increments to 1/2 or 1 EV values, change the max. lens aperture, and the ISO values.
Photo Spot Metering. Using the iPhone’s camera, you can set a spot point in the image from which the reflectance exposure is metered. Results are displayed below the frame in real time.
Cine/Video. Using the dome side, the Cine mode allows you to set FPS or shutter angle, and exposure in whatever increments you desire (1/48th or 1/50th of a second, for example).
Photo/Flash. Using the dome side, you can measure flash just as you would with a traditional flash meter. Press the Start button to arm, and Stop to disarm. Once armed, you trigger the strobe to take a reading.
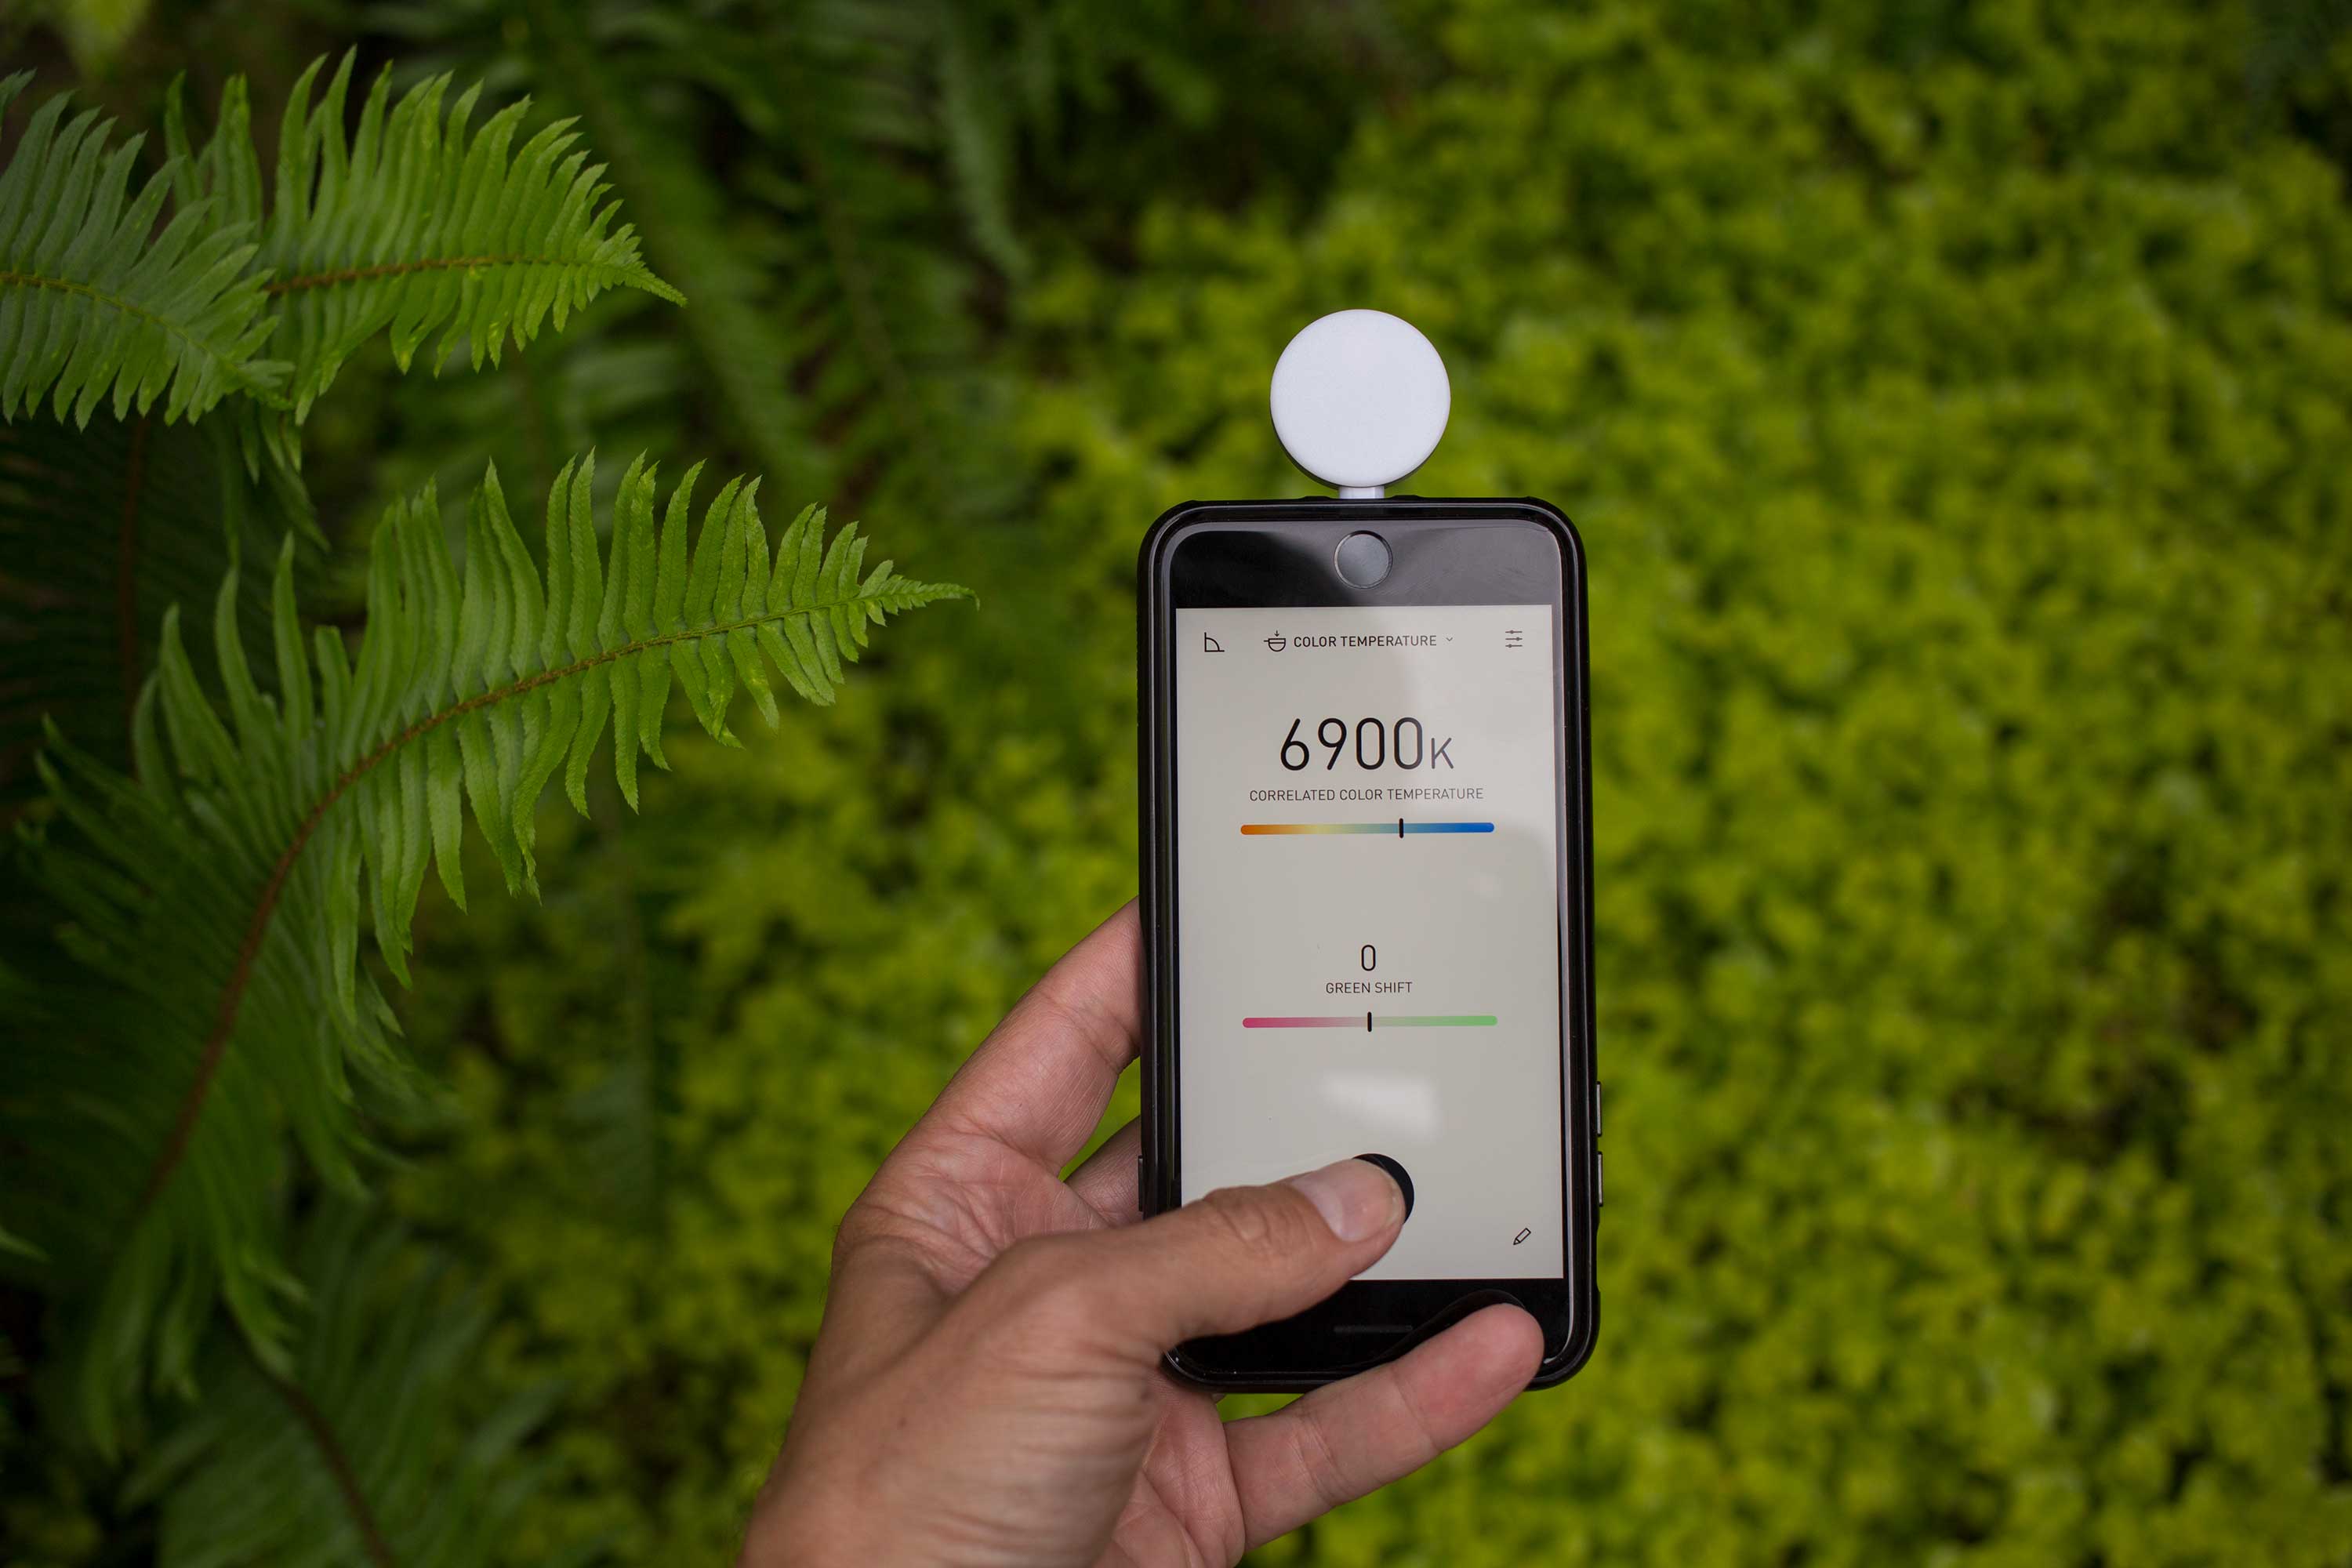
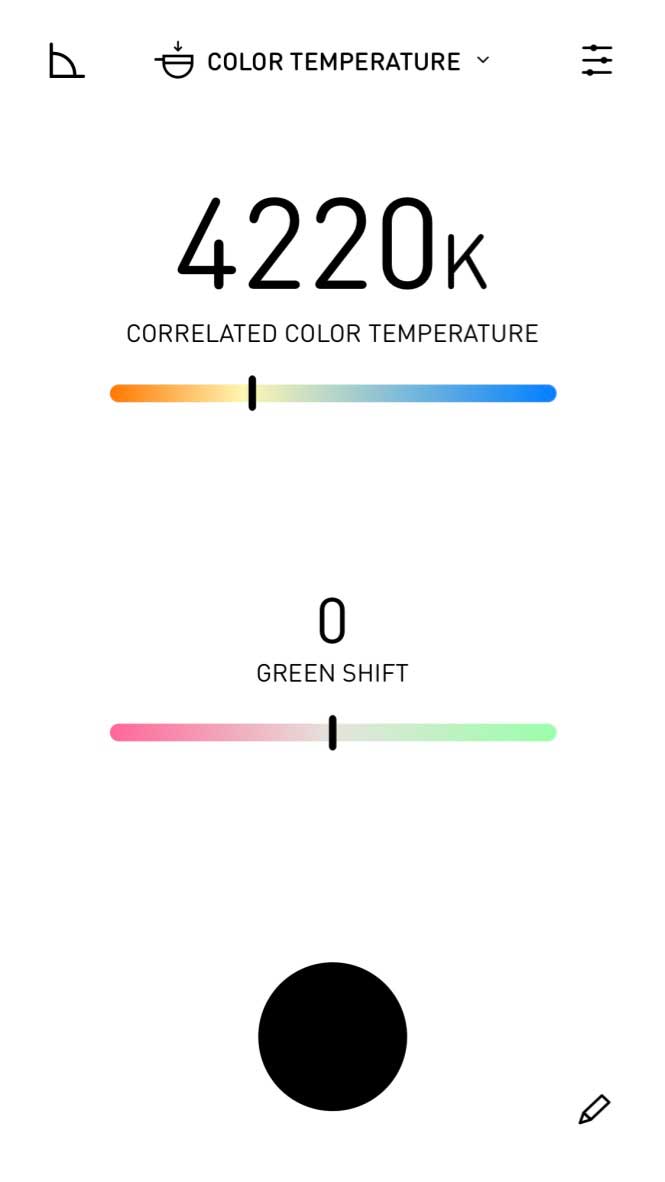
Color Temperature. The flat side of the dome measures color temperature in degrees Kelvin, and also displays any green or magenta shift present.
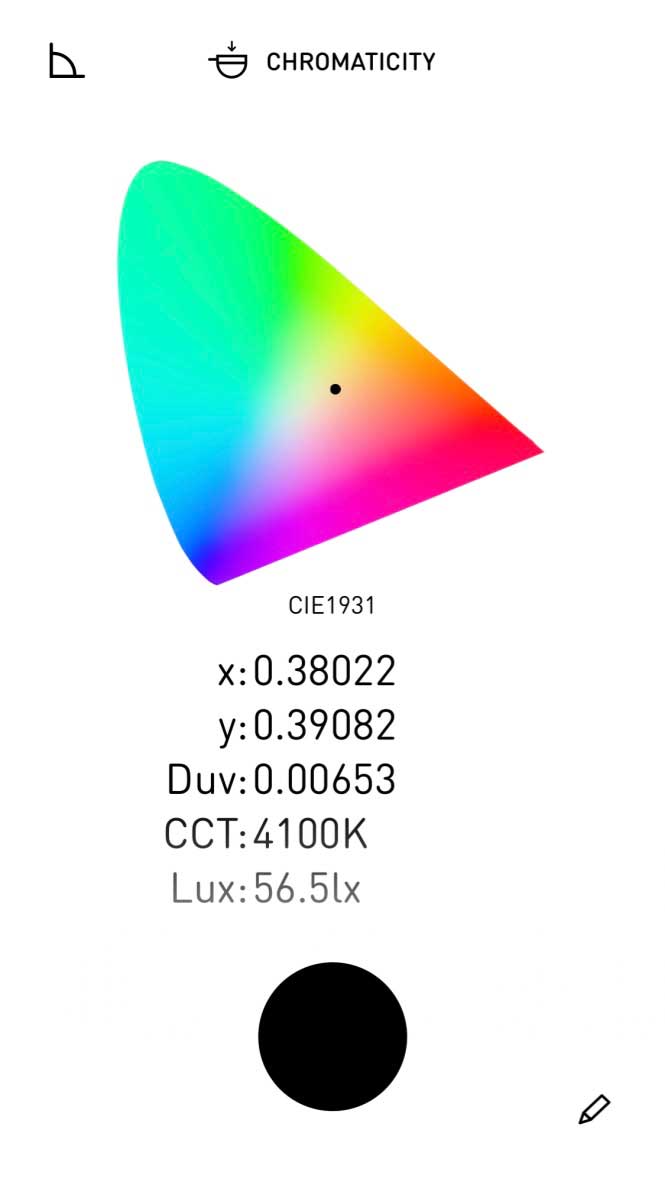
Chromacity: The flat side gives you a CIE1931 color space map, with the location of your reading on the map, as well as Due, CCT and Lux values.
Raise your lighting IQ
I don’t know about you, but I’m always location scouting. I collect scenes in my head. If I’m in a restaurant, for example, I wonder how bright it is, what the color temp is, and what it might be like to shoot there. But until now, this work was entirely mental, and subjective. I could snap a photo of a scene, but I could only guess at how bright it was or the color temperature. With the Lumu Power, it becomes possible to do both. And Lumu Power has a killer tool to keep track of your settings, called Notes.
If you are connected to the net, you have the ability to store a lat-long location, which can be displayed as a map.
Notes save your readings
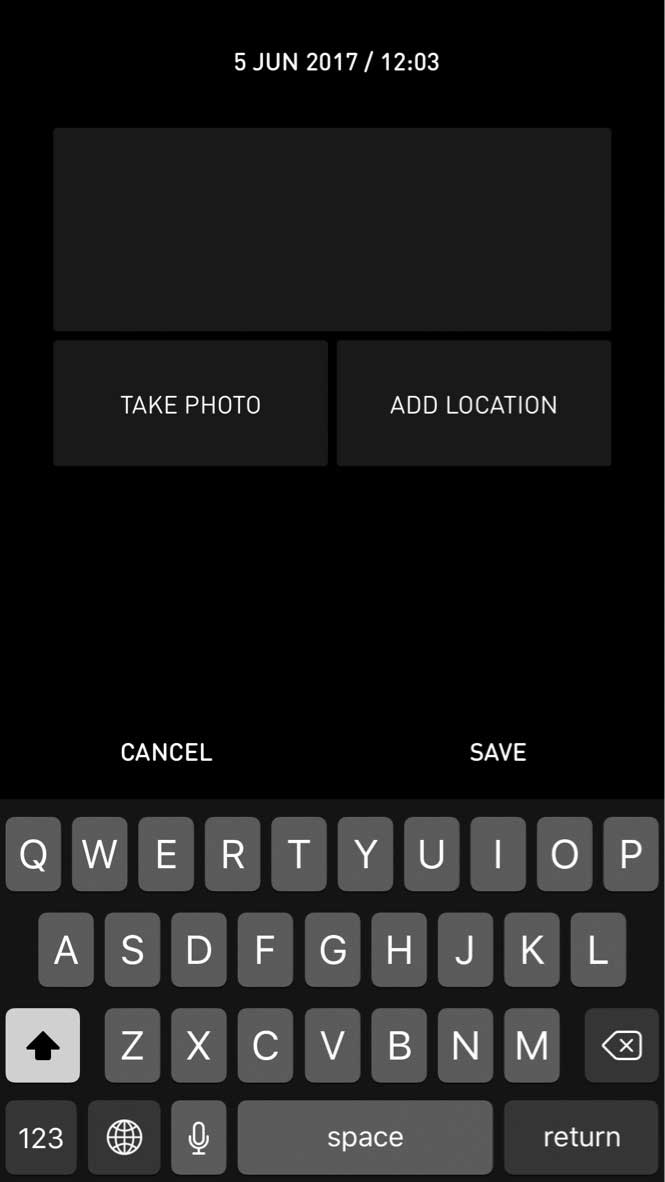
There is a pencil icon in the lower right corner of the screen in all modes. Click it to unlock one of the most powerful features of the Lumu Power: the ability to store meter readings along with a still photo. For location scouting, this is incredibly useful. Now, along with location snaps, you can save color-accurate meter readings. This is huge.
Annoyances
The Lumu Power occasionally appears to forget what mode it’s in. Instead of the full option menu appearing, only the mode you are currently in will appear. To get the menu back requires unplugging the Lumi Power.
Also, it’s a good idea to set your phone to not go to sleep as frequently as usual when using the Lumu Power. Otherwise, you’ll constantly have to dismiss the open screen.
These are minor annoyances if you’re only using the Lumu Power for occasional readings, but if you’re a light meter power user, you may find them frustrating enough to send you back to your traditional meter.
Carrying tip
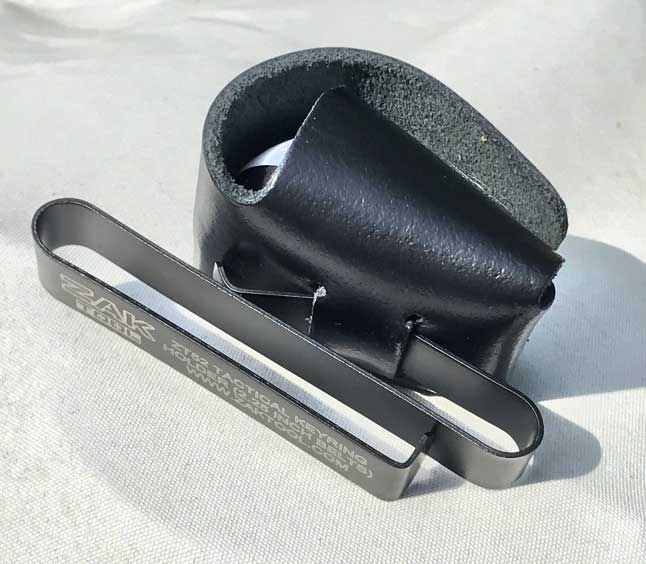
Included with your purchase is a small leather case for carrying the Lumu Power. However, the slots are too small to accommodate a typical belt. They are, however, a perfect fit for a Zak Tools Low Profile Key Ring Holder which costs less than $6. This makes it easy to adapt the case to any belt up to 2.5″ wide. I typically wear an AC pouch when I’m shooting, and the Zak holder clips perfectly into my AC pouch, putting Lumu Power within easy reach whenever I need it on a shoot.
What could be improved
There’s currently no way to calculate CRI or TLCI, which is something I would love to have for appraising the quality of LED lighting. Is that something that could be added with a software update to the iPhone app? That’s an update I’d be willing to pay for.
Ergonomically, I find it awkward to hold the phone straight up and down to take readings. So the ability to tilt the Lumu Power up to 45 degrees on it’s lightning connector would be sweet. Further, I find myself frequently having to unplug and rotate the Lumu to switch between Cine and Color Temp mode. If the hemisphere could rotate, it would be a real timesaver. However, adding that might mess up the elegant simplicity of the design. And I’d hate to see that happen.
Conclusion
The essence of Lumu Power is its ability to instantly become the color meter you always have with you. It’s like having a tiny bionic eye for your iPhone. And it’s a great tool to open your own eyes to see and understand the light falling all around you, every day.
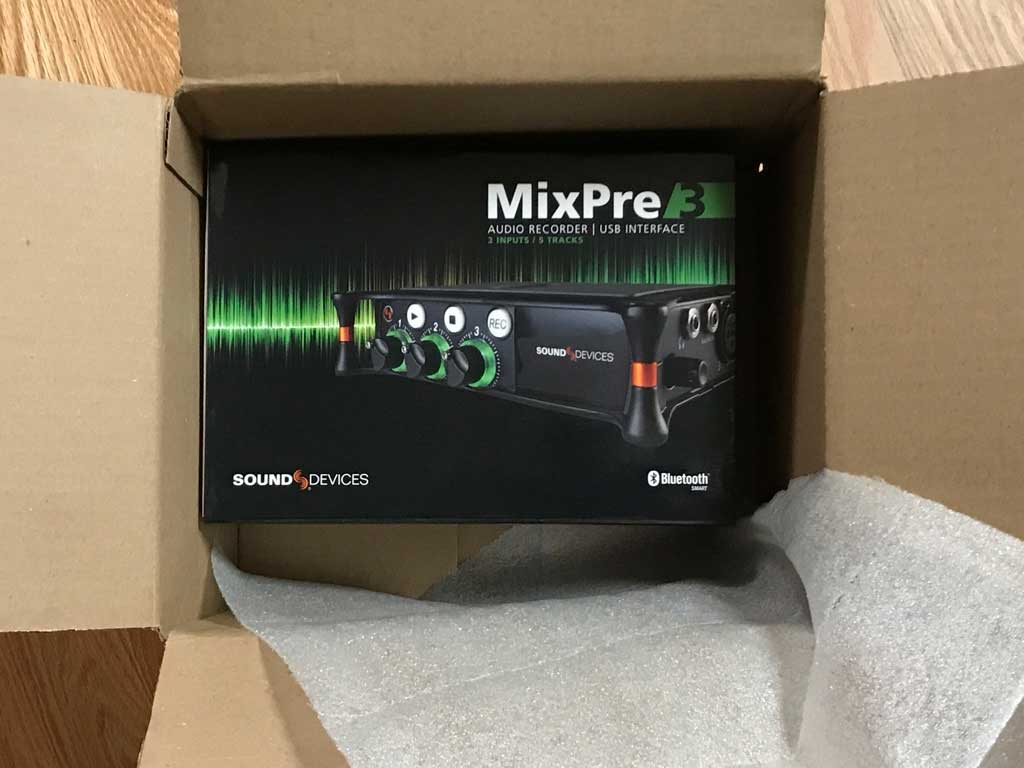
When the Sound Devices MixPre-3 announcement dropped at NAB 2017, I got excited. For years I’ve been dreaming about a device as small as my original MixPre, but with built-in recorders. Could this be it? I hit the pre-order button but didn’t expect to actually hold one in my hands until summer, despite Sound Devices promising delivery before the end of the month. So when this box from B&H arrived with a couple of days to spare, I was thrilled:
MixPre-3 in box
First impression: Sound Devices delivers on time.
Next impression: This recorder is tiny. About the size of a sandwich:
The MixPre-3 is tiny.
Included is a Y cable that allows you to use the MixPre-3 as an audio interface while also powering the unit when attached to two USB-A ports. You also get two stickers – one “Sound Devices” logo and one that says “Video Devices.”
Powering the MixPre-3
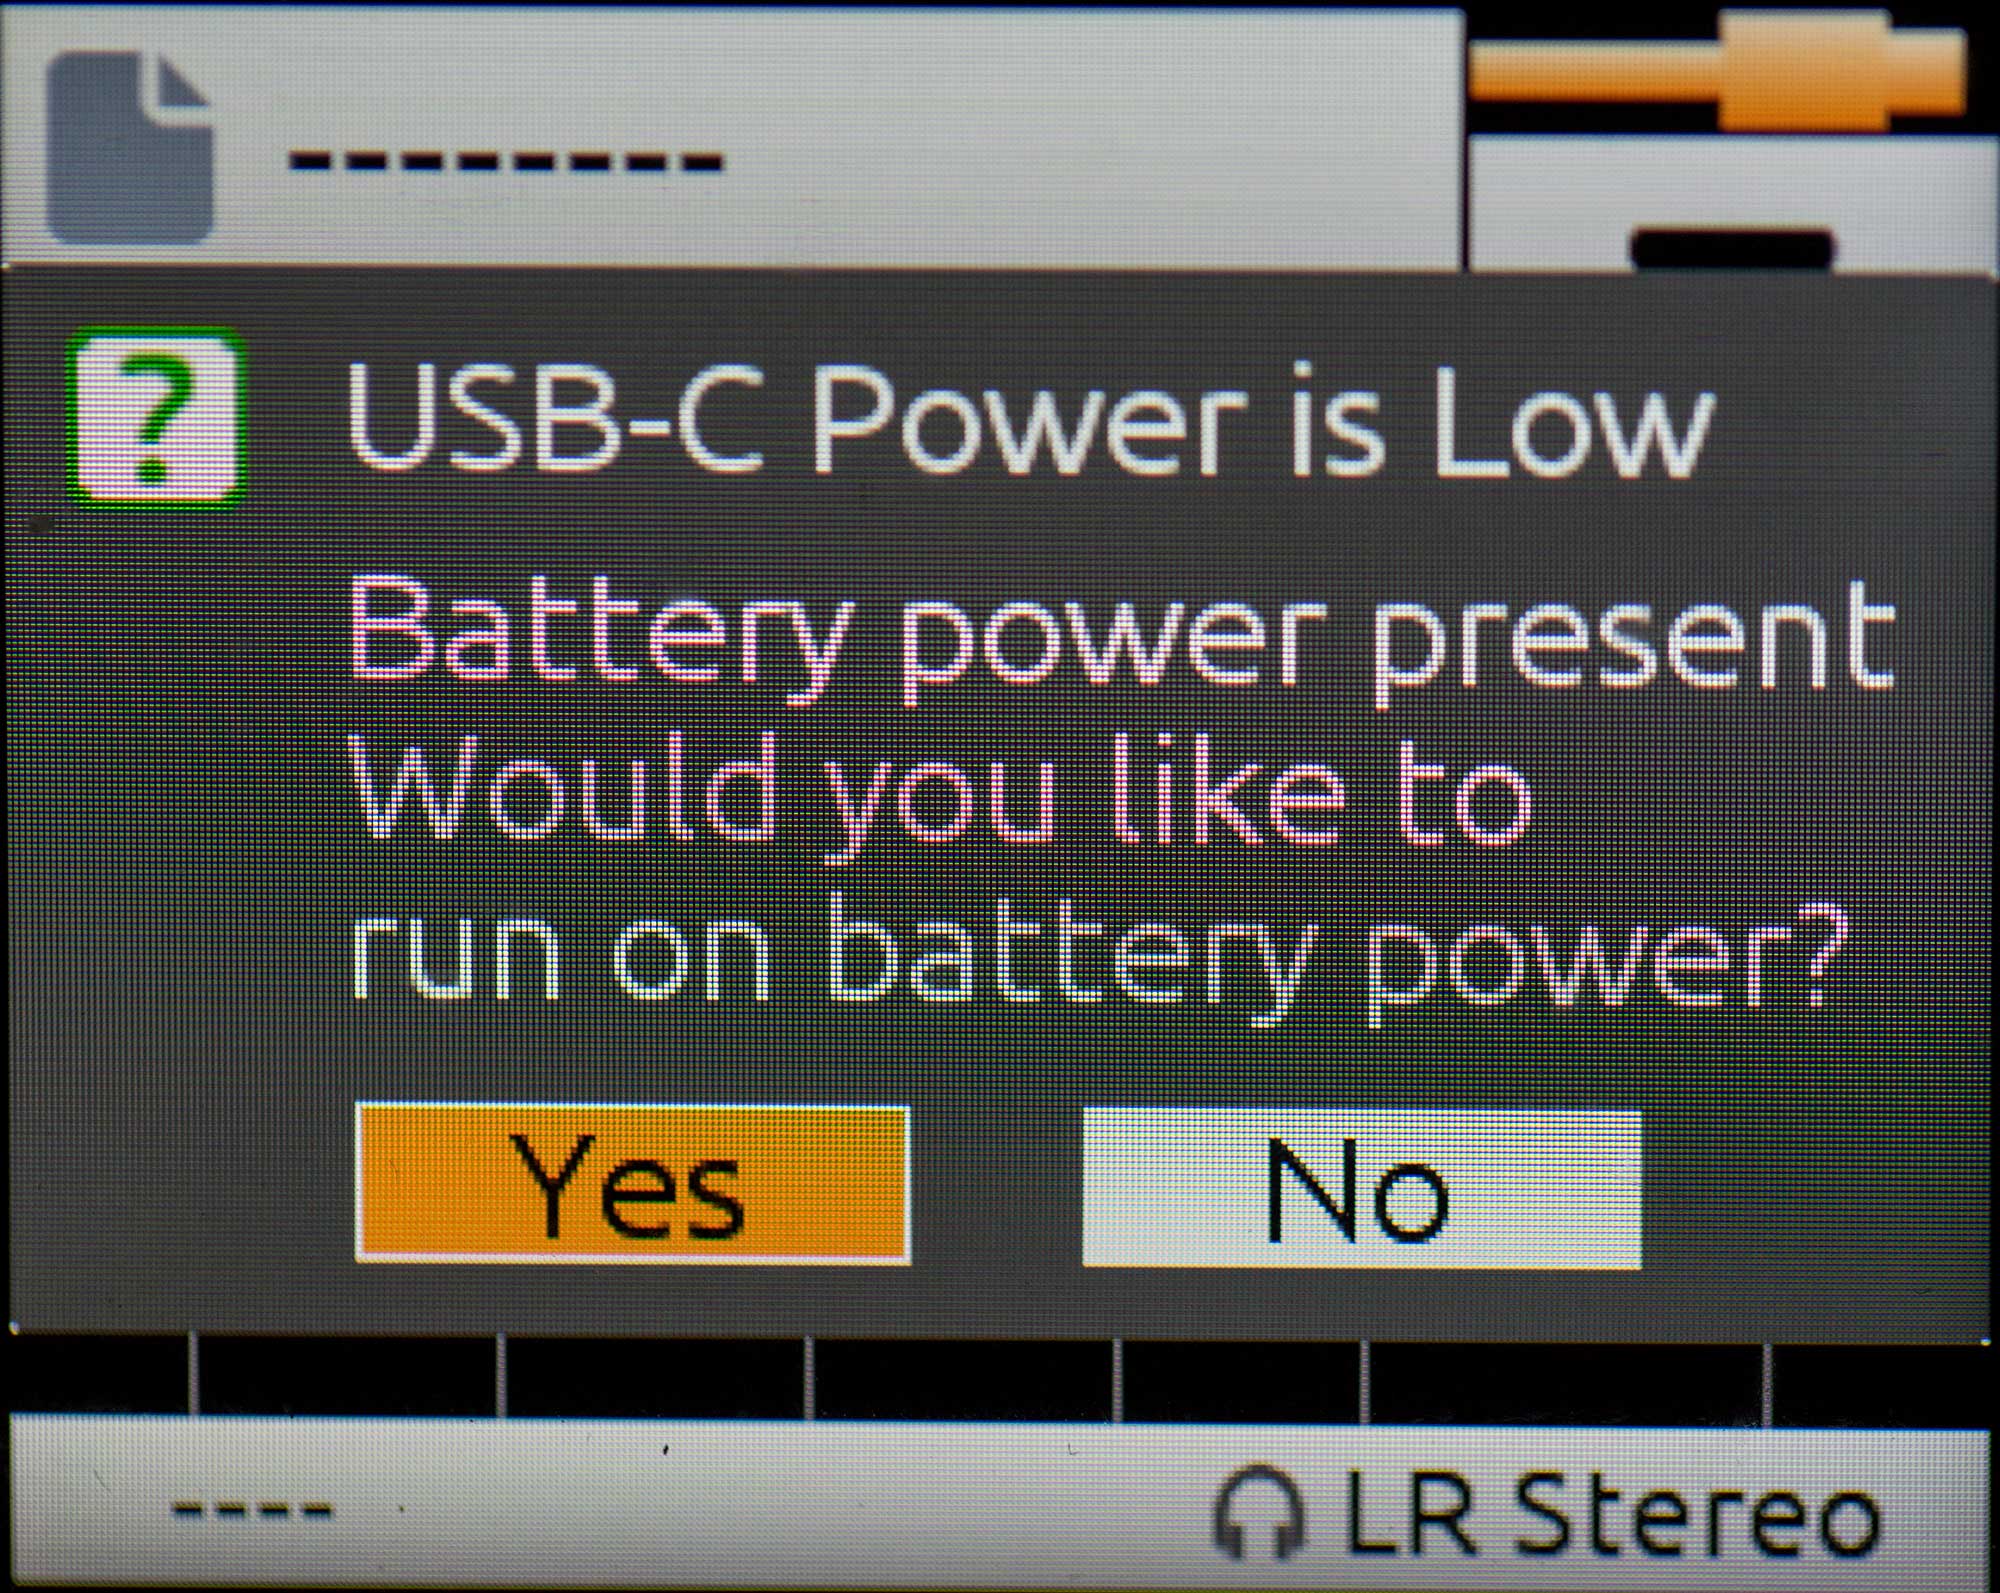
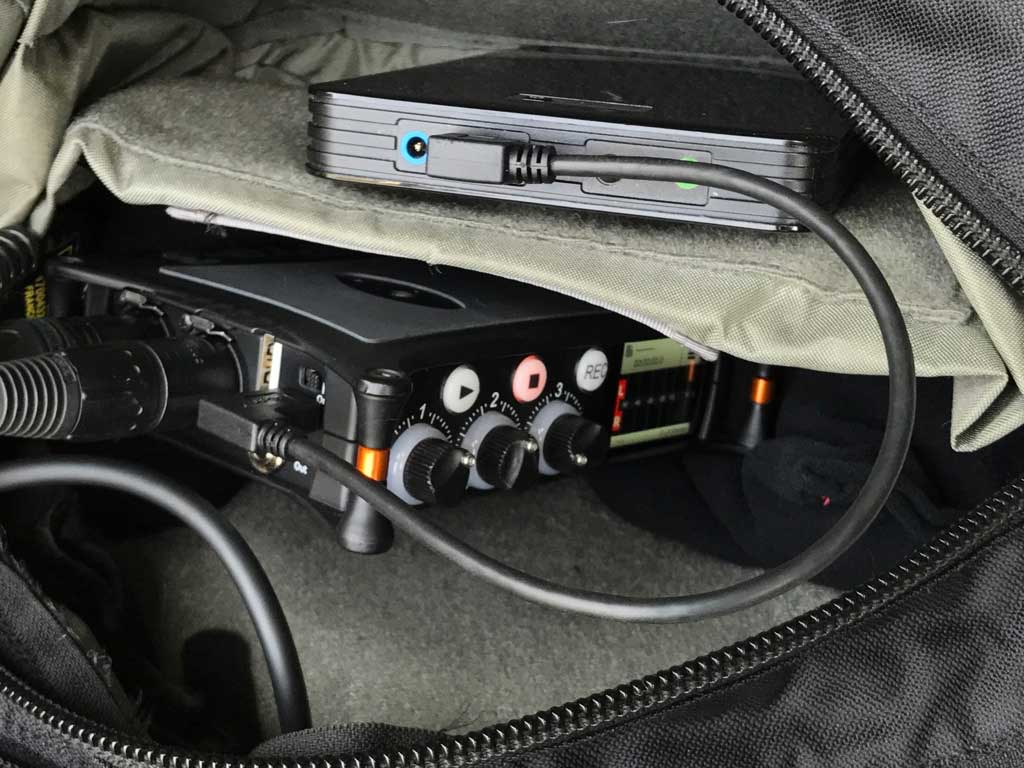
I had previously ordered a USB-C to USB-A cable for powering the device, so I plugged that into my Energizer XP1800A and turned on the MixPre-3. I was greeted with this screen (see right):
Huh? The battery was fully charged. My first thought was that there was some sort of incompatibility with the current supplied by the Energizer. But it had worked just fine with my first-gen MixPre, so I figured something else must be going on. I pressed the Yes button, thinking that meant it would try to use the external battery. Instead it switched to the internal batteries. So I restarted, and this time when the screen came up I hit “No.” The result was that the screen slightly dimmed, but everything seemed to work fine.
MixPre-3 powered by USB-C to USB-A
I later learned (by reading the MixPre-3 user guide) that a single USB-C to USB-A connection isn’t capable of supplying the full power requirements of the MixPre-3. When it’s powered in this way, it enters a power-conservation mode that allows it to function at the expense of a few features. It turns off the USB-A port, dims the LCD, and won’t supply phantom power to on track 3, to name a few. Otherwise, it works perfectly fine. You can tell it’s in this mode because the USB cable icon in the upper left of the screen turns orange. The icon is green when fully powered.
To fully power the unit via USB-C, you need a USB-C to USB-C cable, and a power supply that supplies 7.5 watts to the MixPre. There aren’t a ton of these on the market right now, but I’m sure there will be soon. I went with the Anker Power Core+ 20100mAh charger, which comes with the required usb-c to usb-c cable. It’s a good value at $65. However, it takes forever to charge unless you also purchase a Anker Quick Charger.
Don’t even think about running the MixPre-3 off the standard 4 AA batteries. If you’re using phantom power, you’ll get like 20 minutes of record time before it sucks the life out of them. You definitely will want a robust battery option like the one I’ve described above.
How does it sound?
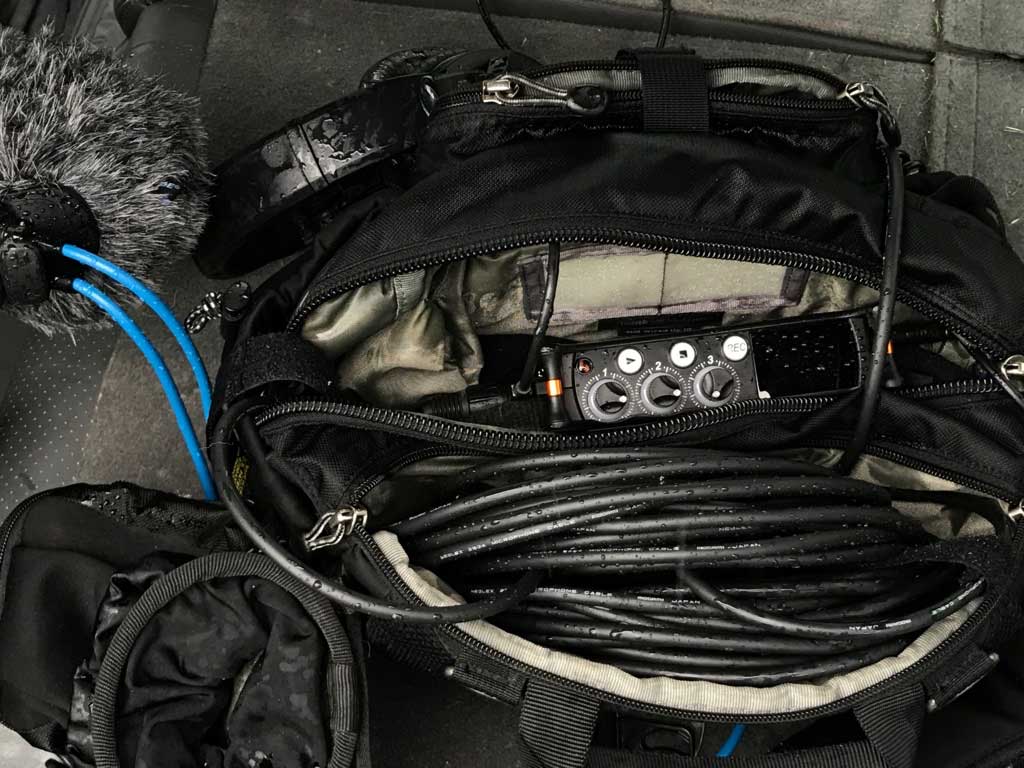
I performed a little changing-of-the-guard ceremony in my sound bag, pulling out my venerable MixPre and my Tascam DR-70D to make room for the new sheriff in town. Then I grabbed a Rode Stereo Videomic X and headed to the beach, where as luck had it, a thunderstorm was brewing. Here’s what it sounded like on the MixPre-3 (with no tweaks other than normalizing levels in post):
I look forward to trying this mic out with dialog in a very quiet recording environment to see if the Kashmir preamps live up to their billing. But I sure like what I hear so far.
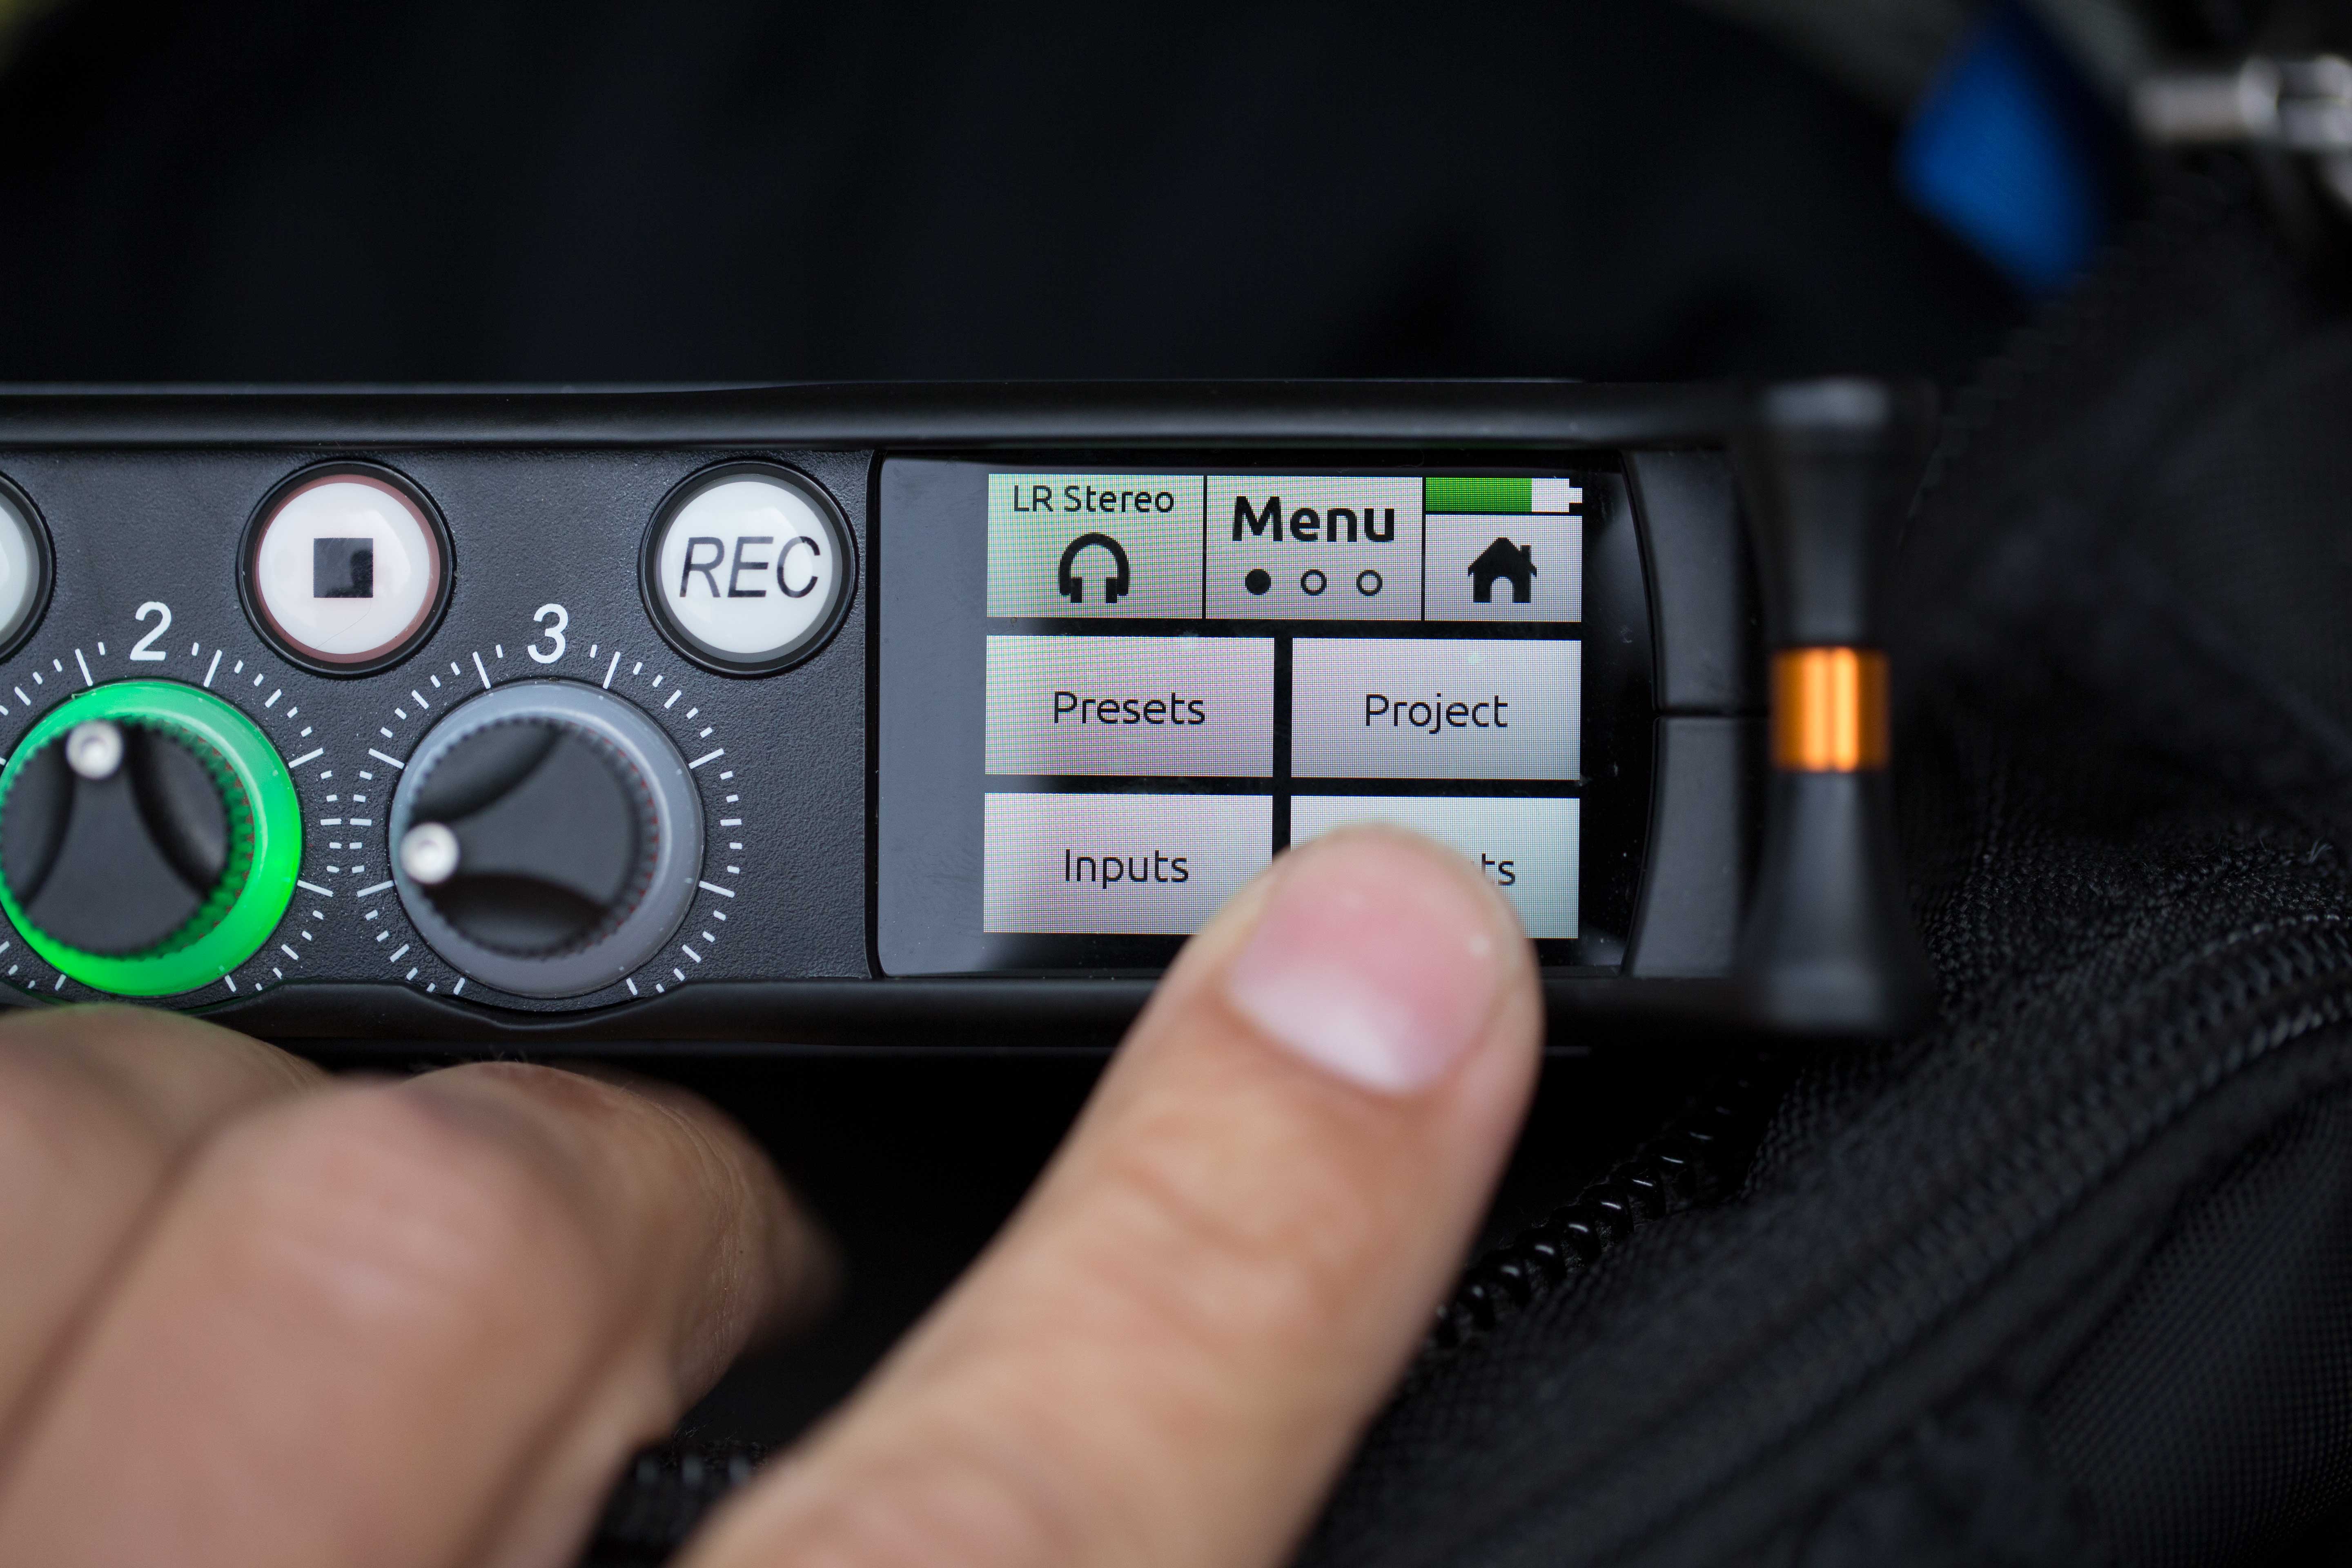
Touchscreen size
MixPre-3 touchscreen is small, but you get used to it quickly
The touch screen at first seems way too small to be functional. But after a little getting used to it, I found it worked just fine. However, I wouldn’t want to spend any time entering metadata this way. So it’s nice that you can do that via the Wingman app, OR by attaching a USB keyboard to the USB-A port.
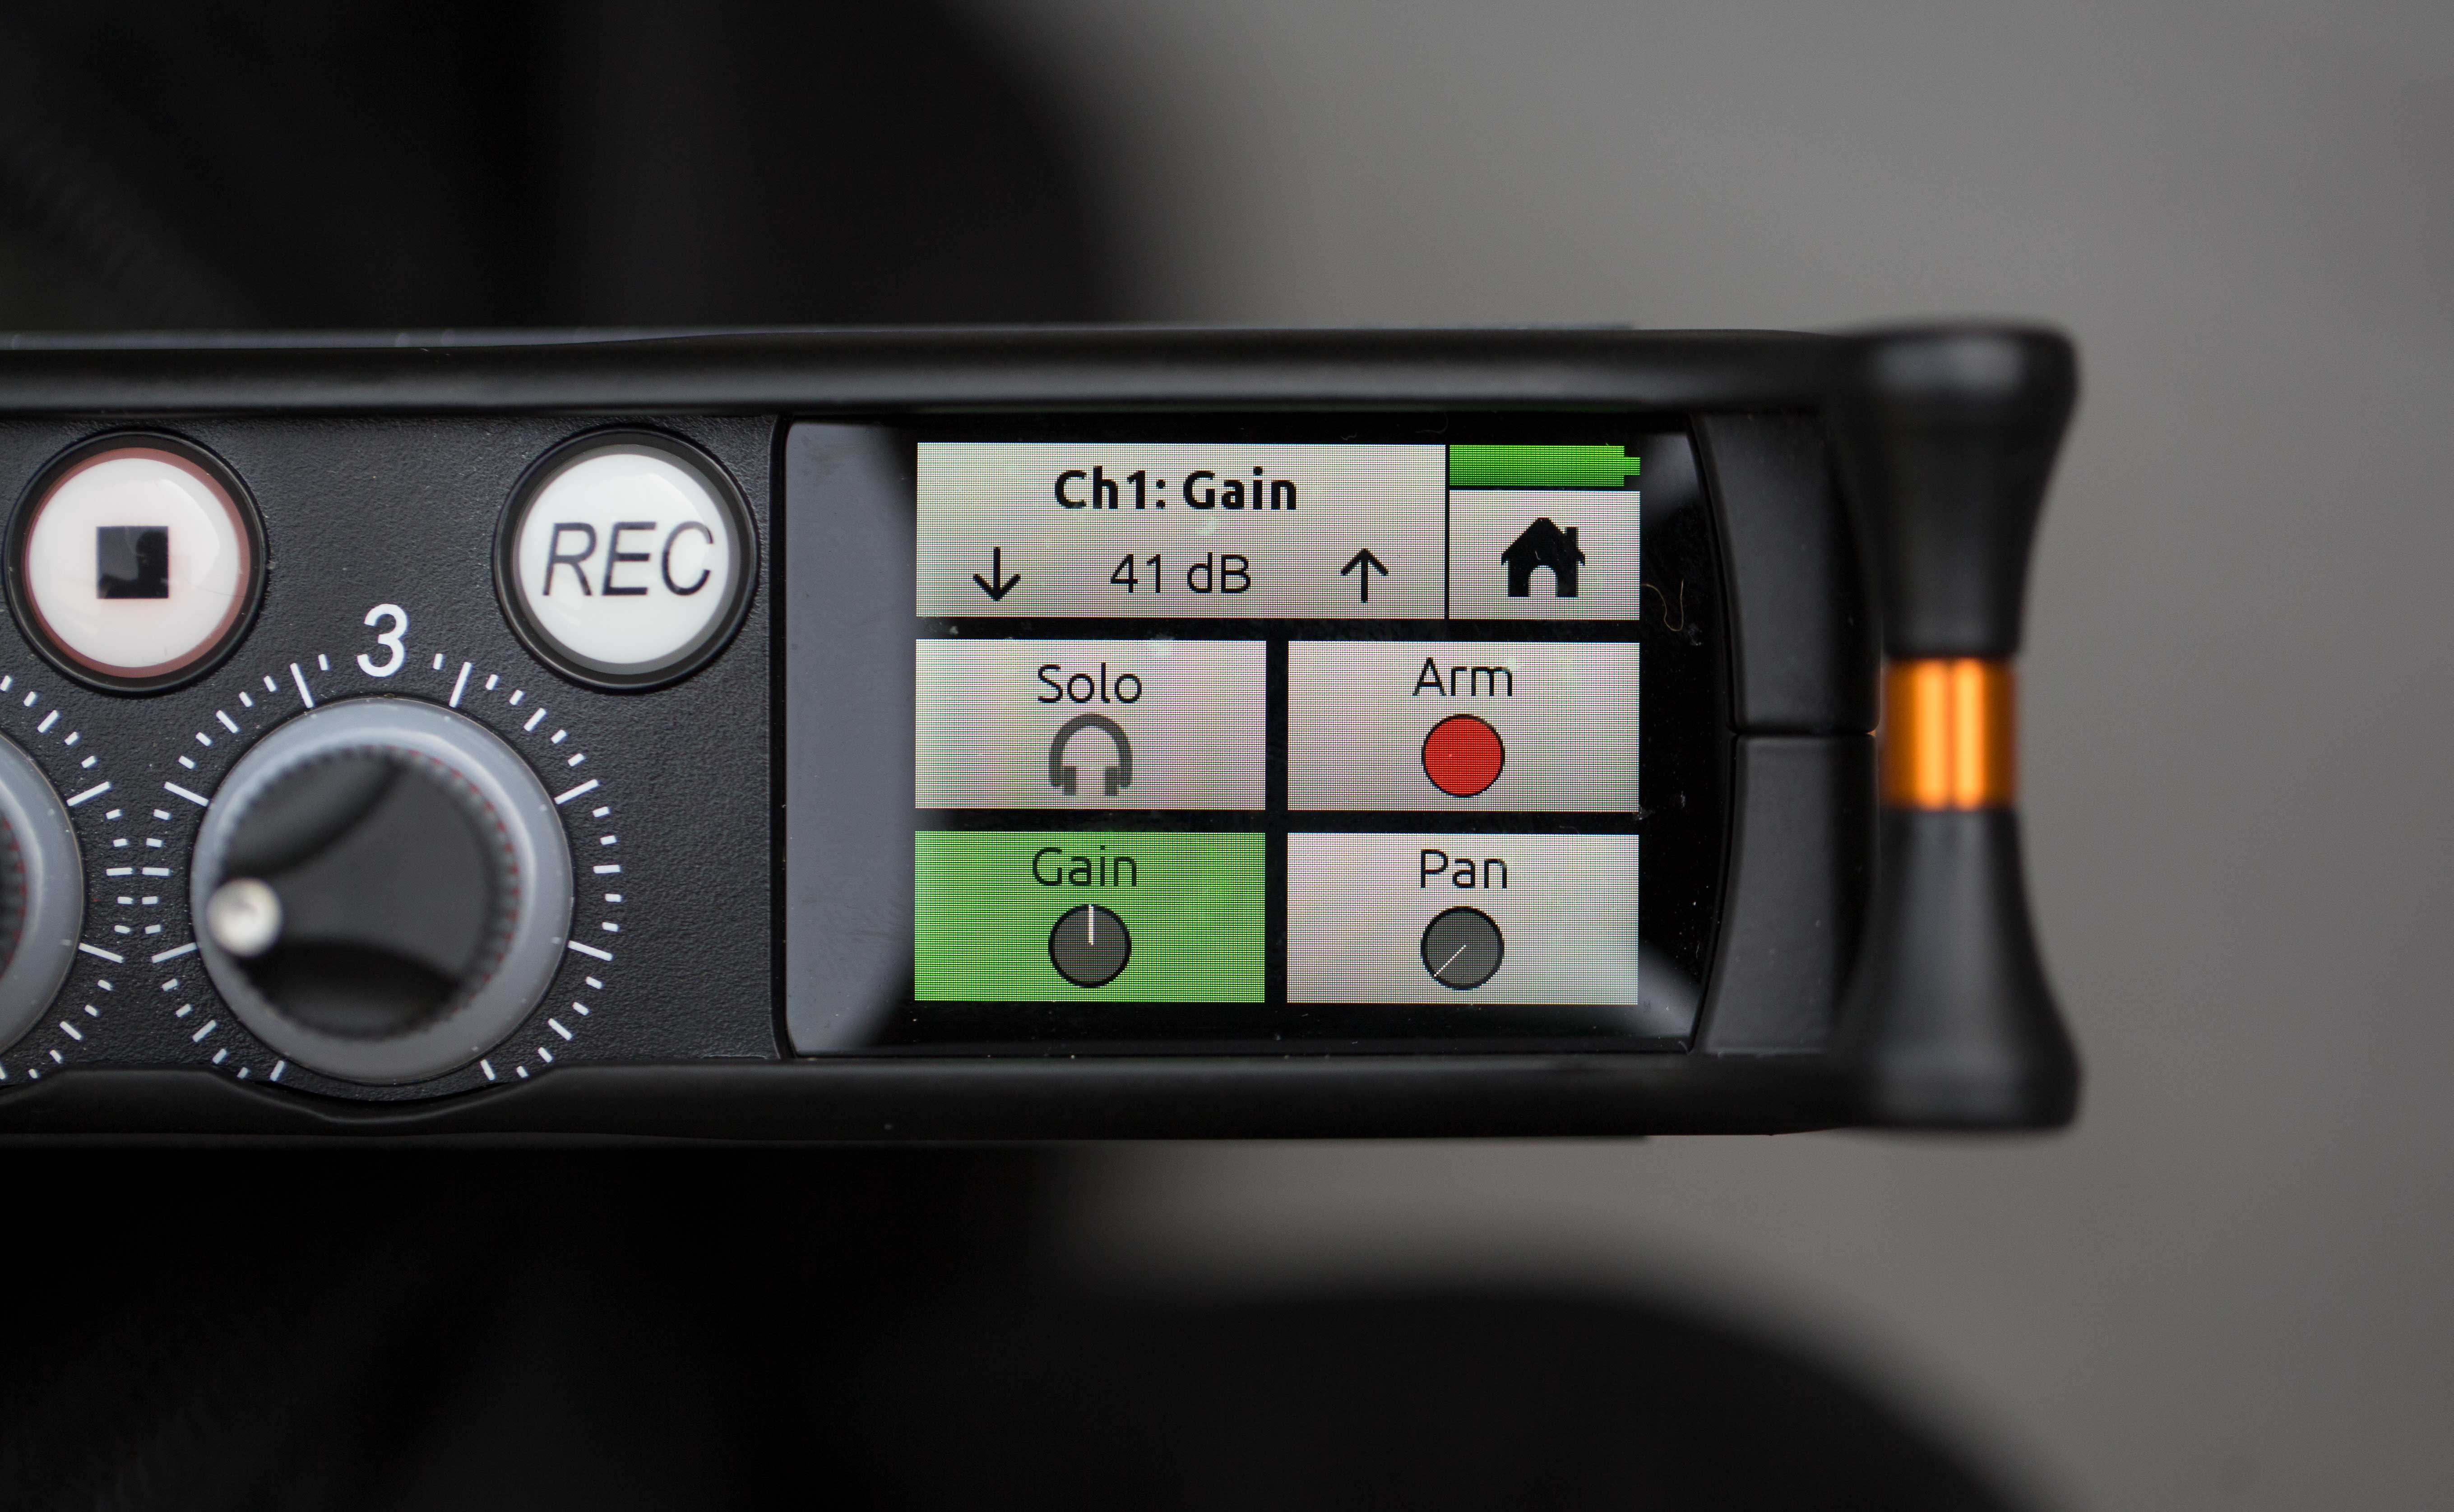
Setting recording levels
It takes a little getting used to setting levels on the MixPre-3. Out of the box, they seemed much lower than on the original MixPre, on which most of my mics run hot. To get the levels up to where I expected them, I had to crank up the gain on the inputs to 41db (out of a possible 76db). On the screen this shows as middle-gain (see green Gain icon below):
Gain controls
Then I realized that the MixPre-3 is actually using an entirely different approach to the interface than the old MixPre. The old one was entirely analog – the new one is a mix of analog and digital. On the old mixer, you turned up the gain knobs until you found your levels. Done. On the new one, you set the base recording gain level digitally, then use the fader knobs to make minor adjustments during recording.
After working with the MixPre-3 for awhile, and looking at the files it creates, it became clear how to set the levels correctly. The steps are:
Set fader knob to 0 (with silver dot at top).
Plug in mic.
Use gain screen to set levels a little lower than you would typically set them.
Use fader knob to make minor adjustments.
Record.
It’s very important to note that the adjustments you make with the fader will ONLY be applied to the mix tracks, and not the iso tracks. The iso tracks are recorded PRE fader. It’s a little confusing, because on your screen, your ISOs are labeled tracks 1, 2 and 3. When you open your files in post, the first two tracks, 1 and 2, are your mix tracks. Tracks 3, 4 and 5 are the ISOs.
For me, this whole idea of a mix track takes some getting used to. I prefer to cut with iso tracks. With my Tascam DR70D, I’m used to recording each stereo pair (or dual mono pair) to it’s own two-track file, and there’s no such thing as pre- or post fader. And, I WANT to control the levels on the iso tracks. So I suspect they way I’m going to actually use the MixPre-3 for most dialog recording is to set up the lav on the left, the shotgun on the right, and then pan them so they are isolated from each other on their own track anyway.
Nice touches
Tools included
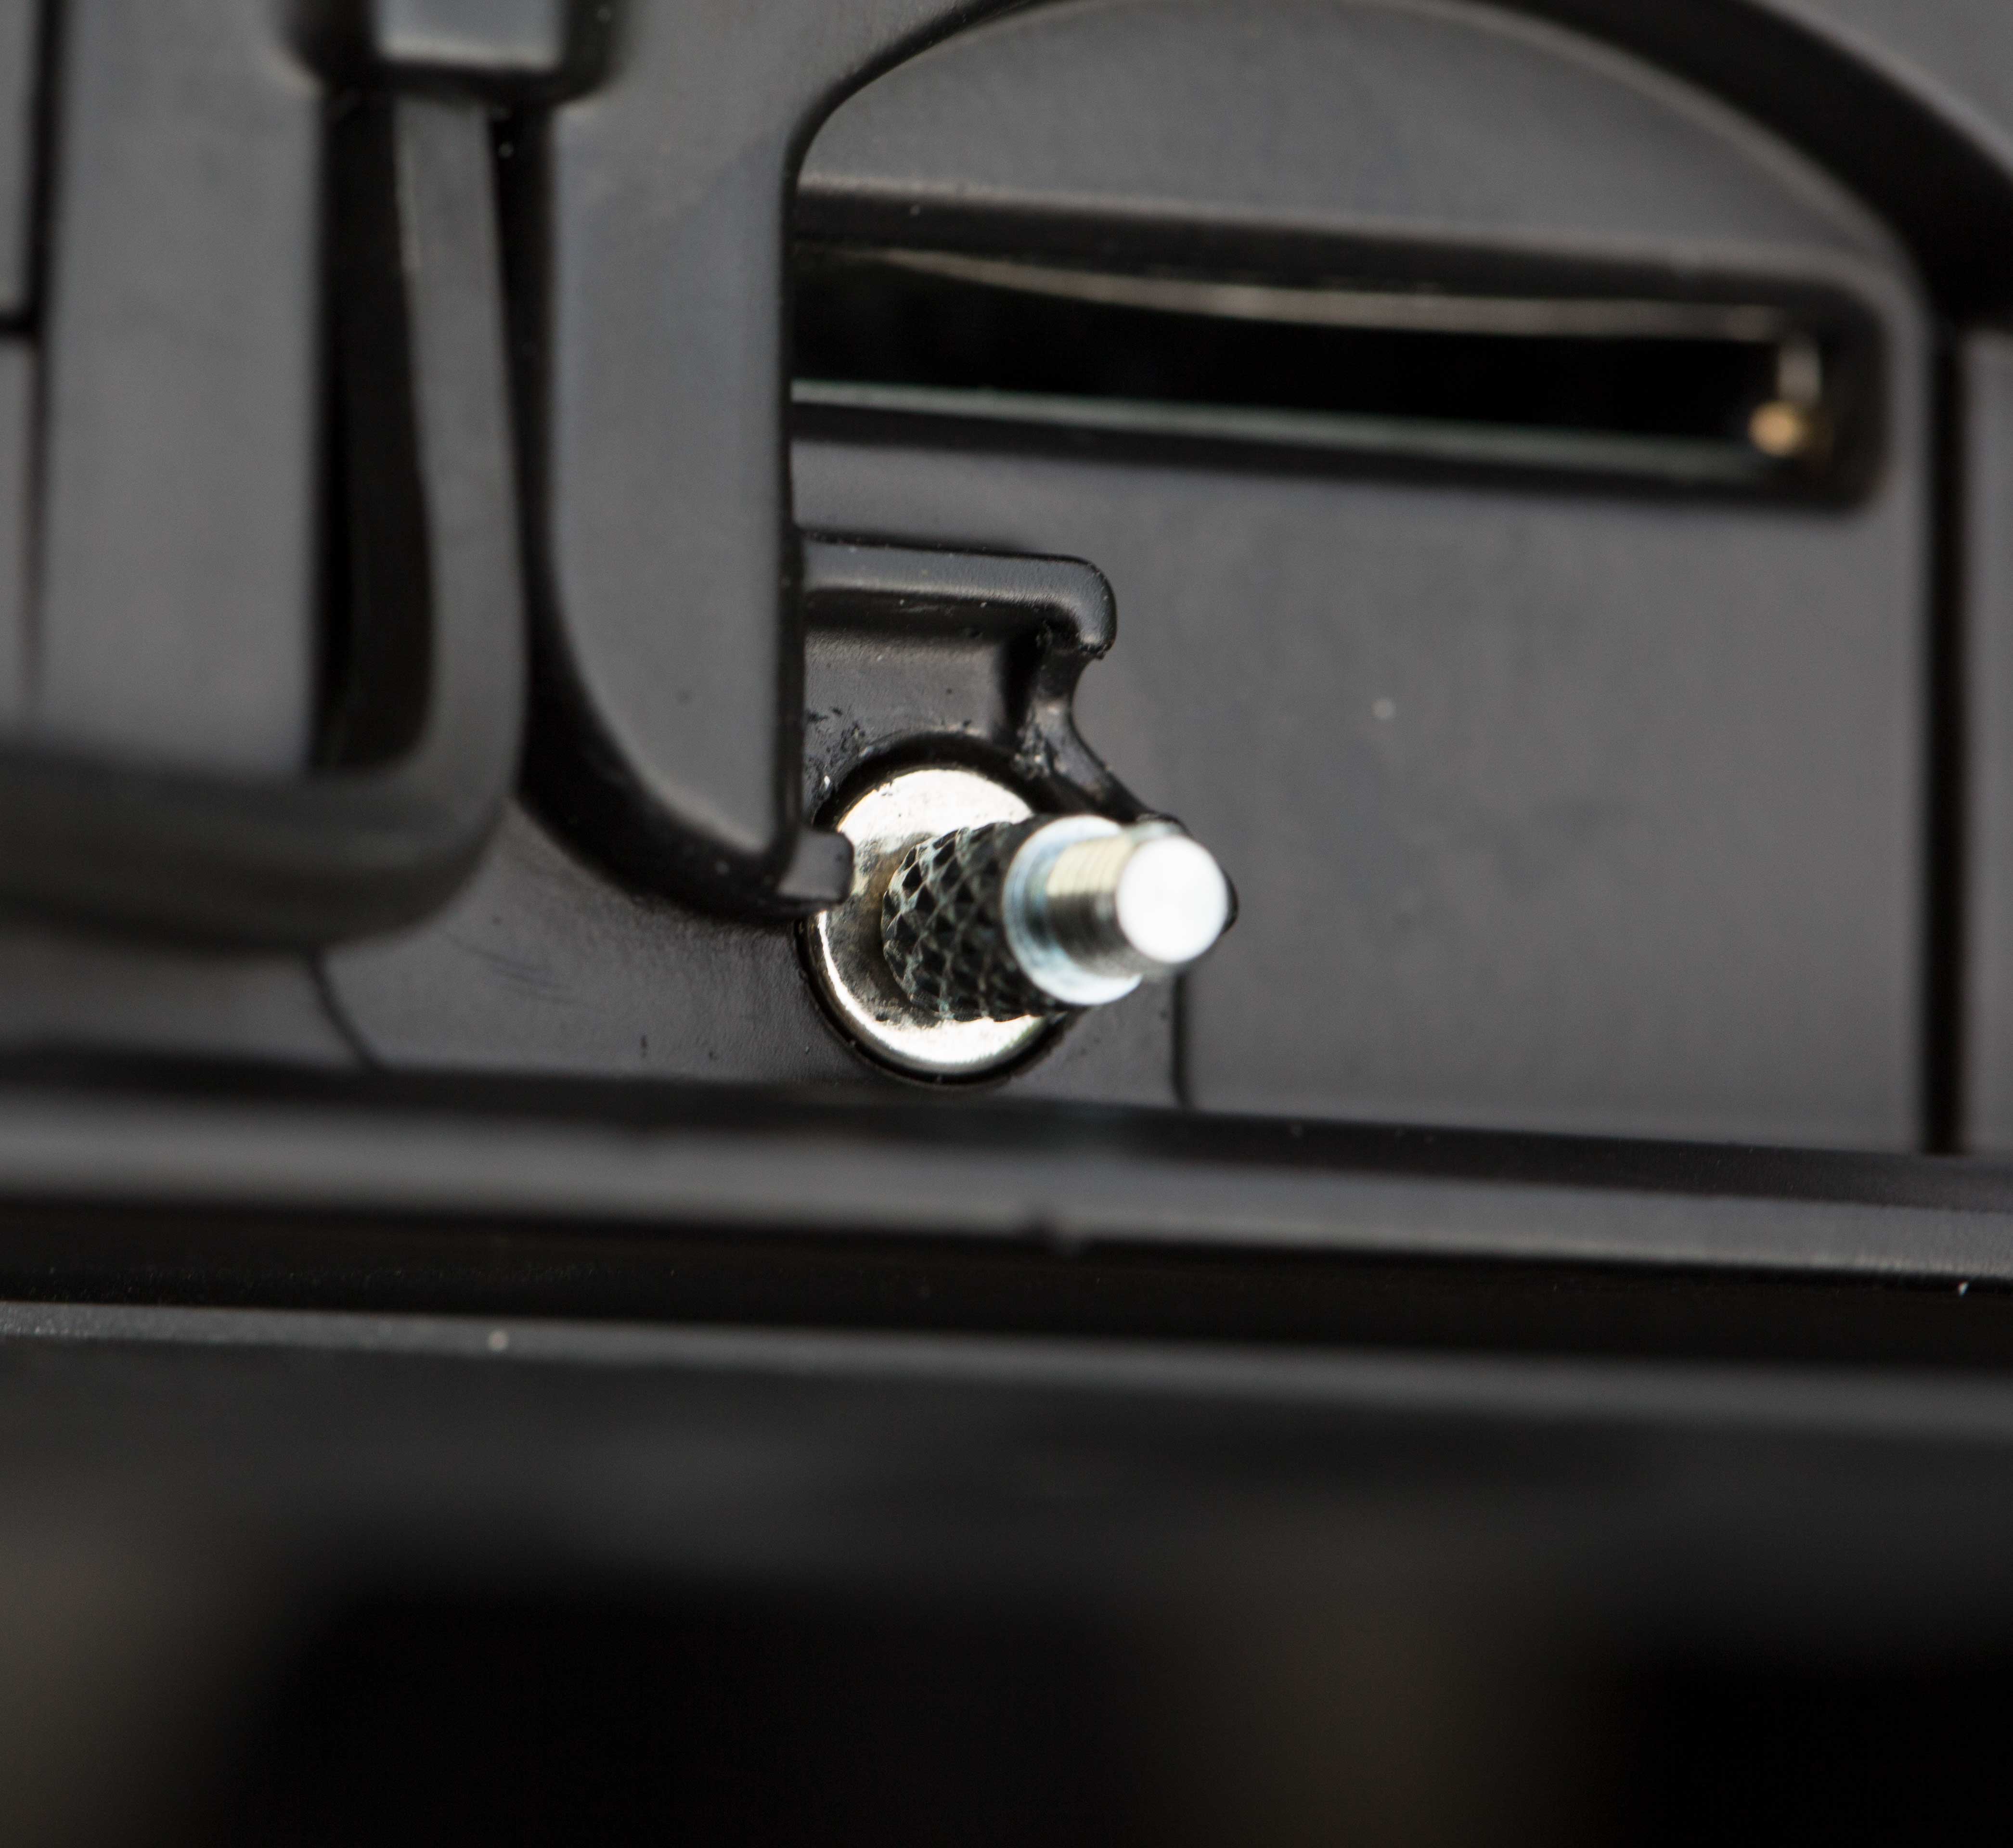
It’s abundantly clear that the engineers at Sound Devices put a lot of love into this project. As an example, check out the flexible options for attaching the recorder to a video camera. They’ve included a centering pin and a hex key required to turn the 1/4 20 screw.
But wait, there’s more! See that little round metal dot? It’s a very powerful magnet, which holds both the pin and the hex key in place, making it less likely you’ll lose them. I love that sort of attention to detail.
Wingman app
The Wingman app connects automatically to any MixPre-3 in the vicinity right out of the box. You can add a password to the MixPre if you want to secure it. The app gives you everything you need to enter basic file names and add notes, even while a clip is still recording.
It also reveals which tracks are armed (that is, which are actually being recorded) and gives you the ability to arm and disarm tracks by tapping on the left side of them (turning them red when armed and black when disarmed).
However, the UI is a little lacking. For example, the timecode displays on the screen in HUGE numbers, while the elapsed time is shown in tiny little numbers that are hard to see. I wish I could toggle between these, because I want my producer to take notes based on elapsed time of each clip. If you turn the timecode off on the MixPre-3, the big numbers just turn in to dashes, and the elapsed time remains so small that it’s hard to see by anyone over 50.
Nevertheless, the ability to see the elapsed time at all is a big step up for us. Our previous system involved my producer starting a stop watch at the same time as the sound recordist started rolling.
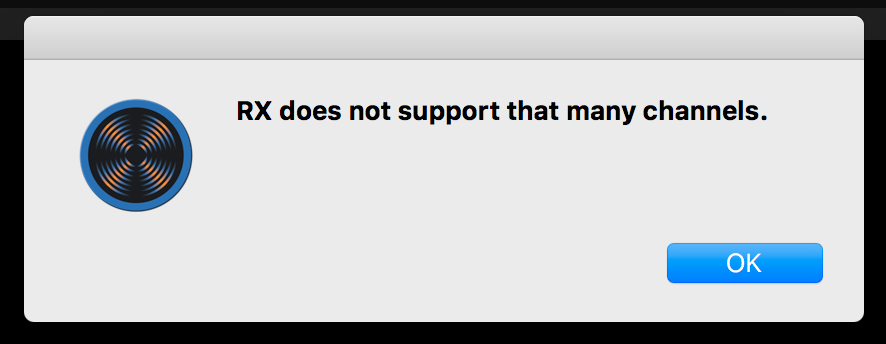
Working with the files in post
The MixPre creates polyphonic files. Thats a fancy way of saying that your files contain multiple tracks, and your NLE may have some issues with this. When I tried to drop the files into iZotope RX 6, for example, I get this error (see right):
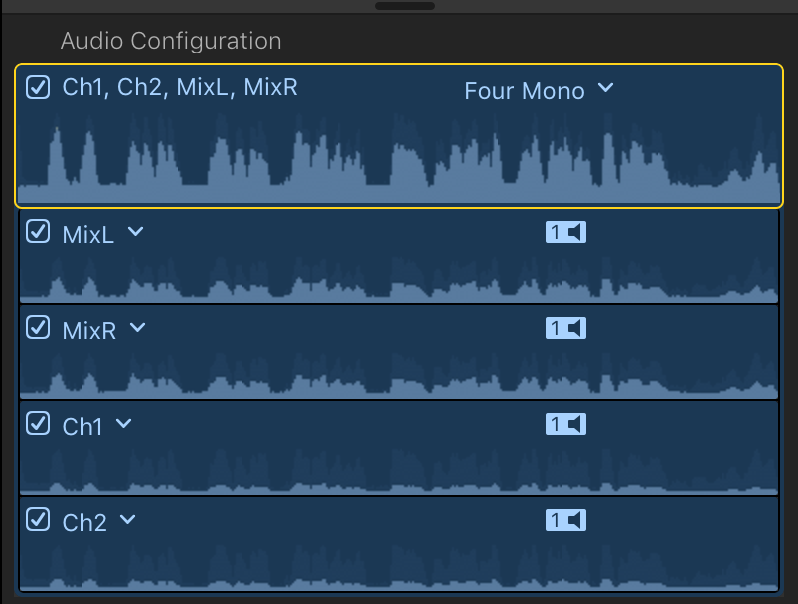
FCPX interpretation of polyphonic files
Also, when I drop stereo files that I recorded with MixPre-3 into FinalCut Pro X, it interprets them as 4 mono files. It’s easy to fix this – you simply change the file type to stereo, and disable the redundant tracks.
But what if you want it clean from the start?
There are several ways to resolve this. First, you can simply disable any tracks you don’t want before recording, using Wingman, or directly by pressing the fader for that track and disarming it. If you want to control the mix levels, you want to disable tracks 1 & 2, which is a little counter intuitive, since that appears to be disabling the track you are trying to record. But that’s not the case – you will find your MIX recorded on tracks 1 and 2 when you open the file in post.
There are advantages to letting MixPre-3 do it’s default thing, however, which is to record your mix AND lay down numbered iso tracks (which are recorded PRE fader, as we discussed earlier). That way, it’s like you have a backup recorded at a slightly lower level in case things get loud. But you still need to split those tracks up before importing them. How?
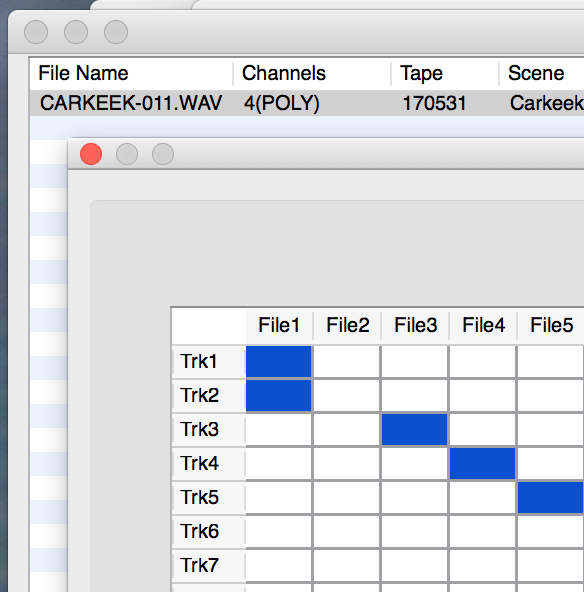
Sound Devices has foreseen this dilemma, and they created a free tool called WaveAgent. It lets you split out and export just the tracks you want, all nice and tidy. It also gives you a great interface for appending metadata to your audio files, should you wish to.
You can tell at a glance how many channels your file contains, the bit depth it was recorded at, etc.
To export tracks 1 and 2 into a single (stereo) file, for example, you click under File1 in Trk1 and Trk2. Then you select the file format you wish to export, select a location to save it, and export.
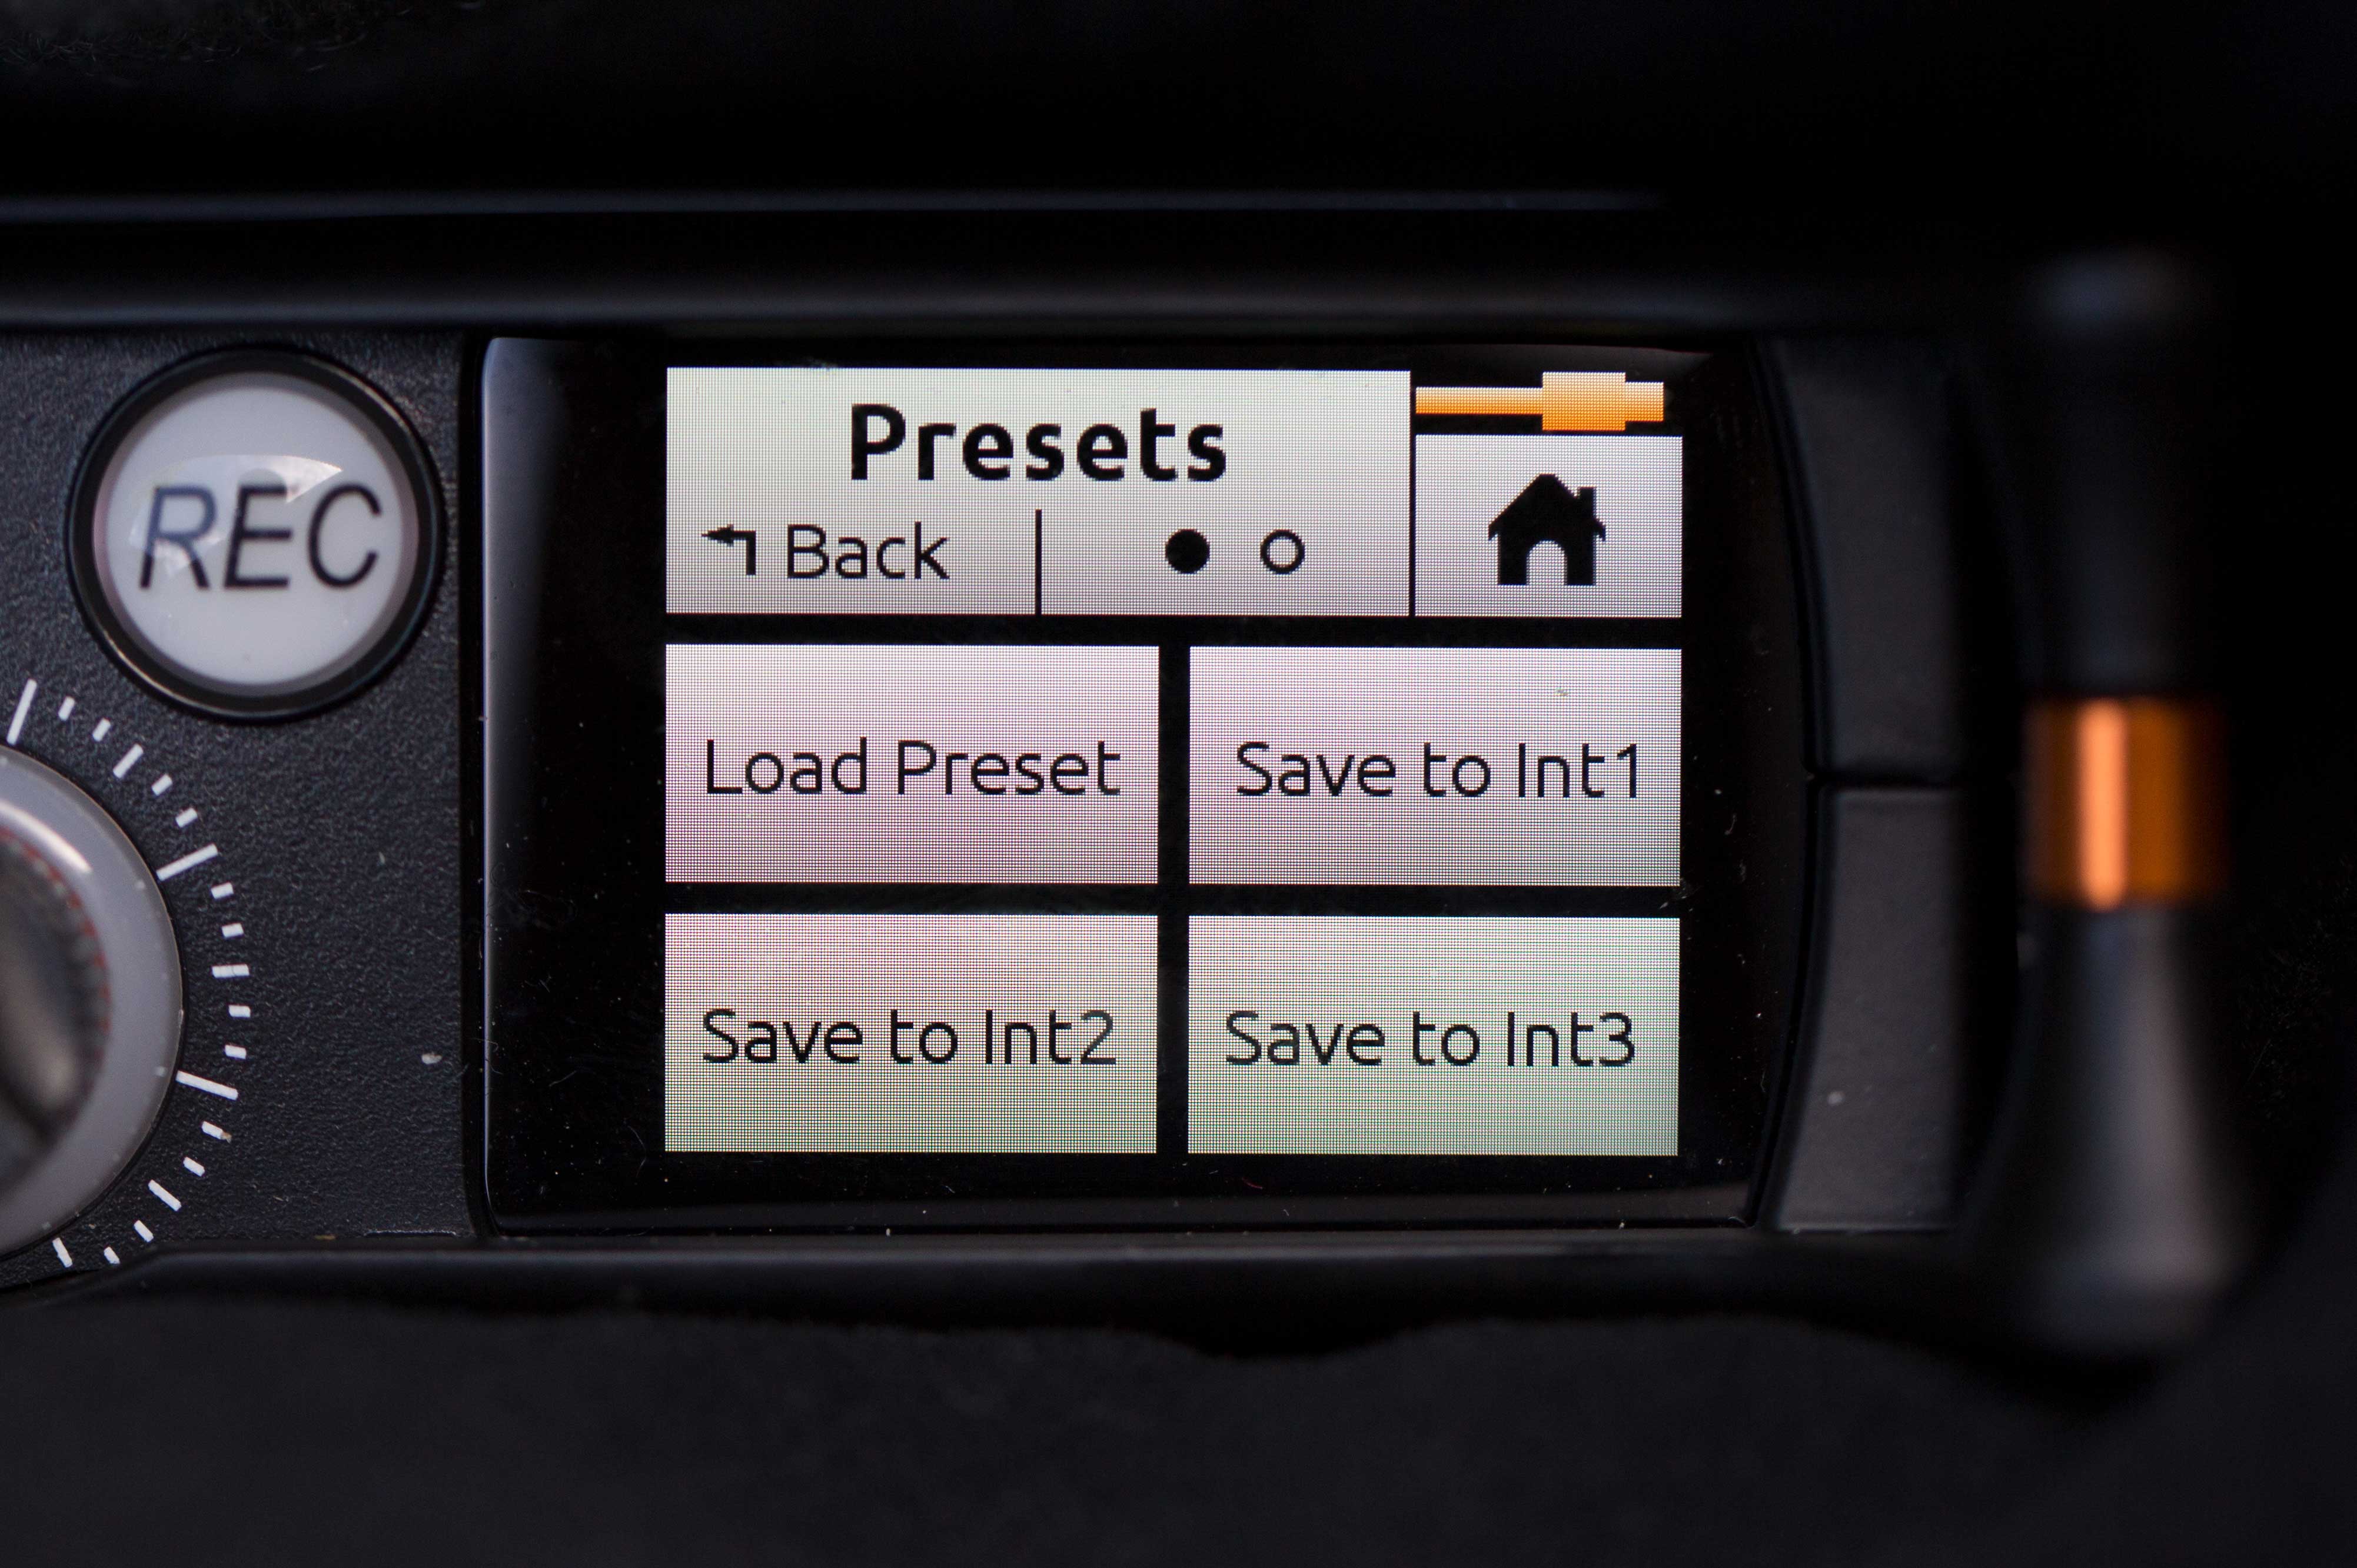
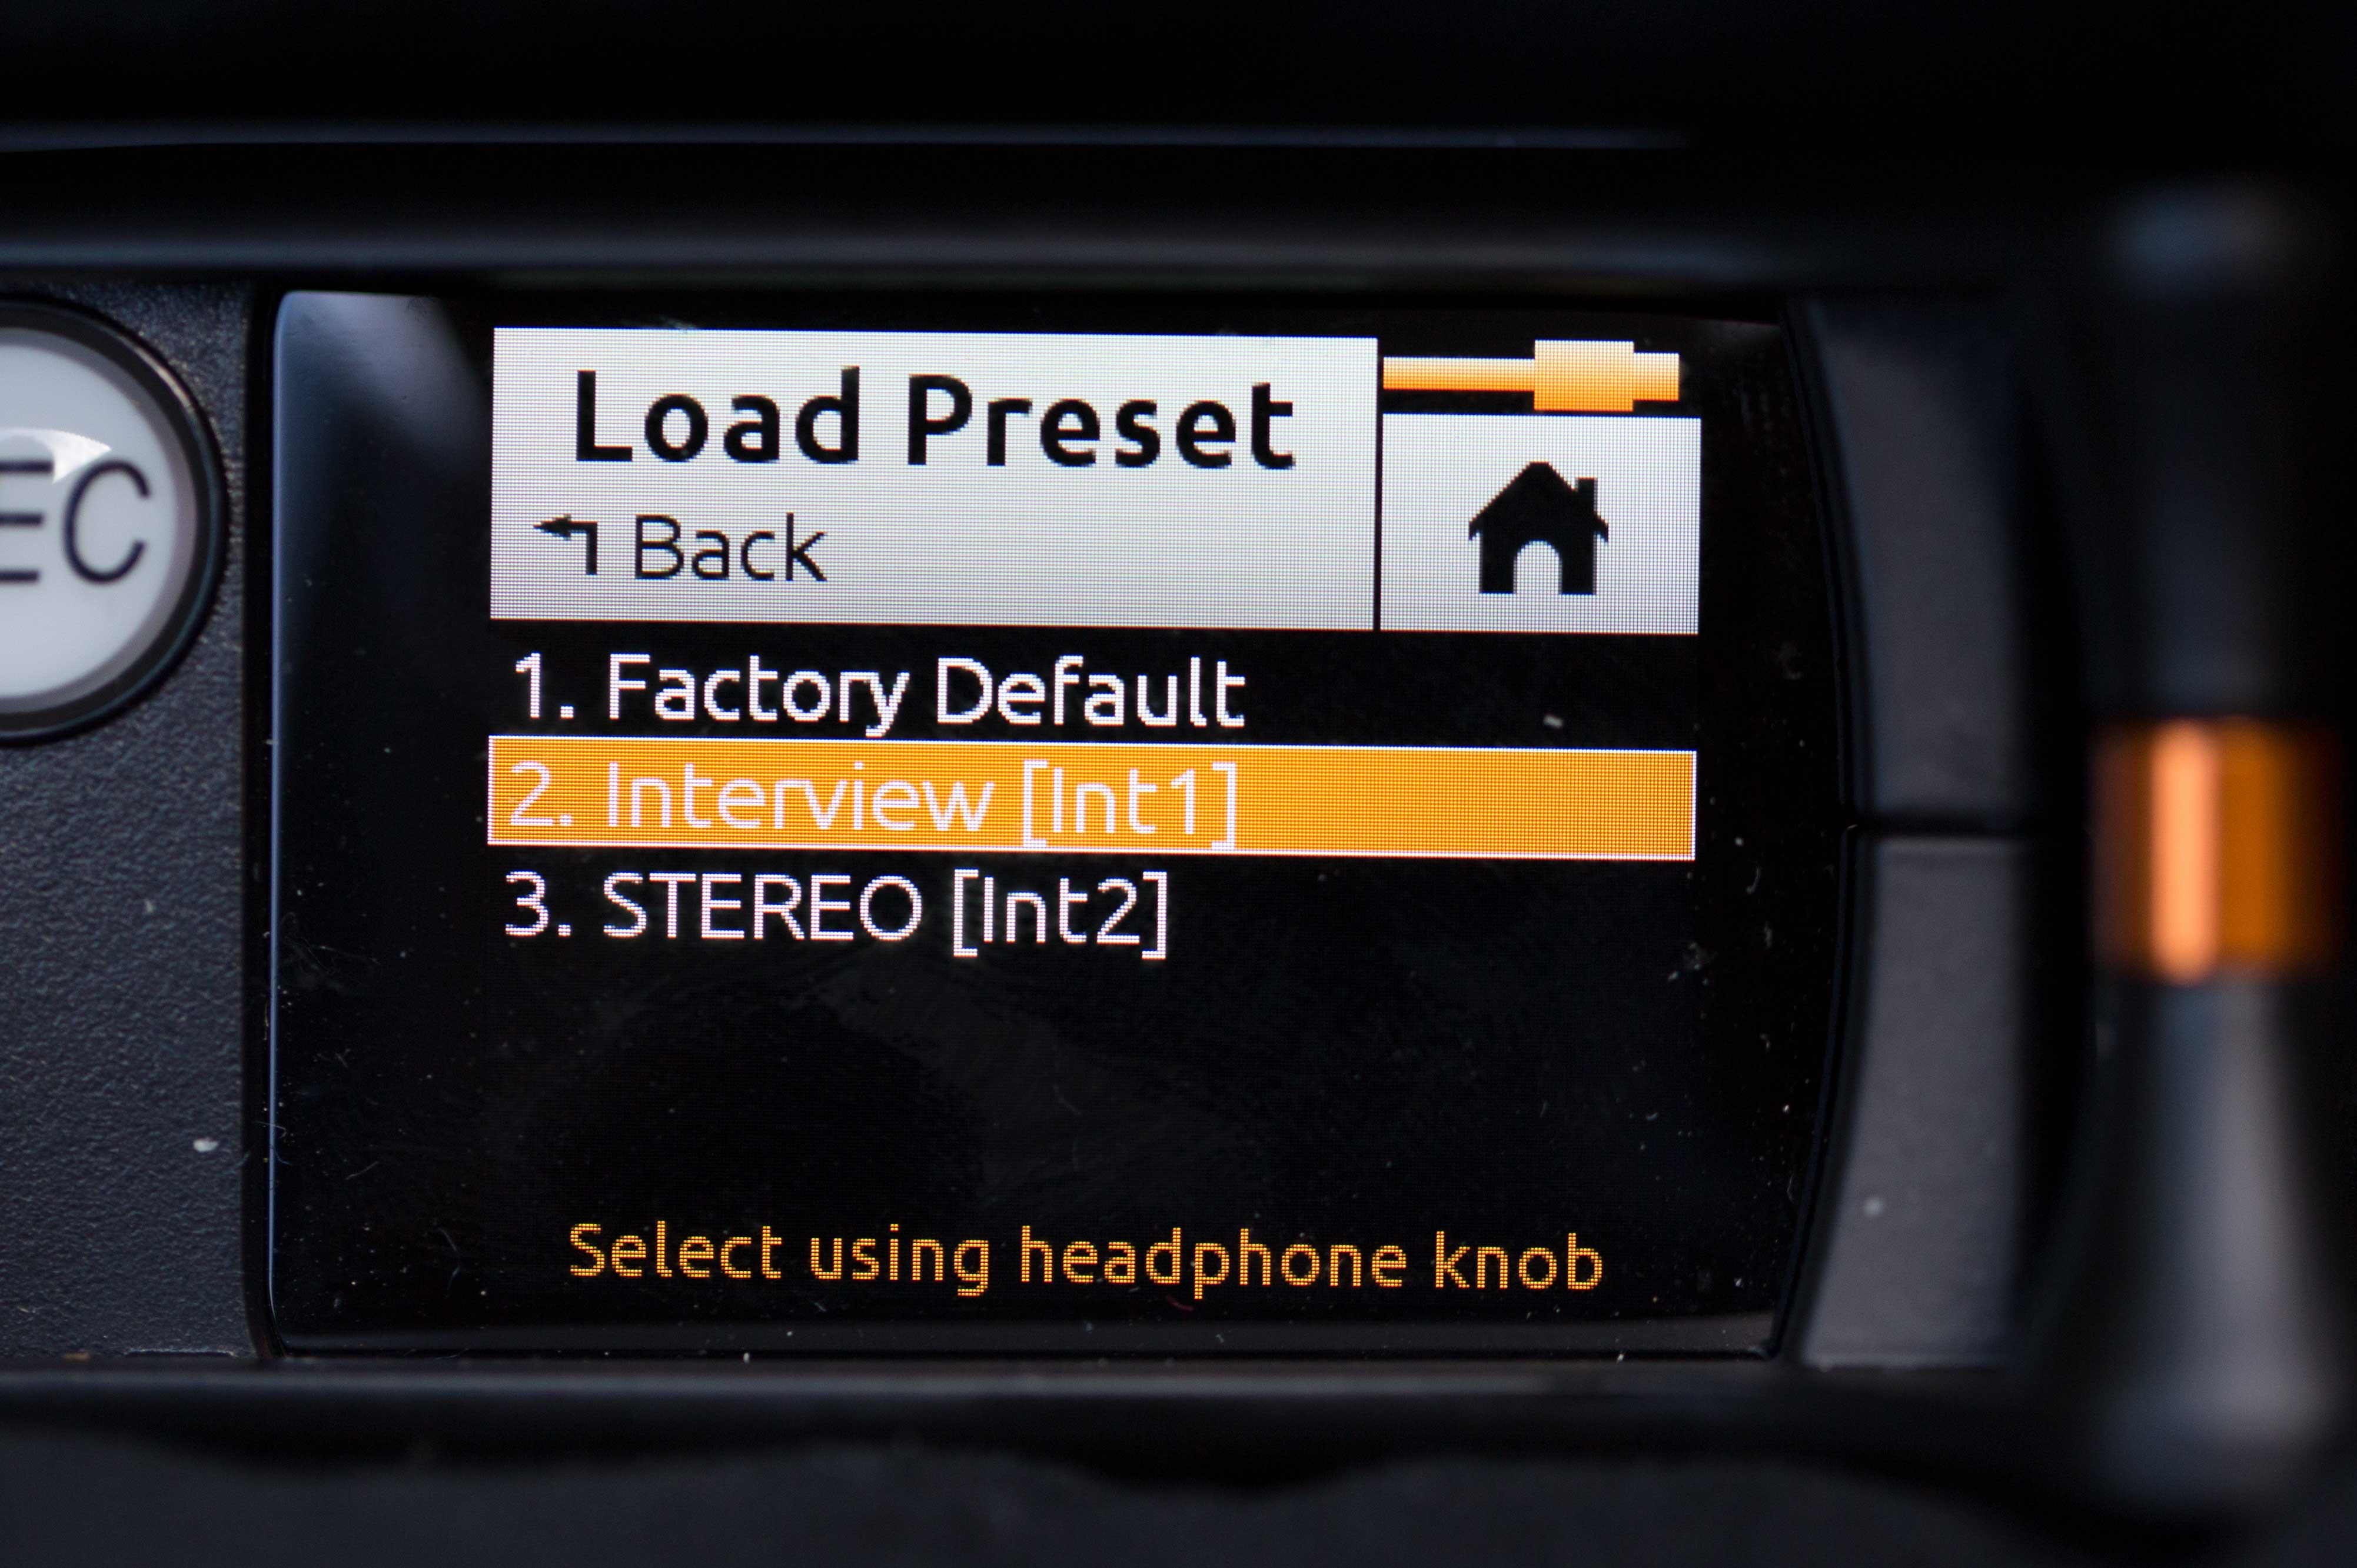
Presets are awesome
It used to be that when you got your mixer all set up correctly, you didn’t want anyone to touch anything. They could easily mess it up.
With the MixPre-3, those days are over. You just set up your mixer however you like – arm some channels, disable others, set levels, pan, etc.- then store that setting as a preset.
When you’re ready to use that configuration, you simply navigate to the present menu, dial down to your setup, and load it. Done!
I’ve set mine up with two presets – one for recording sound effects and ambiences with my Rode Stereo Videomic X, and another configured with the lav for interviews. On the left channel I’ve got a lav without phantom power, on the right a shotgun mic with it. If you label the preset by it’s function, it makes it very fast to set up your recorder to match the situation you’re working in.
A new benchmark for documentary sound?
I will be using the MixPre-3 heavily in production in the coming weeks, and I’ll post a more thorough review when I’ve had more time with it. But if initial impressions bear out, the MixPre-3 could easily become the new benchmark in documentary film audio. If you’re a stickler for sound, but you want to spend more time thinking about your story than you do about your tools, the MixPre-3 was made for you.
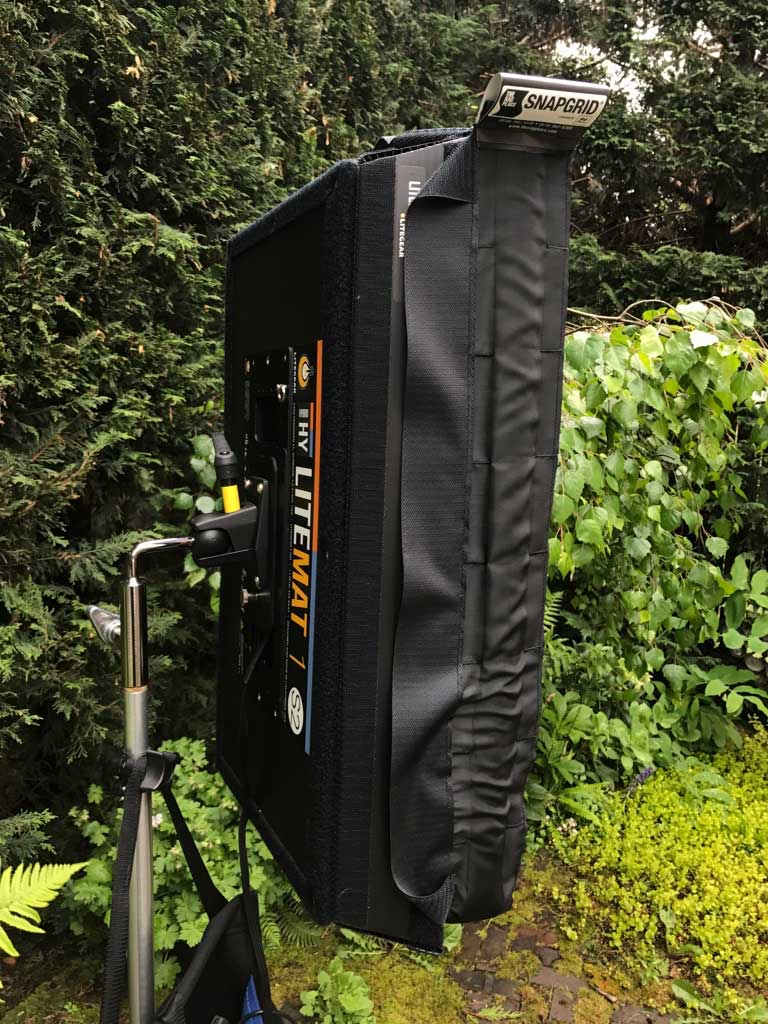
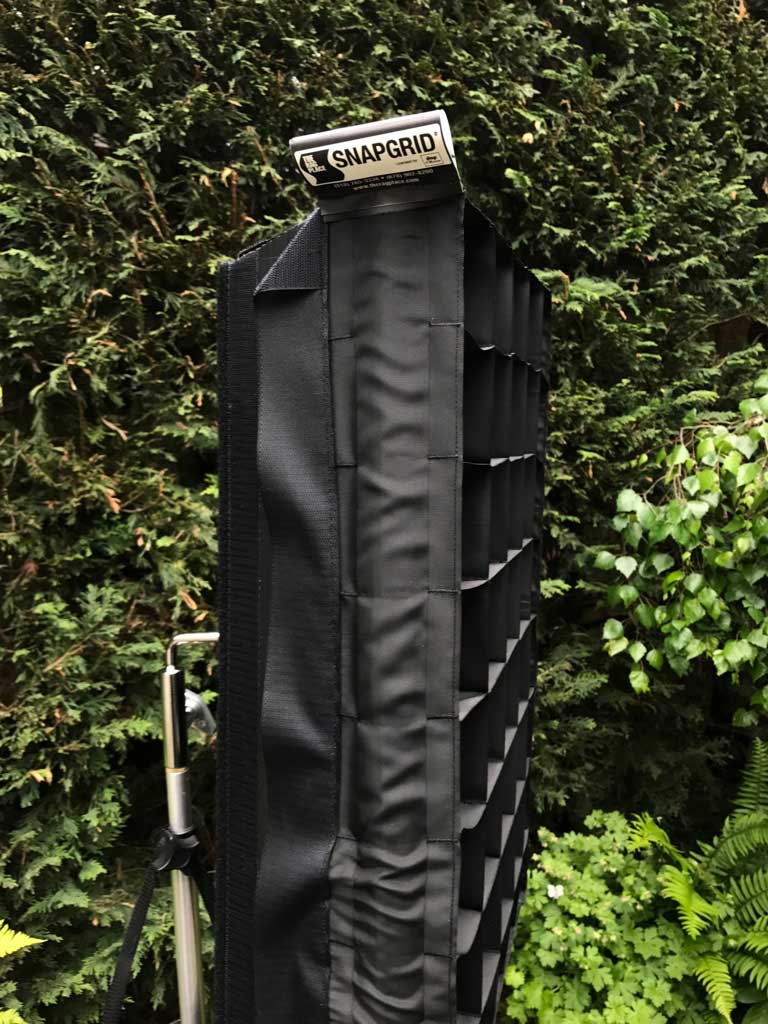
I prefer LiteGear LiteMat’s over just about any other light for documentary location lighting. Why? Because they are so easy to control. With most lights, you need to deploy flags or bulky soft boxes keep the light from spilling everywhere. The LiteMat kits contain everything you need to control the light without requiring anything else – the poly skirt, the diffusion, and a poly grid. So when I heard about the LiteMat SnapGrid which promises even finer control, I investigated.
The SnapGrid is made by a company called The Rag Place (at their Georgia facility). For $200, they will custom-sew a 40-degree SnapGrid for the LiteMat1. That’s a lot of money for what you’re getting, really, but hey, it’s the film industry. I pulled the trigger on it and received email notification that my custom-sewn SnapGrid was finished and shipped within 3 days. That’s snappy!
Solidly built
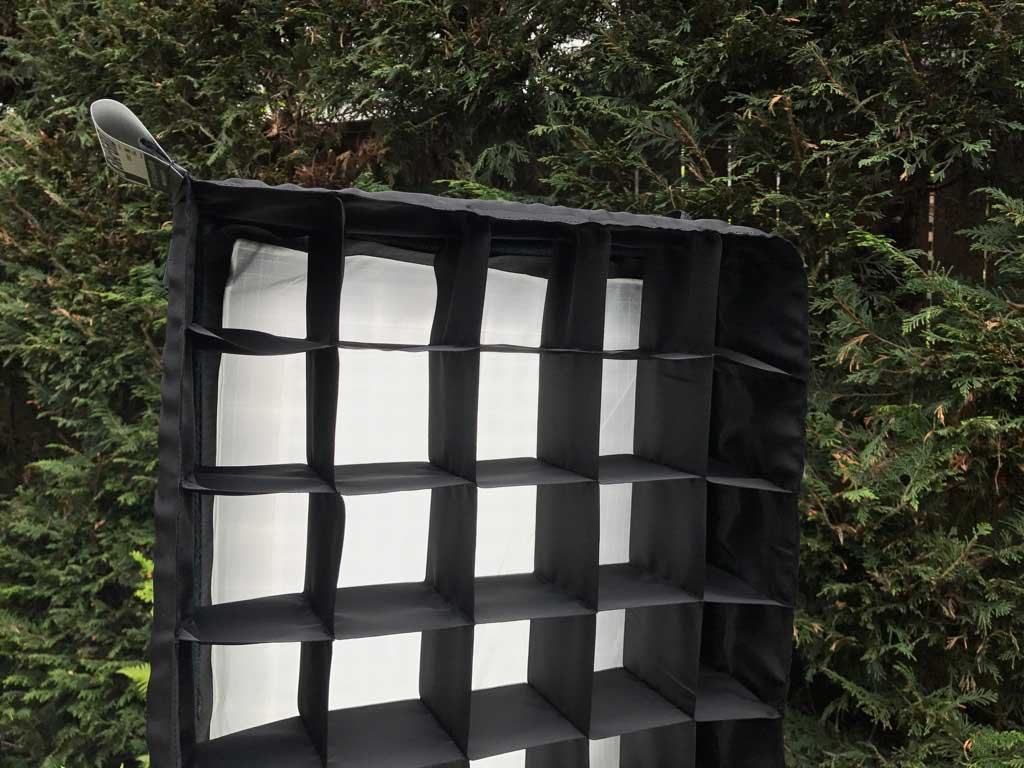
The SnapGrid arrives in a nice compact hand-sewn bag that’s made out of durable, water-shedding poly material. The grid itself, as it’s name implies, snaps open with what feels like blinds used as stiffeners under the black fabric.
It’s made of material that seems well suited to day-in, day-out use. The unit velcros easily onto the poly skirt of the LiteMat 1, making a super-compact and highly controlled light source. You can also attach it directly onto the LiteMat without diffusion or the poly skirt if you want maximum light intensity.
With the grid in place, the light is very well controlled. With the light on a stand at 5 feet above the ground, you don’t see any light hitting the ground in front of it until you get to about 5.5 feet. By comparison, even with the poly grid that ships standard with the LiteMat kits, you get some spill at less than one foot.
Minimal light loss
The thing with thick black grids, however, is that they are lossy. You lose some of the light intensity. The larger the grid, the more it sucks up the photons of light. And this is a pretty thick grid, about 3 1/4″ deep. So just how much light do you lose? I set my light meter to ISO 1000 at 24p, and did a little test:
LiteMat1 S2 with 1/4 diffusion at 10′: f/2.0.4; with poly grid: f/2.0. with SnapGrid: f/2.0.1.
So we’re looking about about a 1/3 stop light loss. Amazingly, the SnapGrid suffers slightly less light loss than the poly grid, at least in the center of the focus area. However, the focus area is much tighter, and the light intensity falls off quicker as you move away from the center.
Compact
As a bonus, the SnapGrid is small enough that you can fold it into one of the main compartments in the LiteMat1’s carrying case. And that’s great, because I am going to want to have it with me everywhere I go. The SnapGrid really allows this light to reach its true potential as a location lighting power tool.
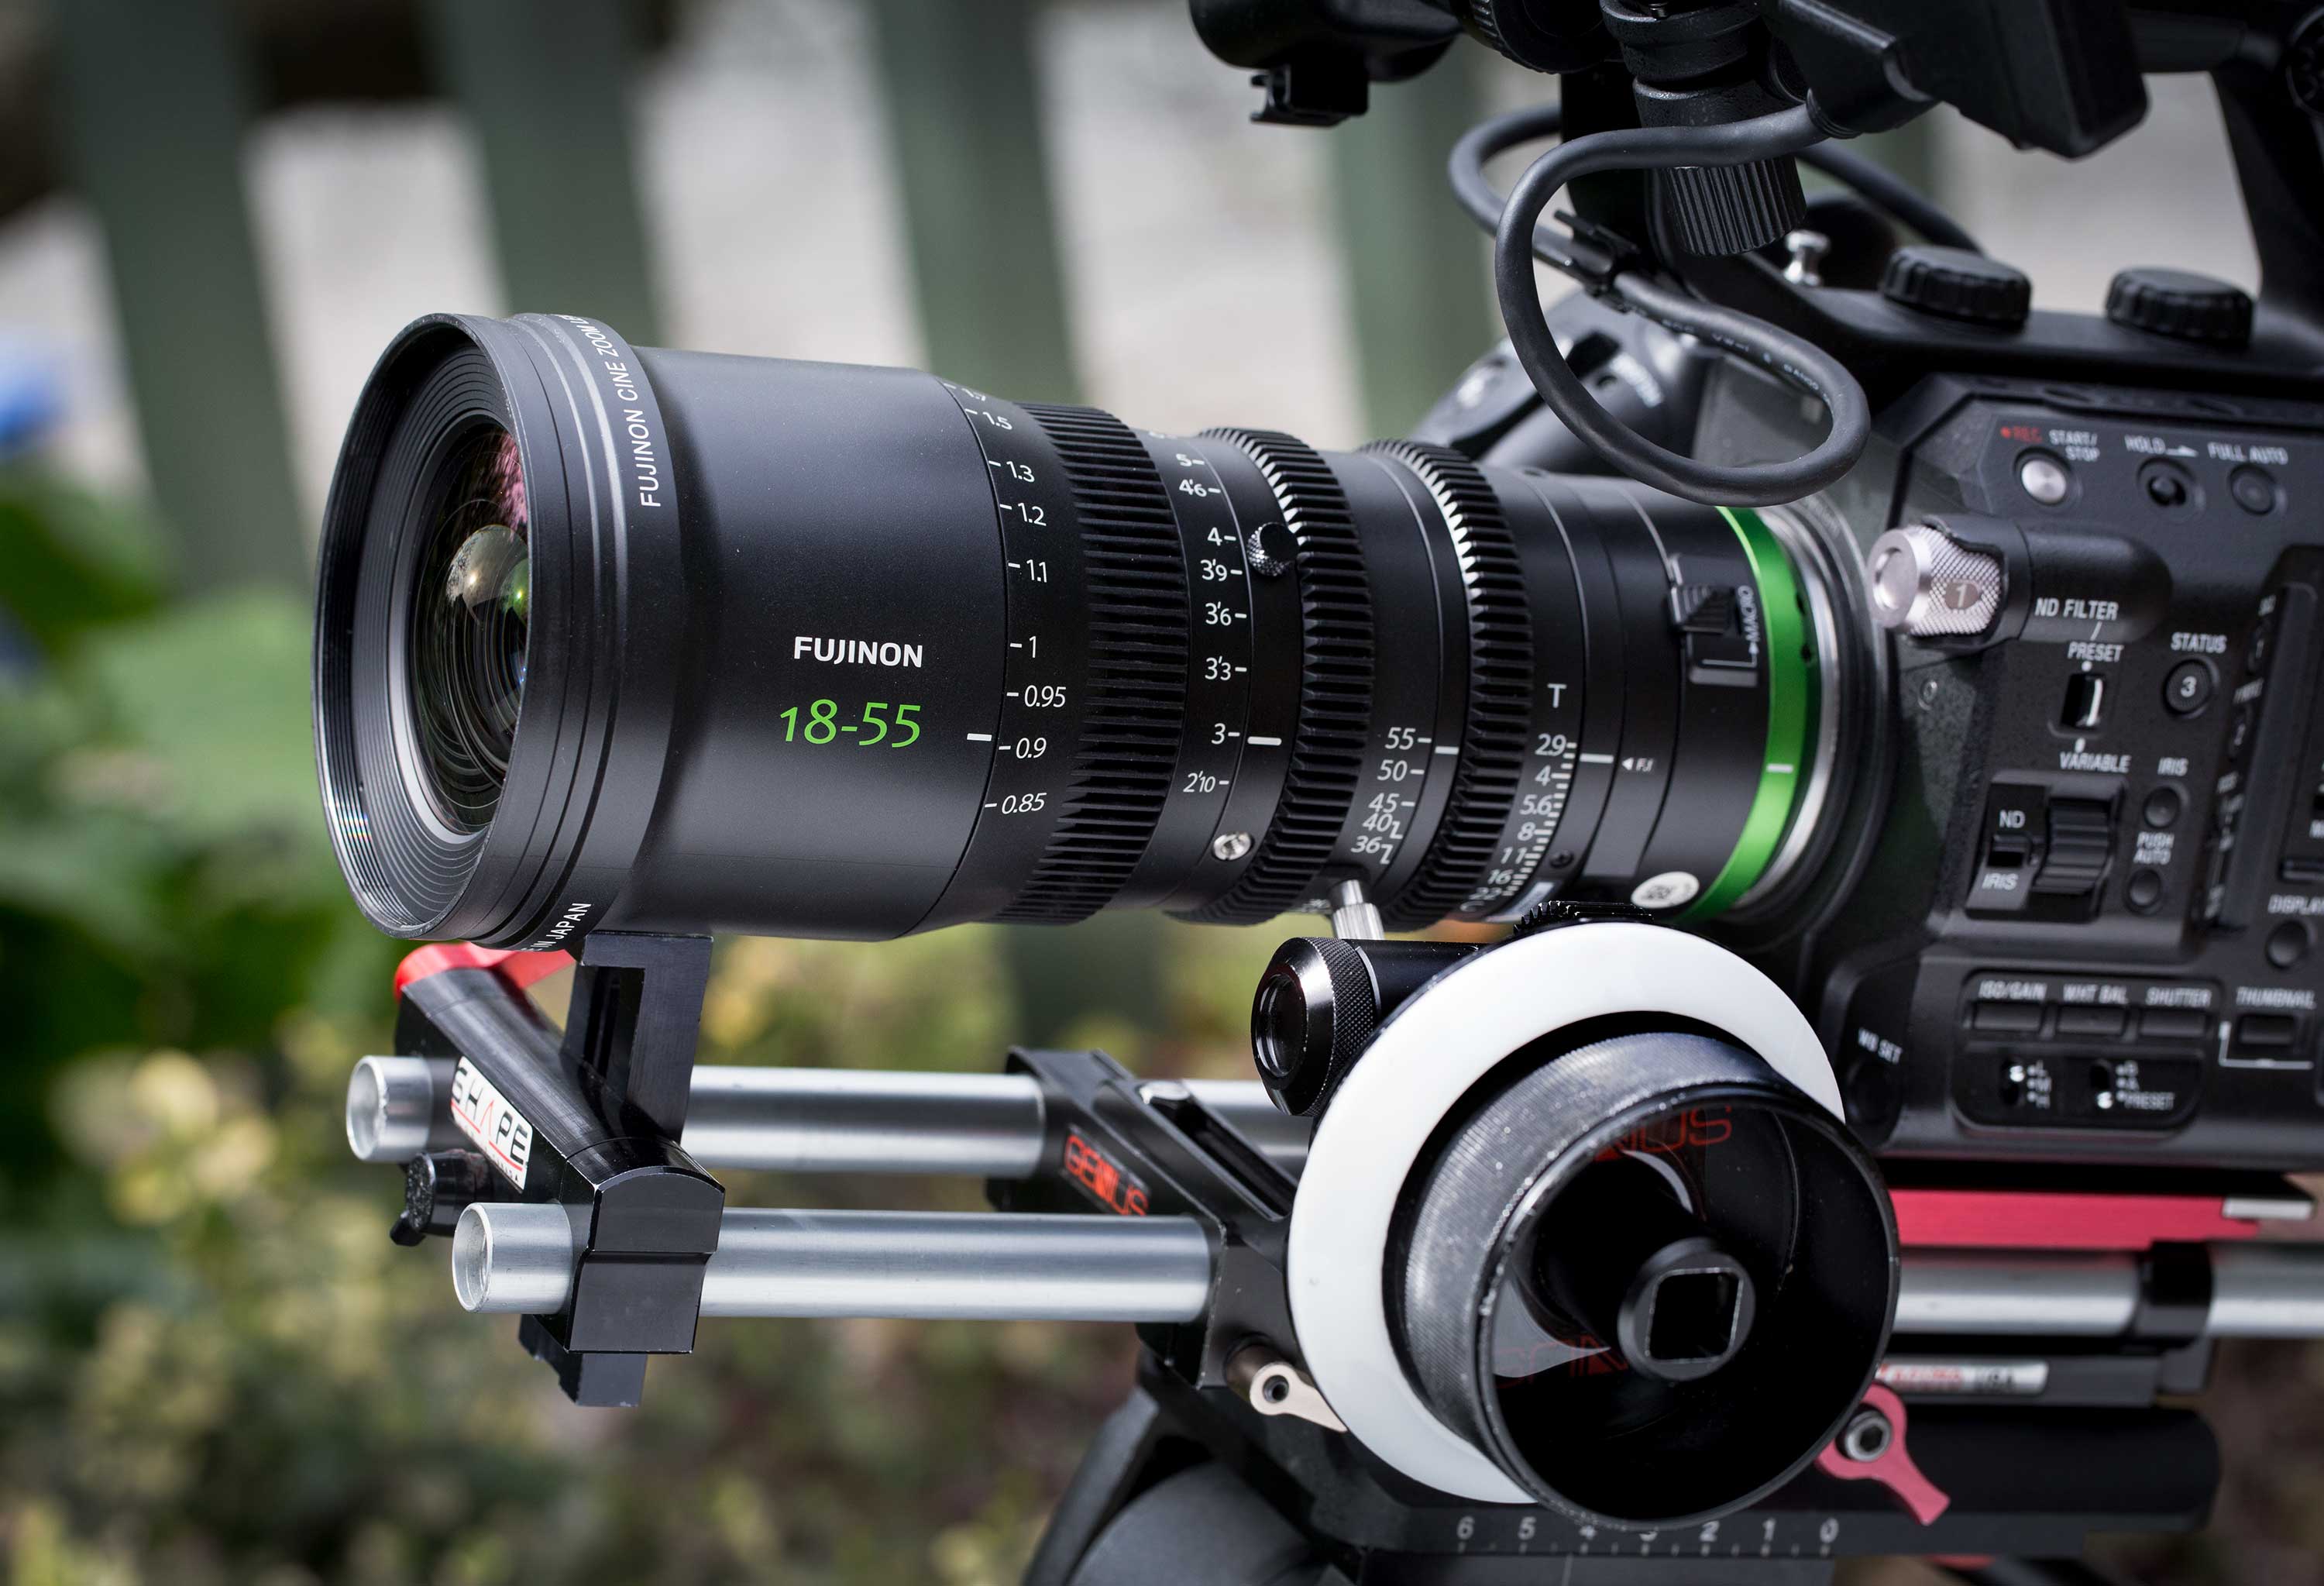
The Fujinon MK 18-55 is the first legit cinema lens that this documentary shooter has a prayer of owning. But $3,700 is still a lot of money. Is it worth it? To find out, I was among the very first people to rent one.
Fujinon MK 18-55 vs Canon EFS 17-55 with Metabones adapter.
First off, it’s much more compact and lightweight than the photos I’ve seen imply. By way of comparison, my go-to lens on the Sony FS5 has until now been the EF-S 17-55mm f/2.8 IS USM Lens with T Smart Adapter Mark IV. Check out the photo on the right: this extraordinary lens from Fujinon is about the same weight, and only slightly longer.
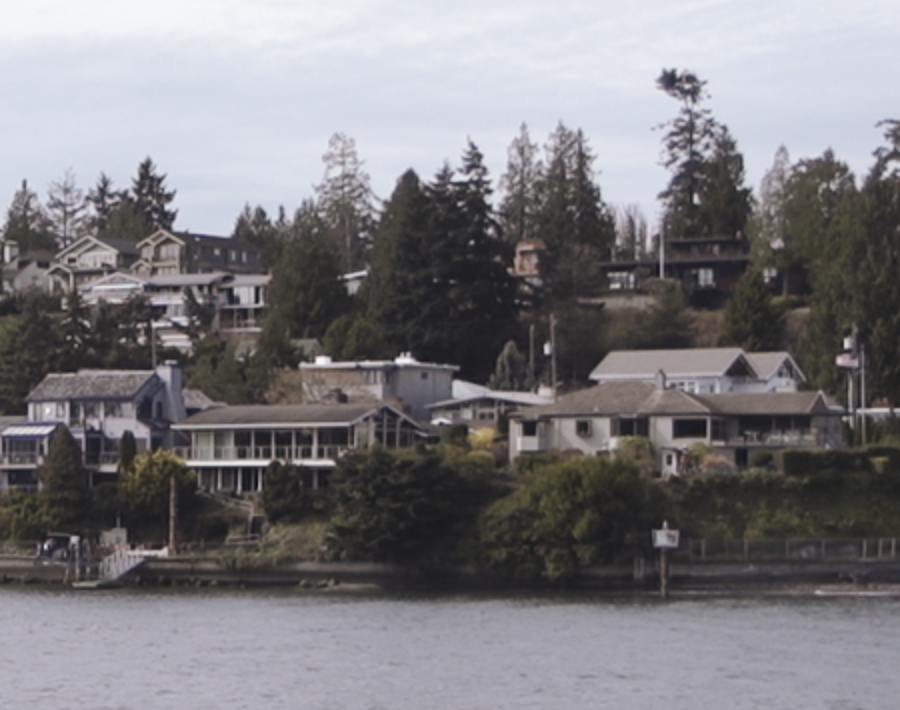
The Fujinon MK 18-55 is also sharper than my Canon 17-55. But not dramatically sharper – I had to blow the image up 200 percent to perceive the difference. See below.
What about barrel distortion? The difference is slight, but the Canon EFS 17-55, which has plenty of barrel distortion on the wide end, fares better than the Fujinon MK 18-55. I do wish that the MK didn’t bend vertical lines (i.e., walls) the way it does shooting on the 18mm end. And there’s really no way to correct that in post, like you can automatically do when shooting with the Canon on a C100 with lens profile correction enabled, for example.
Warmer and sharper
Compared to Canon EFS 17-55, this lens is warmer, sharper, and a little wider. See for yourself:
Fujinon MK 18-55 at 18mm (Sony FS5, Cinegama 1)
Canon EFS 17-55 at 17mm (Sony FS5, Cinegama 1)
In the frame above, the Fujinon 18-55 reveals itself to be significantly warmer glass than the Canon.
To see the difference in sharpness, you need to zoom in to 200 percent:
Fujinon 18-55 @200 percent (uncorrected)
Canon EFS 17-55mm @200 percent (uncorrected)
Smooth operator
This lens makes me want to pull focus all day. I was really impressed by how easy it is to get extremely precise pulls. The heft of the rotating elements, all three of which are geared, is just right for hitting repeatable, consistent marks. It would be a joy to use this lens with a wireless focus puller.
As a rule, I don’t use zooming as shooting technique. But after rocking this lens, I’m beginning to wonder: why not? With the Fujinon MK 18-55, it’s hard not to feel like I’ve just added a new word to your vocabulary. “Parfocal.” Mmmmmm. Sexy.
While it is still quicker to digitally punch in to check focus, with this lens it’s possible to crash zoom in, grab focus, and back out to your shot. Where that’s truly useful for a documentary shooter is when you’re rolling on something, and want to cut in-camera. Instead of having to refocus every time you zoom in or out, now you just keep rolling and watch your keeper count go up, up, up.
Look Ma, No Breathing!
This is the first lens I’ve ever used that doesn’t show any noticeable breathing. Know what I’m talking about? Narrative-style focus pulls, coming soon to a documentary screen near you. To see how lovely this is, here’s a short clip comparing the Fujinon MK 18-55 to the heavy breathing Canon EFS 17-55:
BUT: There’s NO IS
As you probably noticed in that clip above, you have to be really careful when pulling focus not to jar the camera. With no IS, any shaking or vibration translates directly into your shot. Small amounts of this can be removed in post, but for many situations, such as shooting handheld, there’s no substitute for IS. For example, I was working on a doc a couple weeks ago where I found myself shooting on a bridge, with lots of car vibration. For those situations, this will not be your lens. Let me repeat that. If you want to handhold this lens, forget about it. If you’re going from shooting an IS lens to this, you are going to notice your footage has one hell of a case of the jitters.
But for precision situations where you’re going on sicks, or any other controlled motion situation, you will most definitely want this to be your lens.
Mind the gap
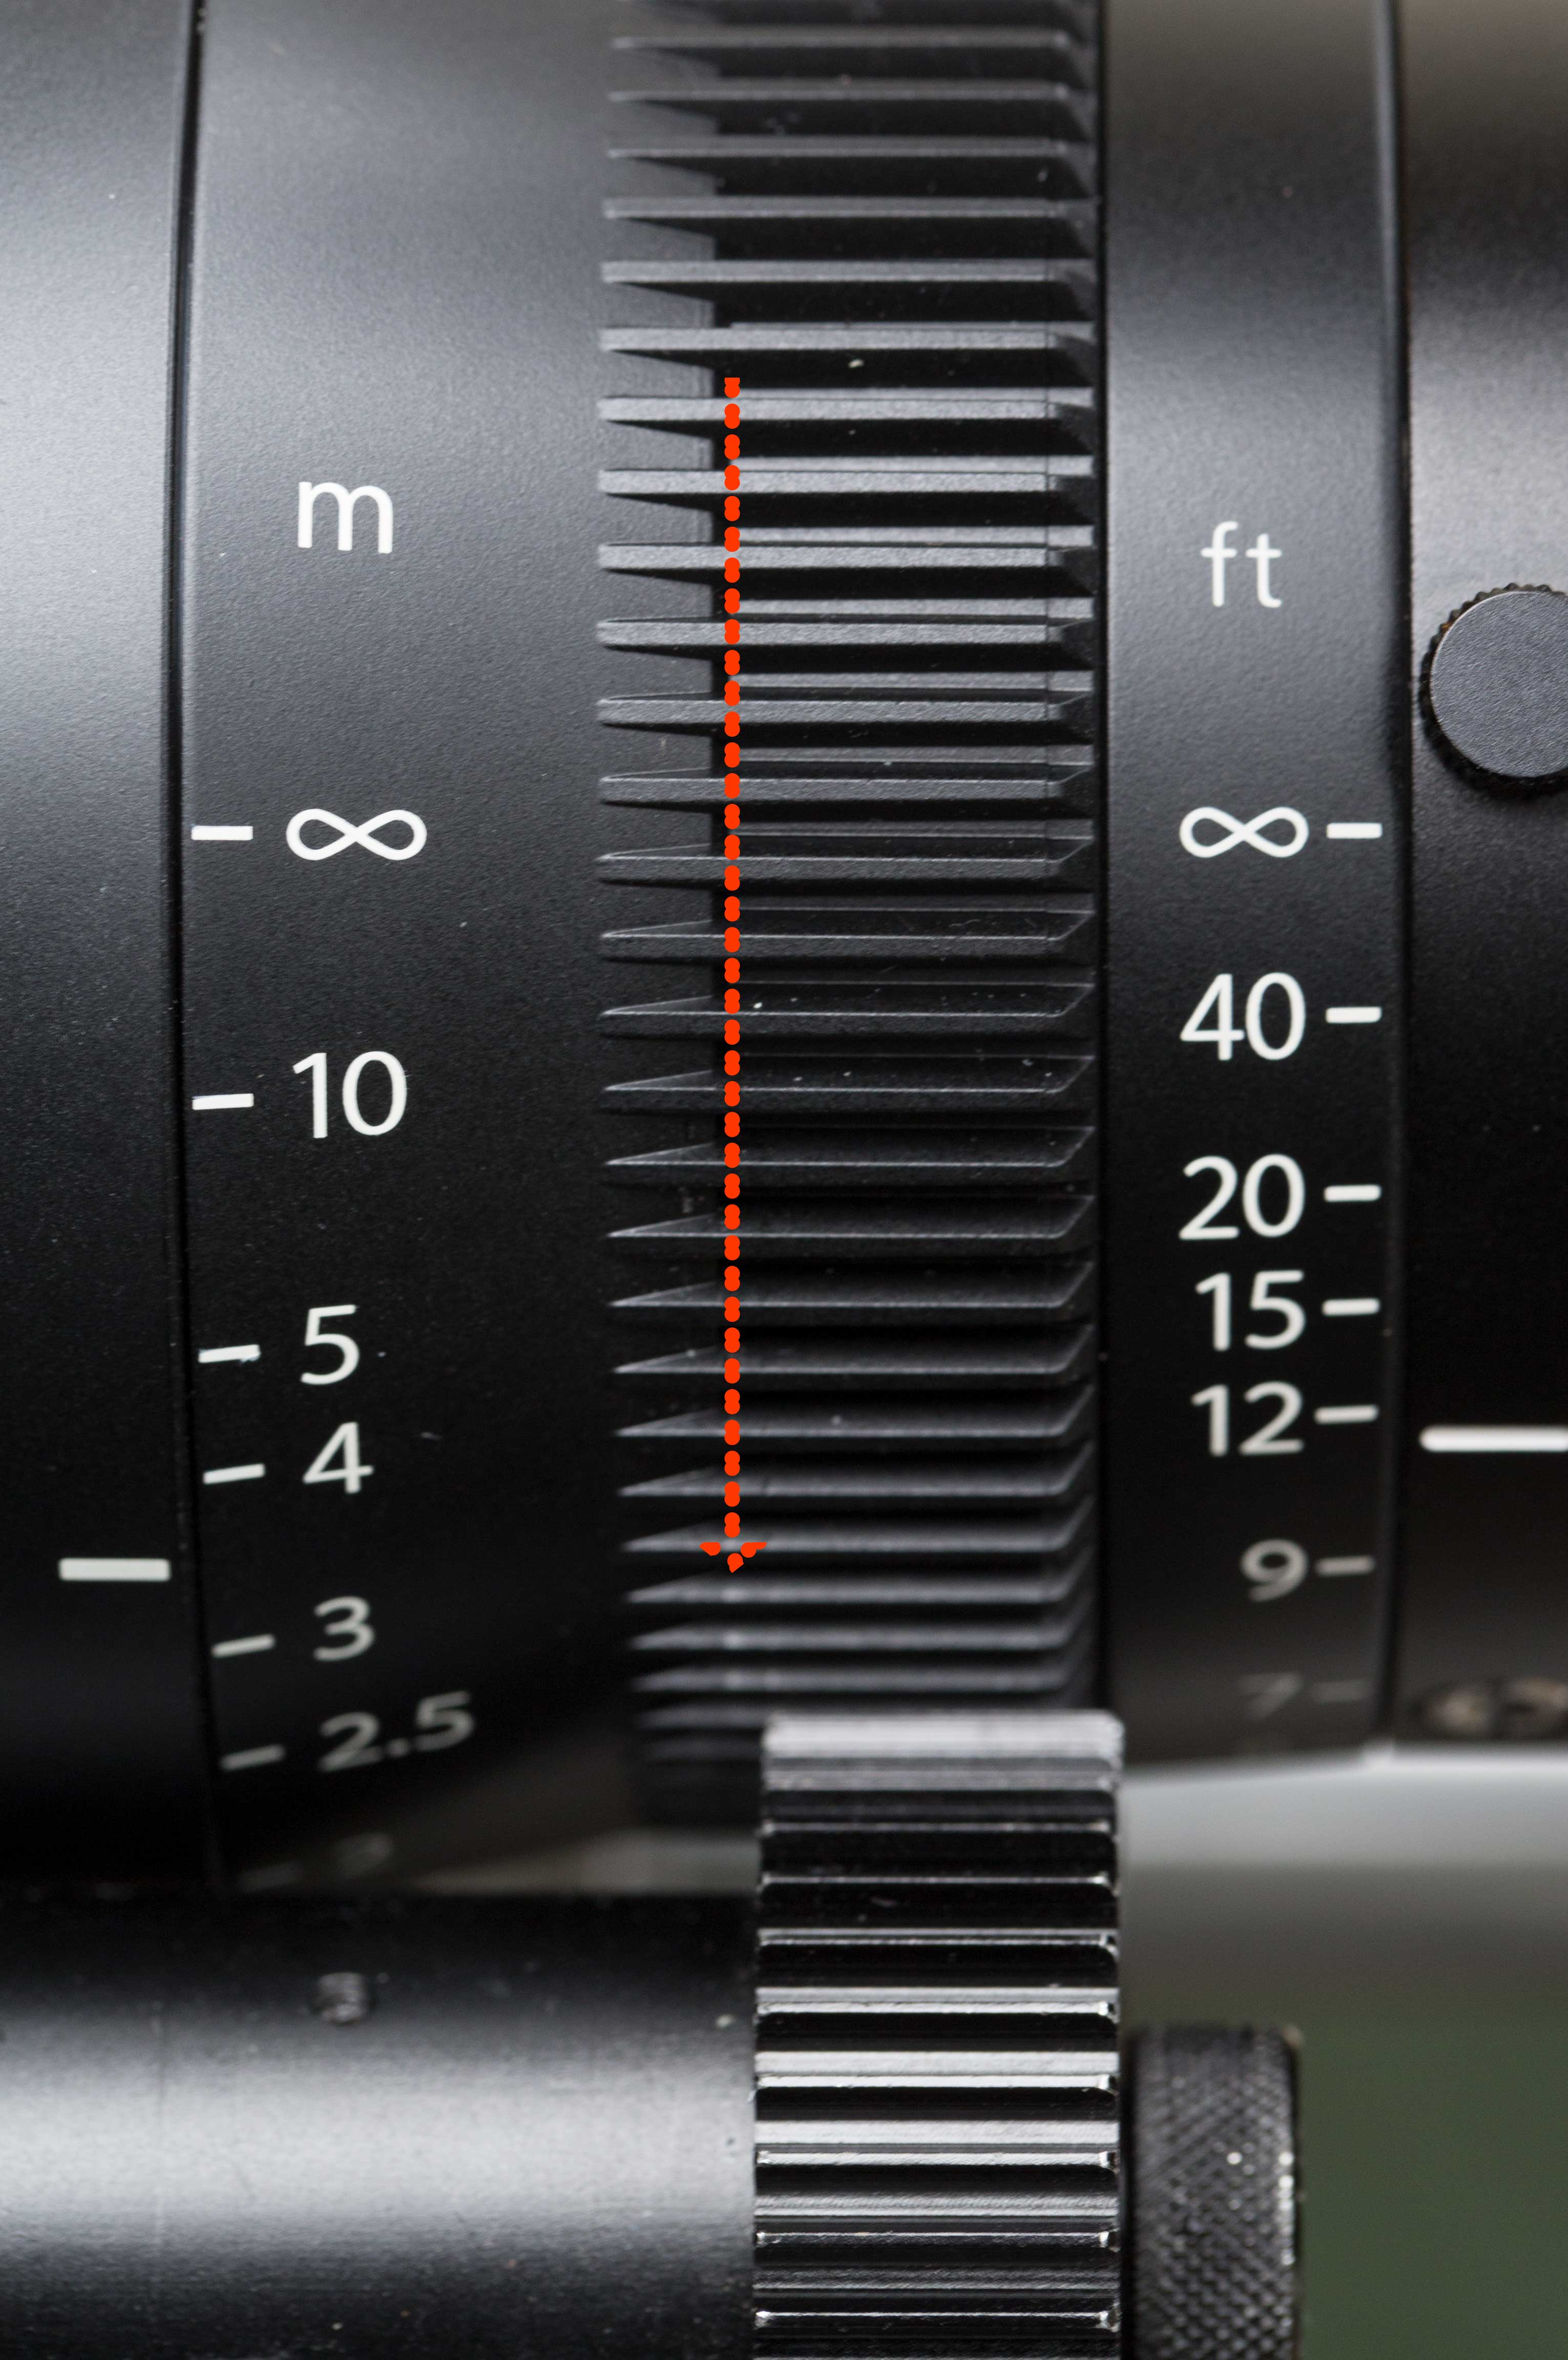
You have to pay attention to the focus gears when pairing this lens with a focus puller. The Fujinon MK 18-55 appears on first glance to have a very wide gear width in which to seat the focus puller, but actually, it isn’t that wide – the geared area slopes down toward the front, causing your gears to not mesh correctly if mounted too far forward. Be sure to place your gears behind the red line:
Correctly mounted focus puller, above. It’s easy to mistakenly mount focus puller too far forward.
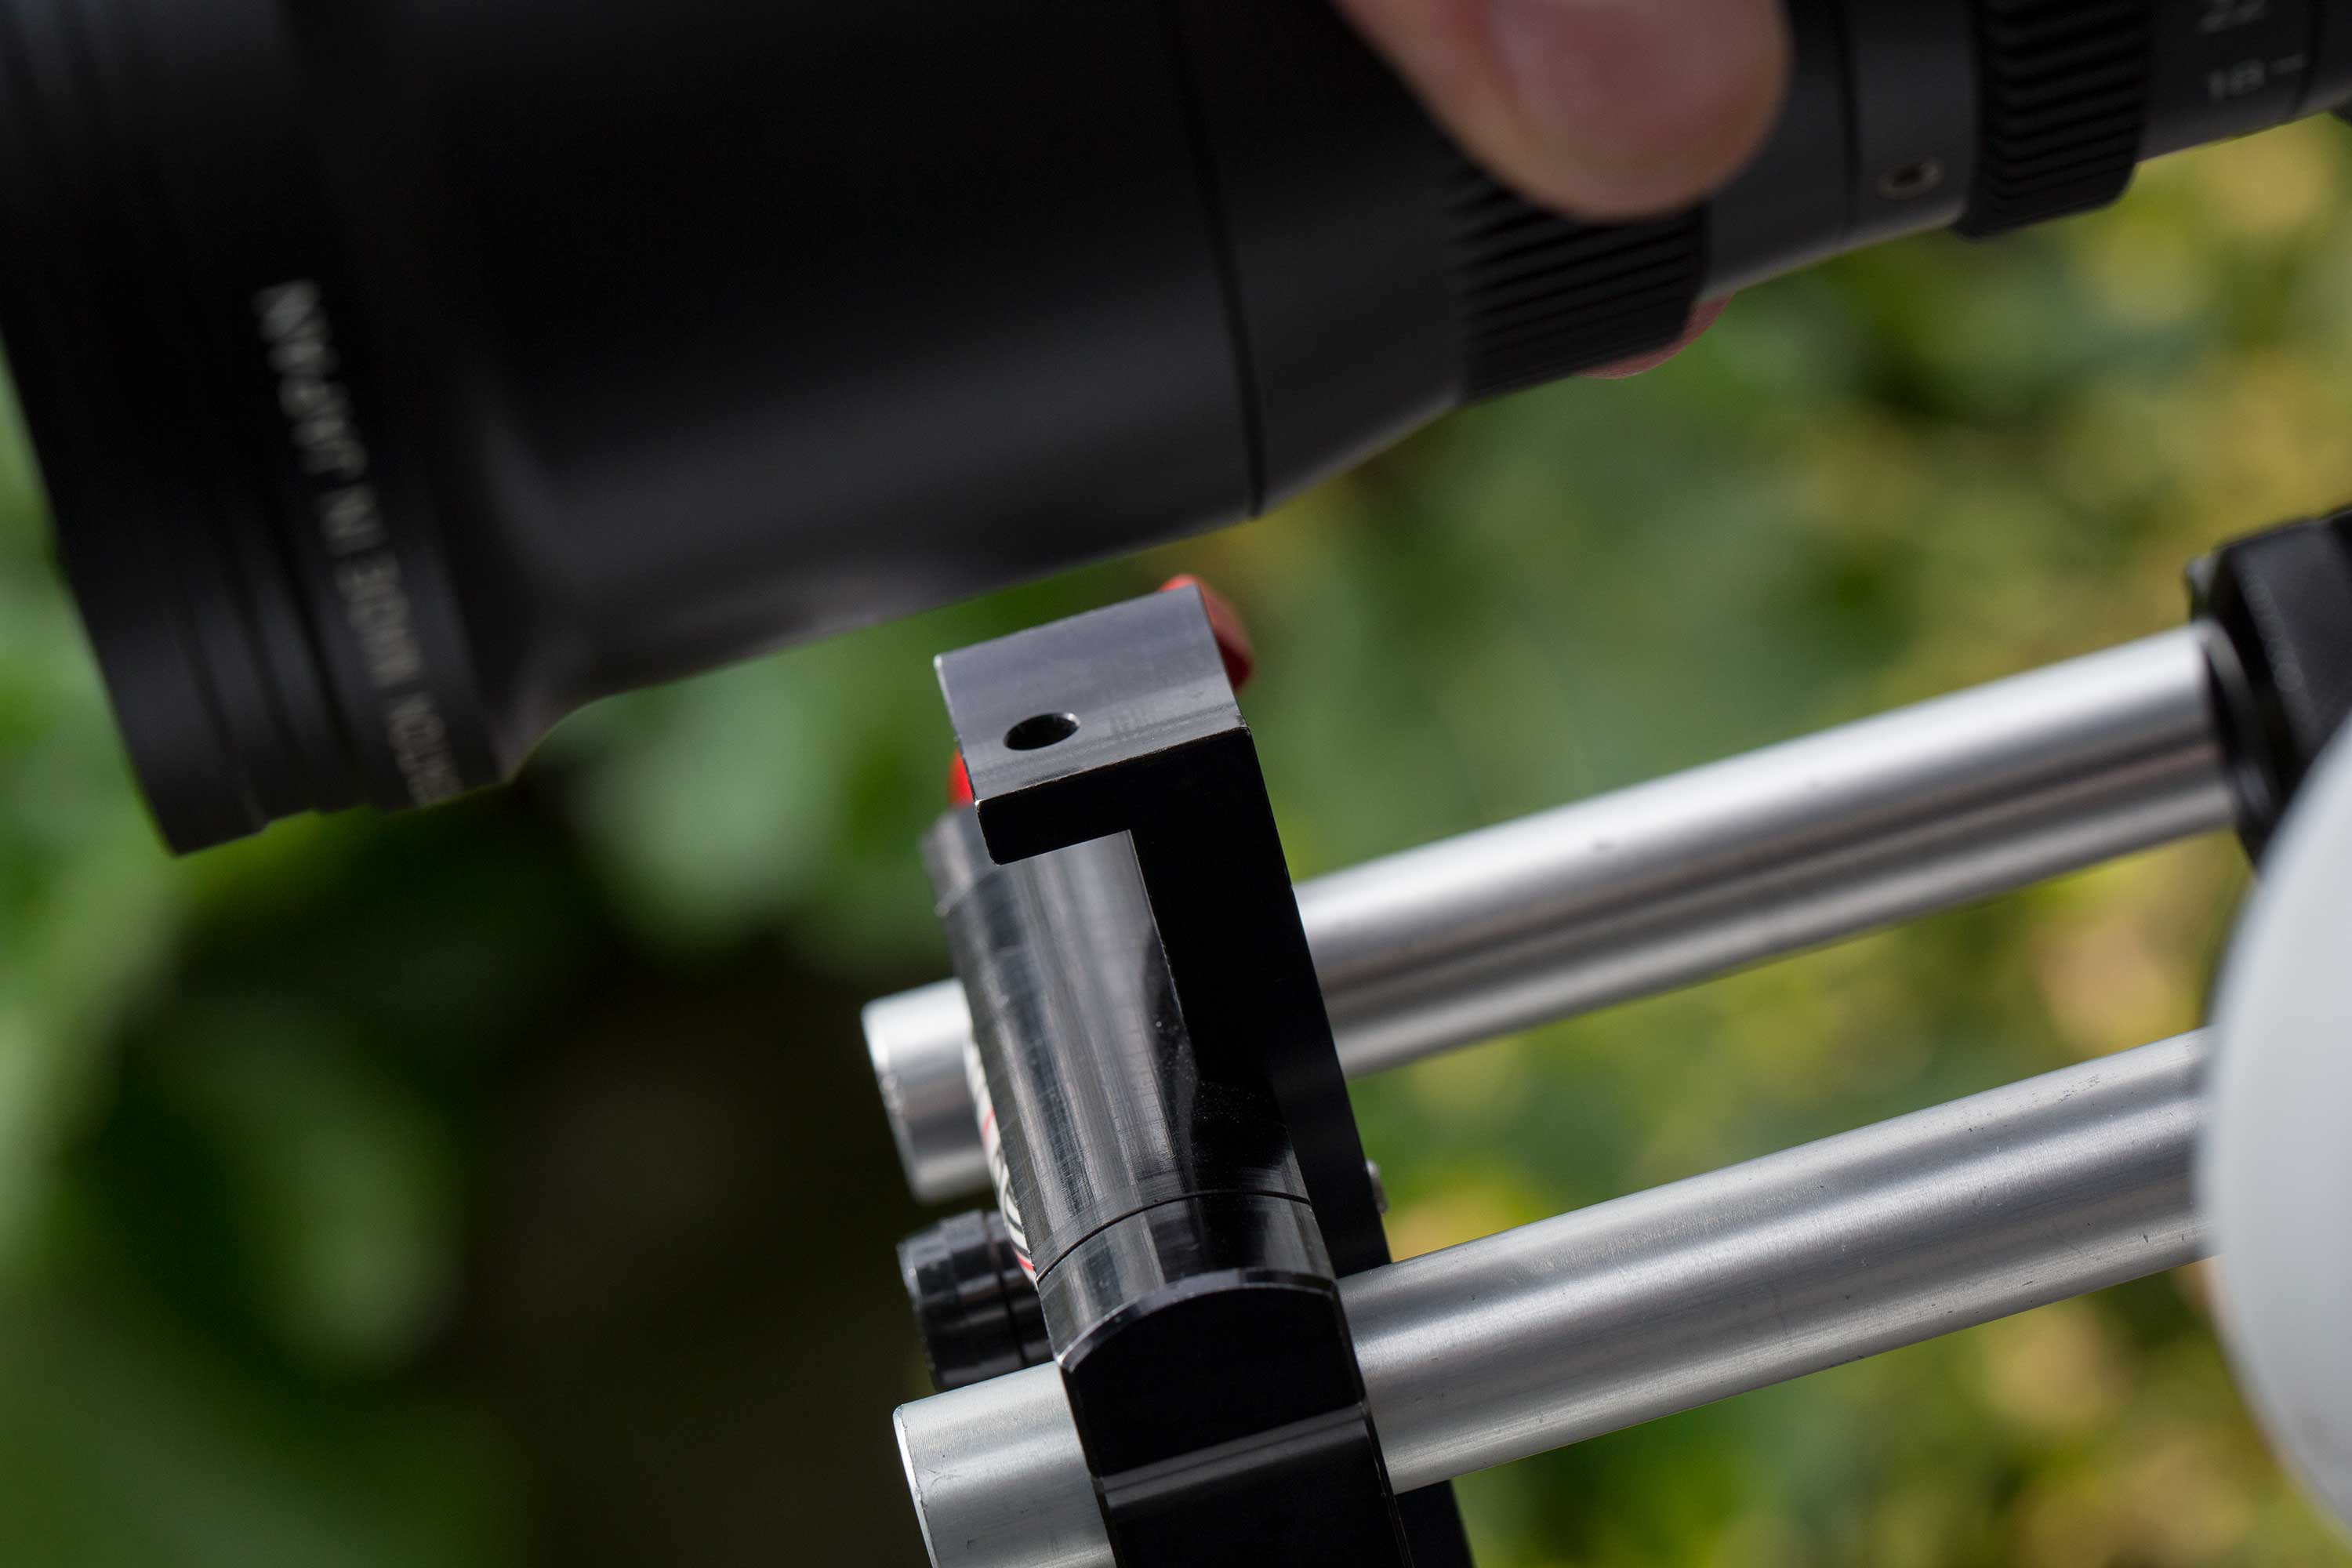
Best lens support: Shape
This lens is long enough that you really should use a lens support. It’s not absolutely essential, but for vibration-free focus pulls, I found I needed it.
Shape lens support pairs perfectly with MK 18-55
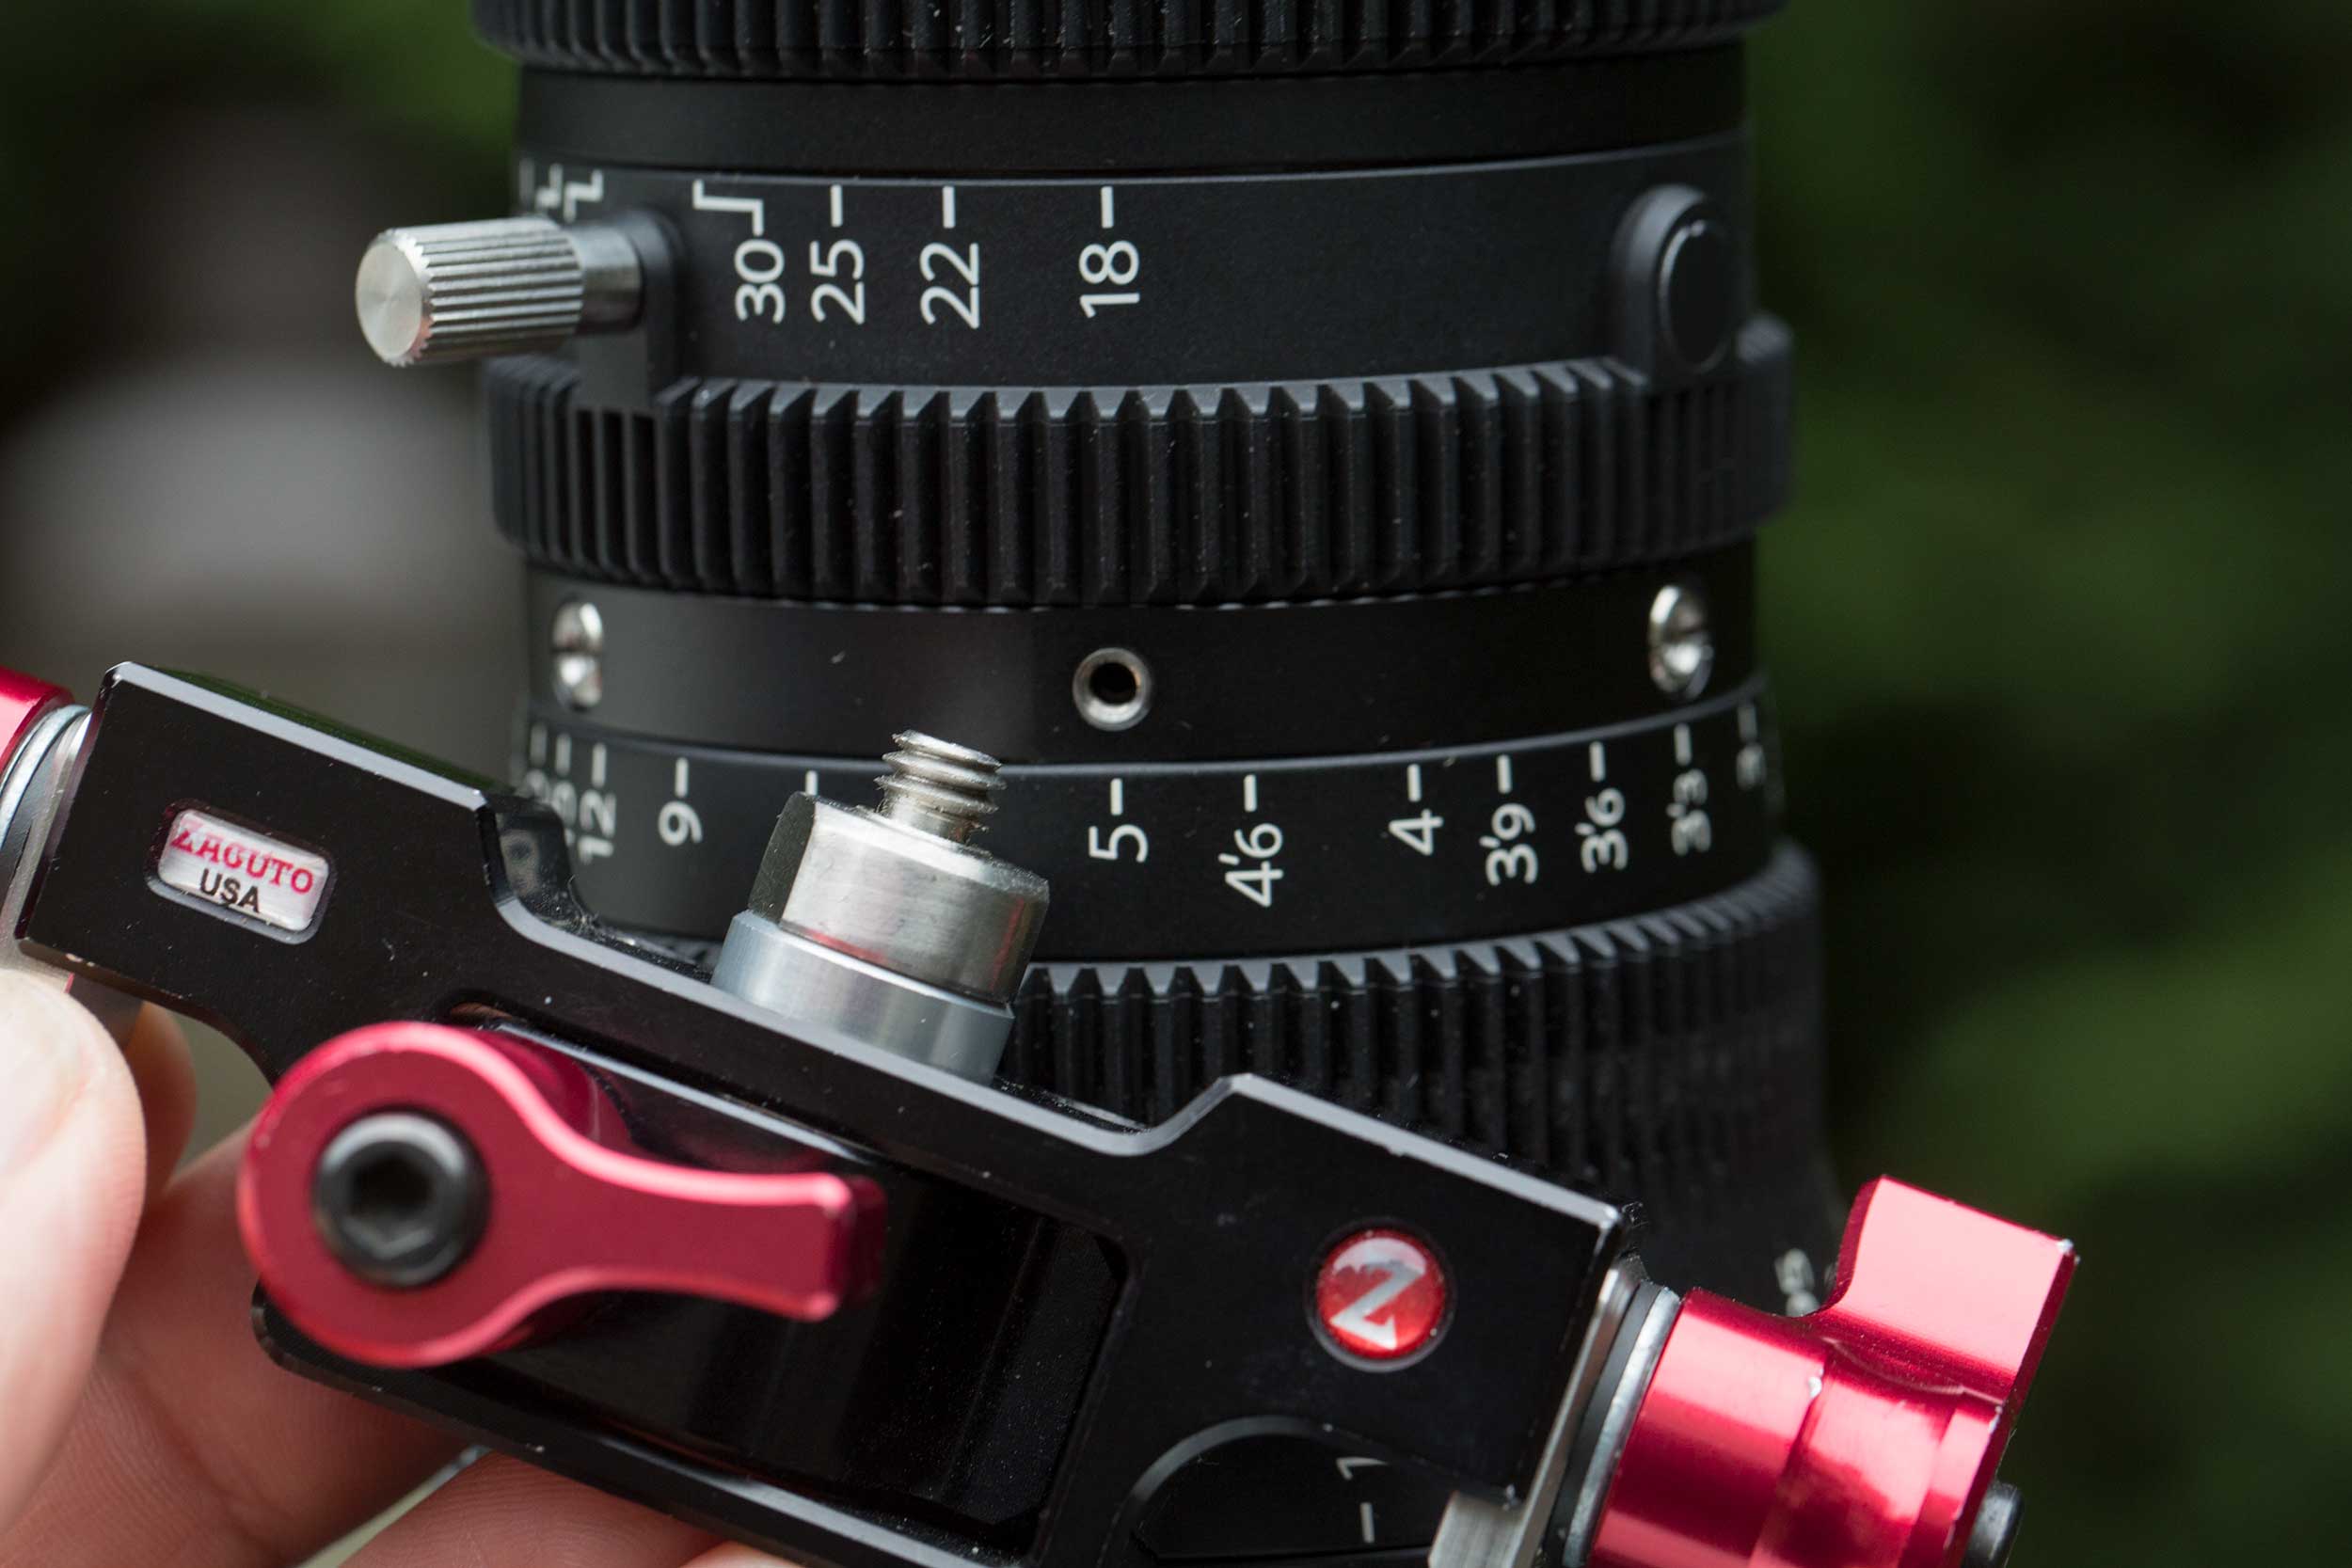
I tested the lens with two supports, Zacuto 1/4 20″ Lens Support and Shape Lens Support. The winner, hands down, for documentary shooting was the Shape support. Not only is it far more affordable than the Zacuto, but it also allows faster lens changes.
The Shape lens support simply cradles the lens perfectly. The Zacuto requires screwing in a locking support rod, and that will slow down your lens changes. Speaking of that, this lens will really come into its own when it’s sister, the MK 50-135, is released this summer. That will give you a range that will cover most documentary situations with just two lenses. So you’ll be able to spend more time shooting and less time swapping glass.
It’s worth noting that the Fujinon MK 18-55 does not have a 1/4 20″ support mount hole. It’s mount screw is smaller:
The Fujinon MK 18-55 does not have a 1/4 20″ mounting point, so if you want to attach a support you’ll have to use the adapters that ship with the lens (but not with the rental).
Lensrentals.com did not include the adapter in their package, so be sure to specify that you want the adapter if you plan on supporting this lens with a screw-in support.
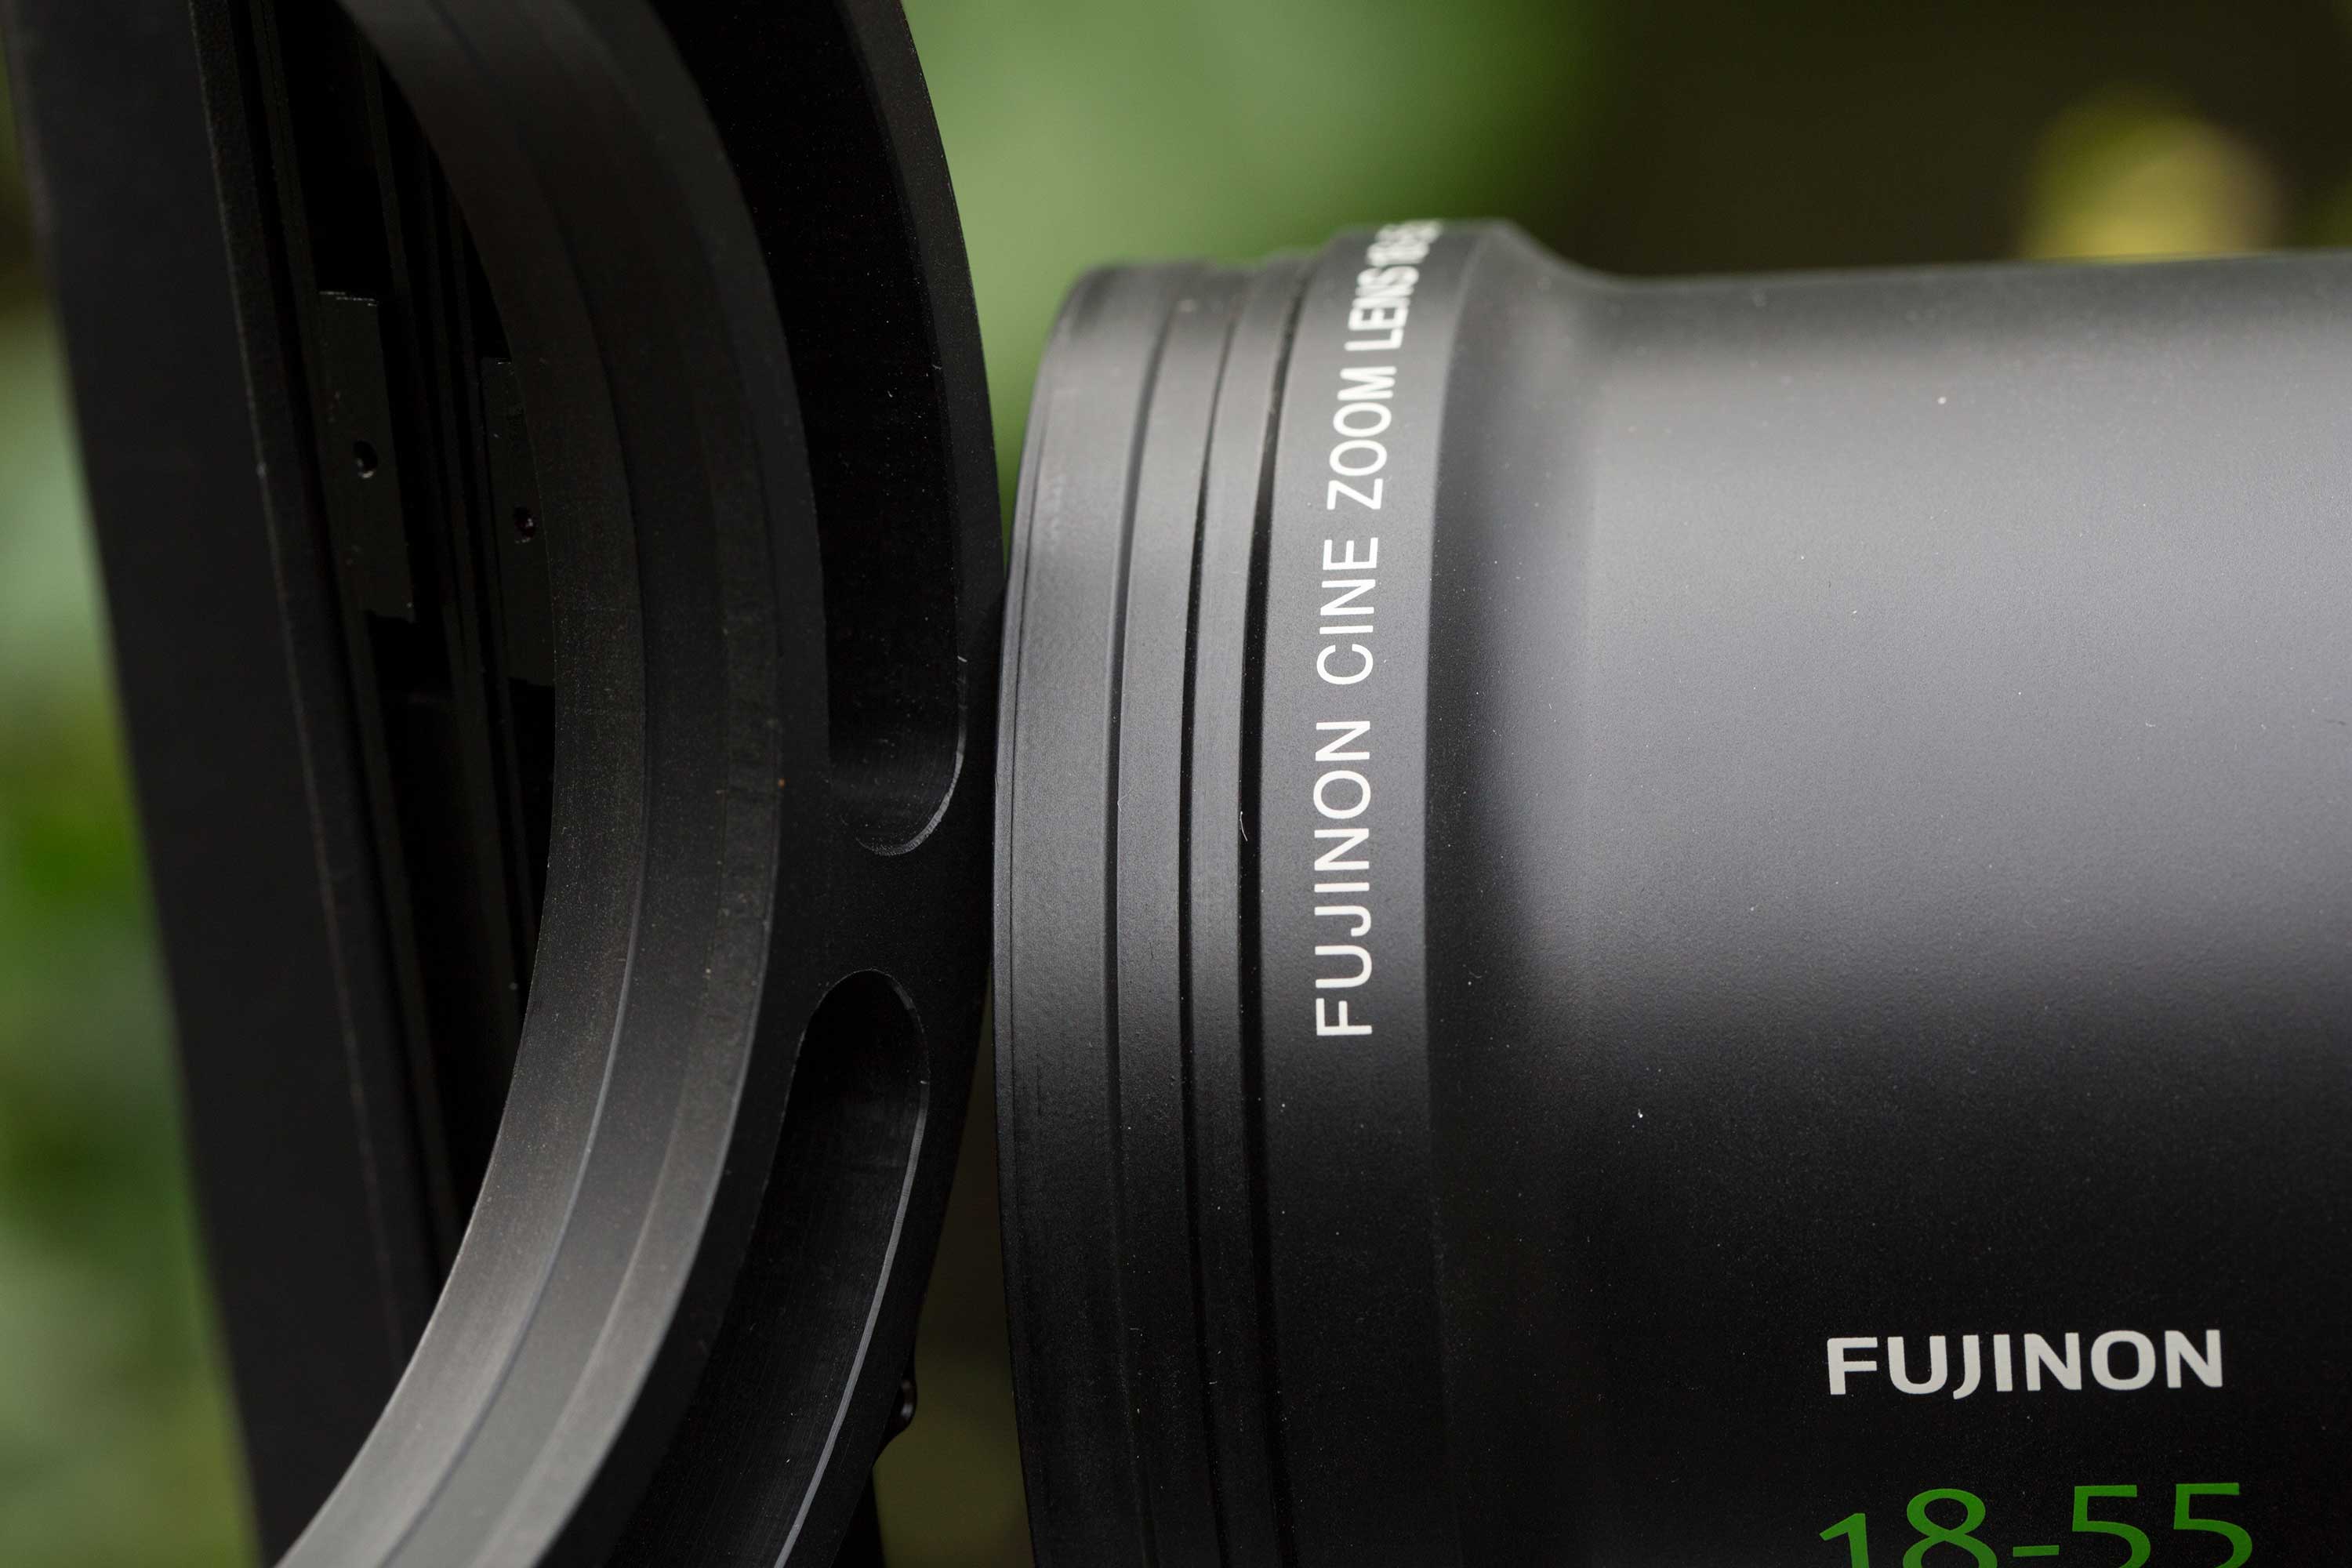
Mattebox Mate
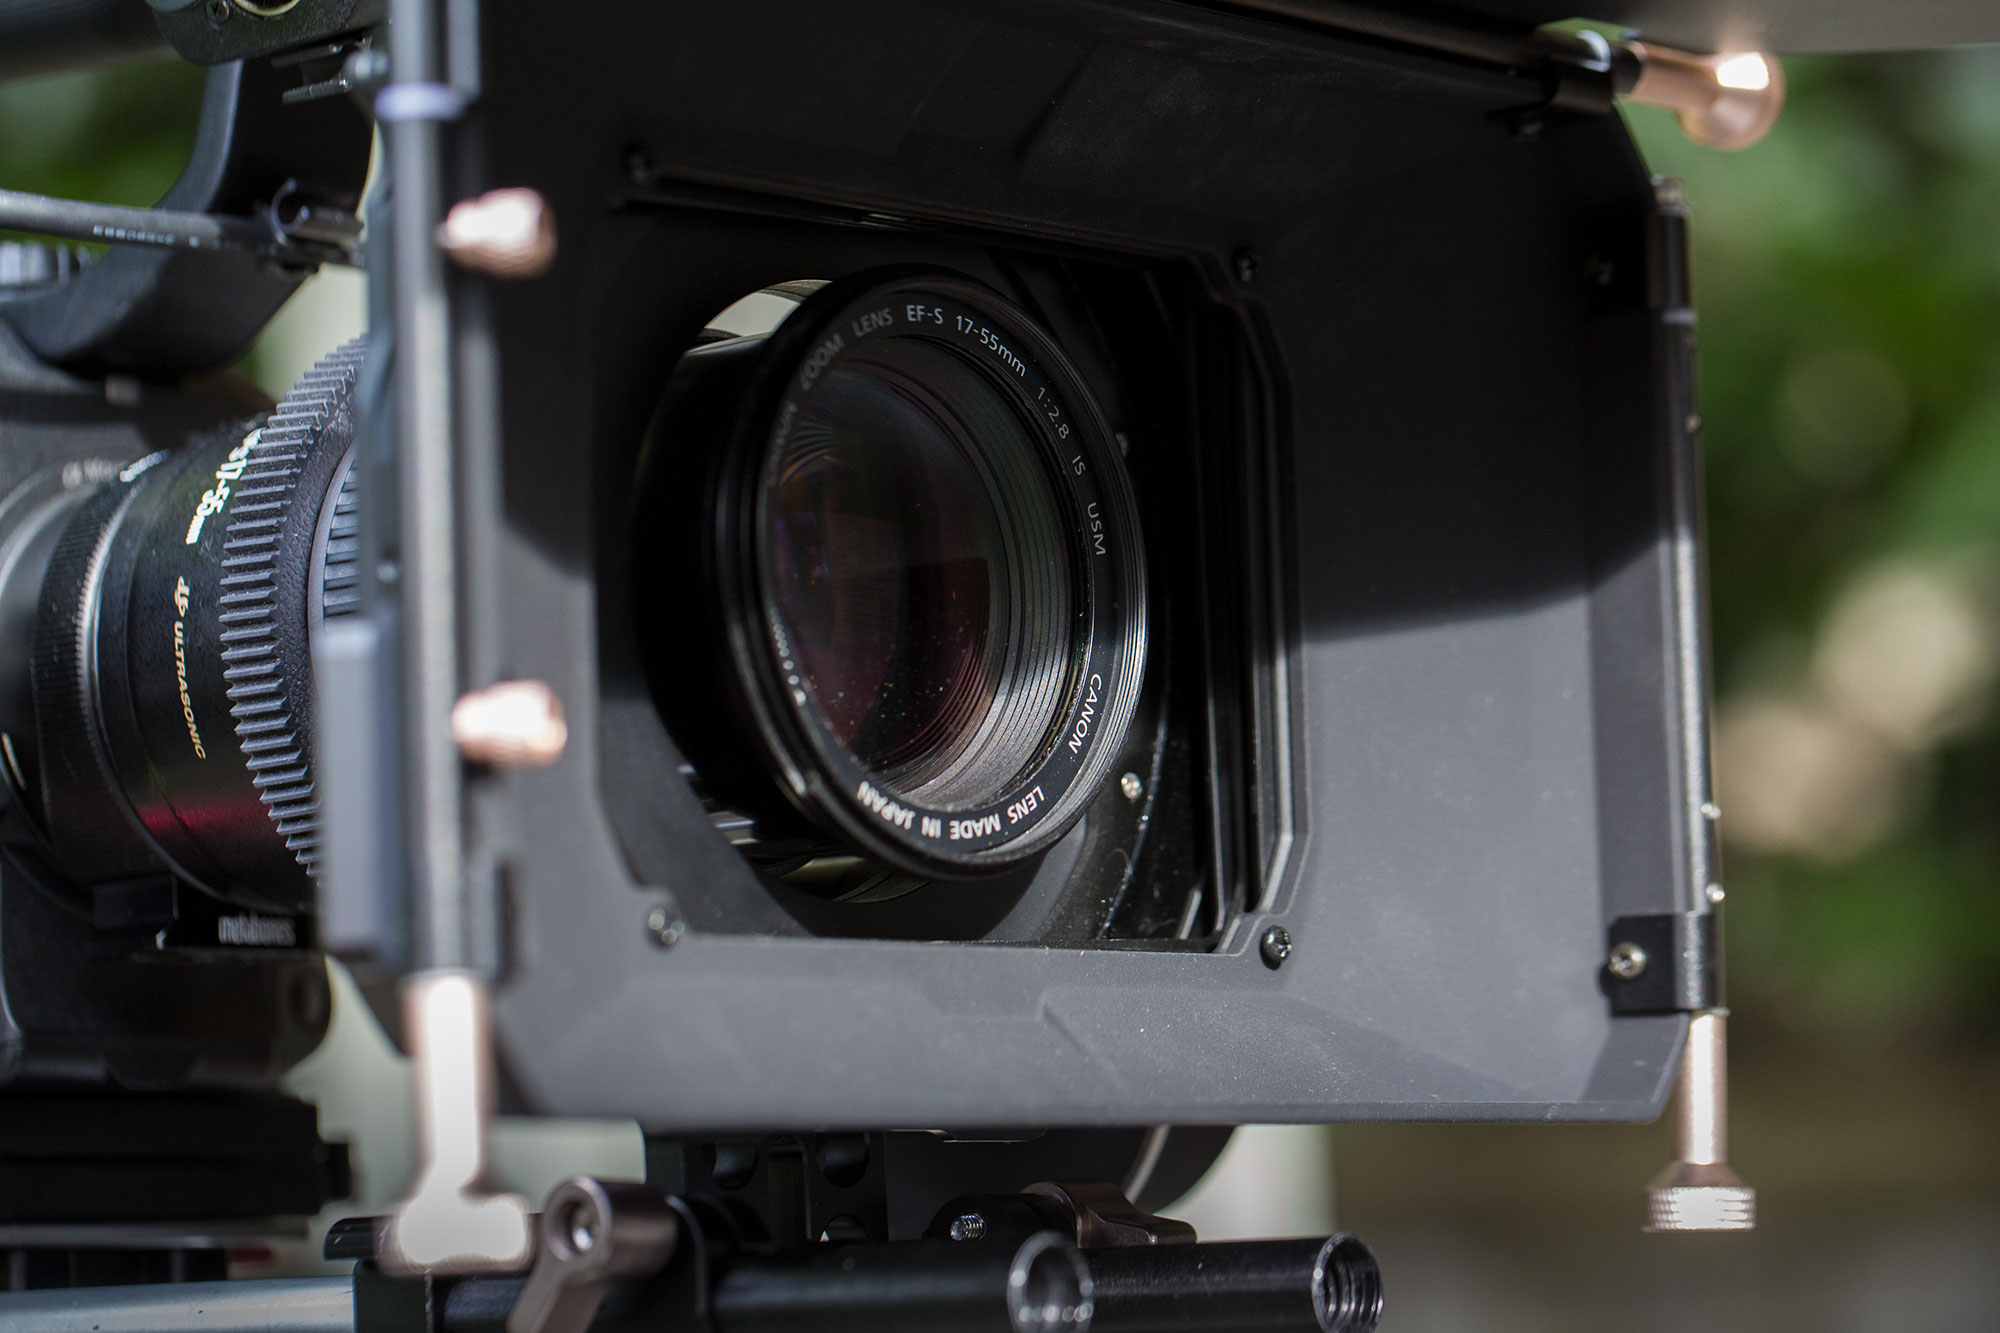
Using still lenses with a matte box is a pain in the ass because every lens diameter is different. But the MK 18-55 is designed to mate seamlessly with a matte box in seconds.
How easy is it to swap the lens in and out with a matte box? I tried it out with my Genus Production Matte Box, and I was delighted to discover that the GPMB default lens fitting pairs perfectly with the Fujinon HK 18-88. The box simply sides over the front element of the lens, and screws tight to mate. Like so:
Genus Production Mattebox pairs perfectly with Fujinon MK 18-55.
The Genus Production Mattebox’s default 85mm clamp is perfect to mount it securely to the lens.
I found the best way to use the Production Matte Box was to remove the rail block mount altogether, and simply clamp the matte box to the lens. It’s overall lighter that way, and the Fujinon MK 18-55 lens is designed to accommodate the weight of a matte box without damaging the lens in any way. Contrast that will many still lenses, like my Zeiss CZ 50mm f/1.7, which fell apart under the weight of my Genus Matte Box Lite, forcing me to use them only with rail-mounted boxes.
How to adjust the backfocus
The focus can change depending on the temperature and humidity with this precision lens, so it’s important to set back focus on the Fujinon MK 18-55 correctly before a big shoot. Here’s how it’s done.
First, grab a tape measure and focus chart, if you have one. Otherwise just focus on something with fine detail.
Set up on sticks, and measure 10 feet to your subject.
Set iris wide open at 2.9.
Zoom to 55mm. Focus.
Zoom to 18mm. Release backfocus screw, and rotate it (not the focus barrel) until you get sharpest image.
Repeat 3-4 until your lens is perfectly focused at both 55 and 18mm.
Lock the backfocus screw.
Another neat trick this lens does is maintain the same light level throughout the entire zoom range. When I zoom from wide to tight on my Canon EFS 17-55, it gets noticeably darker on the long end. But not the Fujinon – it’s precisely the same brightness at both ends of the zoom.
“Demanding.” That’s a word I’d use to describe this lens. It’s not forgiving like IS glass. But once you go there…
“Tesla.” That’s another word that wasn’t in my vocabulary until a few years ago. I don’t own one (yet). But I imagine owning this lens could make me feel a lot like someone who does.
I just returned from a week on the road, shooting 2-person, 2-camera interviews for a documentary film that we hope will shine a light on an unsolved murder. Although I can’t talk about the content yet, I can talk about our lighting package. I chose Kino Flo Celebs, and I have some insights to share about these industry workhorses.
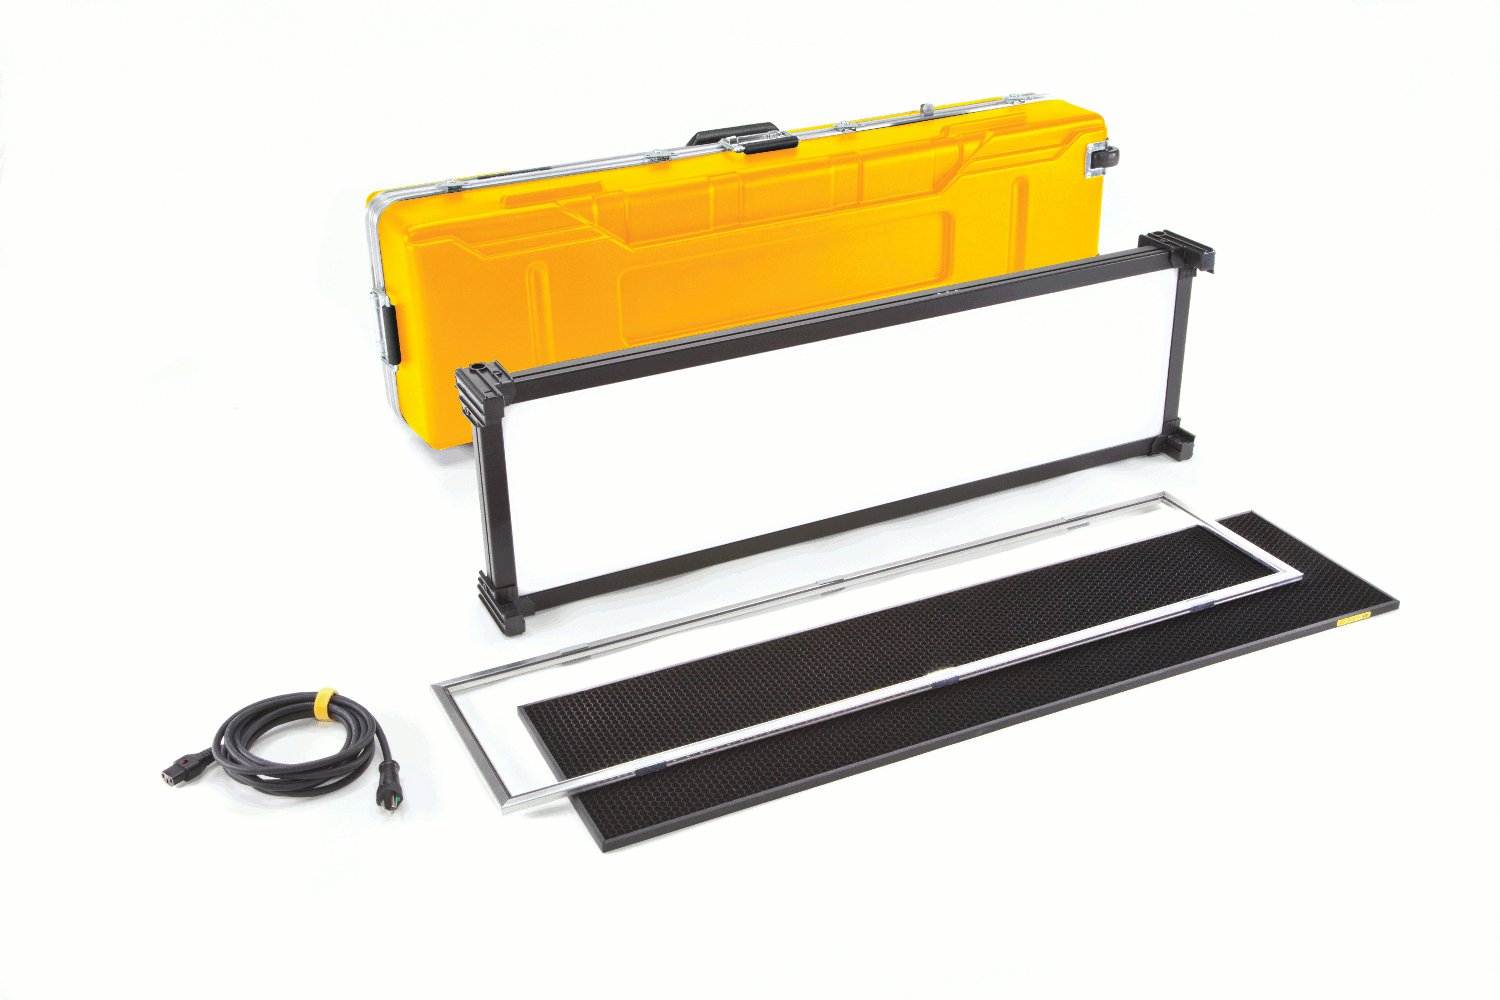
Kino Flo Celeb 401 kit
Kino Flo Celeb 201 kit
For this documentary production, we needed to light both the interviewer and the interviewee. So the job required something a little bigger than my usual kit. The shoot location was in a major US city that I would be flying to. And with extra baggage fees, it became clear that it would be more cost effective to rent locally than it would be to travel with my own lights.
Kino Flo Celebs rental package
Rent it or pack it?
On American Airlines, your first piece of checked luggage is $25. The second is $35. Each additional bag jumps to $125 each. I already needed two checked bags for my camera and tripod. Therefore, to bring my own lighting kit would have required two additional checked bags, totaling $600 round trip. With fees like that, it makes more sense to rent locally – and skip the hassle of traveling with all those cases.
Here’s what I specified in our package, which came to $942 for a 5-day rental:
4 c-stands (2 for 201s, 1 for my Dedo DLED 7 which I packed, and 1 for sound guy)
1 combo stand (for 401, which requires a Junior receiver)
1 25′ stinger (with power strip for distribution)
4 15lb sand bags (for c-stands)
1 25lb sand bag (for combo stand)
6 A-clamps
2 furniture pads (for blocking light if needed)
To drive all this around, we rented a Yukon SUV. It was big enough to fit our 4-person filmmaking team and the entire lighting package and camera gear in the back. Note that we also hired local sound recordists, who drove their own vehicles. We also had a local PA for a couple of shoot days, but we traveled light enough to not require a PA.
What I packed:
1600 Pelican case with my Sony FS5 camera and lens package.
Nanuk carry-on case containing Dedolight DLED7 and Genus Production Mattebox, plus 5 of my Swit S-8U63 lithium ion batteries (which power my Sony FS5), which airline regulations require must be carried on.
Why Celebs rock
When you’re both the gaffer and the DP, you really don’t have the time or the mental bandwidth to fuck with the lighting for very long. You have to put your camera hat on pretty quickly. I chose the Celebs because they offer controlled, soft light right out of the case. A light that requires setting cutters or flags or diffusing isn’t going to cut it. I need a light that I can set and forget.
The Kino Flo Celeb is perfect for these situations. Not only are Celebs soft without additional diffusion, they also include a honeycomb grid that focuses the soft light and aims it just where you want it. It’s hard to overstate how well this honeycomb works. One of the best things about the Celeb is its ability to minimize light spill.
To set up a Celeb, you just pull it out of its case, yolk-mount it on a c-stand (in the case of the 201s) or on a junior stand (in the case of the 401). The 401 really does need the Junior stand – it weighs 26 pounds. That’s a lot of light.
Celebs are built like a tank. They are designed to withstand the wear and tear of day-in, day-out production. A set of convenient metal handles allows you to easily lift the lights in and out of their road cases. The only cord you have to hook up is the power cord – the ballast is built into the back of the unit. And as color-selectable LED sources, the lights can be dialed from 2700K – 6500K. You can also dim them to about 2 percent, invaluable when you want just a hint of fill.
The lighting setups
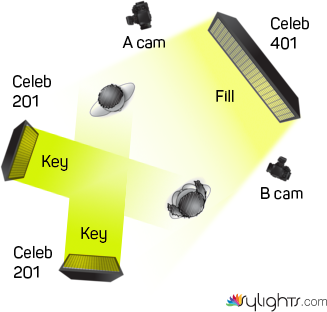
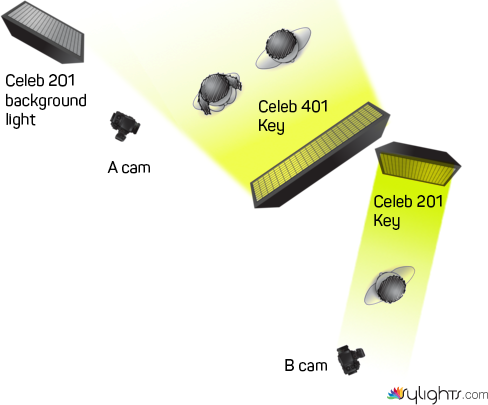
The basic setup for our 2-person, 2-camera interviews was to place the 401 as fill for both subjects on the camera side. Then we placed the 201s on the opposite side to key each person individually. We could then adjust the fill level down to get the dark, brooding vibe the director wanted, while still holding enough detail to reveal expressions.
Basic 2-person, 2-camera interview lighting setup
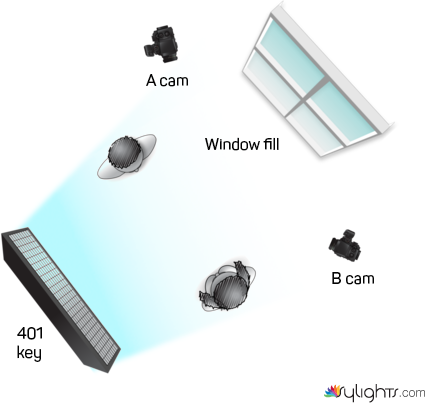
The above setup worked great in conference rooms without windows. But we also often shot in rooms that had a daylight window on one or more sides. In those cases, sometimes I would use the window as fill, and the 401 as key for both subjects, with a 201 to wrap the light a little further around onto the fill side of their face if needed.
Daylight window lighting setup
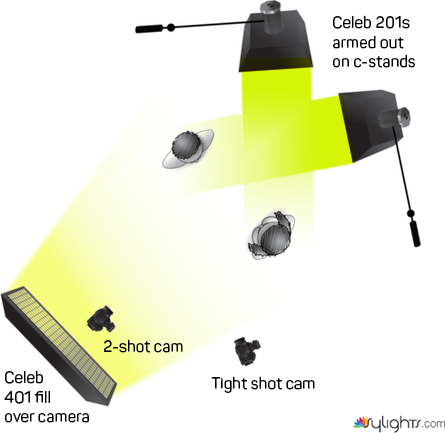
Sometimes we filmed a 2-shot with one of the cameras, placing the 401 as fill by raising it above the 2-shot camera. This setup required placing both 201s on c-stand arms and raising them until their stands are out of the shot:
2-shot interview lighting setup (note both 201 lights are raised on arms to avoid seeing their stands in background of 2-shot camera)
In one case, we had to light three people: two interview subjects sitting next to each other, with the interviewer opposite them:
3-person interview lighting setup (note 401 is raised and on c-stand arm to keep it out of both camera shots, which requires counterweighting the arm. Dicey!)
Sketchy to boom
We had to shoot the above 3-person setup at night. So I chose to use the 401 as key for the 2 subjects so they could be lit evenly. However, to keep the stands out of frame, I had to boom the light out over the camera and aim it down on the subjects at a 45. I was able to make this work by clamping the yolk in a c-stand grip head, and placing a 25’lb bag on the other end of the arm as a counterweight. But this was a pretty shaky setup, and I probably should have used a 201 for each of the subjects and the 401 for the interviewer. This is where having something like a LiteGear LiteMat2L (which weighs just 3 pounds) would have been really nice.
Nitpicks
The Celebs are not bright enough to match open window light in the background of a shot. You’d need HMIs for that. But they are bright enough to match windows that are controlled with shears, curtains or blinds. And on overcast days when you have foliage in the background of a window (which reduces the light level a couple of stops) the Celebs can match it. If the sun comes out, though, you’re cooked.
I also wish the locking power cord, which is only about 8′ long, was at least twice that length, the way Arri lights are. Because manufacturers really should include a usable length of cord with their units.
Kino Flo Celebs are clearly built to withstand the rigors of daily use in production. However, I feel they are actually overbuilt. Why couldn’t these lights be both lighter weight and durable? Competitors like Aladdin and LiteGear are making lights that are almost the same size but weigh a tiny fraction of these beasts. So I look forward to reviewing some of the lighter Celeb alternatives soon.
Lesson’s learned
Pack a small light stand. Many rental houses don’t have them, and standard C-stands don’t let you place small backlights like the Dedo DLED7 as low as you may want to.
A Baby Pin is a much better way to mount 201 Celebs to a C-stand. This allows you to mount them on the grip-head end of the stand’s gobo arm, and angle the light more precisely.
For really soft light, or room ambience, bounce the 401 into a wall or ceiling (or foam core, but we didn’t have any of that with us).
1 stinger with power strip wasn’t always enough. I should have asked for 2 25′ stingers in my G&L package.
Bottom Line
With the Kino Flo Celebs and a small crew, I was able to handle a wide variety of documentary lighting challenges. The honeycomb grids allowed me to effortlessly control light spill by simply angling the light, rather than placing flags or cutters (which require more stands). Due to it’s design, you’ll never see a single LED. Celebs produce a light that is soft enough to require no further diffusion, and they pack up very quickly. That allowed us to schedule more shoots in a day. Because of this all-in-one design, I noticed that it took more time to break down our c-stands than it did to break down and pack up our lights.
It’s no wonder NAB awarded Kino Flo Celebs “best new light” in 2014.
As for that unsolved murder? It’s a long-standing mystery, one that our team believes deserves a new hearing in the court of public opinion. So stay tuned.
I got my hands on one of the new Fiilex Matrix LED location lights the other day. It was for a shoot that was unfortunately canceled, so I didn’t have a chance to use it on a job. But I tested it out, and I do have some observations I’d like to share.
The Matrix is quite compact – about 8.5″ square on the front, and 5.5″ deep on the side. It packs into a rolling case that would be easy to check on a plane, but too big for carry-on (though once you start checking luggage, you’re usually better off renting lighting at your destination, given how expensive extra luggage fees are these days).
This light has been billed as an HMI replacement. Others have described it as comparable to a 1,500 watt source. So I was keen to test its punch.
I found it most comparable to a 650 watt Arri fresnel in terms of intensity. A bit of a letdown in that department. But it’s much cooler in other ways.
Placing the Matrix side by side with an Arri 650, the beam of the Matrix with it’s unique quad fresnel lens is slightly wider than the 650 fully flooded. But it doesn’t focus, so it’s impossible to spot it like a 650. But the Matrix doesn’t really seem designed for use as a fresnel; it’s more at home bounced into foam core or diffused with a softbox.
With the fresnel attachment on, and the Arri almost fully flooded, the two lights match each other in intensity in Tungsten mode (at 15′, my Sekonic light meter gave me a reading of f/4.1 @1000 ISO @48th sec. shutter).
Bounced into a 4×4 bead board at same distance, my meter gave me f/2.0 for the Matrix and f/2.3 for the Arri 650 (both at 3200K). I was able to squeeze another half stop of brightness out of the Matrix by going to 5600K.
The Matrix’s ability to spit out daylight is very very cool. But by the time it’s softened through a softbox or bounce, I found the Matrix is no match for holding sunny daylight window detail in the background of a shot, unless you move the light very close to the subject. Way too close.
The controls on the back of the panel give you not only the ability to control color temperature and dimming, but the middle knob gives you plus or minus green, which could come in very handy on shoots where you’re trying to match fluorescent lighting.
The Matrix has a built-in fan that runs quiet enough to be inaudible in all but the most pristine recording environments.
The speed ring that is built into the M1 is larger than a standard ring, and the rental house told me it wouldn’t work with soft boxes other than the one Fiilex makes specifically for this unit. However, I was able to fit my medium Photoflex softbox on the M1 without too much difficulty. But I sure wish the holes were slightly angled (about 15 degrees, like this speedring) to make removing the softbox easier. I found it a real pain to get boxes on and off, including the Fiilex box.
I long for the day when I can roll up to a location with an LED the size of the M1, and turn on the grid-cloth-punching power of an Arri M18. That day is coming. But we’re not there yet.
LED lighting is getting brighter by the year, and the M1 Matrix from Fiilex represents a step in the right direction.
You’re driving home at the end of a long day, turn a corner and run straight into the sun. Bam! You’re momentarily blinded. You reach up for the sunshade, and twist it down. Ahhhh. Five minutes later, you’re home with a cold beer in your hand.
For most documentary filmmakers, having a matte box is like having a visor on your car. You won’t use it very often, but when you do need it, you’ll be glad it’s there. Unfortunately, however, a matte box does not come standard with a camera like a visor does with a car. There are a million camera setups, so there is an bewildering array of matte boxes.
My own matte box journey began a few years ago when I picked up a Genus Matte box Lite. This simple solution snaps onto the front of your lens via a ring that screws into your filter threads. It worked great — as long as I used a zoom and didn’t have to change lenses frequently.
But alas, it didn’t take long before my needs become more complicated. When I began using prime lenses more frequently, the weight on the front lens element was too much for my Contax-Zeiss primes. The barrel of the lens twisted off it’s moorings. After a second repair, the technician warned me: “Don’t screw anything heavier than a lens filter onto the front of this lens.”
So I ponied up for a Tilta matte box that had a swing away arm to enable easy lens changes, which mounted to rails for support. But this is a heavy solution, and over the years I’ve found myself leaving it at home when I rolled out on documentary shoots.
When Genus invited me to review their Genus Production Mattebox, (which I’ll hence refer to as GPM) I was eager to try it out. Genus has a reputation for making matte boxes that are a good fit for filmmakers with simple needs. Here’s what I discovered.
Pros:
Relatively Light weight. 2.2 pounds with all flags attached (vs. 2.9 pounds for Tilta-but Tilta has swing-out arm and the GPM, although one can be added as an option).
Deep French flag. The GPM has a nice, deep French flag which cuts 6.35″ of light off the top of your lens. By comparison, my Tilta is 2″ shallower. This extra depth goes a long way to reducing the amount of light hitting the lens. Love it!
Multiple options for mounting. The GPM comes with two options for mounting the box to your lenses. For larger glass, use the included nun’s knickers. For lenses 82mm and smaller, use one of the half dozen included step-up rings, which vary in size between 52mm and 77mm. But the truth is, I don’t use any of these things. I simply align the box in front of my lens and start shooting.
Since I use a matte box simply to keep light from striking and flaring the lens, it’s not necessary to block light from entering the rear of the box. This allows easy use with lenses the change length when focused, such as my Canon EFS 17-55mm f/2.8.
The reason you’d need to choose a mounting solution that blocks all light from the rear is if you’re using a filter in the tray, to eliminate reflections caused by light entering from the rear of the matte box.
Small footprint. I am able to fit this matte box (not including the top flag) into a 1400 Pelican case. See the difference in size between the case I use to store my Tilta matte box and my GPM:
The Genus Production Matte Box (minus top flag) fits into a small 1400 Pelican case.
Tip: I store the top flag in a side zipper compartment on my camera case. If I stored it in the Pelican case with the matte box, I would have to use a larger case. So it makes sense to break up those storage locations.
Cons:
No option for bottom flag. But then, I think I’ve only ever needed to use a bottom flag once in my entire career. So it’s not exactly something I lie awake at night worrying about.
Lens changes are awkward without swing-away door. If you’re using prime lenses a lot (rather than the zooms that many documentary shooters prefer), this can be kind of a big deal. It’s a real pain to have to release the rail block, slide the box forward, change the lens, then slide it back and retighten it. But swing away arms add weight. And when it comes to matte boxes, I prefer lighter to heavier. Also, you will need the Genus Height Extension Bracket to adjust the box to the right height for different lenses.
The Genus height extension braket is essential to setting the correct height for different lenses
Wide-format tray. The GPM box accepts only 4 x 5.65 filters, and Genus offers no tray adapter for it to accept 4×4 filters. Even though most documentary shooters won’t be using filters anyway, I wish there were an option to use it with 4×4 filters, because, well, those are the only filters I own! And 4×4 filters are more common than the wide format ones.
Update: Genus contacted me after this piece was posted with news they plan to make a 4×4 tray for the GPM. I look forward to testing it.
At the end of the day, my favorite thing about the GPM is that it’s small and light enough that I find I DO actually take it with me on shoots. Even though it stays in its case most of the time, when I need it, it is there. Just like that visor when I’m driving into the sunset on my way home.
When I first discovered variable ND filters, it was like trying on a pair of photochromatic sunglasses for the first time. Suddenly, I had a kind of super power: I could steplessly adjust exposure without touching the shutter, iris or ISO. I thought variable ND was the solution to all my DSLR video exposure problems. Like magic!
Variable ND and polarization
Then one day while reviewing footage of a subject shot in bright sunlight, I noticed that his skin tone looked like play-dough. I had no idea why. But I knew I’d been shooting with my vari-ND filter, so I was suspicious. I did some Googling, and learned that variable ND filters work by placing two polarizing filters in opposition to each other. On most variable ND, the rear polarizer is fixed, and the front can be rotated. As the front filter is rotated, the opposed polarization causes the lens to darken. At maximum darkness, the crossing point is reached, where the image contains an X (if the field of view of the lens is wide enough).
Crossing point, where the two polarized lenses reveal an X
Of course at this point the image isn’t usable. But at lesser degrees of rotation, and by avoiding wide-angle glass, the effect appears to be a darkening of between 2 – 8 stops.
But polarizers are tricky beasts. They are often used in landscape photography, to darken blue skies, for example, and enhance foliage. But when shooting a wide shot that includes the sky, a polarizer doesn’t affect the whole sky evenly – it polarizes the light at a 90 degree angle to the sun but not that falling parallel to it.
So variable ND isn’t the magic after all. And it has some limitations. But those same limitations can also be strengths. For example, when you want both a polarizer and you want some ND at the same time! But most vari-ND filters only give you the ability to rotate the front element, not the rear. To control the polarization effect, you have to unscrew the filter and hope it doesn’t fall off, as I described above.
Genustech’s solution
Genustech has created a variable ND filter that gives you a measure of control over this problem. It’s called the Solar Eclipse. It has a lovely little handle protruding from the second element, allowing it to be rotated. Rotating the handle doesn’t darken or lighten the image – it simply controls degree of polarization in your shot.
By rotating the handle, you can change the angle of polarization – where the dark edges appear in your frame. Sort of like a graduated ND filter. Rotated 3/4, it looks like so (ungraded images):
Genus Eclipse rotated 3/4, vignetting occurs in upper left and lower right of frame.
Rotated 90 degrees, it appears to vignette the image from both sides (but not the top or bottom)
Without Genus Eclipse, (using just the built-in variable ND on the Sony FS5)
As you can see above, the built-in variable nd on the Sony FS5 is something quite special. To my eye, the ungraded image that uses the built-in electronic nd on the FS5 looks very faithful to the colors present in the actual scene. The Genus Eclipse appears to suffer from a bit of color contamination that shifts colors toward green (IR contamination, perhaps)?
Here’s how a standard Hoya polarizer compares to the Genus Eclipse (with an unfiltered image for baseline comparison):
Genus Eclipse vari-ND filter
Hoya polarizer
Sony FS5 built-in variable ND only (no polarization)
In the images above, again we see some shifting of colors toward green with the Genus Eclipse. Nothing that couldn’t be corrected out in post, but something to be aware of.
Speaking of eclipses…
One place where using a variable ND filter like the Eclipse comes in handy is when shooting the sun directly. With a long lens, such as a 300mm, you can rotate to the Genus Eclipse to the crossing point of the filter, and use that to look directly into the sun, as if wearing a pair of welding glasses. I found in my testing that with my lens set to f/16, I still needed to active my Sony FS5’s built-in filter to really tame the sun. But the Eclipse came quite close all by itself.
The sun with Eclipse ND and additional ND filtration added
Which size filter to get?
Because most lenses have different filter thread sizes, I recommend getting a 77mm variable ND. Then, using step-up rings, you can use your 77mm filter with any lens of smaller diameter. You can even use it with lenses slightly larger, with a step-down ring. I use the Genus Eclipse with my 300mm Nikon f/4 lens, which has an 80mm filter size, for example. It works great without noticeable vignetting. But anything larger than 80mm, you’re likely to get vignetting.
Conclusion
As long as you’re aware of its limitations, the Genus Eclipse ND filter is a useful tool to have in your kit. Especially for filmmakers who don’t have a camera with built-in ND, it provides you the ability to reduce the amount of light hitting your sensor by 2-8 stops, without touching shutter speed, aperture or ISO. Just be sure to keep an eye on how polarization is affecting your shot, and use the handle that Genus provides to control that.

 If you’re in the Seattle area and want to try before you buy, you’re in luck. This belt, including AC pouch and all contents, is available for rent on ShareGrid for $35/day.

 When Lumu Power launched their Kickstarter campaign for
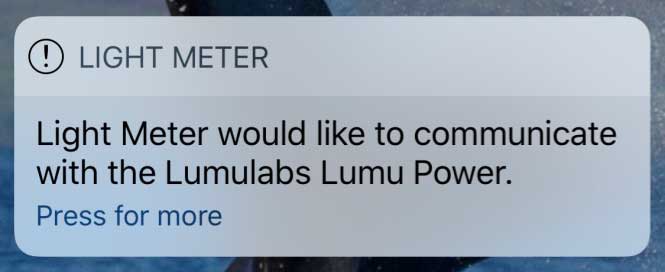


 The Wingman app connects automatically to any MixPre-3 in the vicinity right out of the box. You can add a password to the MixPre if you want to secure it. The app gives you everything you need to enter basic file names and add notes, even while a clip is still recording.