Category Archives: Video clips

Random video clips that I’ve made from work in progress or elsewhere.

Digital Kitchen: midwestern work ethic meets creative soul

The latest video in the series we’re making for Seattle Interactive Conference was officially unveiled today. It’s a peek at Seattle creative agency Digital Kitchen, the geniuses who make videos for the likes of BMW and Warner Brothers.

The best part of working on this project, besides meeting the friendly DK folks, was the opportunity to view so much jaw-dropping DK work. We were particularly inspired by the elegant simplicity of their Ask Away campaign, a series of documentary-style videos for the Atlantic Lottery. It’s commercial work worth sharing.

Transform underexposed dslr footage with Neat Video for FCPX

My most recent commercial piece, which Lisa Cooper and I made for Seattle startup Decide.com, is a great example of how a powerful Final Cut Pro X plugin called Neat Video can improve murky DSLR footage. We shot this piece on two Canon 60Ds, which like virtually all DSLRs, produce heavily compressed files that can get noisy when you lift the exposure levels.

Let’s start by taking a look at the finished video, and I’ll work backward from there.

Two challenges on this shoot combined to produce the noisy footage: mixed light at low levels, and monochromatic backgrounds. Let’s talk about mixed light first.

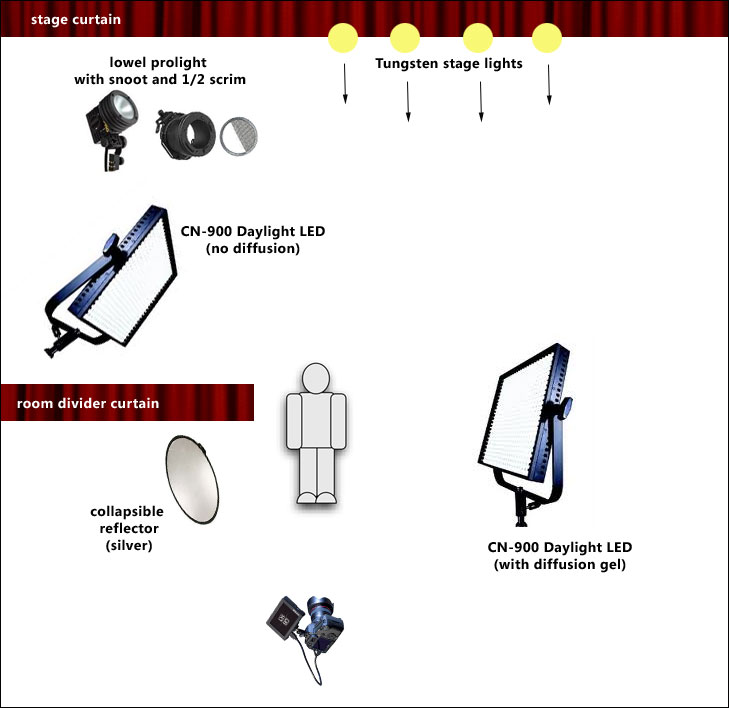
This office interior, like many, was lit by overhead fluorescent fixtures. But there was also big daylight windows. So the color temperatures didn’t match. My solution was to turn off the overheads, and set my white balance to daylight at 5400K, which I did with the employee interviews I’ll talk about shortly. The drawback to turning off overheads is that now the overall ambience of the room is darker. But, not so dark that I couldn’t bring them up to where I wanted them in post. But that’s where the problem comes in: lifting the levels in post introduces noise. And noise can look really ugly.

The second problem was the even tonality of the interview background, which was a bare, colored wall, which I hit with a Lowel ProLight to give it some life. But because of their highly compressed 8-bit codec, DSLR footage doesn’t hold up very well in large areas with the same color value. There just isn’t enough data available to make the subtle transitions appear totally smooth, especially when you have a gradient or subtle variations in color (a totally clear blue sky is another area where this problem often shows up).

In the example below, take a look at the grey background behind the subject. It’s essentially a gradation from darker shades of grey to middle shades of grey (actually, it was light green on left and grey on right before grading – grey throughout after).

As-shot section of video screen grab:

Notice there isn’t too much noise, but the image needs to be lightened quite a bit.

Graded, before Neat Video:

The color-adjusting and grading has improved the image dramatically, but also introduced lots of noise in the background. To help you see the noise, here’s a portion of the image cropped to 100 percent, at which the noise is most visible:

After Neat Video (below):

The noise is almost completely eliminated. Sweet. (Click the image above to view at 100 percent)

Here’s how it works.

First, download and install the Neat Video plugin for Final Cut. You can get a free trial, but it overlays a watermark, so to do any useful work, you’ll need to cough up $99. It’s totally worth it if you’re getting paid for your work.

Under the effects browser (Cmd-5), search for “noise.” The filter is called simply “Reduce Noise.”

Apply the filter to the selected clip in your timeline by double clicking the filter. It will appear in the Inspector, like so:

Click “Select to open” twice (for some reason it won’t open the first click). This will bring up these controls:

The first thing you want to do is click in the area where the most noise is, an area that has just noise, and no details that you care about preserving. In my case, the decision was easy: click and drag the box in the area against the background:

Next, select Auto Profile, then Noise Filter Settings to preview the results:

Under Filter Settings, you have the option to play with Luminance, Chrominance and Sharpening. I’ve found that it doesn’t seem to improve anything by fiddling with the first two defaults, so I recommend leaving them alone. Sharping is a powerful tool, so if you want to apply sharpening, be careful not to overdo it. It’s in effect the same thing as a sharpening effect, only it’s included within this plugin.

When everything looks good, click Apply in the lower right. Now, take a look at your Inspector, where you have a couple more options that you should leave alone until this point:

Temporal Radius
Temporal threshold
Adaptive filtration

Temporal radius refers to the number of frames that Neat Video analyzes when it’s determining how best to de-noise your clip. The higher the number, the more frames it looks at. Choosing a larger number than 1 will definitely improve your footage. BUT. It will SIGNIFICANTLY slow down your render times. And, at least on these clips, the footage looked plenty good enough at 2.

Temporal threshold should be lowered below 100 on footage that has a lot of motion, and raised above 100 if your footage is static. So, for my interviews, I chose 150 and it looked brilliant. Play with it until you see what looks best, or just accept the default.

Adaptive filtration should be checked only if the level of noise changes during your clip (ie if your camera was moving from a well-lit place to a dark place, for example). For an interview that is pretty static, leave it unchecked.

One final tip: Applying Neat Video to your clips should be the very last step in your editing process. Why? Because it slows your computer down big time. All of the complex calculations required to selectively remove the noise from your video will bring even a fast computer to a crawl. My iMac 2011 27″ i5 quad-core beast will let me work through just about anything, but not Neat Video. Plan to apply the clips and go for lunch. But when you come back, you’ll be thrilled with the results.

SEOmoz on Radical Transparency in Business

The idea of being honest with your customers sounds great, but what about when things go wrong? Here’s the most recent installment in the series we’re doing for Seattle Interactive Conference, a 2-minute look at what radical transparency means to the people running Seattle-based SEOmoz.

This is the first piece that my partner Lisa Cooper edited, almost entirely on her own, in Final Cut Pro X, with very little help from me. Nice job Lisa!

Nordstrom's windows

Our most recent commercial piece is up today on Nordstrom’s Facebook Page. Lisa and I shot this piece primarily with three GoPros, all running concurrently in timelapse mode, one frame every two seconds. We repositioned the cameras a couple times to get more angles covered. But I think what makes it especially fun is the very brief moments of dslr footage intercut with it.

Some frame grabs:

Filter: We've Got Your Back

Our most recently completed and published project is a 1-minute promotional video for the fab folks at Filter, a Seattle-based creative firm. Filter provides staffing as well as creative for clients that include Nike, Disney, Xerox, Google, and many others. This piece was screened at a conference in LA to inform attendees about Filter’s services. This video is an example of the type of work we do best at Visual Contact: taking a documentary approach to crafting a corporate message.

Video produced by our first workshop participants

Check out the video produced by the 10 above-average students in our first workshop on April 21! Not bad for beginners with only an afternoon and an iPhone, hey?

To create this video, we created a fictitious flower company, and tasked two attendees with acting as the co-founders. The rest of the crew helped light, shoot and record audio for this piece.

It was a lot of fun and I thank all 11 of you for your hard work. Making videos really isn’t rocket science, hey? Anyone can do it with an iPhone and some clear instruction.

What could your business do with a web video? Our second workshop, on June 2, is now open and limited to 12 participants. Learn more and RSVP here.

Black Magic BMD Cinema: A camera worth getting excited about

There’s been a lot of development in cameras lately. But I’ve been sorely disappointed to see Canon stuff almost all the goodness into cameras they’ve chosen to price at $10 – $15k or more, while making barely credible improvements to the 5d mkiii and raising its price to $3,500. I was beginning to feel like the big guys were only making cameras for the big guys. But today, Black Magic changed all that. With this:

I can’t wait to get my hands on this insane piece of camera tech.

Dramatic interview lighting

Seattle Interactive Conference today launched the first in a series of short films that Visual Contact, my company, is making for them. We’re delighted to be working with SIC on this project, which over the next six months will spotlight some of the entrepreneurial minds involved with the conference.

I’d like to share a behind-the-scenes look at how we shot part of this first piece, a profile of Neumos co-owner Jason Lajeunesse, who is a panelist at this year’s event and host of the after party.

I gotta say this is the most beautifully shot piece we’ve made to date. Check it out:

OK, so a few observations I’d like to share about making this piece. In particular, the interview setup. As is common, we had about 10 minutes to identify a spot to conduct the interview that was not only quiet, but looked fantastic. The main dance floor at Numos was the only quiet place during mid-day, as the bar next door was blasting music and pouring day drinks. Lisa just walked out into the middle of the floor next to a divider curtain and said “right here.” I protested for a minute, attracted to the only window along the north wall, where some beautiful natural light was falling. But that’s why we pack lights. Framing the shot with him behind the curtain in front of the stage was a perfect way to spotlight the owner of one of Seattle’s landmark night clubs (a place I’ve spent more than my fair share of evenings). I explain how we lit it in a minute.

But first, some frame grabs:

So, here’s how we approached lighting Jason for his interview shot.

It was nice to have a lot of space in this scene, because it meant I didn’t have to flag off the lights. The light spill was absorbed by the large dark space. I used three lights in addition to available light:

Ambient light:
There were some tungsten house lights aimed toward camera spilling onto the floor, which provided the splash of red. Also there was one big vertical north-facing window that was letting in daylight but not nearly enough for a proper exposure. I simply augmented this light to make it my key.

I set the white balance on my Canon 60D to 5400K daylight, which made the tungsten light spill in the background a super-saturated red.

Background light: Lowel ProLight with snoot and 1/2 scrim (this blocks a stop of light from half of the light, so that the light projected across the curtain is more even). I use a cheap 300-watt dimmer that you can get at Home Depot with the ProLight, which draws just 250 watts. It’s a small light, but I find it incredibly versatile and I use it all the time as an edge light or hair light.

Key light: CN-900 LED at full power. I clipped a 24″ piece of full-stop diffusion onto the barn doors, which goes a long way to softening this light.

Rim light: CN-900 LED dimmed down quite a bit without diffusion.

Here’s the shot again, with a floor plan for how it was lit:

AUDIO

This is the second video we’ve recorded primarily with the amazing new Sennheiser MKH-8060. As backup, we also recorded lav audio with a Tram TR-50, which is a great lav, totally professional and used by lots of major productions. But wow, comparing the audio between these two mics was flat-out stunning. Who knew that a Tram could sound like such crap? The 8060 just blows it away entirely. Granted, it’s not a fair comparison to match a lav with a top-of-the-line shotgun mic. But my previous go-to shotgun mic, the AT875, was about on par with the tram, so I was gobsmacked at how sweet this mic sounds. It’s also incredibly forgiving to use – if you’re accidentally off-axis a bit, it’s a simple fix: just boost the levels, without need to tweak the EQ, because off-axis sound isn’t colored the way most every other mic is.

The MKH-860 is an incredibly rich sounding mic, and after using it a couple of times, there’s no doubt in my mind that it was worth every penny of the $1,200k it cost to acquire the beast. Audio is a massive part of every video we shoot, so it just makes sense to have an epic mic even more than an epic camera (or a c300, or even a 5dmkiii for that matter. We shot this film with a pair of Canon 60ds).

Lisa and I will be delivering a new video in this series every month between now and this year’s conference on October 30th, and we’ve got some incredibly talented and fascinating personalities in the pipeline.