I’ve been cutting on Final Cut Pro X for more than a year now. And during that time, I’ve learned to hate working on rough cuts where the audio levels are too low, clipped, or noisy. It’s too tempting to yank on the volume levels of individual clips and introduce problems that will bite you down the line. So over the past year, I’ve evolved a workflow for prepping interview clips that is pretty close to perfect for us at Visual Contact. In our approach, we make the clips sound good as part of the import process, BEFORE we start cutting. It’s made our work a lot smoother, and ultimately it saves us time (and money). Here’s how we do it.
But first, some background on our production technique. When we shoot an interview, we record dual-system sound (reference audio on the camera, and two mics on the subject: a lav and a shotgun mic, recorded to left and right channels respectively, via a MixPre to Zoom H4N. All things being equal, we usually don’t end up using the lavalier audio, preferring the superior sound of a shotgun mic. But experience has made us believers in redundancy.
After a shoot, I import all of the files (audio and video) into Final Cut Pro X, which places all files into the Original Media folder of the Event. From there, my workflow involves the following steps, each of which I’ll explain below:
- Batch-sync audio with DualEyes.
- Organize files into Smart Collections.
- Change sync audio files to Dual Mono.
- Create synchronized clips.
- Assign keywords to synchronized clips.
- Fix glaring audio problems.
Step 1: Batch-Sync Audio.
While it’s possible to individually sync audio within Final Cut Pro X by selecting individual files and creating a sychronized clip, this only works when you know which audio file belongs with which video file. If you have a lot of both, you’re screwed. Unless you were slating everything, which we documentarians almost never do (in part because what I’m about to share with you is much faster).
Batch-syncing in our workflow is made possible with DualEyes. It creates audio files that are clearly labeled with both the video clip from which they are derived, AND the audio clip. This makes syncing them in Step 2 a snap. Note, the latest version of PluralEyes can also accomplish this – but the syncing process involves placing files into a timeline, exporting them out via xml, running PluralEyes, and then bringing them back into FCPX. If you use this method, be very sure to delete the project files that PluralEyes creates after the sync, so you don’t get confused about where your files are – they should only ever be in the Event Library.
So let’s get started. First, quit FCPX (so it doesn’t try read in the temp files that DualEyes is about to create). Open DualEyes, and create a new project. I save it to my Desktop, where I can remember to delete the temp files it creates after the sync. Now drag all your interview audio files and video files into the project.
If your shoot included clips unrelated to the interview such as b-roll, you CAN just drag everything in. It won’t hurt anything (unless you have a ton of clips). But it will take longer for DualEyes to run.
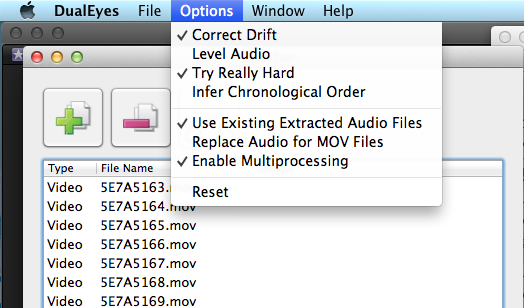
Before you click the scissors icon to begin the sync, check the options. Here’s my settings:
- Correct Drift: This will create a new audio file that is timed to precisely match the reference audio. Check it.
- Level Audio: This performs an adjustment to the audio levels, which is probably fine for quick and dirty projects, but if you want to have full control over how your dialog sounds, definitely leave this unchecked.
- Try Really Hard: Of course you want your software to work hard for you, right? It takes longer, but it does a better job. Check it.
- Infer Chronological Order: generally your files will be numbered sequentially, but if you are using multiple cameras or different audio recorders, leave this off.
- Use Existing Extracted Audio Files: This saves time if you are doing a second pass on the files (for example, if it missed some files on first pass, and you’re trying again, it will use the same temp files without having to recreate them, saving time). Check it.
- Replace Audio for MOV Files: Checking this box will strip out the reference audio from the MOV file and replace it with the good audio. I like to keep my options open, in case I want to use the reference, so I never check this.
- Enable Multiprocessing: Check it.
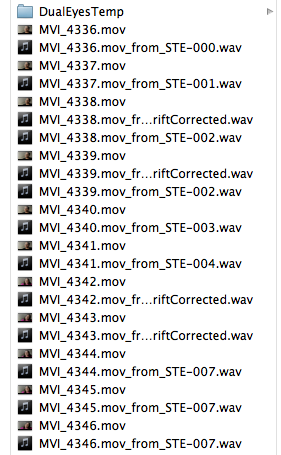
Click the scissors to run the sync. Your machine will churn for awhile. When it’s done, take a look at the new files created in your Original Media folder:
Note that DualEyes has created audio files for you, which are perfectly timed to match the length of the MOV file. And, it titles each file with the name of the mov file AND name of the audio file, important for the next step. You’ll also see that a folder called DualEyes has been created. Delete it, after checking to ensure that a new audio file appears below each video file that you expected to synchronize. If any is missing, run the sync again.
Step 2: Organize Files into Smart Collections.
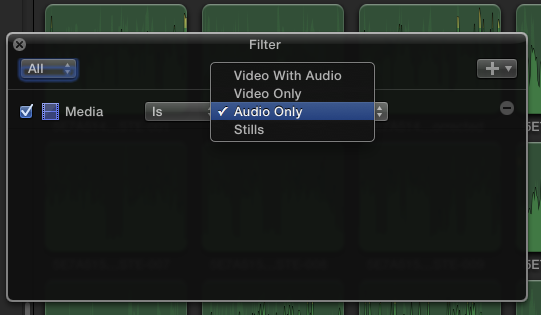
It’s time to start getting organized. Start FCPX, and open the event. I start by creating a Smart Collection for each of the media types in my project (for example, one called Stills for all the still photos, and one called Audio Only for the audio files.
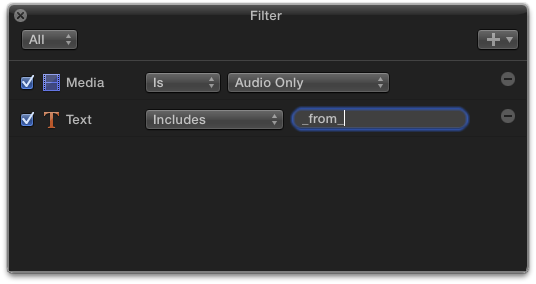
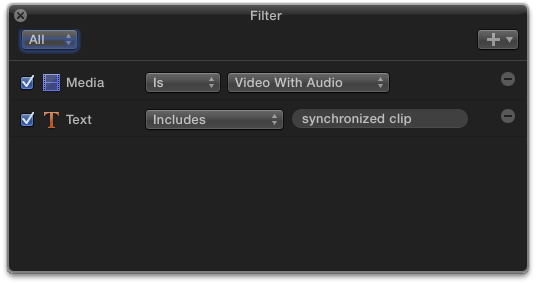
I also create a temporary Smart Collection called Sync Audio to make the next step faster:
In this collection are listed all of the files that DualEyes created for you. They need some work, which we’ll do next.
Step 3: Change sync audio files to Dual Mono.
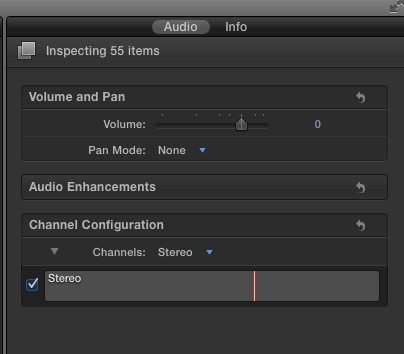
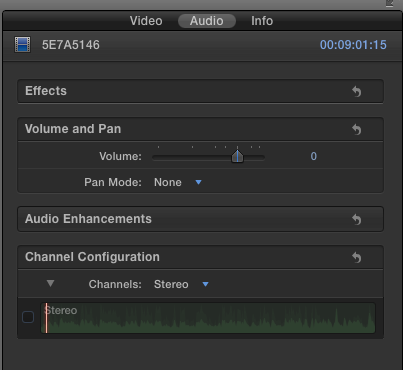
Choose the “sync audio” smart collection. Select them all in the event library (Cmd-shift-A). Then, open the Inspector. You should see something like this:
Notice that the default setting of Stereo. Change this to “Dual Mono.”
This will allow you to choose only the best-sounding mic (or to mix both mics) in later steps. But first, we need to create synchronized clips in FCPX.
Step 4: Create Synchronized Clips
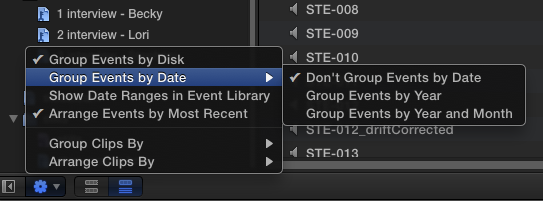
Put the Event Library into list view (opt-cmd-2), and select the event title so that all clips in the event are displayed. At the bottom of the event browser, click the settings gear, and make sure you have selected these options:
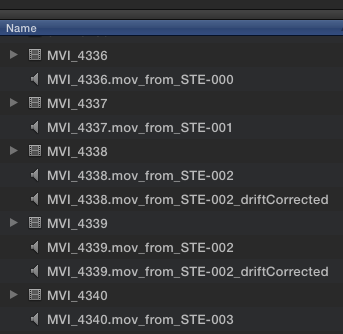
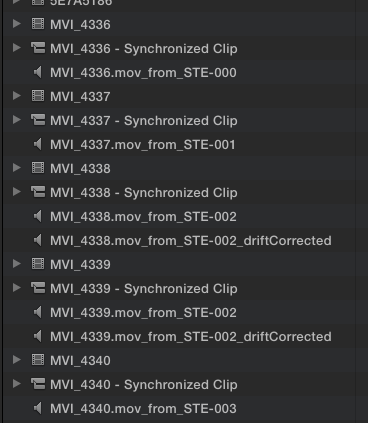
This will ensure that all your clips are displayed by name, next to each other, like so:
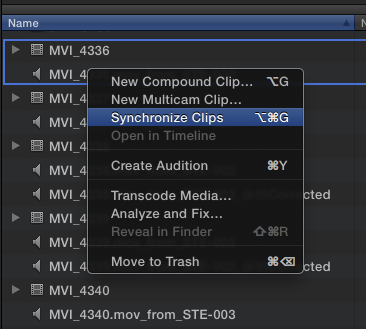
Select the first movie file, hold down the command key, and select the audio file immediately under it (select the “drift corrected” version if you have more than one).
Repeat this for each file. When you’re done, your directory will be filled with synchronized clips, which are the ones you’ll be using for the rest of your edit.
At this point, I create a new Smart Collection called Sync Video, so I can keep track of all the new clips and have them all in once place for the next round of work, adding keywords.
Step 5: Organizing with Keywords.
In this example, my shoot included two interviews with different people. Later in the edit I’ll want to quickly find interviews with each person, so I’m going to assign keywords to each. To do this quickly using the files that have the good audio linked to them, I start by putting the Event Browser into Browse view (opt-cmd-1). Now I can see at a glance which clip has which person.
In the image above, you can see I’ve created a folder called “Interviews” into which I’ve created two keyword collections. To assign, I select all the clips with each person and drag them into their respective keyword.
If you’re lucky and your audio levels are perfect at this point, and you like the balance between the lav audio and the shotgun mic, you’re done. But because we live and work in the real world, it probably isn’t quite that neat. Your audio levels, like these, might be too low, and maybe there was an HVAC system running in the background that leaves a low level noise you want to remove. And in my case, the lav audio needs to be turned off altogether, because the shotgun sounds far better. The next step is where we do that, keeping basic adjustments where they belong – with the file in the event library, before editing starts.
Step 6: Fix audio problems.
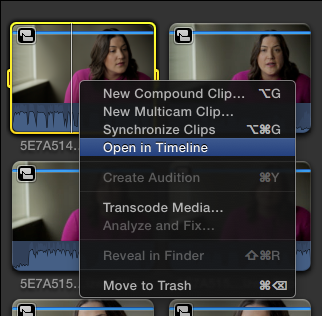
In the Event Library, select the keyword collection with that contains the synchronized clips you want to work on. Select the first clip, and open it in the timeline.
You’ll see the clip above the attached audio below, in green.
Select the blue clip, and make sure you can see the Inspector (cmd-6).
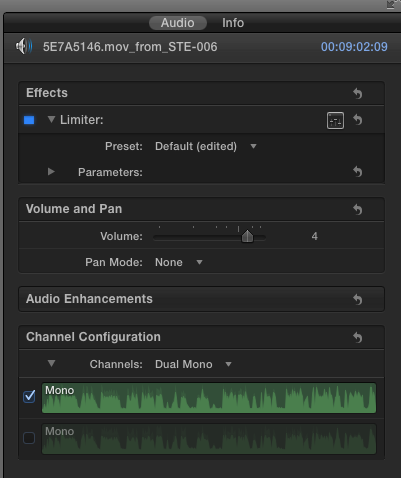
Since this clip contains only our reference audio, turn it off entirely by unchecking the box under Channel Config.
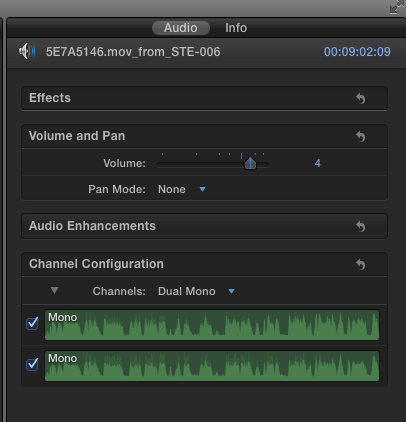
Now go back into the timeline, and click on the green audio file. In the Inspector’s channel config, both tracks are enabled.
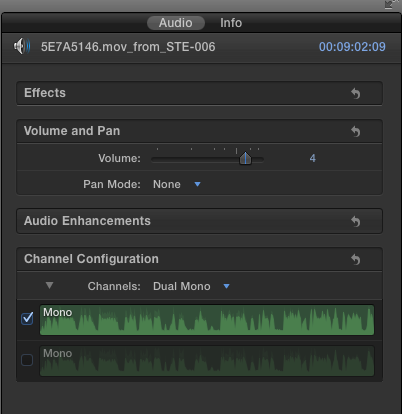
In my case, I want to turn off the lavalier track, which is on the right channel, because it is inferior quality to the shotgun mic.
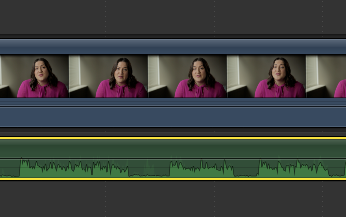
Now that I’ve got the best audio quality, it’s time to check my levels. Here’s how the clip looks. I can see just by looking at the waveform that the volume is too low:
While playing our clip, the audio meters show the levels are bouncing between and -11 and -30 db. That’s too low. A good rough levels setting is between -6 and -20 db. Let’s fix that.
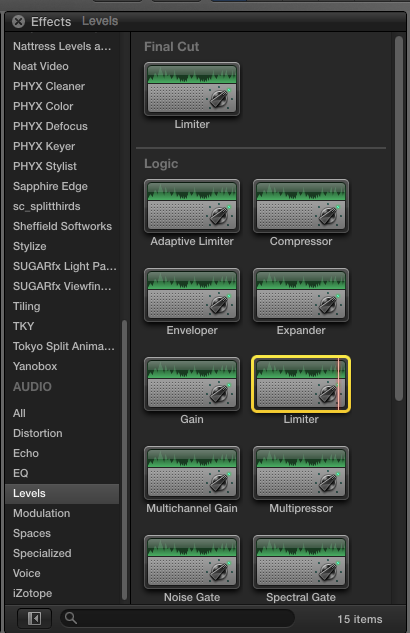
I could just yank up the volume, but that would leave us open to spikes of volume that might clip. I want to raise the levels without the danger of clipping, and leave any micro adjustments to levels to later editing. So I’ll use Final Cut’s Limiter effect, located in the Effects Browser, under Audio > Levels.
With the audio clip selected, double click the Limiter effect to apply it. It now appears in the Inspector.
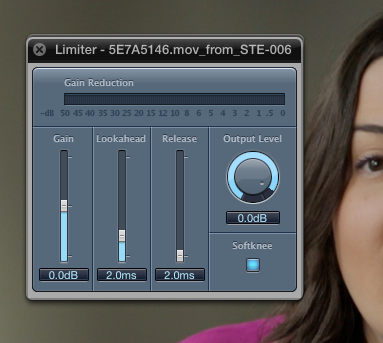
Click the slider icon to bring up the HUD controls for the Limiter.
Here’s how I set mine:
Output Level: -3.5db. This means that the Limiter will “limit” the volume level to -3.5db, no matter how loud the clip gets. This is the correct setting if you don’t plan to use music under the piece. This is a pretty good baseline setting. If you know for sure that there will be music under the dialog, set it to -4.5.
Release: set to about 300ms for dialog.
Lookahead: leave it set to 2ms.
Gain: This will depend entirely on your clip. Drag the slider upwards until you are seeing levels that sound good, that range between -6 and -20 or so.
You will likely see some peaks reaching into the yellow in the timeline:
Listen to your clip one more time. In my case, I’m hearing an annoying HVAC system in the background that needs to be cleaned up. For that, I use iZotope RX, an insanely useful suite of audio repair plugins that work within FCPX. If you routinely work with dialog recorded on location, you won’t regret shelling out the $349 that it costs. It can also do miracles with clipped audio, which many audio engineers say is impossible to fix.
It’s beyond the scope of this tutorial to explain how to use iZotope, but in this case, I’ve applied the Denoiser effect, trained it to identify the noise with room tone I recorded at the location, then applied the setting to the clip to nix the HVAC. It doesn’t entirely remove the offending sound, but most of it is now gone.
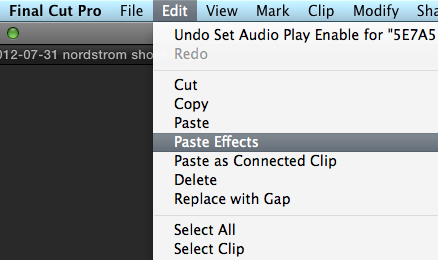
At this point I’m done fixing things. It was a lot of work, and I don’t want to have to repeat it on every clip. So we’re going to select the audio clip, copy it (which also copies the effects which have been applied to it). Now, you’ll need to open each of the remaining clips, select the audio track, and choose Paste Effects.
You can select all of the clips at once, and paste the effects to all of them. But if you have individual channels turned on or off, as I have, you will have to open each clip individually to adjust that.
Now you’re all set to start cutting with the confidence that your clips will sound great from the moment they land in your timeline.










Dan, this is really great!! We’re just switching to X, so this workflow stuff will be invaluable. I’m an audio geek so this stuff is really important to me. Didn’t know about iZotopeRX, so I’ll be looking into that (assuming it beats the built in noise reduction!). Still really miss the spectrum editor from Soundtrack Pro for clean-up.
Quick question. Do you add compression and EQ to your voices at the end or do you find using the limiter up front in the way you have described is enough on its own to get the voices sounding as you want them?
Best,
Oren
Hi Oren,
As an audio geek, you’re going to really love iZotopeRX. It’s truly a killer app for dealing with difficult audio issues like clipped signals that were improperly recorded, and background noise. It’s far superior to the built-in noise reduction in FCPX.
Regarding compression, as long as you’re just working with dialog, the limiter does the same thing as compressor. You would choose a compressor if you’re working with music or some other audio that you need to finely fuss with. But if all you need is basic compression while protecting against clipping, the limiter works great, and with a simpler interface. But EQ is another thing, so to get the sound just right you’ll still sometimes need that. As an aside, one of the reasons I invested in a Sennheiser 8060 mic ($1,200) is because it sounds so sweet without any EQ, that I rarely need to add it later. In that regard, it paid for itself pretty fast!
As you’re switching to FCPX, let me know if you come up with great solutions for this stuff – I’m always learning too. Cheers.
Awesome advice here, thanks so much for sharing. I will definitely start to try to incorporate so of your techniques. They are really clear and make a ton of sense.
Glad you find them helpful!
Awesome tutorial on audio syncing with fcpx Dan…best I’ve found on the web. Quick question. Once you’ve synced your audio in the event browser, you are using those compound clips in the timeline, correct? So then do you delete all of the video and audio files out of your event browser that arent the synced clip? Seems like its unnecessary to have them there taking up space.
Hi Bryan,
If you deleted them, that would mean throwing away the source video that that compound clip is made from. So then the compound clip would show up with a big red x through it, and your media would be offline, and no way to get it back if you emptied the trash. So don’t do that.
But if you’re intent is to clean up your Event, so that you don’t accidentally confuse the good compound clips with the no-longer-needed original ones, there’s a solution.
Just highlight the clips you don’t want, and press the Delete key. This will mark them as rejected, without actually deleting them. They will be hidden from your view, as long as in your Event Browser you have selected “Hide Rejected” (the default). If at any time you want to see something you rejected, simply change the Event Browser popup to “All Clips,” and you’ll be able to see it again.
Absolutely brilliant tutorial. You have easily saved me 10 hours of work over a 6 hour production with about 200 clips.
Excellent, Gabriella. Glad it saved you some time.