The more I use the Zoom H4N, the more I love it and discover new uses for it. My latest find: it can work as an audio interface. I’ve been doing a lot of voiceover work lately, and was on the verge of purchasing a USB audio interface such as the Fastrack so that I could use a quality mic like my Octava MK0-12, to record directly into Soundtrack Pro. The Zoom H4N is supposed to work as a USB audio interface – but it doesn’t. I did a ton of testing, and all the voiceovers I recorded via the USB connection to the Zoom were distorted – not only tonally, but they had weird random snapping and crackling and occasional skipped sections of sound. Very bad. But there’s a workaround…
As I was on the verge of placing an order for the Fastrack, it occurred to me: why not simply use a 3.5mm male-to-male cable (which I already own) and connect the Zoom from its line out to the Mac using the Mac’s 3.5mm input jack? I tried it out, and it works great! That’s about $120 saved, and one less piece of equipment to clutter up my editing table. 
Configured like this, the Zoom does not have to itself be recording for this to work – I simply press the record button once (not twice, which would cause it to record onto the sd card), which puts it in standby mode, passing the signal through the line out and into the Mac, which handles the actual recording in Soundtrack.
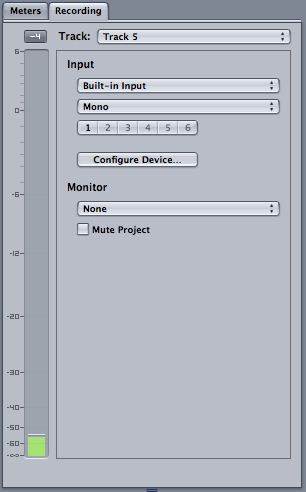
Soundtrack’s right pane is set as follows (see graphic to right):
Input – set to Built-in Input and Mono selected for voiceover work.
It’s best to leave the monitor set to None, or else you’re likely to have feedback issues while recording.
Finally, arm the track you want to record to, press the record button and away you go.

My H4n works great as a USB audio interface. I’m curious what your settings (buffer, sample rate, etc) are when the problems occur. Interesting. Thanks for the post.
Next time I need to use an audio interface, I’ll check it out and post them for you here.
Massively helpful post. Merci much.
same horrible scratchy problem.. if zooomanate has any setting they can post I’d be very grateful. Finding a workaround seems a little redundant when people are getting good results from USB.
Hey there, I was having the same problem and now is fixed. I did 2 things:
– In the main menu of the H4n I had NiCad instead of Alcaline for the battery – switched it to Alcaline (this could be coincidence)
– In the USB menu of the H4n in Frequency I had 48khz instead of 44khz – switched it to 44khz and the distortion, clipping and pitch shift went away (this probably did it)
By the way I was recording on a 2012 MacBook Pro. Cheers.
Thanks for that tip Alonso.
Thanks for the comments. I too was able to connect via the USB port with my mac. I discovered that you must select 44.1 Hz frequency and not 48 Hz in order for it to work. Keep the communication going.
Hi Dan – I have the H4n and use it for voice-over work. I heard there are settings in effects cue that can add some bass tone to vocals for use duing voiceovers…but I cant’ seem to figure it out..
–Im using an XLR mic in the input 1 section
What would be the best settings to try and push up the limiter and round out the vocals for voiceovers etc?
Any help would be great!
Thank you!
Jeff
Hi Jeff, I’ve never used any effects applied by the recorder, and I would stay away from that myself. I would do all of that in post by adding EQ and compressor or limiter.
I started recording a voiceover with a shure 57 in to my zoom h4n. The levels of my audio were set correctly on the zoom h4n, however when i opened the files on my mac the audio levels were very low…any suggestions.
thanks
Adam
Hi Adam,
When you say they were set correctly, can you tell me what they were at? And when you opened them on your mac, what app were you editing them with?
old thread but figured i’d post the actual solution here in case someone is wondering.
1. plug in the h4n and select 44.1kHz and connect
2. on macOS open the application called “Audio Midi Setup”
3. Select the h4n with 2 inputs.
4. there’s a clock source drop down (this is what the mac needs to know the incoming rate) choose 44.1
test it. perfect interface now