If you’re starting out with the Sony FS5, and going for a cinematic look, here’s a setup guide that will have you up and rolling fast.
Codec
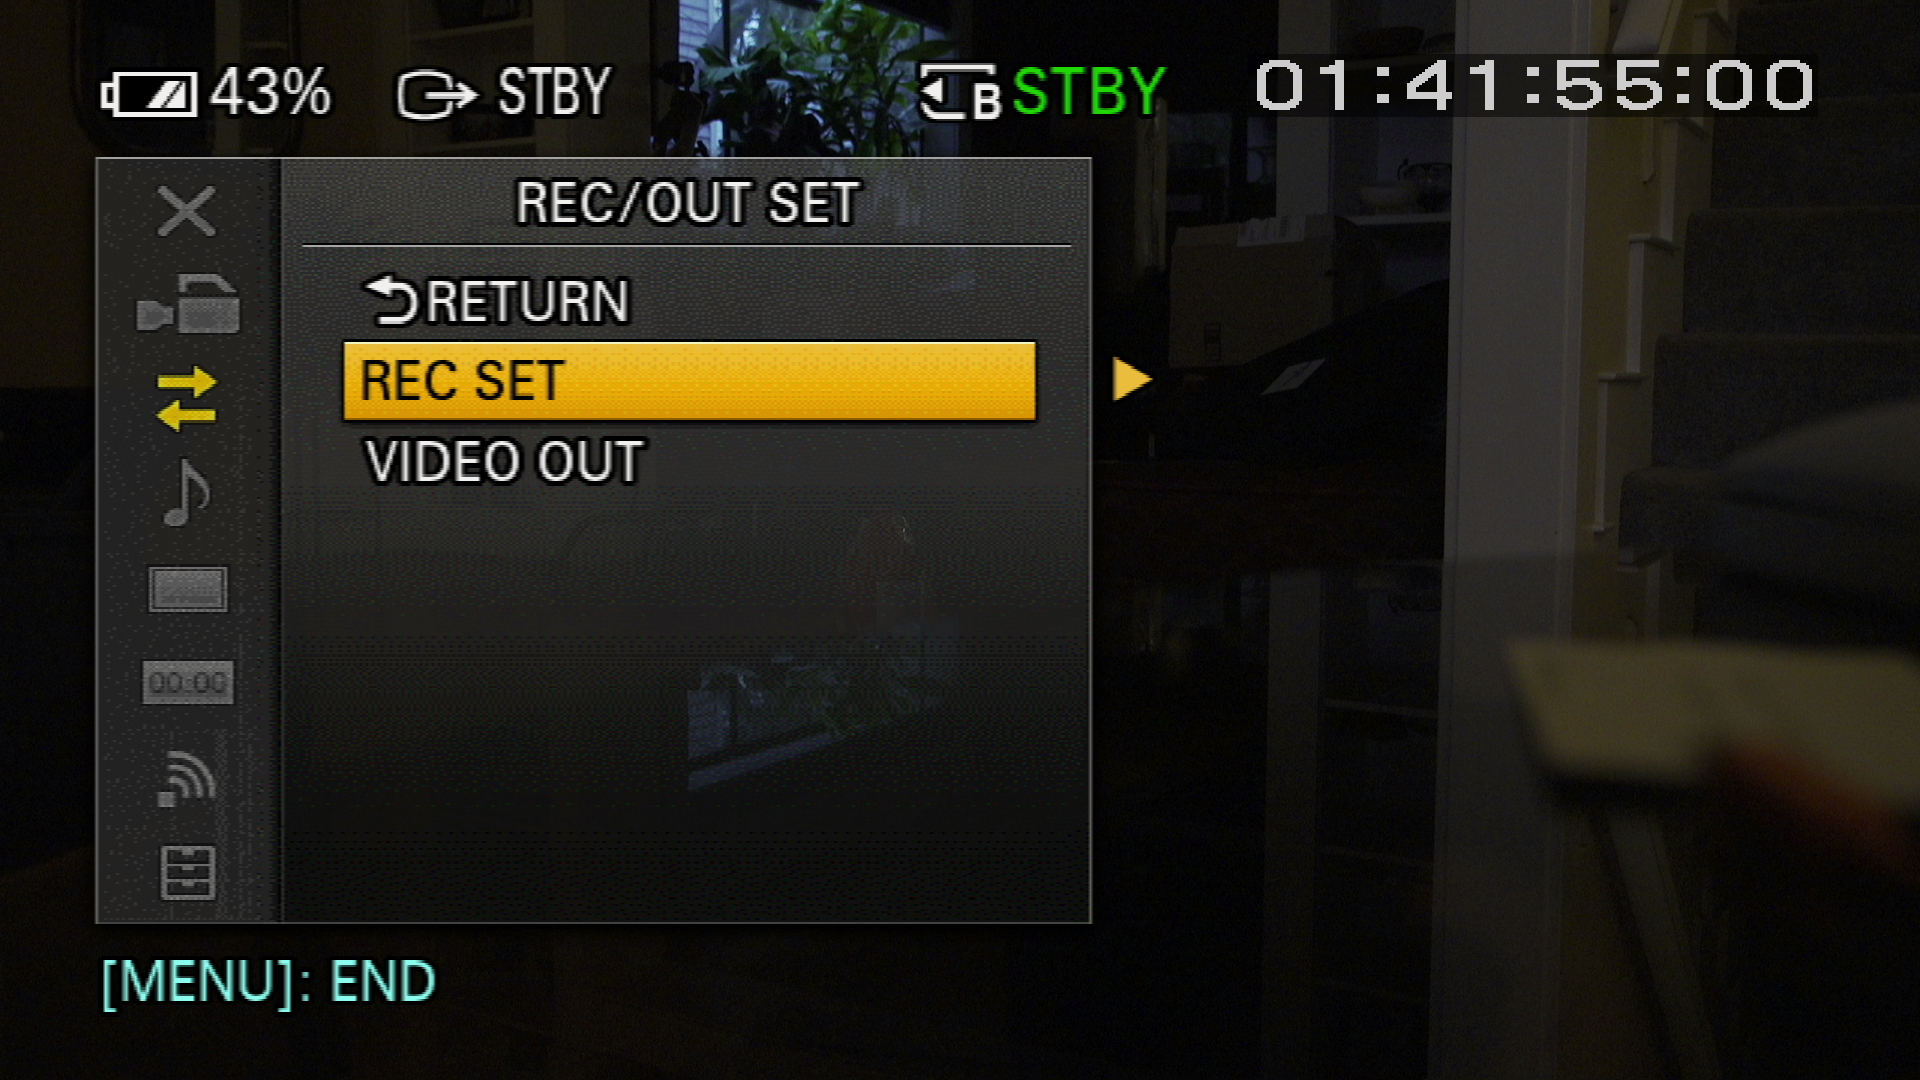
Select REC SET from in/out menu, and choose:
File Format: XAVC HD
REC FORMAT: 1080/24p 50Mbps
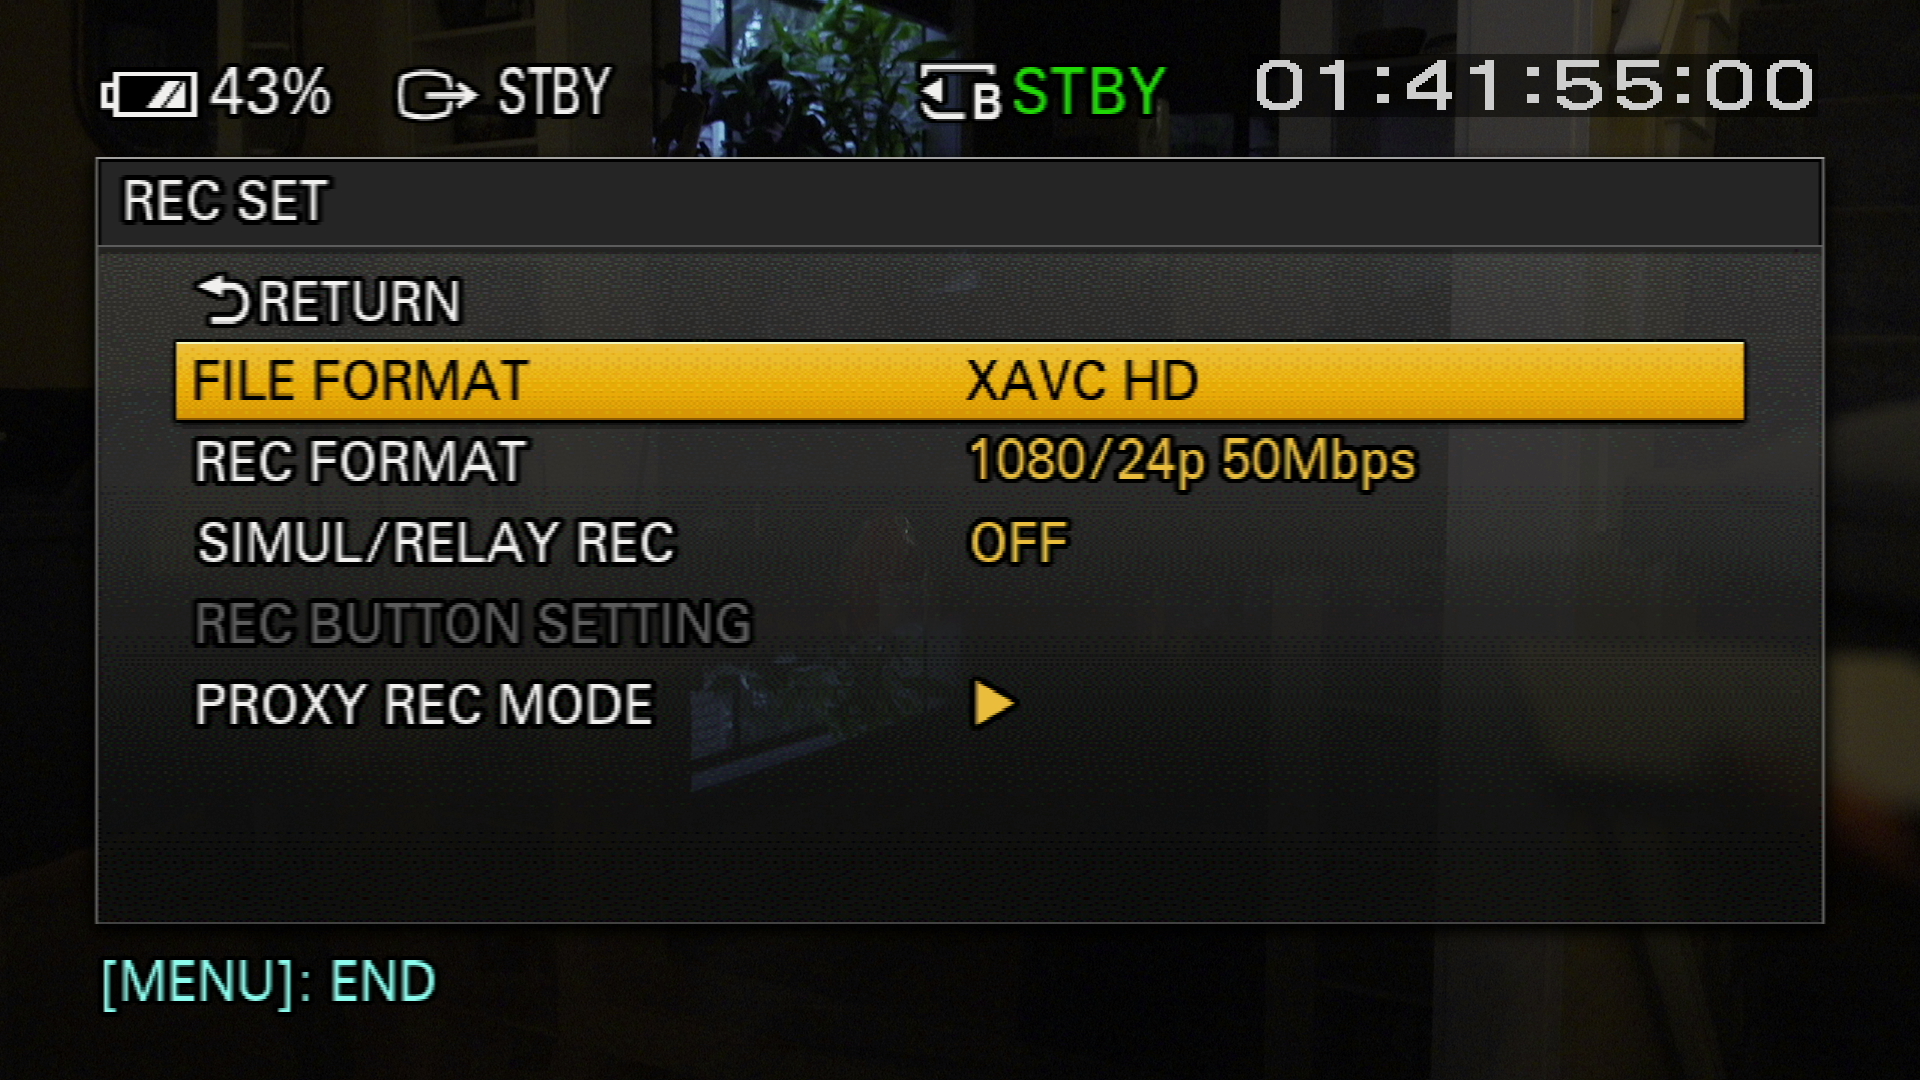
XAVC HD will give you the best quality image this camera is capable of, in gorgeous 10-bit, which can withstand a lot of color grading without getting noisy. The default XAVC QFHD option gives you 4K, but only in 8 bit. So unless you need the higher resolution, stick with HD. And avoid using QFHD in low light.
Monitor
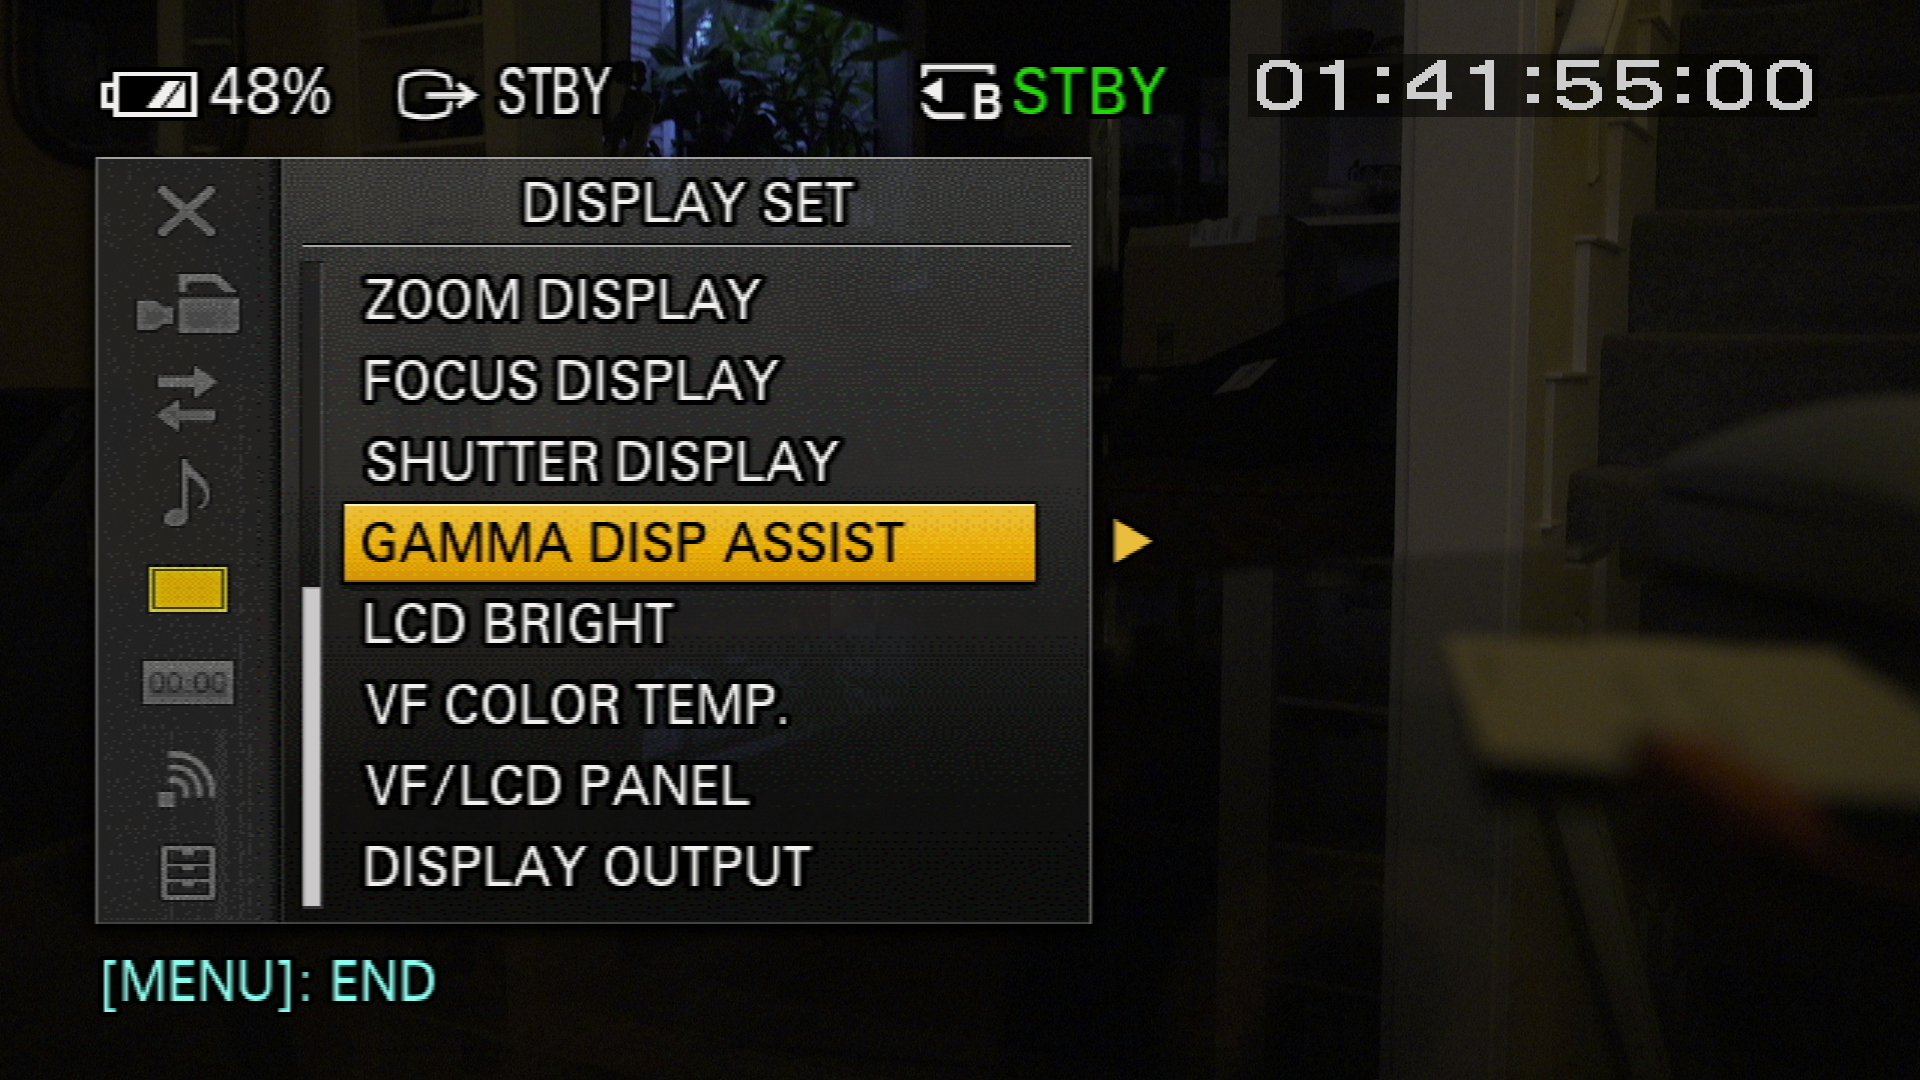
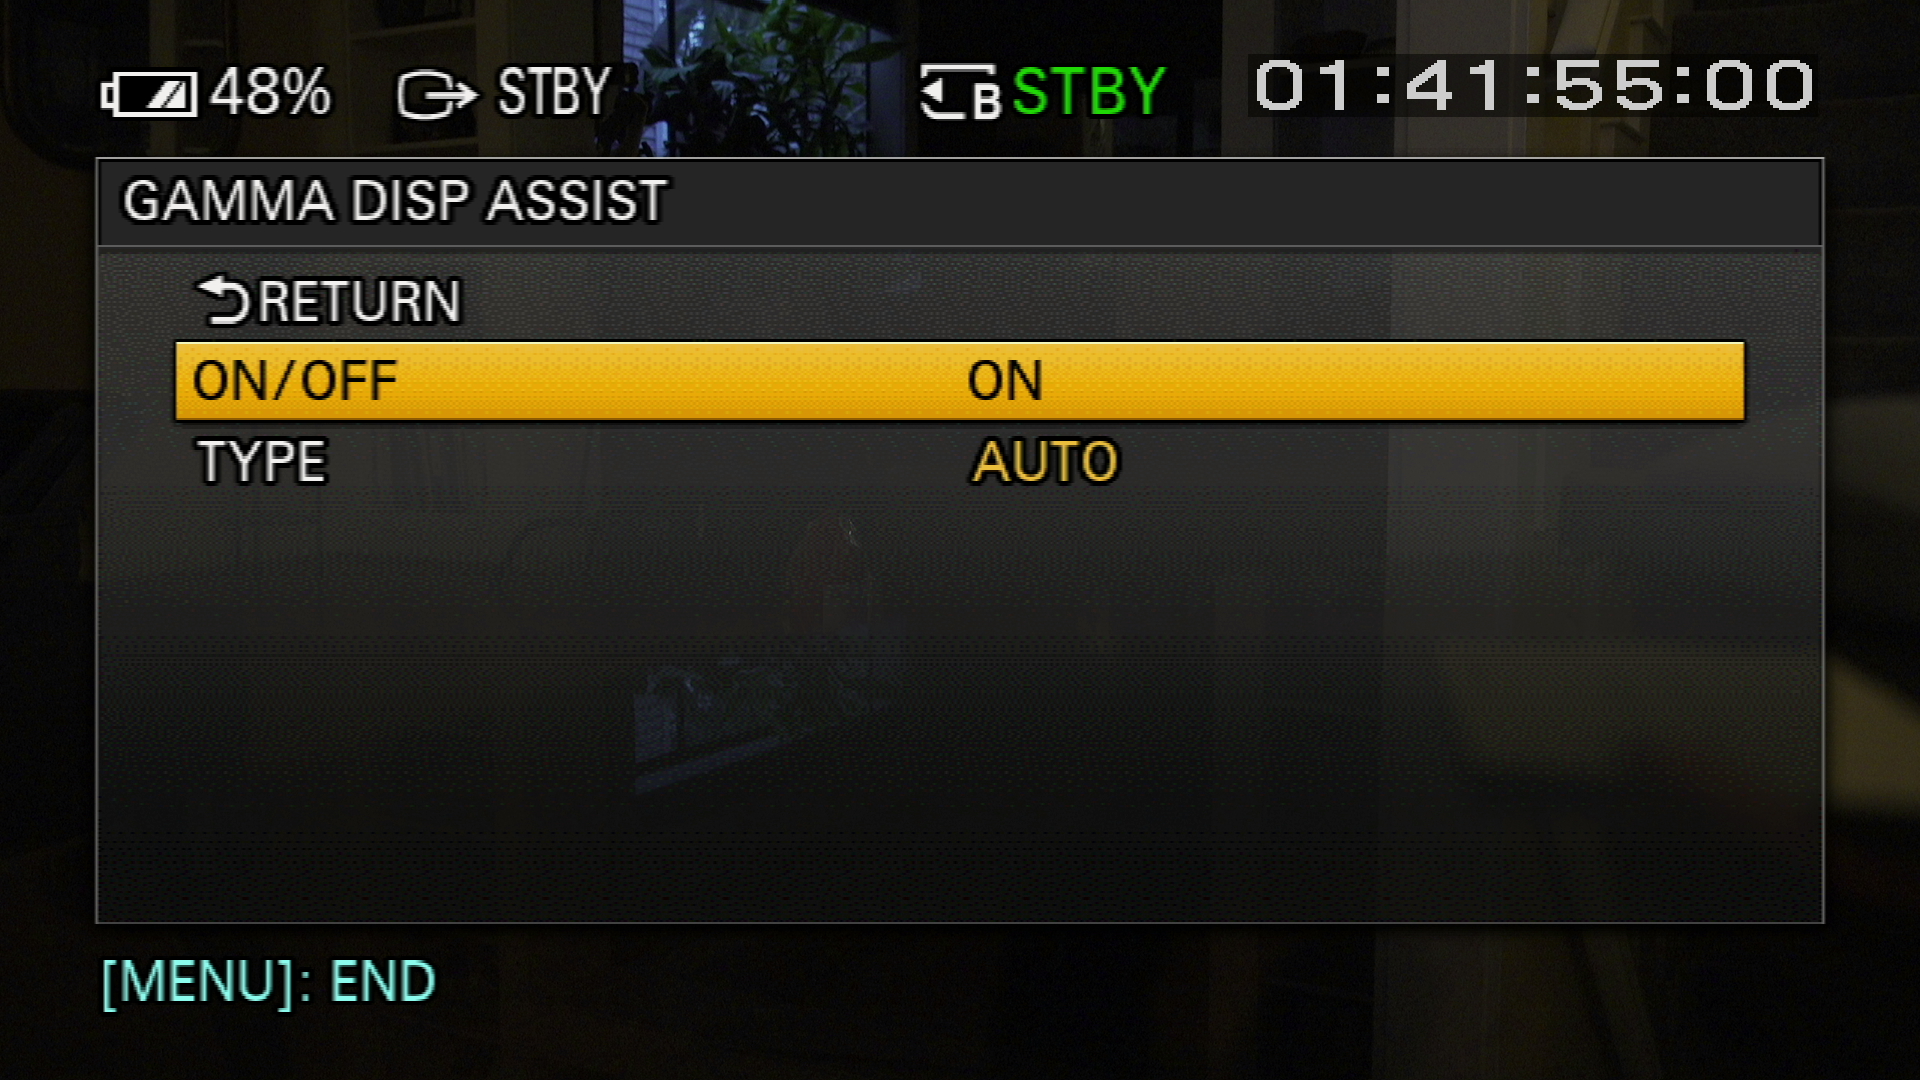
Enable the Gamma Display Assist. This increases contrast when shooting SLOG, making it easier to focus. When not shooting SLOG, it is automatically disabled.
VF/LCD Panel: I set to LCD Panel. Choosing Auto (the default) means your LCD will turn itself off and on whenever you inadvertently block the eyepiece of the viewfinder. You can then enable the viewfinder when needed by sliding the switch on the top of the LCD screen to OFF.

Hand grip buttons
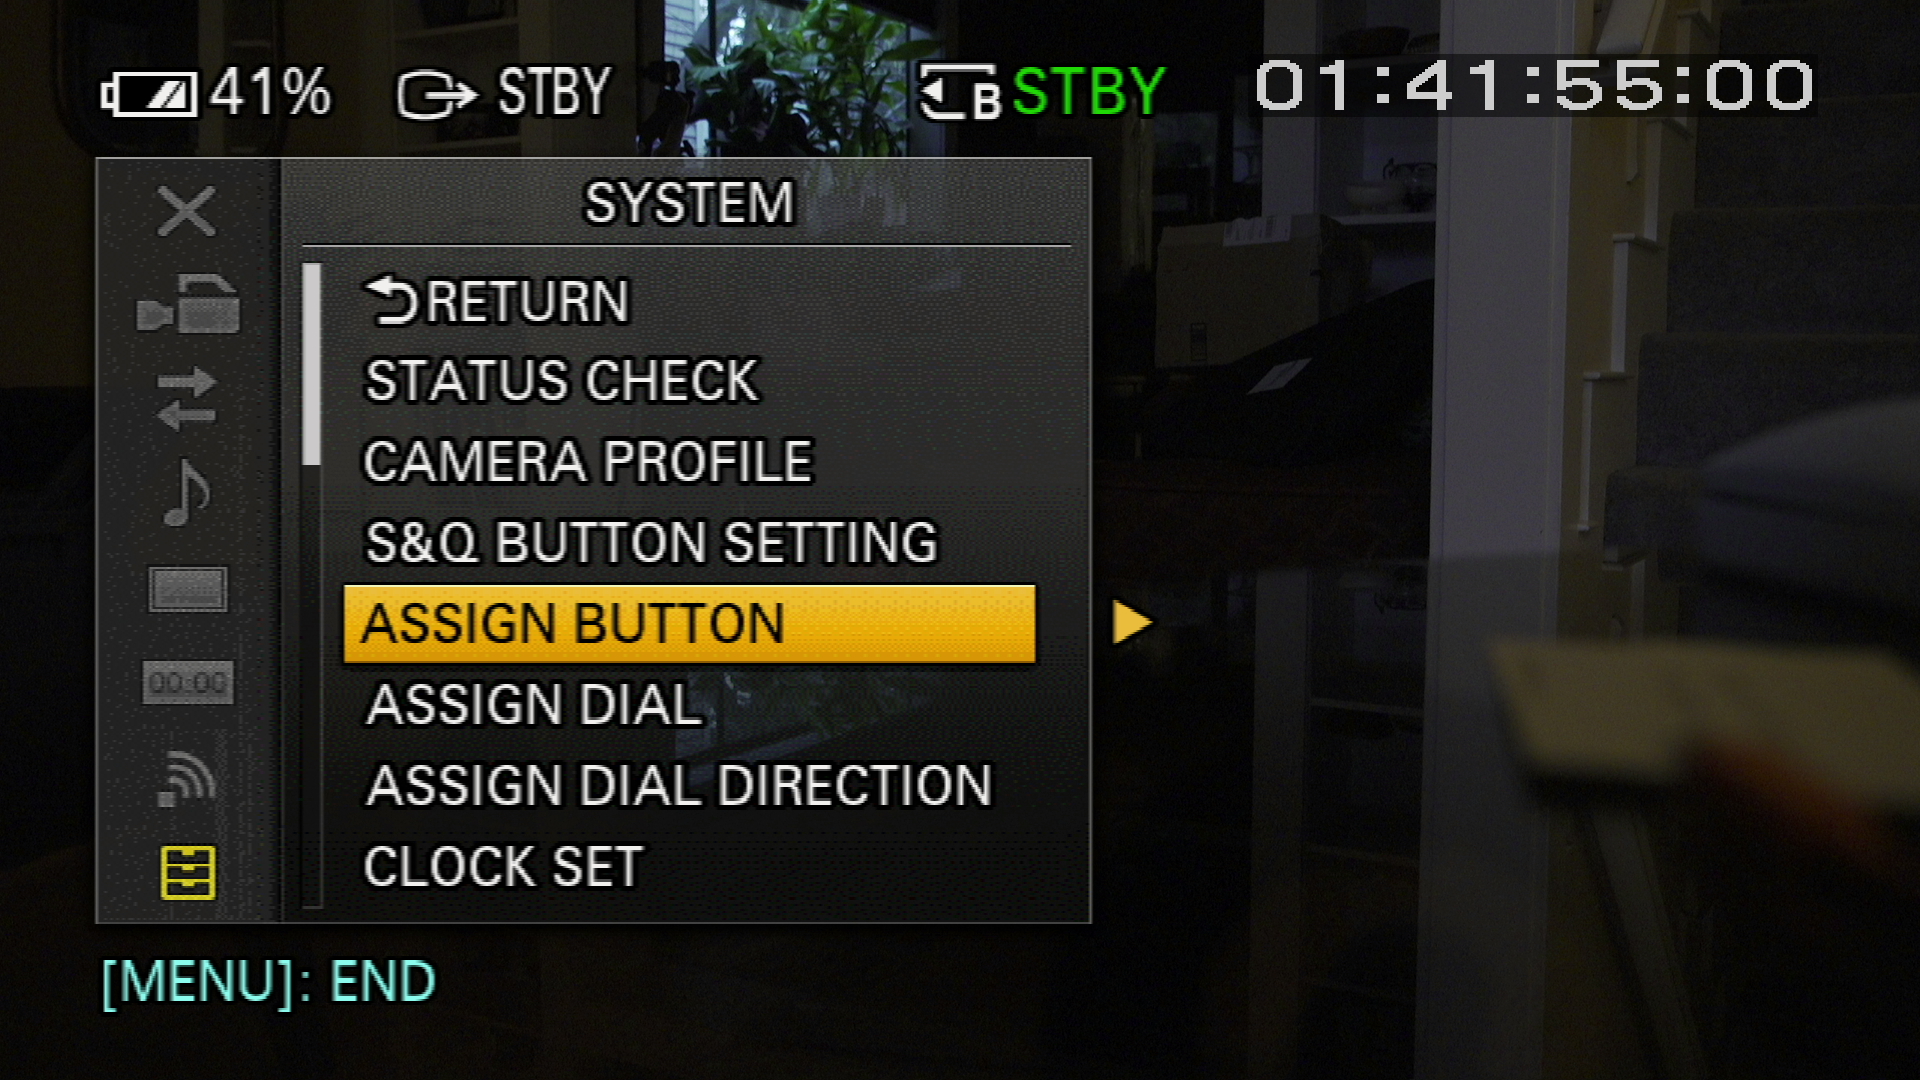
I recommend setting Button 6 to Center Crop. But if you use zebras, it’s a convenient place to toggle those on and off as well, since there’s no dedicated button for zebras on this camera. If you go with center crop, this will give you a fast way to reframe the shot by punching in to it for a quick closer angle. But be careful: this technique isn’t great in low light, as noise in the image is magnified dramatically.

Picture Profiles
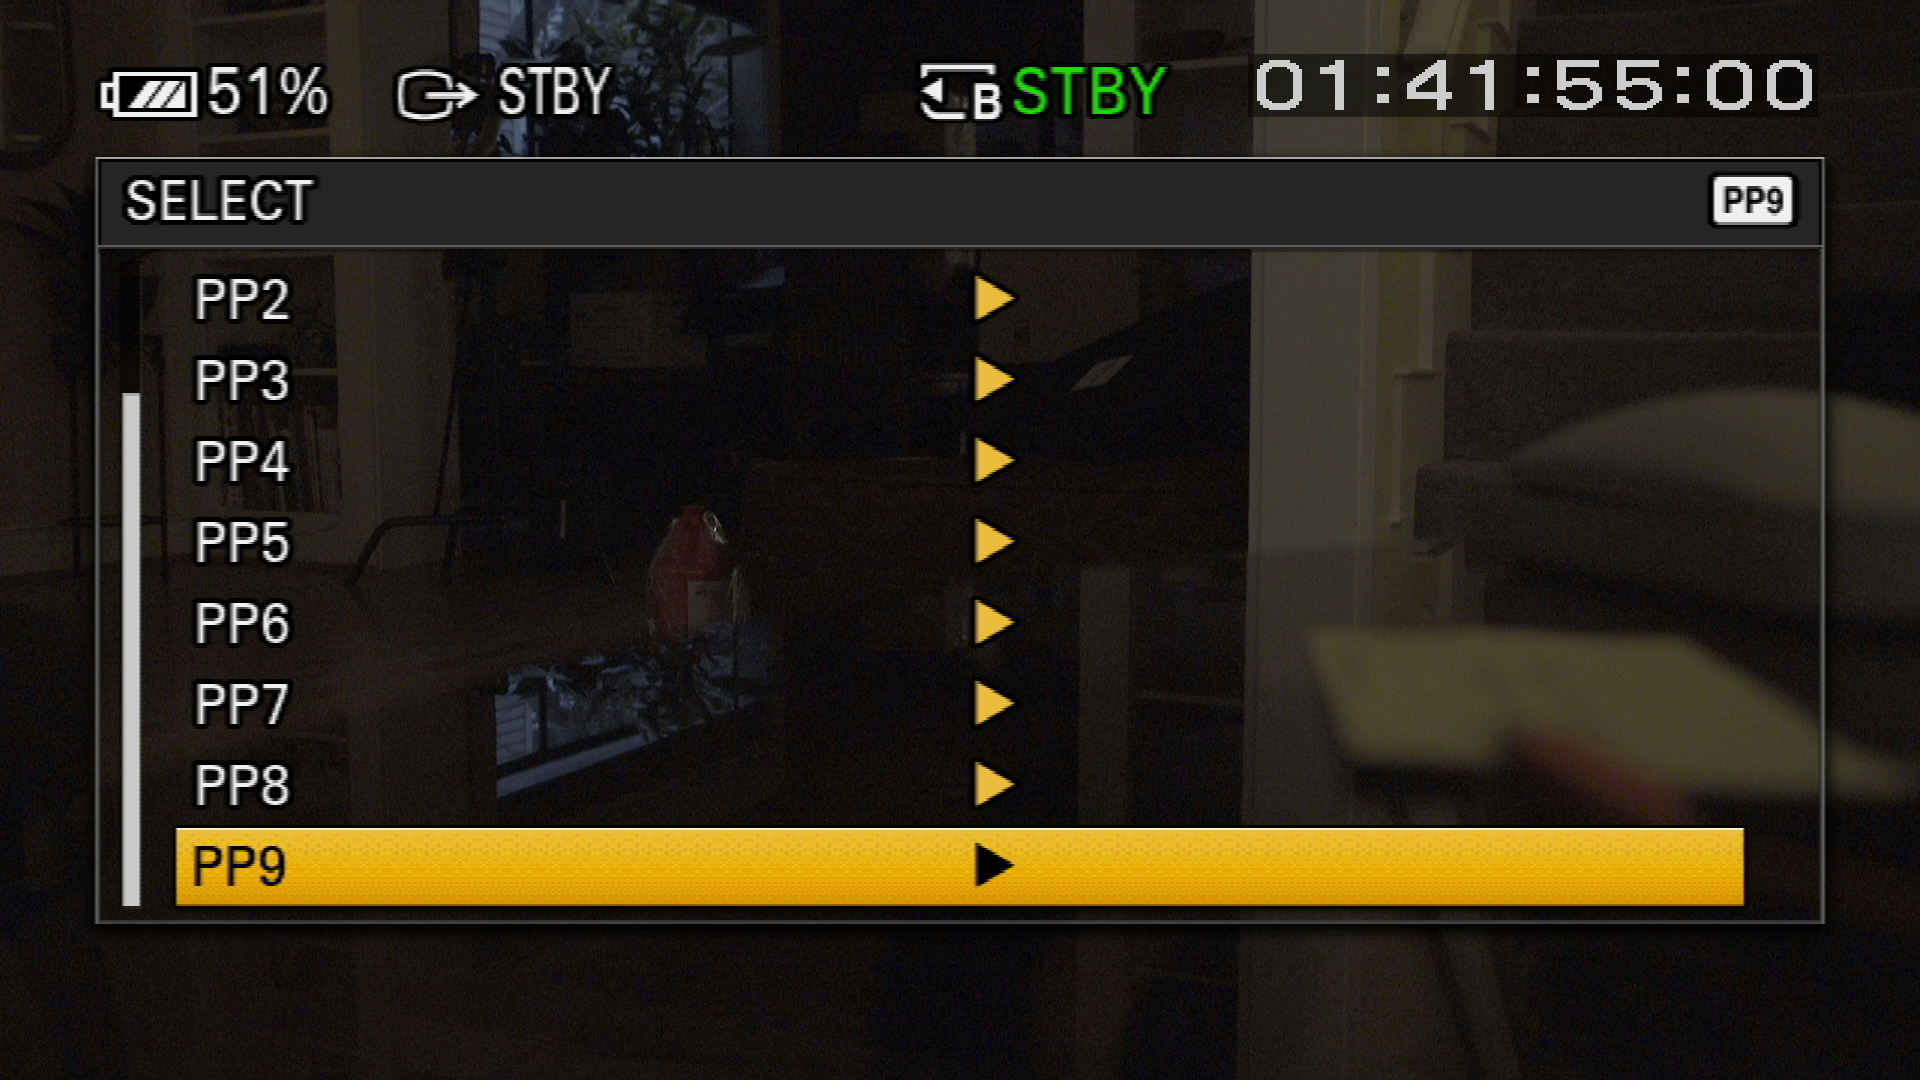
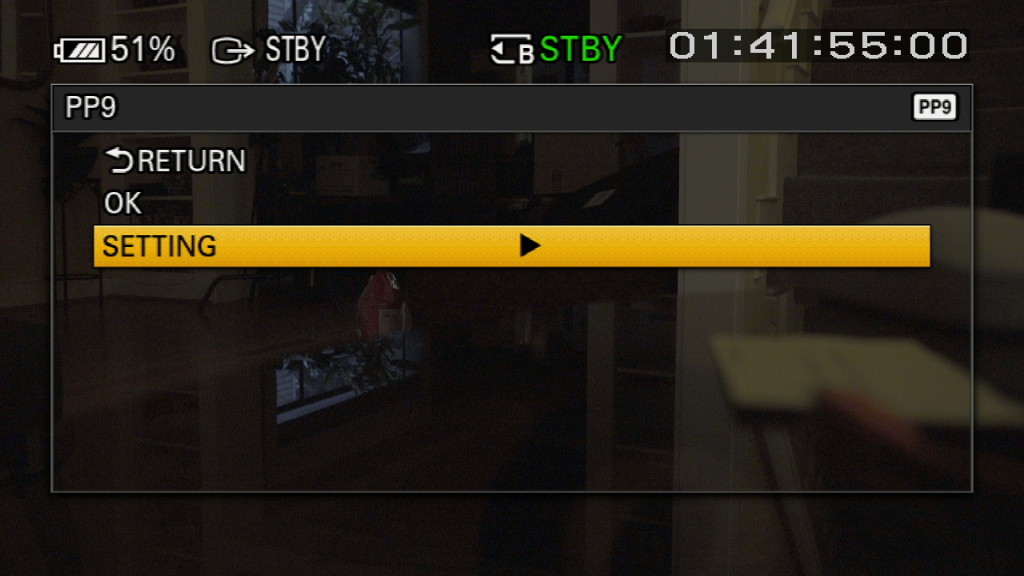
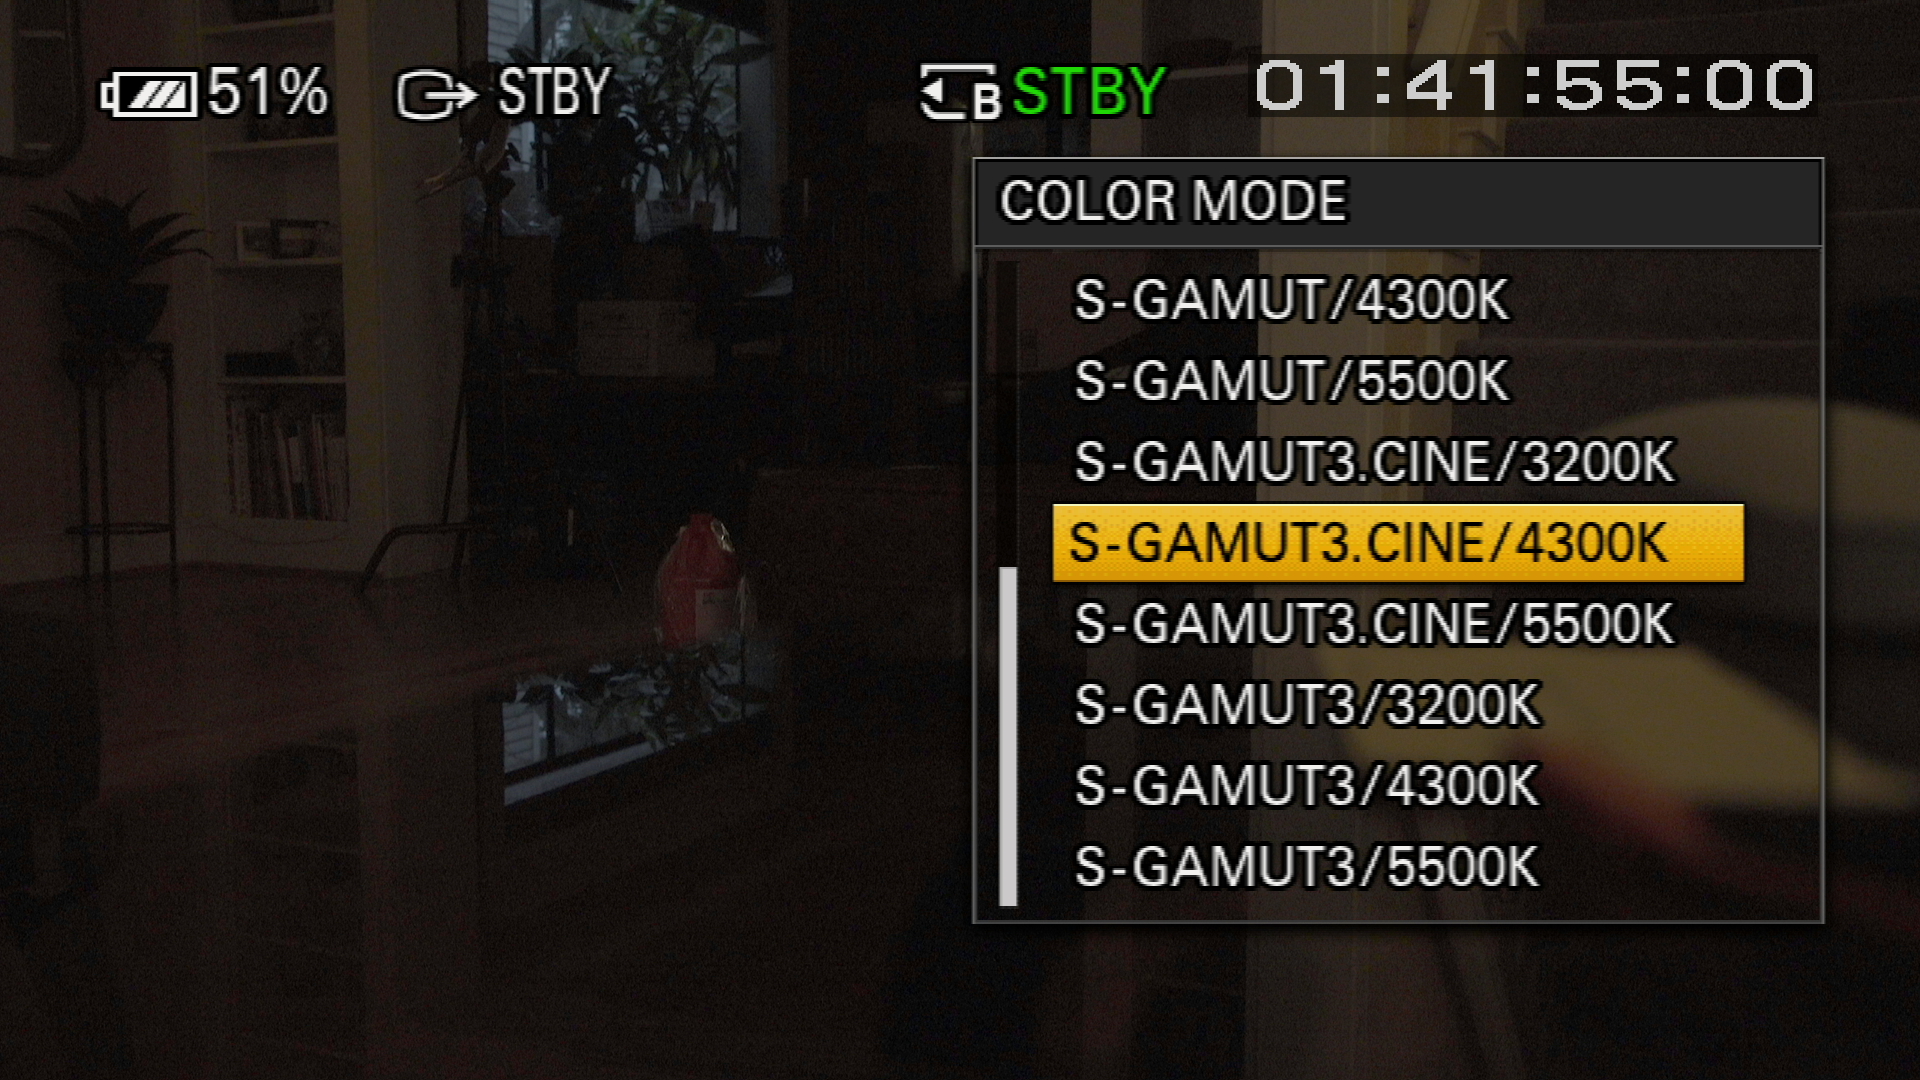
For well lit scenes in general, where you need to hold all the dynamic range possible, shoot SLOG 3. That’s PP 8 for daylight, and PP 9 for tungsten environments. For some reason Sony made the color temperature part of the picture profile in SLOG 3 when using the Sgamut color modes. Choose the option that’s appropriate for your lighting. OR, if you want precise control over color temp, choose Pro color mode. But I prefer to stick with Sgamut3.cine color mode when shooting Slog 3.
If you’re in a mixed light environment and want to split the difference, open either picture profile and dig into the menu, and select the 4300K option.
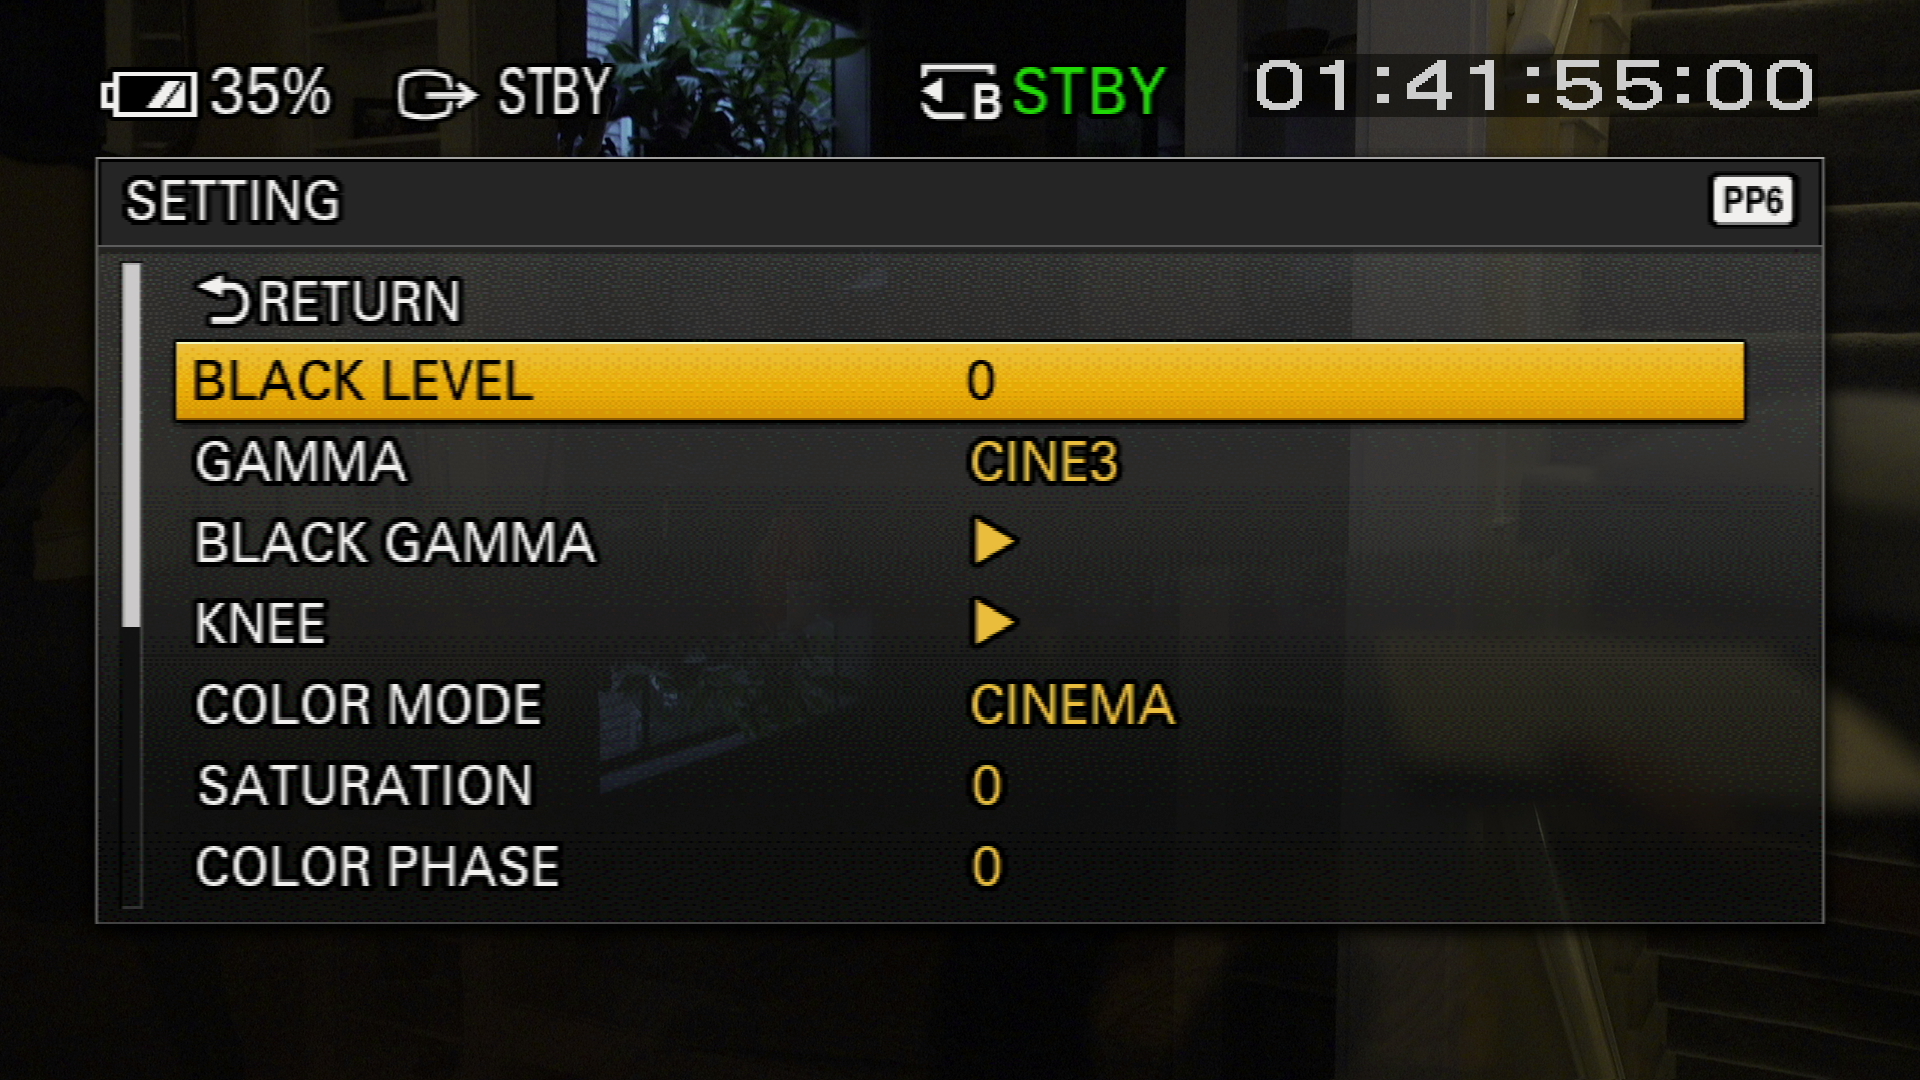
For lower light situations, choose a Cinegamma rather than SLOG. Here’s the rule of thumb: For brightly lit scenes such as direct sun, shoot Cine1. For average lighting, choose Cine3. For low light situations, go with Cine4. Each of these will require a little grading, but not much – just some contrast adjustments to make them look less flat by crushing the blacks a little. I’ve set my camera up with Cine3 on PP6 on my camera, like so:
Gain
If you’re confused by the way the sensitivity of the sensor appears to be changing when you switch from CineGamma to Slog, you’re not alone. Rest assured the sensitivity isn’t changing, just the recommended exposure settings from Sony for each. So if you want to keep it simple, just change the ISO/GAIN SEL to GAIN. This will then display 0db when you are shooting at the camera’s native gamma, which is what you should be using most of the time. When you get in low light, boost the gain (as little as possible to avoid noise).
If you want to use ISO, from the Camera menu, set up the L-M-H gain switch on the left side as follows:

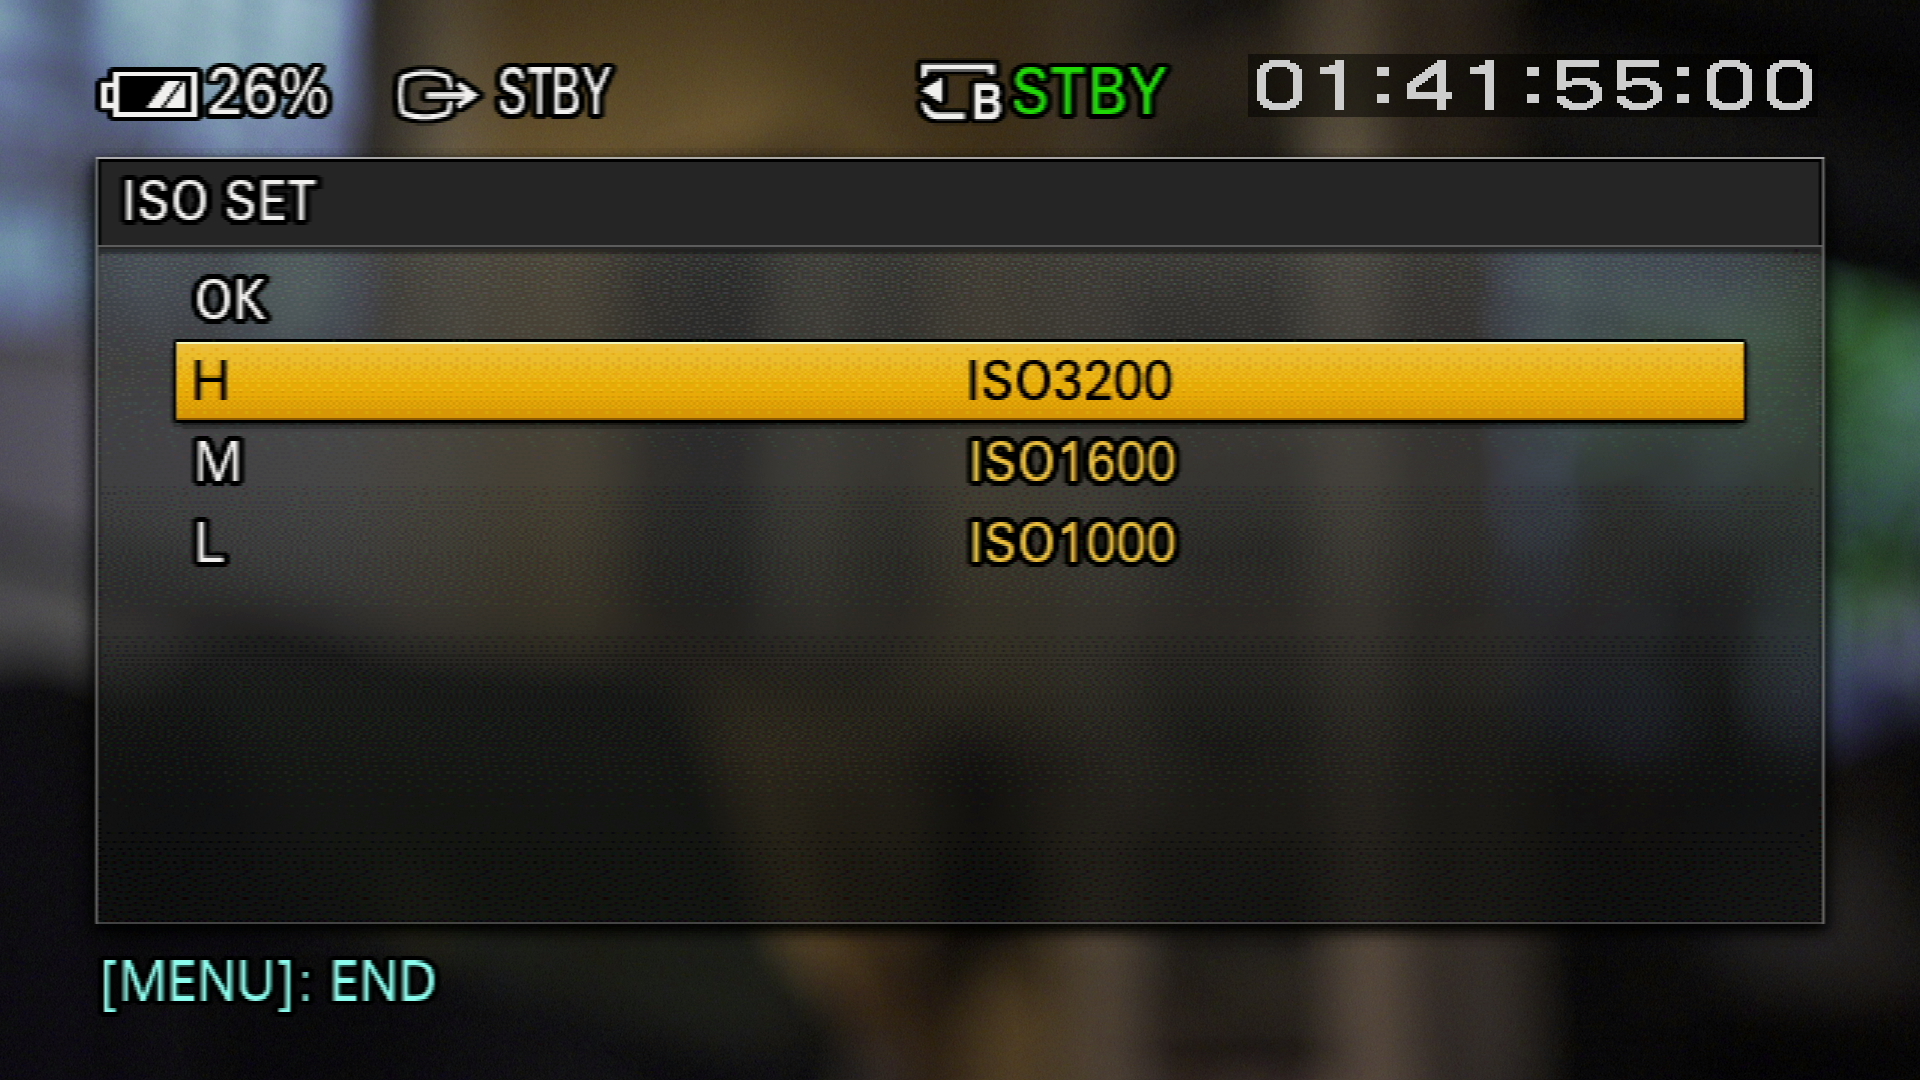
I recommend staying at or below 9db of gain (ISO 1600) with this camera when shooting with the hypergammas. The image quality starts to degrade significantly above 18db of gain (ISO 3200). For best results in very low light, try PP3 (Rec 709/Pro).
When shooting in SLOG, avoid exceeding 19db of gain (3200 ISO). If you need to push beyond that, switch to a CineGamma (see Picture Profiles above).
Audio settings
For general run and gun shooting with a shotgun mic, I set channel 2 for the shotgun mic, and set it to level 5 manual. Channel 1 I set to the internal mic, on AUTO. Adjust the manual level as needed depending on your environment. The auto channel is a backup, that should catch any prolonged loud spikes such as if your subject starts yelling, giving you something to cut to in the edit should you need it.
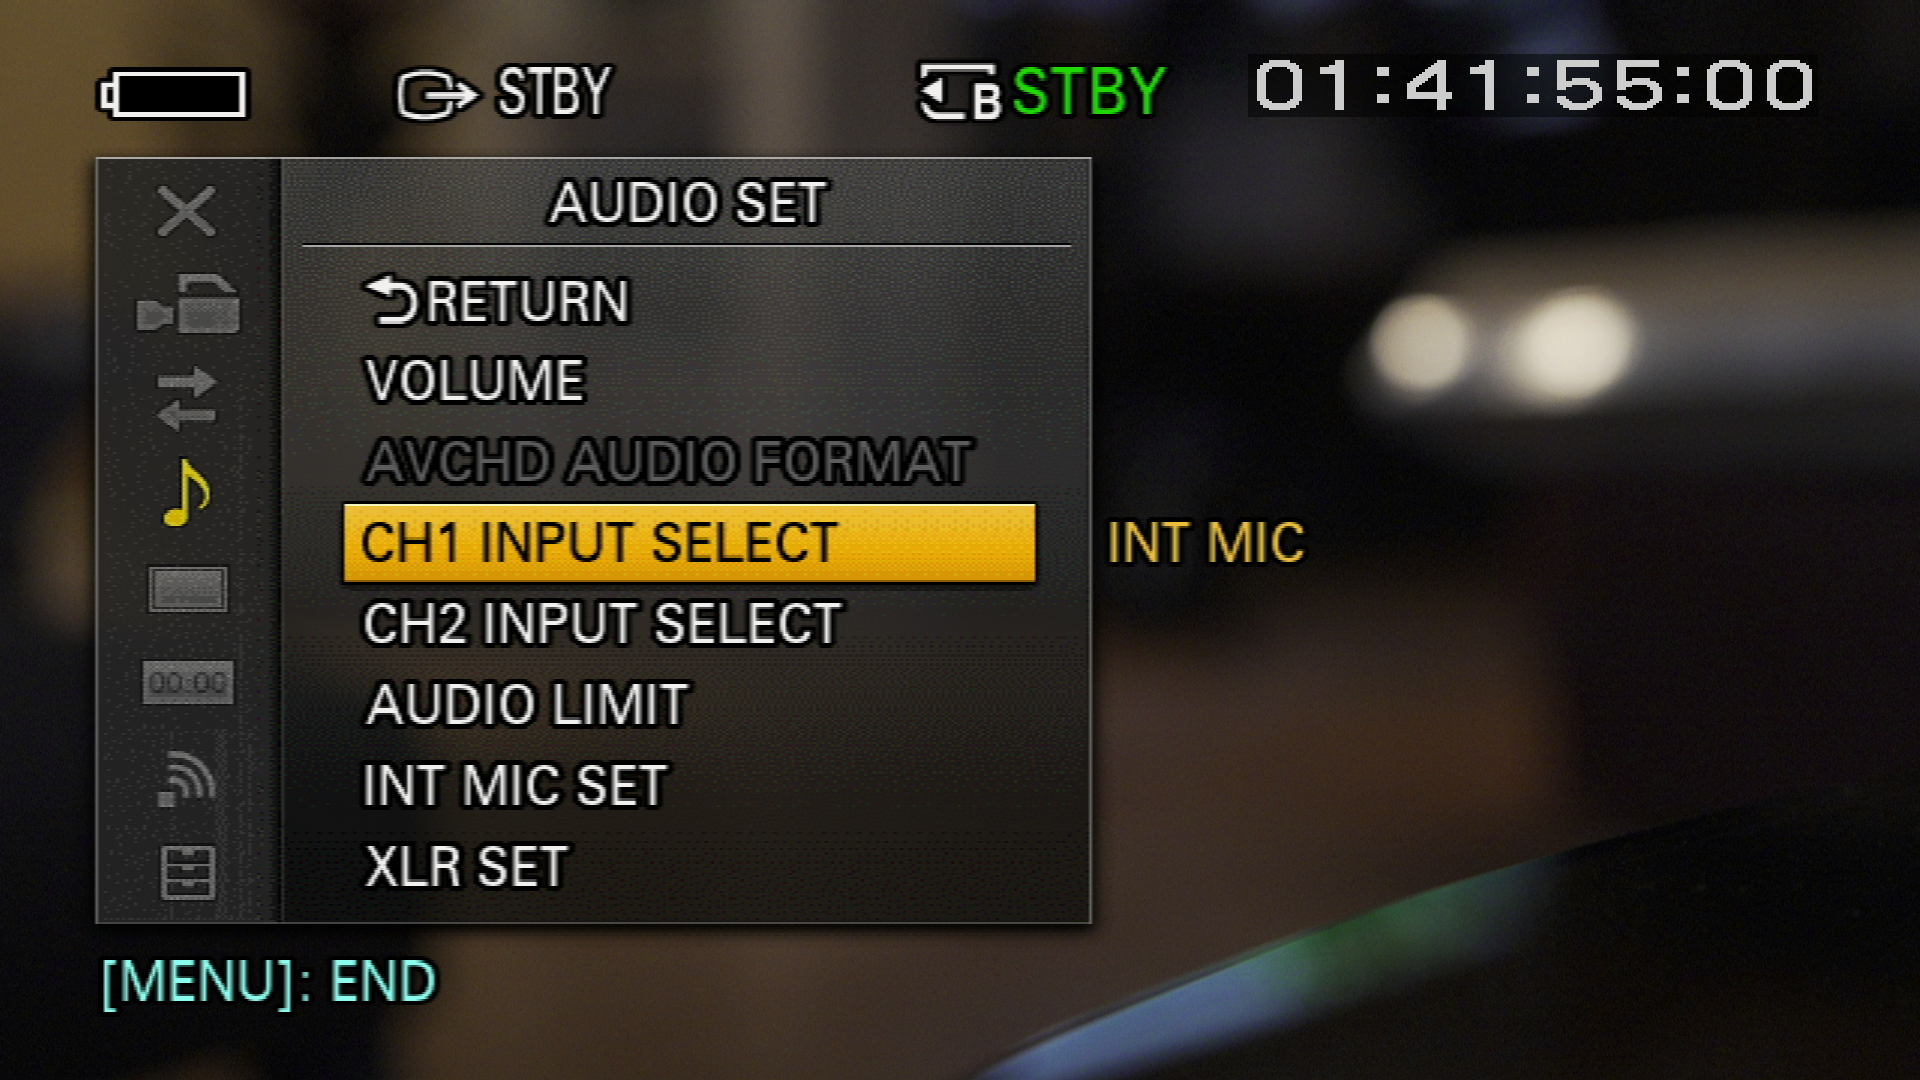
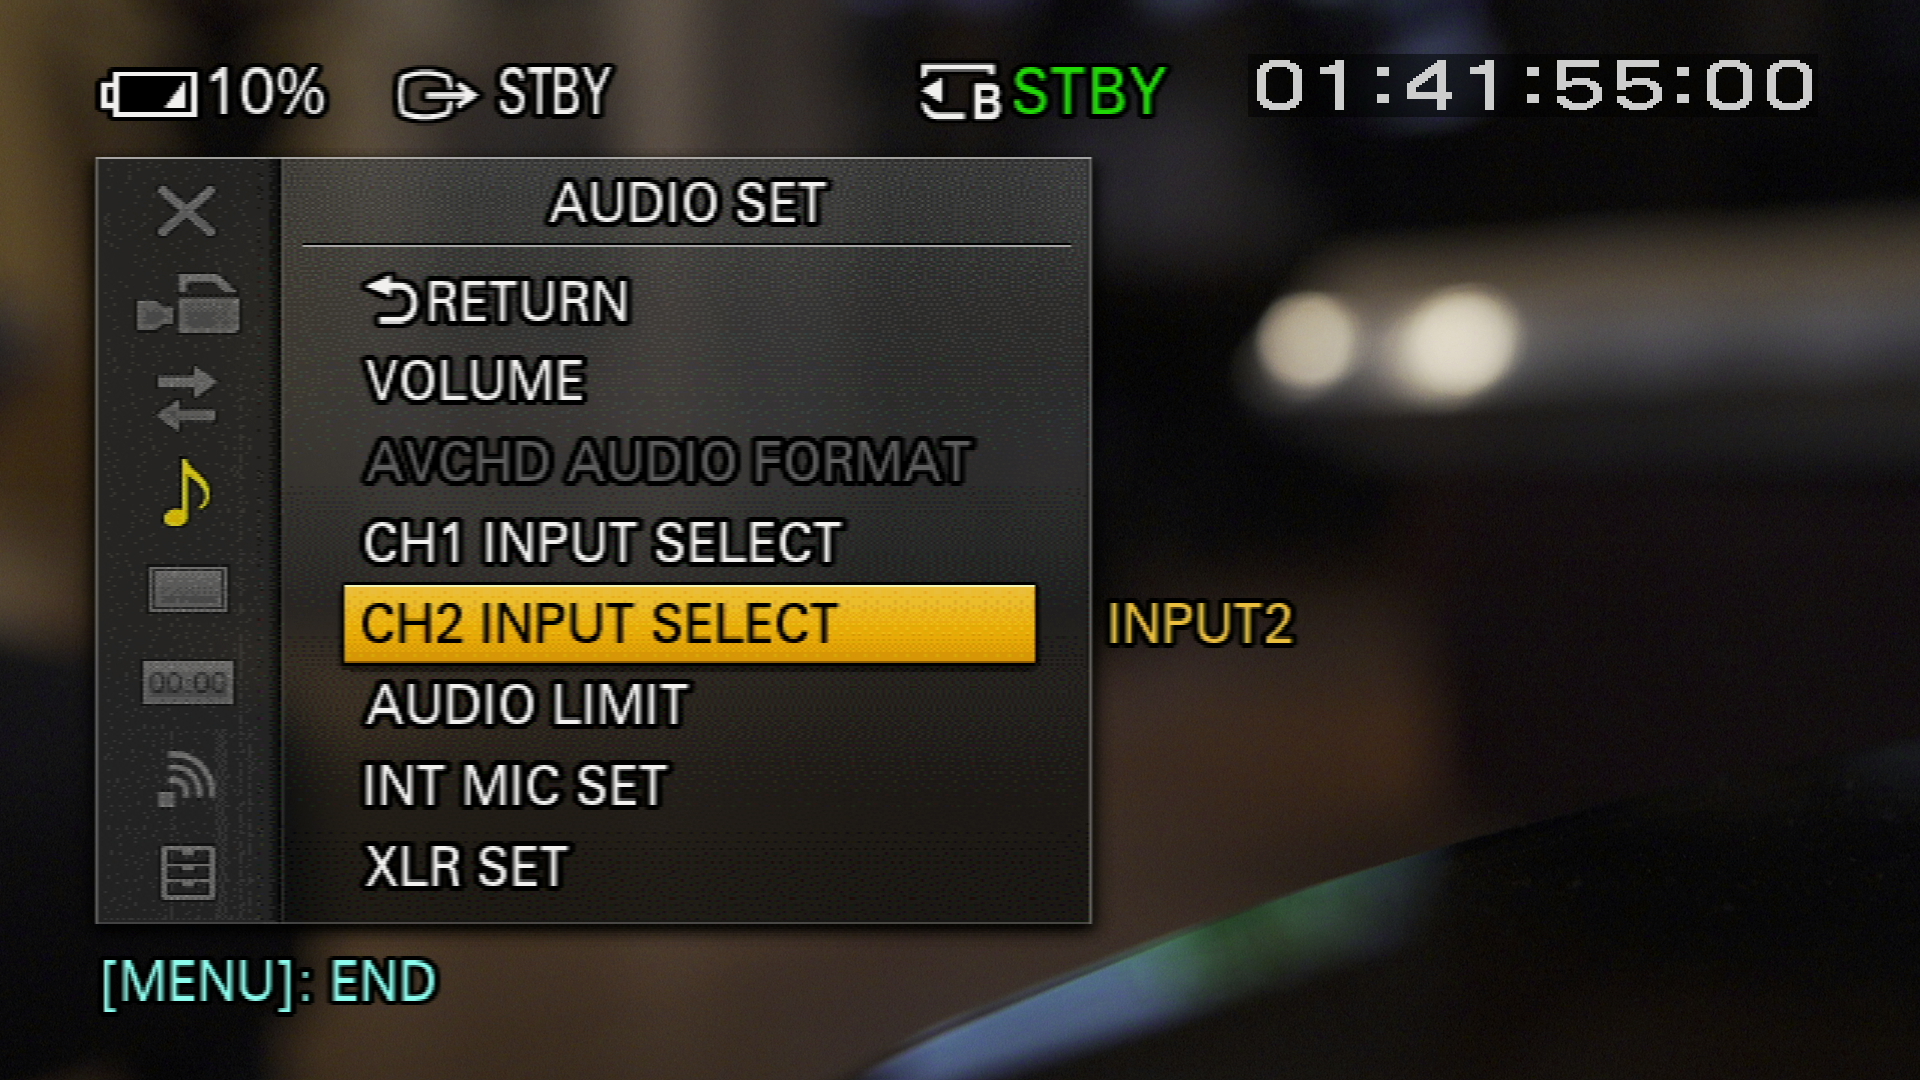
For recording interviews or woking with a boom op, leave the shotgun mic as-is on channel 2 (so you can quickly untether and shoot b-roll without having to touch the menus again) and plug in your external source via XLR cable to Input 1, being sure to set the input on the XLR jack to phantom power (for most shotgun mics) or line level (from mixer output) as necessary. Then, set CH1 Input to INPUT1. That’s it in a nutshell.
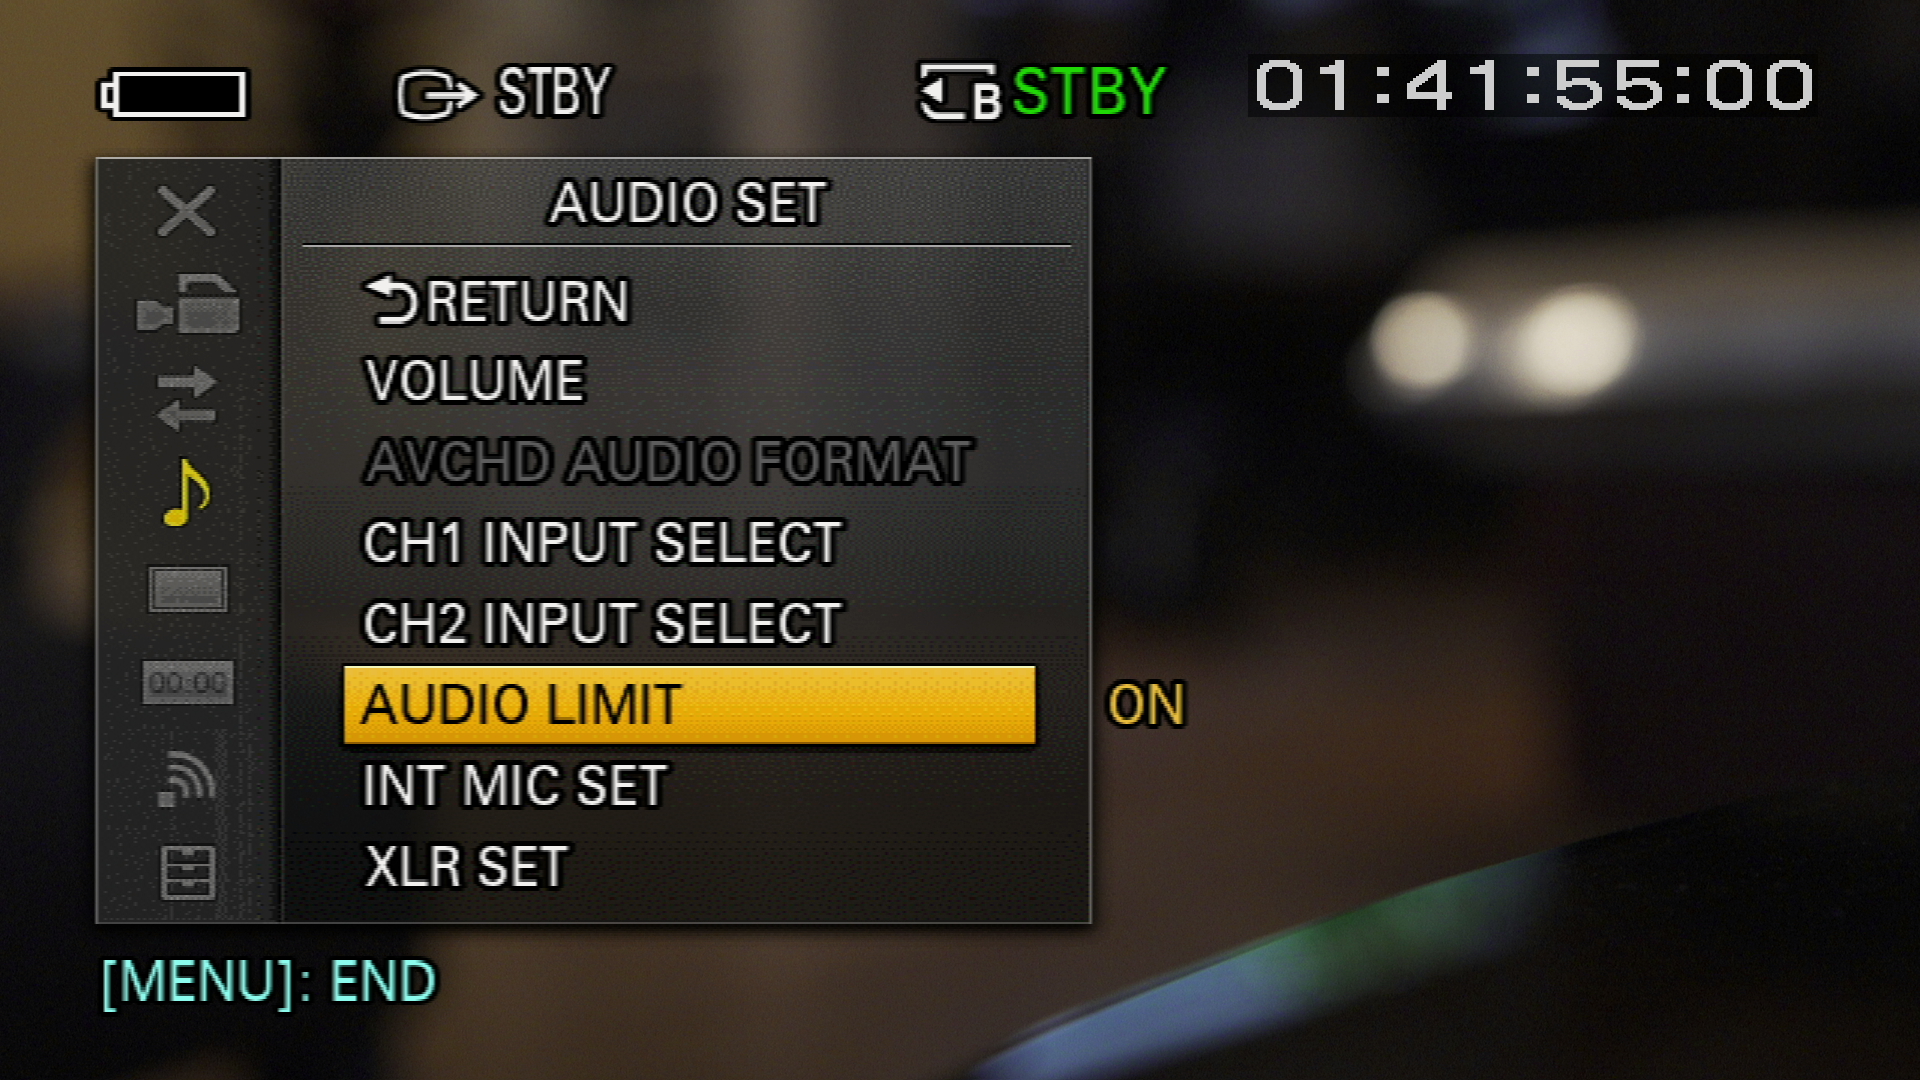
Engage the AUDIO LIMIT to help prevent clipping from sudden brief loud noises such as coughing in an interview. I leave this off when working with a sound recordist, as limiting is better handled by the mixer.
Tip: How to expose SLOG vs. Hypergammas
Exposing SLOG (PP 7, 8 or 9) at the Sony-recommended levels results in noisy shadows. Fixing that is easy: Overexpose your footage by 1 stop (also referred to as a one-stop pull). You will still have plenty of headroom to avoid clipping, and your shadows will be less noisy. You can even go as much as a 2-stop pull, but the image on the LCD and viewfinder will appear blown out, so you’ll need an external monitor that supports LUTs to accurately gauge your exposure.
When shooting in any of the other picture profiles, slight underexposure, by a half stop, will produce the best results, especially with skin tones.
SLOG2 or SLOG3?
For most situations, I recommend SLOG3. SLOG2 is more difficult to grade than SLOG3. Both will give you 14 stops of dynamic range, but the response curve is different. As a result, if you’re shooting 4K in SLOG, you’ll get the most information possible in the limited 8-bits available by choosing SLOG2. If you’d like to understand why this is, along with a lot of other excellent info about shooting SLOG on this camera, check out this talk by Alister Chapman.
A quick way to start your grade with SLOG3 footage is to use a LUT. I’ve found two very good LUTs for this purpose. The first is Sony’s Alexa emulation LUT. It comes in two flavors, one- and two-stop exposure pulls. The second is a higher contrast version of the same LUT, with a one-stop pull, called AA709A, that was developed by Art Adams. I’ve packed up all three and tweaked them so they’ll work with the magnificent SmallHD 502, a monitor that preserves the form factor of the FS5 while giving you the ability to gauge SLOG exposure correctly through use of a LUT. You can download these FS5 LUTs here.
Shooting tips
It’s very useful with this camera to toggle the WHT BAL on and off when shooting in hypergamma picture profiles. This turns auto white balance on and off, and I’ve found the auto white balance feature to be very useful with the FS5. With most other cameras, I wouldn’t be caught dead using auto white balance. But Sony seems to have implemented this well, and I find it quite useful in difficult mixed lighting situations.
Use Button 5 on the hand grip for fast access to ISO, shutter speed and manual white balance.
To get a quick shot you you’d otherwise miss, just toggle on FULL AUTO on the top of the camera. The camera will take over EVERYTHING – white balance, shutter speed, ISO (and aperture if using a Sony lens). You won’t want to use these settings for long, but it’s a lifesaver in some challenging situations, such as following someone through a doorway and into a house.
Toggling any of the three ISO/GAIN, WHT BAL or SHUTTER buttons along the left bottom side of the camera enables auto for each, as well as allowing you to manually set the shutter. For manually adjusting them, I find it’s faster to access them via Button 5 on the hand grip.
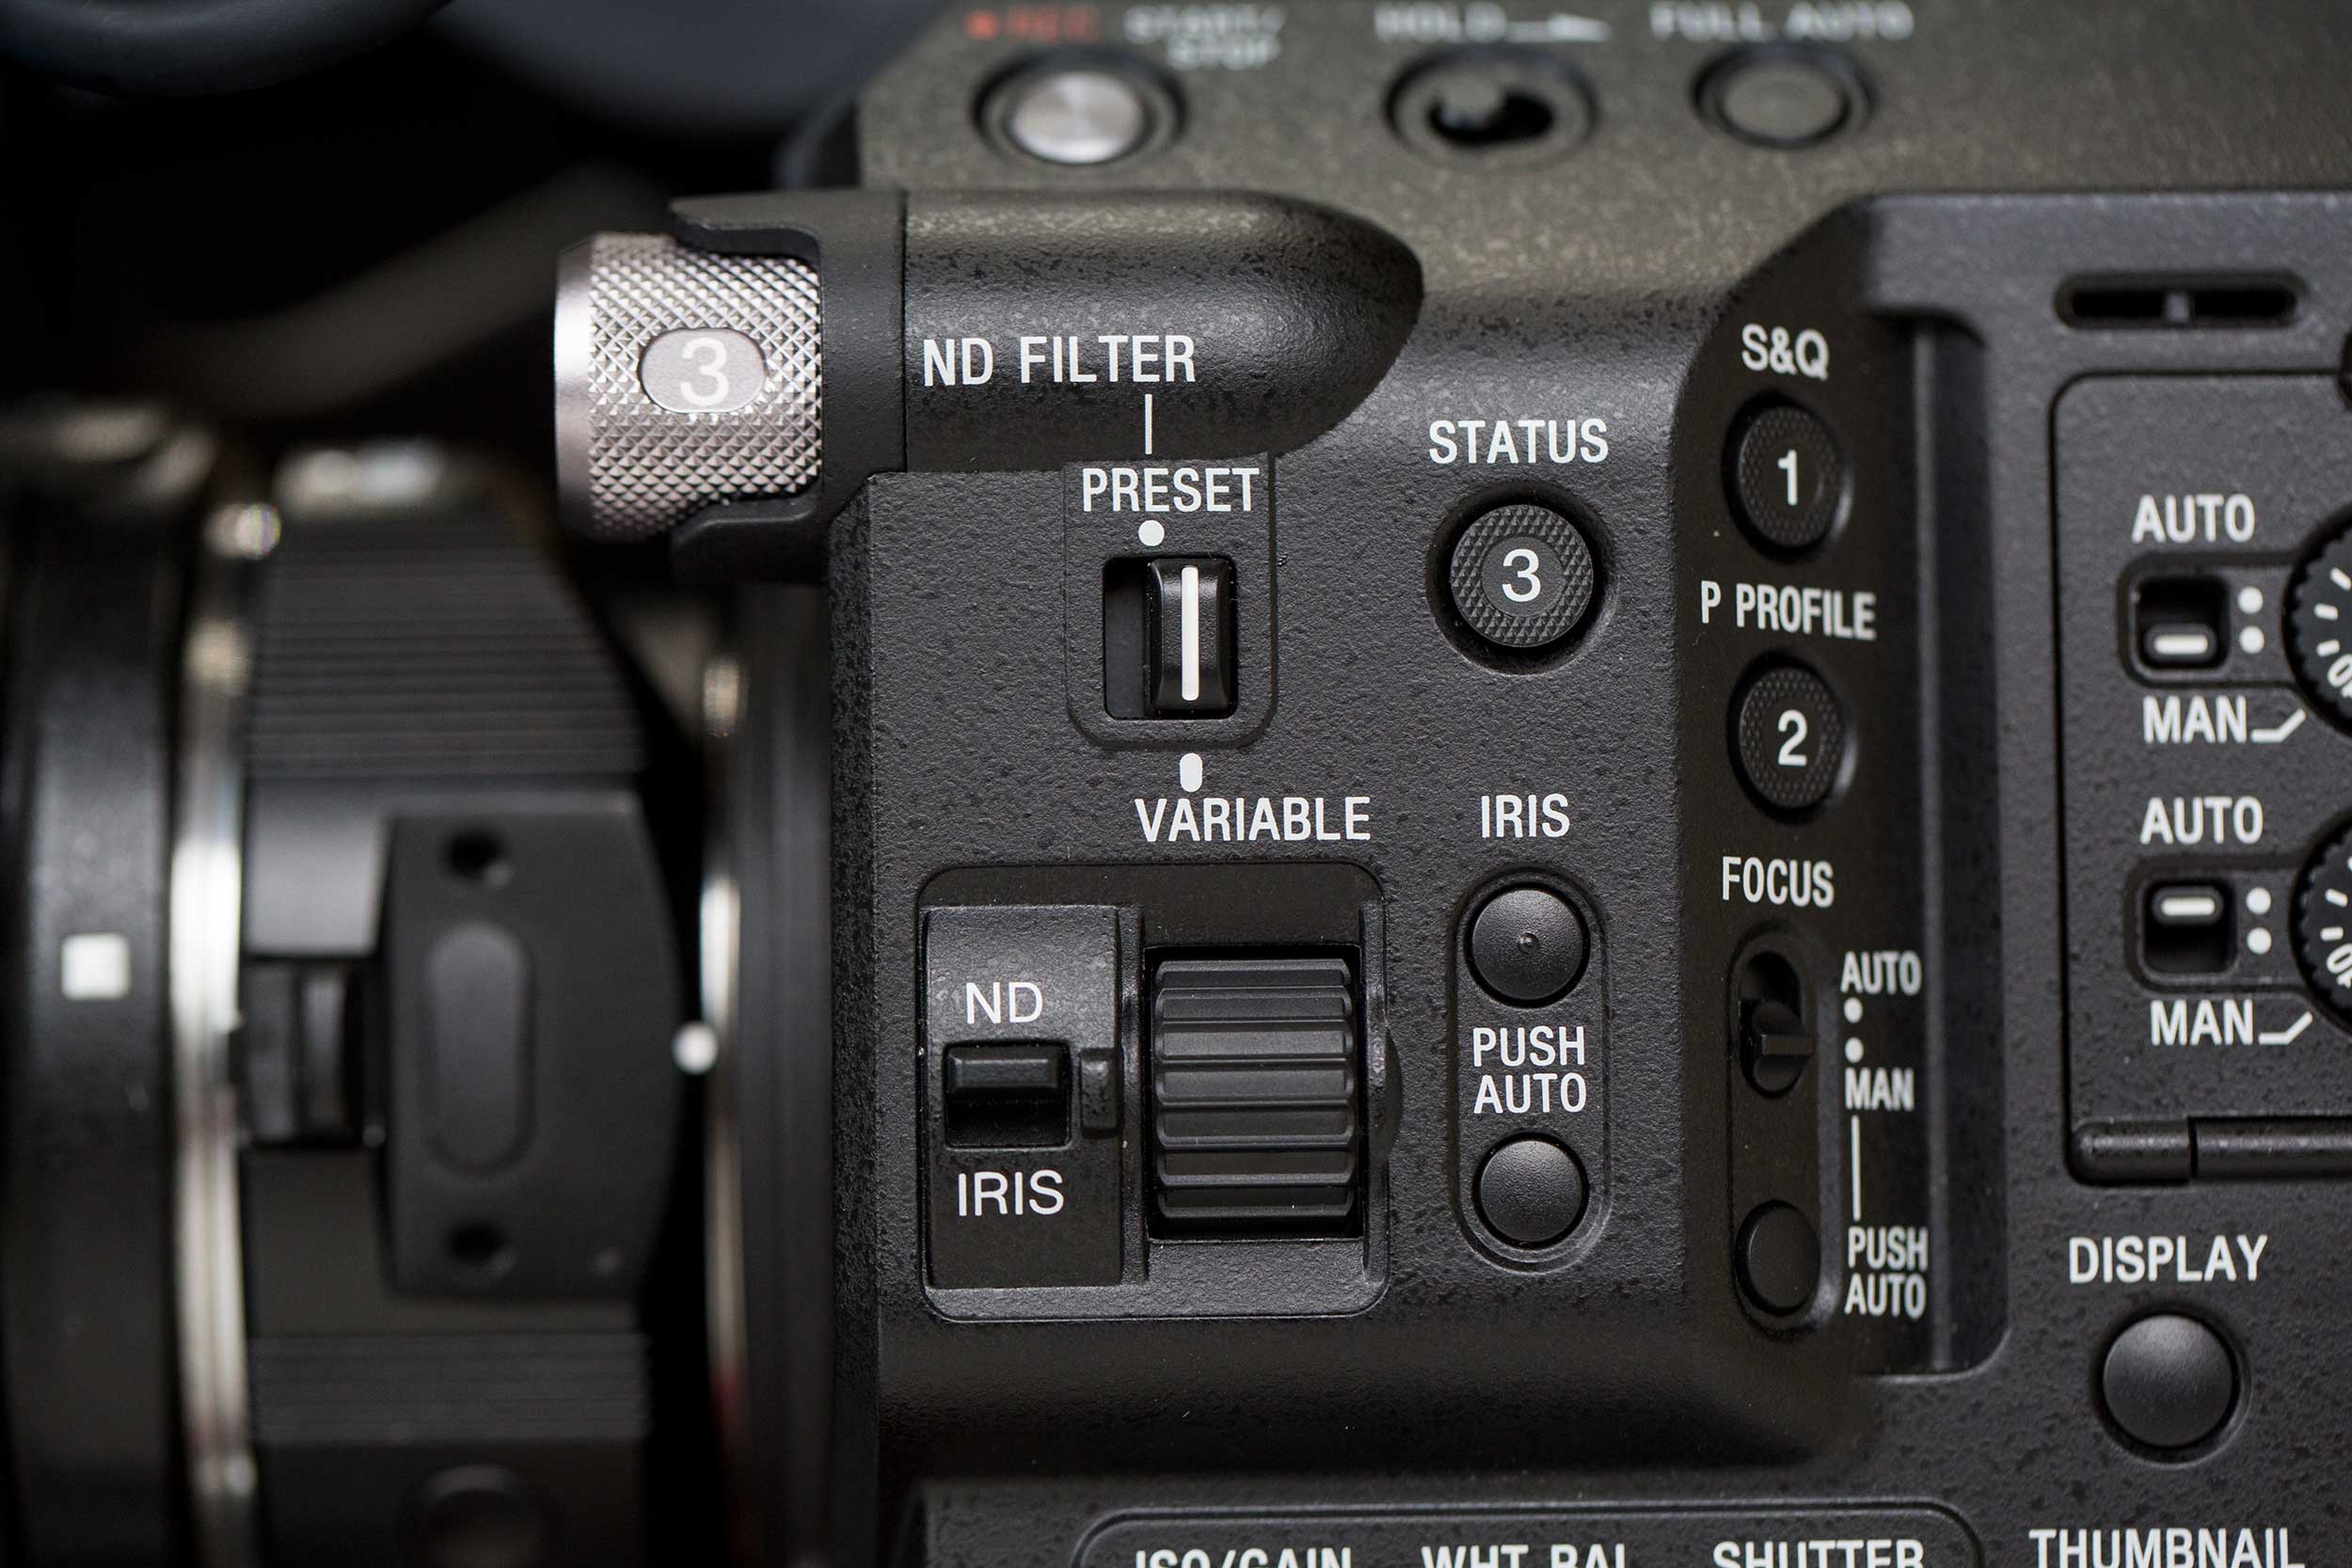
Set the ND FILTER to VARIABLE and ND/IRIS to ND. This allows you to steplessly control exposure with the wheel on the left side of the camera. It’s really the best way to control exposure, and the most innovative feature of this camera. Use it!
Auto ND
With version 2.0 firmware, auto ND is enabled. This is a very, very cool feature. It’s a way to get an automatic exposure without messing with your shutter speed, depth of field or ISO levels. I’ve remapped the Status button (3) so that when pressed, it toggles auto ND on and off.
Oh, one last thing: When you copy your clips off the SD card, be sure to copy over the entire folder structure (not just the clips). Your NLE needs them when determining how to display the files at their optimum quality. Once you’ve transcoded the footage into an editing codec such as ProRes, you can throw them away.
Armed with this camera and these settings, your footage is going to look amazing. Get out there and shoot something epic.
So this is how I configure my FS5. How do you set up your yours?
Wow, thank-you so much for taking time out to write your setup for the FS5. I will have a good look at my setup and see how different mine is to yours. Thanks again and awesome work.
Would love to hear how your setup is working, Dave. There’s a lot of options with the camera!
Is there a way to bake in the LUT internally on the FS5?
Hi Paul,
The FS5 does not support internal LUTs, either for viewing or baked in. You would need an FS7 to do that, or you would need to use an external recorder such as Shogun.
Please, help me to find the replay button. I’d like to watch the shooted materials by camera’s display, but can’t play the video…
You want the “thumbnails” button. It is located on the lower left side of the camera. Press that, and you’ll see the clips on the active card. You can switch cards, and scroll through the clips using the joystick. Press the joystick to play a selected clip.
Thanks for taking the time to do this, I found the audio section very helpful indeed.
Thank you for your suggestions Dan!
Any experience with metabones adapters?
Speedbooster or Smart Adapter Mark IV?
Hi Gianna,
Yes I have both of them, and they are both unique. I use the Mark IV all the time with my favorite Canon EFS lens, the 17-55mm f/2.8. I also use it with my set of Contax Zeiss primes, which have protruding elements that won’t allow use of the Speedbooster, unfortunately. The Speedbooster works great with Canon L glass. Of the two, I would prefer to shoot with the Speedbooster, all things being equal, because I like the full frame angle of view from lenses, not to mention the increase in speed. So if you’re thinking one or the other, ask yourself which glass you’ll be using primarily.
Hi,
Nice to share your setup thanks !!!
I’m on the way to do my one, for now i’m testing the beast !!!
Have you invistaged more on the difference between all the cinegamma and color space ? Sony manual don’t give so much. Also diff between sgamut3cine and sgmaut3.
I look for the small hd, do you like it very much ? i have only budget for video assist for now but don’t looks as good.
Thanks
Hi Math, I have been shooting some more but don’t have any definitive answer for you. Cine 1 is the lowest contrast profile, while Cine 4 is highest, and for that reason, tends to look the best with least grading. Cine 3 is close to 4, just a little lower contrast, which is appropriate for some subjects. One thing I’ve noticed: it’s really easy to overexpose in the Cine modes if switching between SLOG, because with SLOG you are intentionally overexposing, and I find myself getting in the habit of shooting everything hot. So something to be very careful about – you still have to protect those highlights in Cine 3 and 4.
Re: Sgamut3 vs. Sgamut.cine, I just use cine, since that’s the look I’m generally going for.
The SmallHD 502 is definitely the killer monitor for this camera. But any monitor that supports LUTs will take you where you need to go.
Shoot pretty,
Dan
Math, I just saw this today over on newsshooter.com, that Sony will release a guide to using S-gamut and S-log. I’m looking forward to reading that when it comes out too. http://www.newsshooter.com/2016/01/27/sony-acknowledge-fs5-issues-aim-to-update-firmware-by-end-of-february/
Just see it, i wait for them, and train !!!
see you
Thanks for these great tips.
In the “old days” of rec709 I would try to expose most faces at 65-70 IRE. What is a good target when shooting in SLog3? 50 IRE, maybe?
Thanks,
-Matt
Hi Matt,
The “correct” IRE for medium grey with SLog3 is 41 percent. But that should be pushed a stop, 50 IRE should give you great results for a generic well-lit face.
Hi,
can you advise me on choosing the settings of FS5 cam. We are planning to shoot on green screan using the kinoflo lights and XAVC HD format. Which settings would be the most optimal?
Thanks a lot, BR
Hi Marko,
You’ll get the most information to play with using XAVC HD, so great choice for pulling green screen. I’d be very comfortable shooting in either SLOG or Cinegammas for green screen (slog if subject is high key and brightly lit and one of the cinegammas such as Cinegamma 3 or 4 if low key and more darkly lit). Technically speaking, you’ll get the most information (and potentially the best key) if you shoot in rec. 709 /pro gamma, but if you do choose that, make sure your highlights don’t look like crap.
Hallo
You have same recommendation to a god pp,I have all heard the dog johnson have a good pp for FS5..if you have same recommendation thanks
I most frequently shoot SLOG 3 in cine color profile. Works great when there’s plenty of light. In low light, I commonly choose Cinegamma 3 or 4.
So apparently… there is no sleep mode or auto power off. I wonder if Sony can implement such function in the next firmware. I left the camera on and forgot the shutdown and the battery just died. Maybe sony could help with my careless mistake.
You’re right DiDi, I also can’t find an auto power-off feature. But in my experience, I hate features like that, because the camera tends to turn itself off right before an important shot. This used to happen to me all the time when I shot with a Canon DSLR and caused me to lose more than one timelapse. So I would have to disable it if there were one.
Thanks Dan for the reply!
Thanks for the great info you provide! Helped jump start my knowledge about the FS5 that is being used for a Development Farming show in East Africa.
Would you mind giving a quick overview of your media import workflow? I am trying to figure out how to organize all my footage for a multi month project and am new to the XDROOT file system. I do use Resolves Clone feature for a checksum import but after that I am still trying to figure out. I have read that you should not break the XDROOT file system by moving individual files in explorer. I have read to use the sony content browser software but it is a bit clunky. How do you find yourself organizing the footage that you shoot? I am on a windows machine. Were going to be shooting for about 6 months and want to get things as tidy as possible before the import into Premier.
Thanks so much!
Hi Shawn,
Sounds like a big project! If I were you I’d consider a professional utility such Silverstack (http://pomfort.com/silverstack/). But that may be overkill, depending on your workflow. For simple checksum copying, there’s a new tool coming out tomorrow called Hedge, which is specifically designed for filmmaker workflows. Check it out: https://www.hedgeformac.com.
My current workflow (for SLOG footage) is to important directly from card into FCPX, where the footage is automatically transcoded into ProRes. I then import the ProRes into Resolve, and export a daily. I then import the daily into FCPX and cut with that. This works well for me on the smaller projects I’m currently doing. Let me know what you end up going with!
Hi Dan Thx for this important tips.
Ive try today to shoot in PP8 slog3 with sgamut cine 3200K I’ve shoot outside on the snow with a lot of light, and I’ve shoot in super slow-motion Xavc HD.
The trouble is I’ve get all the clips with an incredible rumor on the black tone…
I ve put here one of the clip: https://www.dropbox.com/s/3ew4nm95s6cb01b/Clip0029.mov?dl=0
I think the trouble is because with this picture profile I’ve the minimum iso at 3200….but its whatever strange get all this rumor. did you have any tips for shoot with this condition without get rumor? Its better to not use the s-log profile?
Thank you so much!
bye Federico
Hi Federico, thanks for sharing the clip. It’s taking a long time to download, so while that’s coming in, let me ask why did you choose 3200 for that shot, which appears to be outdoors? The daylight setting is 5600K, so picking that one will give you much more color accurate results. With the FS5, if you set the color tone to “pro” you can then select any white balance you like, even with slog 3. So you’re not necessarily limited to the three color temp settings that slog3.cine gives you.
Hi Dan, yes there was better set 5600k but I’ve try booth the settings with always the same result… and i see more noise when I put the slow-motion setting. When I don’t set a picture profile i very good with no noise….maybe is because when picture profile is off I’ve a lower ISO?
Ive post here the screenshot of the clips:
https://www.dropbox.com/sh/k6vm1j24c1atndx/AABrrNj83XdfNfxsZscmdvLca?dl=0
Thank you!
Ah yes, noise in the shadows! I see it in those frame grabs you posted, big time. So here’s the deal: you are going to get a lot of noise in the shadows when you shoot SLOG unless you overexpose. And that’s exactly what you should be doing – I overexpose routinely by a full stop. SLOG doesn’t contain much image data in the shadows, so that’s why you get the noise showing up there unless you overexpose to give them some data to work with.
That’s why Alister Chapman and others recommend NOT using slog in low light situations – instead use a CineGamma or even standard gamma, which is what you have observed already, because the standard gammas more evenly distribute the data throughout image from dark to lightest areas.
So rule of thumb: for high-dynamic range images (i.e. sunlight and brightly lit situations) use slog; for low-dynamic range images (i.e., low light situations) use CineGamma. And when you’re shooting slog, overexpose by a stop and use a LUT to gauge exposure – your noise will vanish.
Hi Dan thank you so much for the reply!
Today I’ve do a lot of test with the picture profile and yes I’ve find the only solution is overexpose by some stops for not get the noise!
its not easy in conditions where the sun change really frequently the lights and its not easy without a monitor LUT, how i can be sure to not overexpose to much?
Whatever I follow your tips and I try again…
Can i ask to you just one last thing?
Im filming in XAVC HD on a sony sd-xc I 95Mb/s card and i can’t directly import the clips from the camera or the SD reader into premiere or FCPX. So now I’m importing directly in Catalyst Prepare, exporting the clip in ProRase and t than I import the clips in the software. Its the only way I’ve for import the clip? Im using the wrong sd card?
Thanks in advance”
Federico
Glad that’s working for you Federico. I do find that using a third-party monitor such as SmallHD 502 that supports LUTs is essential for accurate exposure viewing with SLOG.
Re: card import problem, I have not experienced any problems importing directly into FCPX with my cards, which are SanDisk. However, I avoid importing directly into FCPX because there is playback bug that causes digital pixelation to happen sometimes on the XAVC footage. Plus, applying a LUT to the SLOG footage in FCPX forces renders, which slows me down. I prefer to work with dailies. So, my workflow is to import from the card straight into DaVinci Resolve, where I apply a LUT, and export a ProRes daily, which I then import into FCPX for cutting.
Thanks for this informative post.
You mention that even in slog 3 you can select any white balance when setting the color tone to “pro” but I cannot find anywhere how you do this.
Where is the setting to change the color tone to “pro” and therefore select any white balance I like?
Many thanks,
Andrew
Hi Andrew,
Go into the picture profile menu, and choose one of the SLOG picture profiles (I use PP9). You will have to change the defaults in two places. Choose Settings. Under Gamma, choose S-LOG3. Under Color Mode, choose Pro. Scroll up past all the S-GAMUT settings, until you see PRO. Select it, and you’ll now find that you can control all the white balance settings on the camera as expected.
Thanks Dan!
Do you know if the “pro” color mode is essentially the same as the s-GAMUT.CINE color space, with the exception of being able to manually set the white-balance? I consulted the manual, but it wasn’t clear to me.
Thanks again for all the help!
It’s not exactly the same, Andrew. Colors look a little different. But it’s a great choice if you want to precisely control white balance when shooting slog on this camera.
Thanks for your post. It’s really helpful. A couple of things I have found. Increase detail. The pictures are a tad soft and I’m using Zeiss lenses.
Also, I have found when shooting cine 4 gamma, I use the peaking marker at 70. I have the histogram always on. When I see the histogram hit the marker, I dial the Iris down 1 – 1.5 stops to the left. Of course I have to bring things up in post but it’s an easy thing to do. Also, as much as I hate FCPx “effects” the Vibrancy effect does some nice things to the sony picture.
Doug Jensen’s vimeo program on the camera is a great place to start. However, I find that his wisywig setting is a bit too hot for my tastes, so I also dial that down.
Chris
Hi Chris, great tip, I haven’t messed with the detail setting at all and will give that a try. Another great source of info about exposure settings with SLOG and also when to use which CineGamma is the $10 FS5 Ultimate Exposure Guide guide that Dennis Hingsberg sells. It’s got some great tips for when to choose which, and why. Well worth the $10 in my opinion.
Hey Chris, what more can you tell me about soft focus when shooting in 4K? In HD, the focus is spot on. I’ve had my FS5 and have had problems finding focus even with peaking on. And fixes? When you say increase detail . . . do you mean in a profile or in a personal setting in the EVF? Sorry if these questions are amateur.
This has always bothered me and I wonder any of you could help me out here.
Whenever I export my clip (shot with cinegamma) from davinci or PP, there is always a color different when play on different player. Quicktime is more washout where as VLC will be the color I see in davinci. I have seen a fix saying the problem lies on the video card (https://forums.adobe.com/thread/1063696?start=0) But this only solves the issue in PC. I still haven’t found a way to fix this problem in mac. Any idea?
I tested with slog3 and used ACES color space under davinci. Everything works beautiful. There is no shift between quicktime, VLC and the uploads to Vimeo, youtube look identical between safari and chrome.
Hi DiDi,
Yeah I see the same problem between FCPX (my NLE of choice) and Resolve. Resolve is always a bit more contrasty and crushes the blacks slightly. I think it’s down to a slight gamma correction that Quicktime and FCPX apply to footage natively. My colorist tells me to trust Resolve as the final arbiter of color, so that’s what I do – if it looks good in Resolve, well, that’s the standard.
I was on a job with FS5 couple of days ago shooting with the new firmware. It was a overcast sky. I was using auto mode and 18-105mm F4 lens. I noticed at the top left and right corner there are two dark pixelated edge. It is not def banding, I was shooting 1080P at 29.97fps 50mpbs. It is really weird.
I have darken the image in Photoshop a little bit to enhance the issue.
https://www.flickr.com/photos/emsart/26275292016/in/dateposted-public/
Hi Dan…just love this piece…just so I am clear on the 502 – – the LUTS in the download mentioned above are monitor LUT’s for the 502 taking an Slog3 signal…or did I get that wrong? cheers…Steve
Hi Dan – Thanks for posting your FS5 tips! Lots of good info there (dang…more gear to consider buying). BTW, the new firmware is out that allows for “auto-ND”, expanded zebra range, and the GPS is now functional. That stuff is free, and for an additional $600 you get the option to output to RAW.
BTW, I’m in Bellevue and if you ever need a second FS5 shooter, I’m available!
Cool! I’m super excited to get my hands on that new firmware update! Hey let’s get coffee sometime, sounds like we’d have lots to talk about. I’ll shoot you an email.
Hi Dan!
As a new FS5 owner I’m currently cramming my brain full of knowledge. I’m shooting in a low light situation tonight so will be putting your tips to the test. I just wanted to say thank you for sharing all this informantion! Cheers!
Glad it’s been helpful Simon. I’d love to know what works best for you in the low light you’re shooting in.
What adjustment would i use to darken the Doug Jensen profile a bit?
Thank
Dano, I use monitor LUTs created in DaVinci Resolve to change exposure levels on my shots. The FS5’s monitor doesn’t support luts, so you have to use a third-party monitor such as the SmallHD 502 or 702.
Hi Dan,
I’m comparing 2 Sony Camera’s. The FS700 and the FS5 as the FS7 is a shoulder setup to replace my Canon XAH1S. For the price difference of roughly 3K between the 2, does the FS5 do any still photos? I noticed that you mentioned that the FS5 does 8bit 4k… does the SDI out change that to 10Bit when connected to an external recorder? I’m trying to see if there is a real need between the 2 versus a Nice to have. I do like the FS5 having all of the wireless stuff available on the Android Phone as then I wouldnt’ need another remote at the bottom of the Jib.
Thanks
Kip
Hi Kip,
The FS5 does not do stills. You can of course grab individual frames in post, which can OK with 4K material, but there’s no still photo feature built in. To me this is a good thing. This is a proper video camera, not a hybrid DSLR.
Re: 4K with external recorder: yes, it will change that, but you have to pay for the $600 upgrade to the CBKZ-FS5RIF. I just ordered mine and haven’t received it yet, but I’m really looking forward to shooting 4K in 10 (or even 12) bit. Should be pretty sweet.
The FS7 is a fairly big camera compared to the FS5. I really like the small form factor. It makes it such a great documentary camera. And with the option to shoot 4K in 10bit with raw now, it’s best of all worlds for the type of productions I generally work on.
Hi do you use histogram on zebra points?any good tips?
Yeah Svend I recently like to set the zebra at 60 percent when shooting with cinegammas. That is a tip I learned from Alister Chapman in Vancouver a few days ago. The standard Rec 709 level is 70 percent for skin tones, but with cinemgammas, you want to be slightly underexposed. So 60 percent is perfect.
Okay, if you turn on Gamma display do that Effects The histogram. And have you seen The orange lines that appers when you activate histogram on zebra points?
It has no effect on the histogram whatsoever – what you see on the histogram is for the SLOG.
Hi Dan, Great post. I have an FS5 and have a SmallHD on order to help with exposing Slog3. Hoping you can advise- Can you stack LUTs on one page on the 502. I.e. could I apply one LUT to compensate the +1 to +2 overexposure ( which would get me to Slog3 -1/-2 on the viewer), and then add a more styled Slog3 LUT for colour etc, to get an idea of final render live? This would save recalibrating all the LUTs in DaVinci R to compensate. Many thanks
Great question. You can have more than one LUT tool installed on each pane, but enabling one of them automatically disables the other. In other words, you can only have one LUT applied at a time. A workaround would be to take the LUT you want, take it into Resolve, apply it to a node, add another node, apply second LUT, and then export a new LUT with the combined changes.
Hey Dan,
Nice to see other peeps enjoying the FS5! I have a couple questions as I have shot with this camera multiple times and edited with it as well. I recently shot a couple of projects with an Atomos Flame to capture 12bit RAW from the SDI output. I didn’t bake in a LUT but used one that I like a lot that is color balanced from ARRI. I shot SLog 3 with Sgamut. When I apply any LUT in post (FCPX) I notice the highlights are blown out. However, I recently just downloaded these LUT’s (link below) and it made the footage really beautifully balanced. These LUT’s are supposed to be for the Odyssey 7Q, but they worked perfectly with the Atomos Flame as well. So I am wondering if the SDI RAW output from the camera is needing some tweaking for the next firmware release..??
Also.. When shooting Slog 2 or 3 at the base ISO of 3200, it can be somewhat noisy. Do you fix that on the fly with just adjusting your Cine gamma’s? I realize that shooting in low light requires different settings, etc. But I have also noticed noise in outdoor shots, even when properly exposed. Would love to know if you have any tips since you shoot with the camera a lot.. And one last thing.. When you say you set your Zeebs to 60%, do you expose until the 60% zeebs show up on the highlights of the face and then call it good? Or do you manage that differently?
Thanks again for all of your helpful input. It really is a great camera and now with the 12bit RAW, I can’t shoot a project with out it.
Link to those LUTs. Check them out for yourself.
https://convergent-design.com/kb.html?view=kb&kbartid=21
Hi Chris,
Yeah I shot with the Flame recently as well, and found it quite nice. Not as nice as shooting with the Odyssey, though – the Flame actually limits you to 10-bit ProRes (unless the new firmware has fixed that, which was released just a few days ago – haven’t tried that yet). To get real 12-bit, you have to shoot with Odyssey in CDNG mode, and that does produce a very nice image with a ton of color information to work with in post. MUCH easier to pull keys when working with 12-bit! Not just green screen, but any type of key for example in Resolve, for secondary corrections. The downside is that the files are huge, and eat up your hard drives QUICK! So always a balancing act there, with regard to how much quality your project really needs, vs. smooth workflow.
So to you specific question about noise: if you expose SLOG at the Sony recommended levels, you will get noise in the midtones and especially in the shadows. The solution is simple: overexpose everything by at least a stop, and as much as two stops. I most frequently use the LUT developed by Art Adams (linked to in my post above) that allows overexposing a stop, but displaying a nice image on your third-party monitor that supports LUTs, such as the Flame. Then, in post, you will apply the same LUT to your footage, which will appear overexposed until you apply the LUT. This works like magic to fix noise problems.
I have used the Odyssey LUTs you describe, and they do work very well indeed. I just prefer the slightly higher contrast of the Art Adams LUT for SLOG – it looks better for clients.
Re: Zebras, I honestly don’t use them much. But if I did, I would set my low zebra’s to proper exposure (plus one stop with SLOG) for skin tones, and my high zebras to proper exposure plus one for white. So you can toggle between them to check you levels depending on the situation.
Dan…quick note on shooting 240fps with the FS5…it really needs light so what I have been doing (using Zeiss for Nikon glass with manual aperture control) is to stop down to F16 then bring up the super slow motion from S&Q menu…the exposure is dark on the screen…then open up the aperture 2-3 stops (yes that many) then expose…the results are much better…less noise in the video…and this is working with +1 stop in exposure comp shooting Slog3 Cine…hope this helps…cheers…Steve
Hello,
I use to have an xdcam ex1r but i am transferring over to the fs5. I do a lot of live streaming and i used the multi port to lightning cable to live stream and i was wondering if i could do the same thing for this camera. Does it support live streaming?
Yes, it does support live streaming via the included ethernet port. You’re good to go!
I want to use the multi cable to the laptop (lightning bolt port) would that work?
Yes, you would need this adapter: http://www.apple.com/shop/product/MD463LL/A/thunderbolt-to-gigabit-ethernet-adapter
HELLO
THANK YOU FOR YOUR HELP
how can i recording super slow motion pictures whit this camera without noise?
how can i setting camera for this step?
Hi Emad, you will be fine by staying at 240fps and less. When you go over that, you run into lots of problems with noise and resolution.
Hello.
When you say..
being sure to set the input on the XLR jack to phantom power (for most shotgun mics) or line level (from mixer output) as necessary. Then, set CH1 Input to INPUT1. That’s it in a nutshell.
How do you SET THE INPUT ON XLR to PHANTOM POWER?
Thanks for you help
Hi Dave, if you look beside the two XLR inputs on the camera (one on the front of the handle and one toward the bottom rear of the body) you’ll see a lever with three settings: line, mic and mic+phantom. To send phantom power to the mic (required by most shotgun mics) slide the lever to mic+phantom.
Hi Dan
Thanks for all the great info, I am thoroughly enjoying the learning curve… somewhere. 😉 I am a new-comer to the fs5 and shooting full chip in general, I am old school and came from the days of the HPX3100 etc.
Something I cannot seem to find any information on at all is why my lens changes appearance between HD and 4k. When I power up the camera in 1080, say with a 24 – 105 canon l series on (vai a metabones), I see a nice wide 24 mm shot for an instance, then it pushes in and looks like a 50 ou 70mm. In 4k, I get a normal 24 – 105. Does this make sense? When I am in 1080 and shoot super slow mo, the lens goes back to 24mm. Very strange. I have searched high and low through the menu program to see if there is a fix, or something I need to do, but I have not come across any information.
Any light that anyone can shed on this would be muchly appreciated.
Sounds like your center-scan mode has been enabled. Check to see if that’s the case, and turn it off. Center-scan mode gives you a crop from the center of the sensor, reducing the field of view (which is designed for use with 16mm lenses).
HI Dan,
great tutorial overview
What is the best setting for shooting slow-mo in low light with the FS5 🙂
Jerry
Hi Jerry,
If it’s a contrasty scene (i.e., if you have highlights you want to hold onto) but otherwise low light, use Cinegamma 4. If it’s low contrast and low light, use a standard gamma (i.e. rec 709).
i’m rather late to the party – so excuse me if i ask a ridiculous question – like where’s the play back ON the camera? is there one? i’ve scoured the tiny body and can find nothing that says play or stop or forward etc… – i am using the metabones for my zeiss 35mm ef glass (i shoot fashion and dance) they’re all primes manual focus – so i’m trying to work out with the extra stop and the variable nd is it safe now to shoot slog and grade in davinci? many thanks! i had a ton of fun reading through everyone’s comments on the way down the page! ty simon
Hi Simon,
To play back clips, press the “thumbnail” button on the left side of the camera, and that will give you the playback menu and options to select which clip you want to review.
What do you mean when you say “safe” to shoot slog and grade in Davinci? I can pretty much guarantee that nothing on the camera or in Resolve will break, if that’s what you’re asking!
Hi there Dan,
Im on a shooting job and im using the sf5 in a low light condition at a christmas party with the sony 18-110mm range with a f4 apeture. I was wondering what settings i would use?
I have never used a sony before but this guide is ver helpful.
Thankyou.
Hi Jen,
To get the most out of that lens, you’ll want to set your aperture to f4 and leave it there. Definitely shoot wide open, and you may need to push your ISO a little as well, depending on how dark the place is. Try to avoid it if you can, but if needed you can get away with pushing your ISO (or Gain, if you’ve set your camera to use that readout instead of ISO). If gain, you can set +9 DB or if ISO and shooting with a Cinegama (Cinegama 3 would be my choice), you can push to 1600 ISO.
Dan, I just got my Sony FS5 today…I need to tell you that I am totally amazed at your knowledge of this camera and would love to know 10% of what you forgot..I look forward to reading more of your amazing tips. Thanks again for being such a fountain in information
Best Regards
Chuck
Dan how do you set the clips name when you change the record card ? o rename the files ? Thank, Pepe
Pepe, I do all of my file renaming in post. Much better control on the back end. However, if you want to set clip names in camera, you can do that. The manual has instructions for how to do that.
Pingback: Camera research | Vampire Project
Hi’a.
Love the settings and love the camera.
I have a question about white balance.
I have found out how to manually change the white balance using K. That’s all fine.
On any camera I have used before there is round histogram for white balance. On most cameras it comes up in after the luma histograms in a sequence of pressing the display button repeatedly.
I cannot find the display settings for it anywhere.
Do you know if the Fs5 has this wheel?
The round thing you’re describing is called a vectorscope. It’s found on many professional video cameras, but not on the Sony FS5. You can get a vectorscope on the FS5 by using a third-party monitor such as the SmallHD 502, which supports that feature.
Hello Dan, thanks a lot for sharing your setup. I need to match Sony FS 7 with a FS5 using SLog, do you have some advice for me. Witch gamma do I chose? Keep in mind that they will edit the material il Final Cut Pro 7.
all the best
These two cameras will match perfectly, as they share the same sensor. Just remember that Hypergamma on FS7 = Cinegamma on FS5. You can also simply shoot SLOG 2 or 3 and match in post with use of LUT or manual grading. Good to go.
thanks! I decided to use slog3 for both cameras and use LUT in post. The problem is that they don’t look the same in the VF (same picture profile, same color temperature etc.) What’s wrong?
Hi Daniel,
The FS5’s VF doesn’t support LUTs. You have to use an EVF that supports LUTs, like the 502 with Sidewinder, or Graticle.
Hallo Dan
Thanks for your tutorial,i tray too use Slog3 but for wedding video is to hard to edit&control for 3hour ov video material.
I test in low light this camera is not fantastic,i use Zeiss Batis 2,8..in low light i use cinegama 4 with rec709 in this combination is not so noise wen i use 6400 iso. Outside i prefer combination from stil with pro,i dont hahe time tu color greading in premiere pro,i tray to finde best pp for use with no color greading
You have same suggestion ?
Thanks
Hi Marius,
Yes I agree with you – I use Cinegamma 4 in low light, or just Rec 709.
Hi Dan,
Isn’t it any mean you can import a Lut in the FS5? BTW by tweaking the SD card files? And replacing one of the PP with a Lut you created in Resolve?
Otherwise I know… the SmallHD 502 😉
Best regards
Hi Blaise, unfortunately the FS5 does not support LUTs natively, and never will – the processor isn’t powerful enough, we’re told. So if you want to use LUTs to help you gauge exposure while you’re shooting, you have to use a third-party monitor that supports them.
I am ex 35mm and new FS5 convert. I have a set of Zeiss superspeed primes in Arri bayonet mounts. They mostly cover super 35. Before sourcing the adaptor, can you pls advise whether these lenses will cover the FS5 sensor? Many thanks for the great post – all comments are really useful. Compared to 35mm film this camera seems really complex.
Hi William,
The sensor on the FS5 is a super 35mm size sensor (25.5mm × 15.6mm to be exact). So with the appropriate adapter, you should be fine.
Many thanks Dan,
This is really helpful as are all your tips and comments. One other question please: the camera does not seem to offer timelapse with intervals more than one second. Can this be achieved by using an external recorder such as the Atomos Shogun? Many thanks.
HI William,
I’ve not found a way to do time lapses with intervals of longer than one second. I’m not aware of any third-party recorder that has this as a feature. For time lapses, I use my Canon 5dmkiii.
Thanks Dan,
I did great timelapse work on my EX1. Shame this feature hasn’t been carried over to FS5. I still the think the EX1 is a great camera.
It certainly would be nice to have the timelapse options for those times where you find yourself just needing to do it all with the same camera.
Great article.
I have a question about the auto ND whilst shooting in SLOG2/3. How do I alter the ND so it shoots 1-3 stops brighter in auto mode? Can this even be done? This currently stops me shooting in SLOG as always under exposes and becomes very noisy in the black.
Thanks.
Great question Brook. The answer is YES! In the camera menu, open the AE SHIFT menu, and add +1. Then everything will be auto-exposed to one stop over, and you can kiss that noise good-bye.
I realize this post is about the FS5, but I was wondering about the FS7. I’m kind of confused about low light situations. I’ve been trying to shoot mostly in slog 3 / s gamut.cine, and that seems to work fine for daylight. But in low light situations, such as a city street or dark alley with no extra lighting, how do you overexpose by 1.5 stops when there is no more available light? And if you don’t overexpose slog, won’t it become even noisier? I understand Alister Chapman to say that he shoots in HG3 because of the limited dynamic range, but then I’ve heard others say you can shoot SLOG 2 or SLOG 3 with no problem and just have to grade the image down in post to mask the noise. Also, in a fairly recent post, http://www.xdcam-user.com/2016/01/log-is-a-poor-choice-for-low-light/, Chapman seems to have modulated his position and says that SLog 3 can yield usable results and to simply test it out for yourself. My own tests have been a little mixed. Slog 3 was disturbingly noisy as shot, but compared favorably to the Hypergammas when shadows were darkened, but then we ended up with an image that was in the ball park of the already less noisy Hypergamma. Any thoughts appreciated. I don’t necessarily mind switching to Hypergammas or Cinegammas for low light situations. I just want the cleanest, best looking image possible. Thank you.
Hi Kevin,
You’ve raised some great questions. And pointed the way to the answers. The only way you can know whether something works for your project is to test and evaluate the results. The “cleanest, best looking image” is going to be the one you choose, because that is always going to be a subjective thing.
Everything you’ve said makes sense to me. You can get acceptable results using SLOG in low light, provided you crush the blacks and maybe apply a little denoising in post. I use this approach all the time with Neat Video plugin in Resolve, which really cleans up noise very nicely.
So test, evaluate, and choose.
Hey Dan,
Great post. This page (with all the Q&A’s as well) has been very helpful!
I’ve been using the settings you recommended without fail until an assistant on one of my shoots set up the camera in a way he can’t remember and I can’t seem to reverse. Now, no matter what picture profile I set it on, the footage comes out with color (i.e. no SLOG, even if I clearly set it to shoot SLOG in the PP). I believe I’ve tried all the picture profile settings so it must be something else that’s baking the color in. Any idea what’s going on?
Thanks so much,
Laura
Hi Laura,
Sounds like it’s time for a reboot! In the Menu, select System > Initialize. You’ll be prompted “Reset to default settings?” Select OK, and after it reboots, your camera will behave predictably again.
If you could do that with children, I might have been tempted to have more than one of them!
Haha thanks very much Dan!
Hi Dan,
Thanks for this, quick couple of questions, when shooting XAVC HD SLOG3, I’m not given the option to drop lower than 2000 ISO. Is this the same for NTSC setups as well as PAL? Also, shooting using XAVC HD seems to result in a lot of motion blur and blended frames. Is this due to the format or a shutter speed issue? Thanks in advance!
Hi Matt,
The ISO level of the camera is completely unaffected by whether you are shooting NTSC or PAL (which affects only the frame rate). If you’re seeing motion blur and blended frame issues, it’s likely because you aren’t following the 180 shutter rule, which states that your shutter speed should be double your frame rate. So, for example, if you are shooting 24fps, your shutter speed should be a 48th of a second. If you’re shooting at 30fps, your shutter should be a 60th of a second. Hope that helps!
Thanks for this Dan! Figured it out in the end.
Hi Dan, So if I shoot at 24fps, can I use 50th of sec shutter speed ? Is that close enough?
Also, I am a bit confused about what REC Format I should use. What us the difference between the p & i in all the options. Given that I am in australia I am aware i need to use PAL, but that about it.
Thanks in advance for any help you can offer.
Gary
HI Gary,
You can use 50th of a second and you’ll be very close. That’s how it works with many DSLRs. But with the FS5, you can set your shutter speed to 48th of a sec and be dead on. So do that!
Re: p and i, that’s progressive vs interlaced. Interlaced is an old TV standard and unless you have a very specific reason to use it, you should avoid it. Choose progress (p) for the best quality.
Hi Dan,
I recently shot a 10-day jazz festival for a feature doc project. We used three Fs5s and one Fs7, plus a couple of other cameras.
I made the mistake (I think) of shooting all of the Sony cameras in SLog3. I was under the impression that Slog3 was always better for grading. But since the concert venue was a dimly lit venue — with performers well lit under spotlights and everything else around them in the dark and against black curtains — I now fear this was a mistake.
The raw SLog3 footage out of the Fs5s looks super noisy/grainy in all of the black/shadow areas, and I’m worried.
Any advice on where to start with my color grade and how to remove as much of the noise/grain from the Fs5 footage as possible.
Thanks,
Matt
Hi Matt,
I think you’re right, a hypergamma would have been a better choice in that environment. However, all is not lost! If I were you, here’s what I’d do.
I’d take my slog3 footage into resolve, and apply a LUT that brings your highlights in check. Then I’d do a basic correction to bring enough detail into the shadows (I’d do this by adding similar shots into a group, and applying the grade to each group so that you don’t have to repeat it everywhere).
Your shadows will be looking very noisy at this point. To fix that, you’ll need the Neat Video plugin (OFX version for Resolve). It’s not cheap, but trust me, you’ll discover it’s worth every penny on this project.
If the project was shot in the same lighting conditions, you may be able to get away with applying the neat video plugin to the group. But if each of the shots is quite different, you may have to apply the plugin on a clip-by-clip basis.
This plugin can’t restore data that doesn’t exist, but I’ve found it’s ability to reduce noise to be near magical.
Hi Dan,
I’m hoping to invest in a new camera, I have some experience with the FS5 which I really like and have found your site very helpful, thank you!
I went to a talk today about the new Panasonic Eva – 1. I’m wondering what your thoughts are on the FS5 vs Eva-1? From what I can tell the main difference is that Eva-1 shoots 10bit in 4k – but how useful is this, and is it worth an extra £2k?
Love to hear your thoughts on this.
Thanks.
Hi Jess,
The differences aren’t too big, really. But the biggest difference, for someone who likes to shoot handheld, is probably the digital image stabilization that the EVA-1 has. I haven’t had a chance to get my hands on this camera and test it out yet, but if it works as well as suggested, it could be a legit way to make all my lovely old prime lenses into lenses I can shoot handheld with the same way I do Canon IS lenses.
Re: 4k, if you plan to shoot projects in 4K regularly, that might be a factor that would sway your decision as well. 10-bit 4K is much better than 8-bit for grading, no doubt. But for me, I don’t shoot much 4K yet, and the few times I do tend to be in carefully controlled lighting, so the 8-bit works fine for me.
So I would say they are both good cameras – make sure the one you get ticks the boxes you plan to use the most.
Hi Dan,
Nice article and thanks for all this information. I am a little confused tho… are you recommending PP6 Cine 3 for low light or PP3 Rec 709 / Pro for low light?
Also, if I set PP 8 and PP 9 to SLOG 3 / S-Gamut3.Cine/4300 wouldn’t this just result in the same picture? You were mentioning something about PP 8 would be for outdoors and PP 9 would be for tungsten lighting which I am guessing would be the right settings for fully lit indoor areas. Unless I am mistaken there?
Please let me know if you have a chance, and thanks again!
Hi Chris,
Great question. For contrasty low light situations (ie, bright highlights like street lights and shop windows surrounded by dark areas such as a city street at night), I’d go with Cinegamma 4. It’s designed to bring up the lows and mids more than the other cinegammas, while controlling highlights. For flat low light situations (ie, shooting workers in a dim but evenly lit warehouse) you will get best shadow detail by shooting rec 709, because it allocates more data to the shadows than the other gammas.
Re: setting PP8 and PP9 to the same setting, yes, you would get the same result. Don’t do that. I preset mine according to the lighting I’ll be shooting in – for example, if I’m going to be switching between tungsten lighting and daylight, I’ll set PP8 to S-Gamut3.Cine/3200 and PP9 to S-Gamut3.Cine/5500. Then you can switch back and forth as needed as your scene changes.
Rule of thumb:
3200 = warm indoor tungsten lights
4300 = mix of tungsten light and daylight coming in windows, some fluorescent lights.
5500 = sunlit daylight.
Any news on known differences with the new Sony FS5 MkII and how to match the different Profiles?
As far as I can tell, the primary difference is that the mkii includes the raw upgrade that mki owners had to pay to unlock, ability to shoot 120fps continuous in 1080p, and the new Venice look picture profile.
All pictures profiles (apart from Venice look) should match perfectly between cameras.
HI Dan – Im having a problem with audio drifting and the FS5
When I export an audio file at 48khz and then rerecord it to my FS5 through car speakers (to get a car radio sound effect), I get drifting on the new recording.
Any idea what default frequency the FS5 is recording at? Is there a way to change this?
Or would this be a mic frequency issue?
HI Andy,
Great question. I’m not enough of a sound geek to be able to answer that one – anybody else have an answer for Andy?
Hi Dan,
I have a few things that I can’t figure out on my Sony FS5 and would really appreciate your help if you’re able.
I am unable to set my ISO any lower than 2000. When I got my camera at first it was set at 1000 but can not get it back to that.
In the camera settings, it will not give me access to AGC Limit, WB Preset, WB Outdoor Level or WB Temp Set.
I am also unable to adjust my Shutter and F/ like I was able to before by using the dial.
I’m sure I made changes somewhere that is causing all of my problems but I have no idea how to fix them. I have only had this camera for a few days so everything is very new to me. Before getting this camera I have always shot Nikon. Sony is obviously very different to me.
If you can help, thank you so much in advance
Hi Riley,
If you’re shooting in Slog, the lowest ISO you can set is 2000. That’s because it’s the base ISO of the camera, and there’s no way to set it lower than the base ISO in SLOG. You can get back to ISO 1000 by switching over into the camera’s Rec. 709 profiles, or by choosing a Cine Gamma profile.
You can’t set ISO below 2000 while shooting in SLOG, so I’m sure you’ve set your camera into SLOG mode. If you switch it back to Rec. 709 or CineGamma, you’ll regain the ability to set to 1000.
You also don’t have the ability to set WB while shooting SLOG. To control white balance with SLOG, choose one of three profiles in the camera gamut settings (button 6): 3200, 4300 or 5500.
You can set WB normally while in Rec. 709 and CineGamma modes.
Hi Dan,
We Shot on 24fps but on Editing Table the actual footage we had shot was showing 23.98 fps. We really need your help to convert the whole footage on 24fps . Please give some solution and guide as for future shooting on 24fps.
Hi Puneet,
Yes, that is in fact true – the footage is actually 23.98. That’s generally true for all cameras. True 24fps footage is unusual in the industry, generally only when you have to match something shot on real old-fashioned film. Why do you need true 24p?
Yes Dan we are shooting one Documentary and half of the shoot is on 24fps and remaining on 23.98. we want to match both the footage. Yes we need true 24 fps.
Hi dan. Our project is 24 fps . Is there anyway we can shoot 24fps or 25 fps ?
Hi Puneey, you can switch between 24 and 25 fps in the Sony FS5 very quickly by changing to PAL from NTSC video in the menus.
Hi Dan,
thanks for bringing so much useful tips online! I work now for about 3,5 years with the FS5 and shot almost only in HD. Now I have to shoot 4K greenscreen footage and want to get a 10 bit 422 signal. With the raw upgrade and a shogun inferno, I will get 12 bit raw. Cool! BUT: Sony wants me to set the FS5 to slog2, which I never would use for greenscreen work because of the noisy shadows.
I am wondering, if it is possible to get “only” a 10 bit 422 signal with cinegamma or – for greenscreen in controlled environment even my preferred one – rec 709. Everybody is talking about raw possibilities. But til now, I didn’t get any information about “only” getting 10 bit onto a external recorder.
I am asking myself, why one has to set the FS5 to slog2? Is the signal then a slog or a raw stream? For greenscreen work, I think it is contraproductive to “throw a slog gamma over” the raw.
Maybe you have an idea about this? What would happen, if one sets the FS5 to shoot in raw, choose rec 709 instead of the recommended slog2 and send the signal to the Inferno via SDI?
Another thought: Do I need to shoot in raw, or do I get a 10 bit 422 signal, when setting the FS5 to UHD (non raw) and a cinegamma or rec709?
Sorry for bombarding you with such an amount of questions. But I really found no helpful information til now, and I asked already a bunch of people, including Atomos support…without really useful results…
All your information in this thread is so useful and with such a good expertise, that I got the feeling, maybe you are a hope…thanks in advance
Hi Markus,
It’s a great question you have! But unfortunately, we are limited by the type of raw file that Sony makes available. If you want 10-bit 4K, you have to debayer into SLOG, there’s no way around it. You can change the camera settings to anything you want, but it’s still going to export the same signal.
And no, you can’t get the camera to export any 4K in 10-bit while in rec 709 or cinegamma modes, even when you are hooked up to a Shogun Inferno. It will be sending an 8-bit file to the Shogun, which will record that in 10-bits, but it’s still just 8-bits going into the bucket.
However, the good news is, you don’t have to worry about the noise in those shadows. All you have to do is overexpose by 1-2 stops, and you’ll find that noise vanishes. And for monitoring purposes (so you don’t have to see overexposed footage on the monitor during your shoot) you can use a LUT that compensates for that. I recommend the ones made by Alister Chapman, which you can find by Googling.
The FS5 isn’t a very good low light camera, for this reason. You really do have to overexpose by 1-2 stops to kill the noise in the shows when shooting slog. But if you can do that, you’ll get excellent results.
This is part of the reason why I’m moving to the Canon C500mkii when it comes out in December, FYI!
Hi Dan! Thanks a lot for your orientation. If you ever need anything down here in Brazil or S.A., we can always talk.
Have a good one.
Alex.
Thanks Alexandre, if I ever get a chance to work in Brazil I’ll look you up for sure.
Hey Dan nice guide. I’m going to shoot using Slog 3 and I know that I should overexpose 1-2 stops. I know that skin tones is around 70% for zebra. Was wondering what’s the value I should set to my zebra to overexpose to 1 stop or 2 stops.