Here’s a little something I pounded out to help the fine folks at Pratt Fine Arts Center raise money for a new hammer. Hot metal is so much fun to shoot. Can’t get enough of that stuff!
Here’s a little something I pounded out to help the fine folks at Pratt Fine Arts Center raise money for a new hammer. Hot metal is so much fun to shoot. Can’t get enough of that stuff!
My review of Red Giant Shooter Suite’s Denoiser II will unfortunately be very brief, because it turns out to be not compatible with my NLE, Final Cut Pro X. Red Giant posts this on their site:
At this time there is a technical feature which FCPX lacks and Denoiser II requires to function correctly. Unfortunately if we were to disregard this component and just made the product available for FCPX, it would not be as reliable and the results would be far below our standards when compared to other host software that Denosier is compatible with.
I appreciate Red Giant’s statement and understand the vagaries of software development. Until Apple feels Red Giant’s pain, though, I’ll stick with Neat Video Denoiser, a company that has managed to ship a reliable solution in spite of all that.
Back in the old days, filmmakers had to clap wooden sticks together to match sound and picture. Then, editors had to meticulously nudge the two together before they could go to work on more creative tasks.
There may still be good reasons for slating your takes, but syncing footage is no longer one of them. With PluralEyes, an application included in Red Giant’s Shooter Suite, all you have to do is record reference audio on your camera, and let software do the rest.
But before I get too far along, let me be clear that what I’m talking about here is dual-system sound. This is sound recorded the right way: by a sound recordist. Someone whose job it is to make your production sound awesome. Many beginning filmmakers think they can cheat and just stick a shotgun mic on top of their camera, and call it good. You can’t. Ninety percent of success in recording dialog depends on getting the mic close. Really close. About 6 inches, in a perfect world. And you wouldn’t want to limit your shot list to 6 inches from your talent, would you?
There are other ways to keep your audio and video in sync, such as using genlock to match the timecode between recorder and camera. But the complexity, not to mention the cost of cameras and recorders that support this method, puts this solution beyond the reach of many smaller filmmakers.
But, if you’re a small filmmaker, why shell out the $199 for PluralEyes to sync audio and video? Isn’t this capability built into Final Cut Pro X? Yes, but FCPX only syncs one clip at a time. That means you have to tell it which clip goes with which audio, and then press the sync command for every clip. If you’ve been shooting all day, this starts to look a lot like syncing the old fashioned way: tedious. PluralEyes lets you batch sync all of your clips at once.
OK, let’s dive in. I’m going to show you how I synced footage on a multi-cam shoot I did to produce this profile video:
My camera assistant shot with a second camera. The subject, a video blogger, also contributed footage that he was shooting himself, for three cameras total. Each camera was recording audio (which I’ll refer to as reference audio, or a reference track.) The high-quality audio was recorded separately with a Tram TR-50 lav mic clipped to the talent, recorded onto a Zoom H4N via a Sound Devices MixPre.
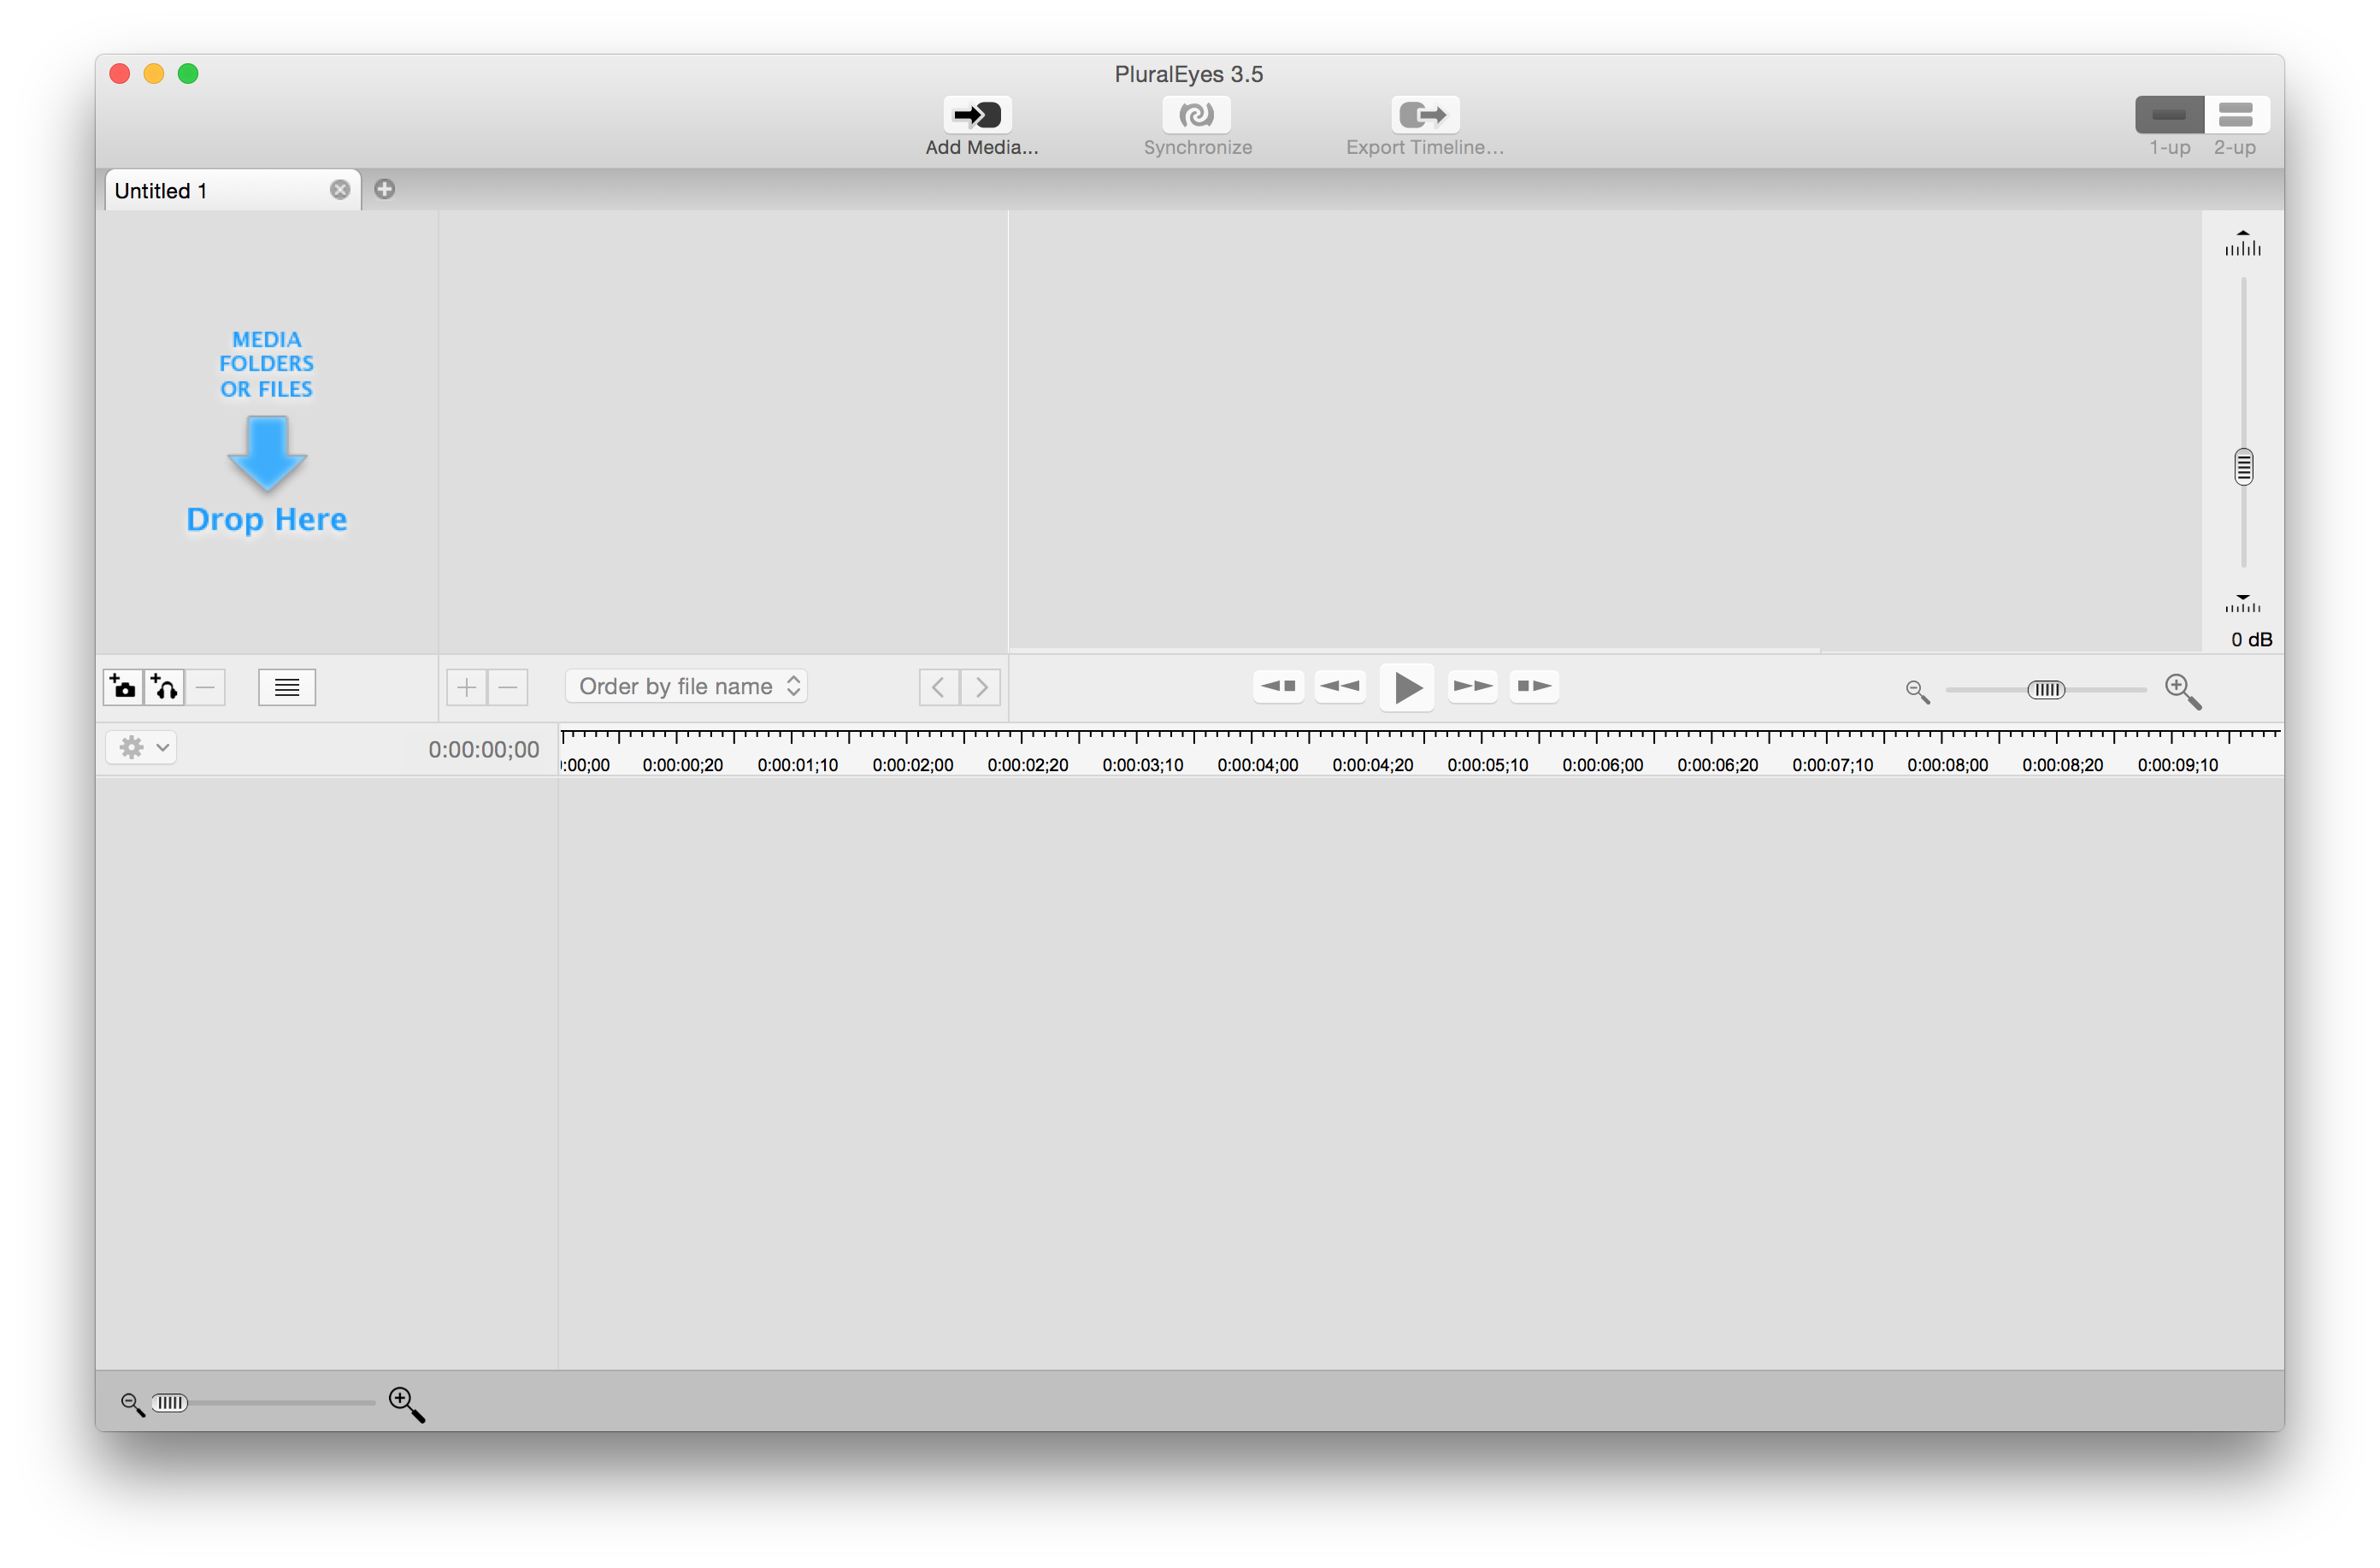

To get started, drag all of the audio files into PluralEyes target window (you can drag them all at once or one at a time). Then drag the video files in. PluralEyes is smart enough to figure out which files are audio files, and which are video files. It will also attempt to figure out whether the video files you’re dragging in are from different cameras. This can take quite awhile.
I’ve observed that PluralEyes can get confused if you drag all of the video files in at once. Try dragging one camera at a time into the window, and wait for it to finish processing, before dragging in the next one.
Once you’ve loaded all the files, you should see that PluralEyes has organized each camera’s footage onto its own track, and audio as well, like so:

So now we’re all ready to sync our footage. But first, let’s take a look at the sync options:
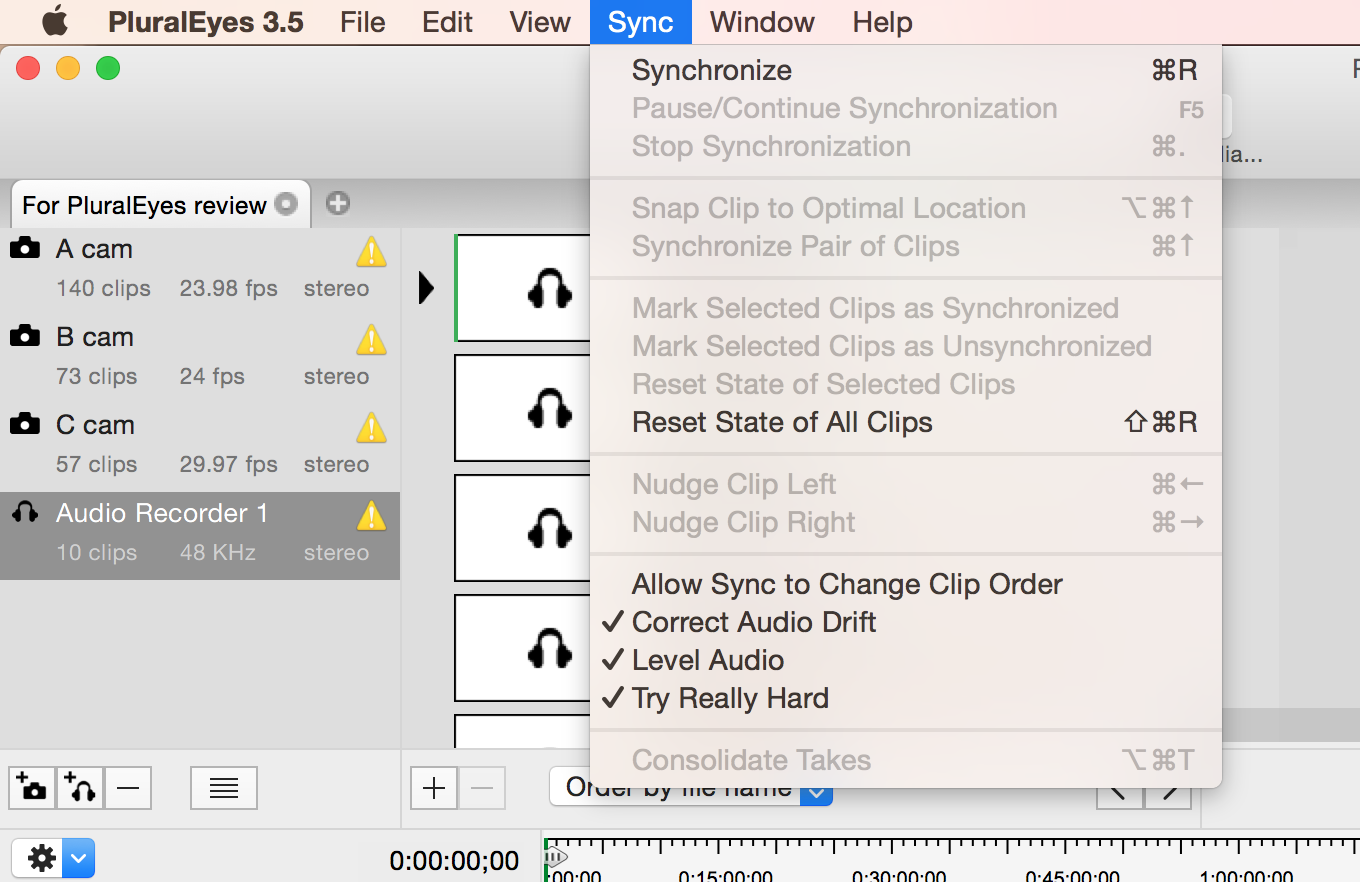
Allow Sync to Change Clip Order. I recommend leaving this one off. Most of the time, your audio clips and video clips are recorded sequentially. So you WANT them in order. The only time I can think of that you’d want to turn this off is if you have named your audio or video files something other than sequential numbers prior to sync.
Correct Audio Drift. This is a killer feature, so be sure it’s turned on. If for some reason your recorder audio doesn’t match the reference audio throughout the duration of the clip, this will fix it by very subtly stretching or shrinking the length of the file so that it lines up.
Level Audio. Sometimes the audio on your reference track will be too low for a good match. Checking this box will raise the levels on your reference track so that it can work with it. Red Giant suggests leaving this one turned off by default, and only using it if you have trouble getting files to sync. But I figure why not start where you’re going to end up? So I leave it on all the time.
Try Really Hard. Of course you want your software to do that, right? Leave it on. It will slow down the time it takes to sync, but do the best job possible.
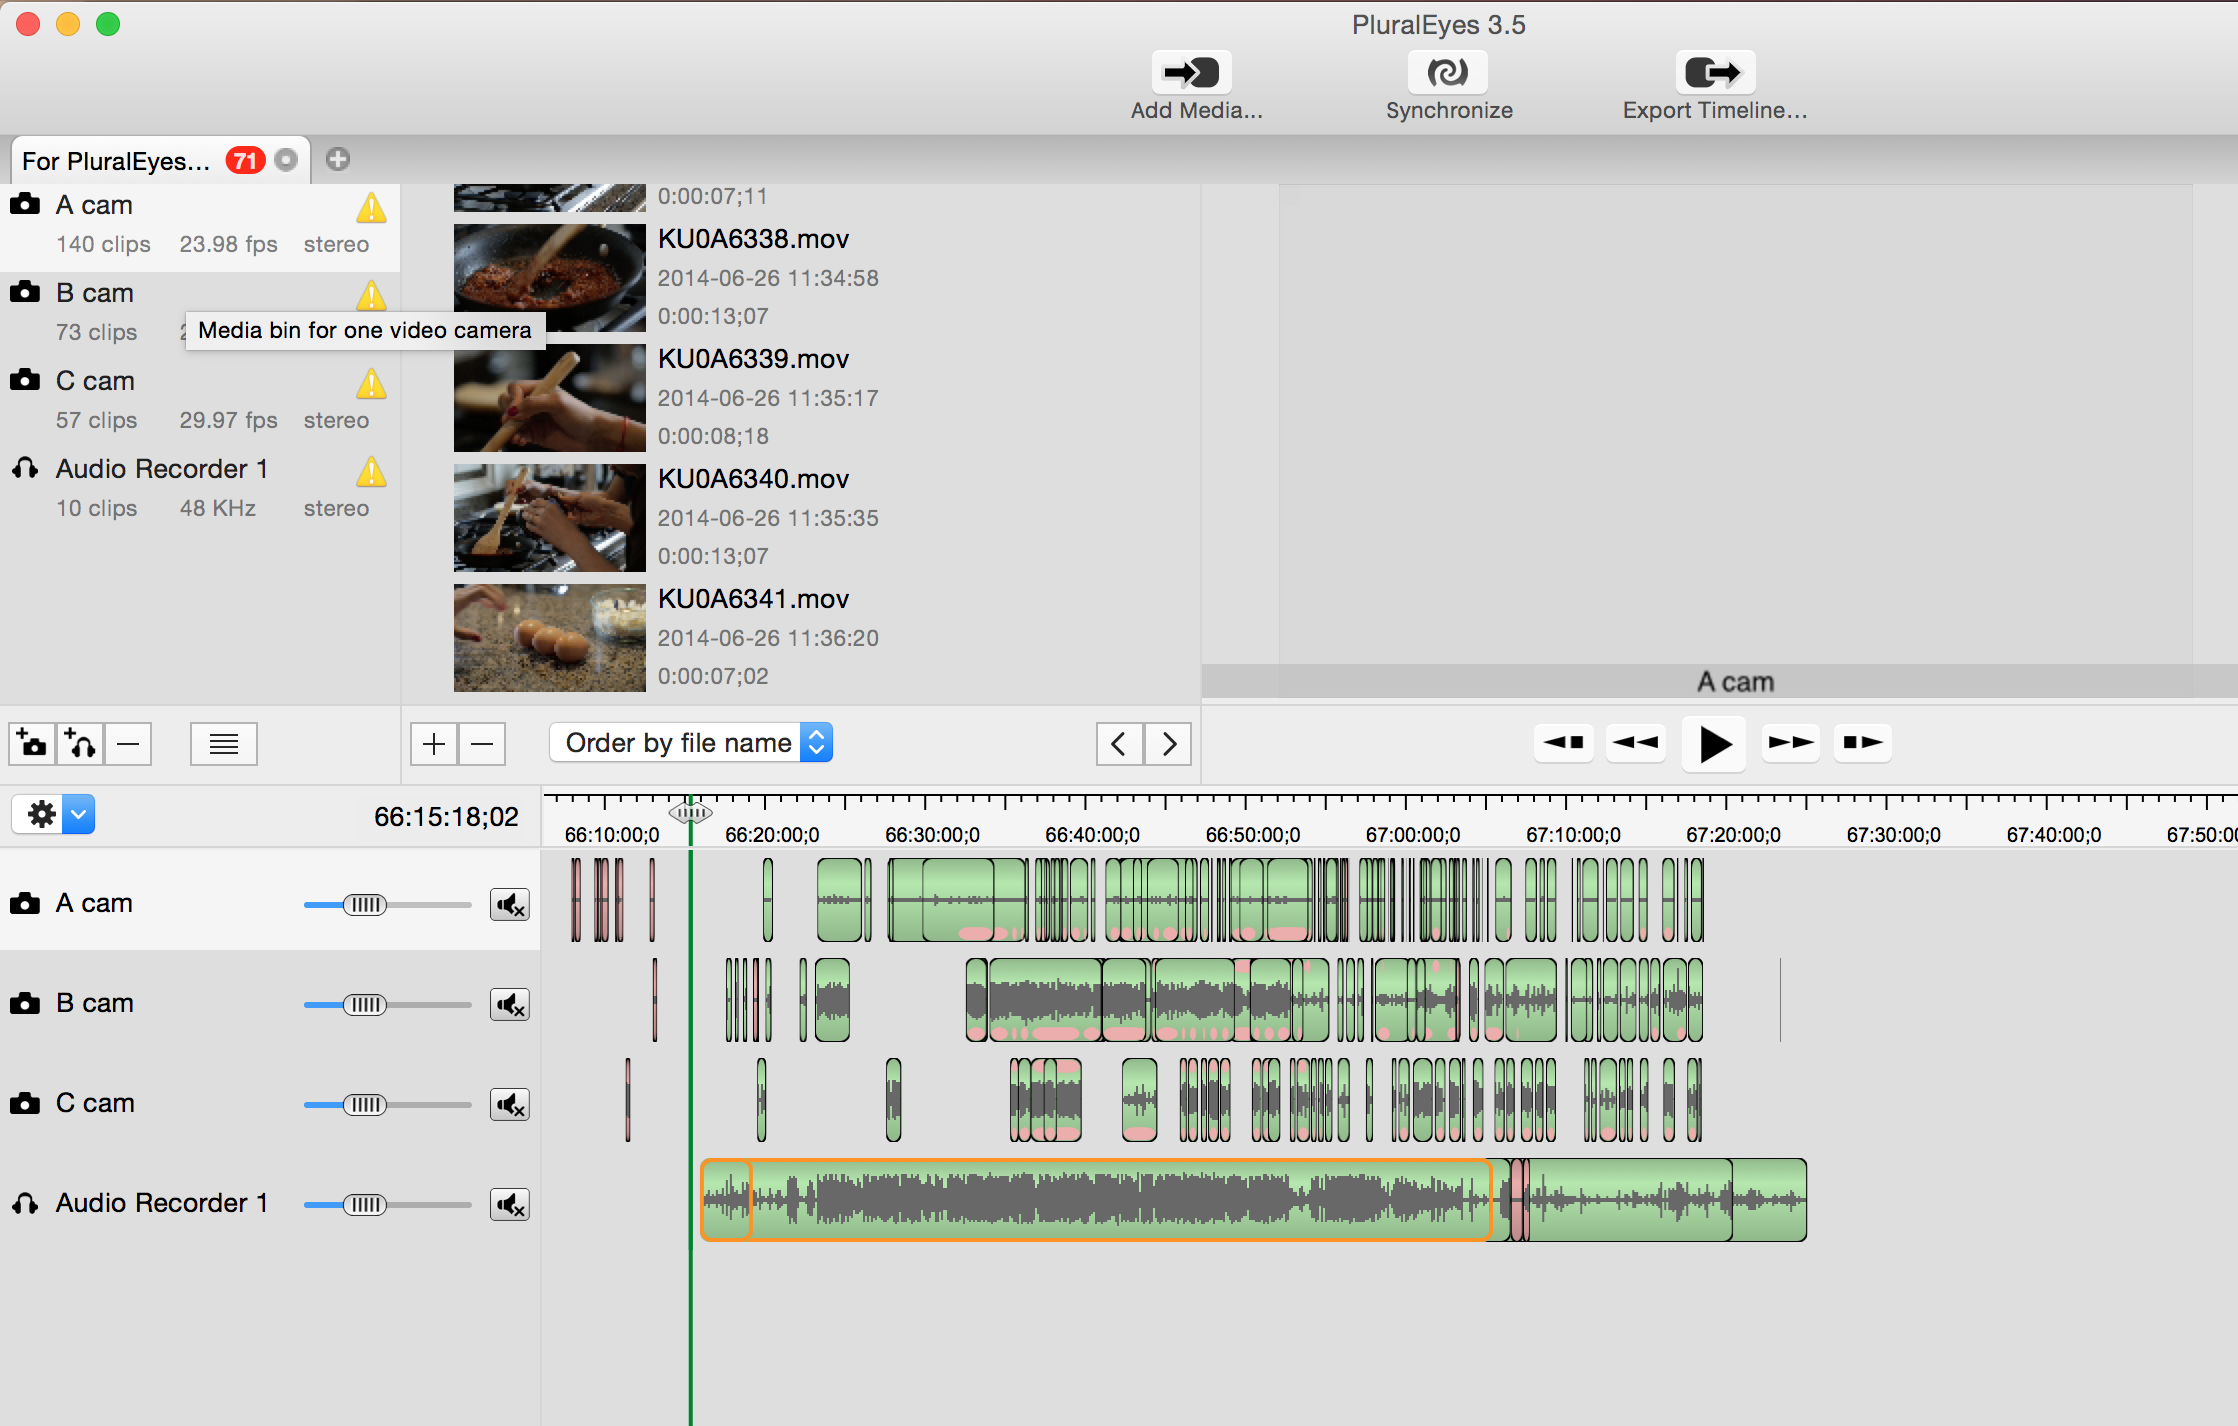
Now click the Synchronize button at the top middle of the screen. Then sit back and watch your footage move into sync with the audio automagically. When it’s done, you should see something like this:
Things are lined up, and now it’s time to export. Click the Export Timeline button, and you’ll get the option to choose your editing format:
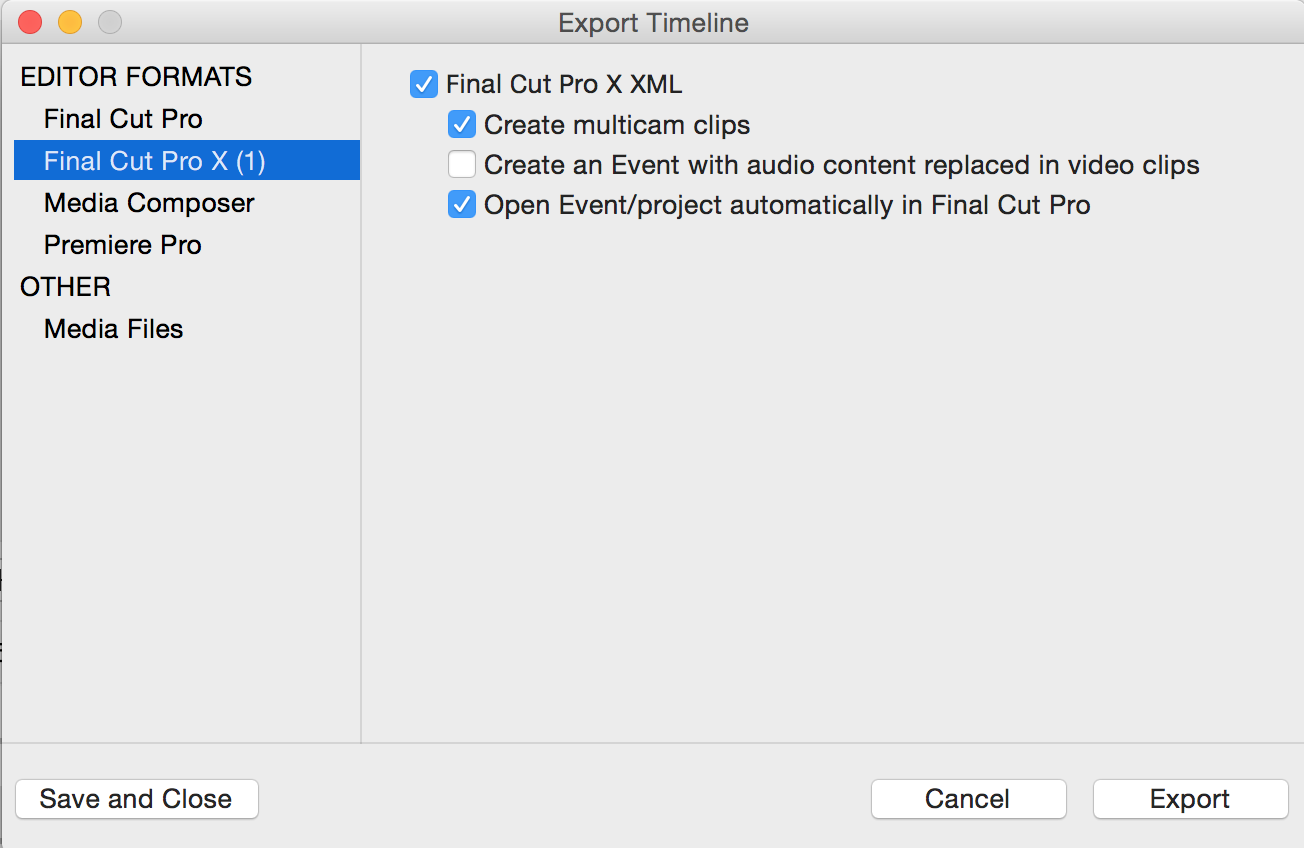
Supported NLEs are Final Cut Pro 7, Final Cut Pro X, Avid, and Premiere. But here’s a power tip: the Other option allows you to create new clips, with the good audio replacing the bad. If you start your project by importing these clips only, and ignoring the reference clips, every clip in your project will be a “good” clip and you won’t have any issues keeping track of which is which.

I’ve found this is a good choice when shooting with a single camera, and you know you only want to use the sync audio and ignore the rest (as with an interview, for example).
If you choose the option to Open Event/Project automatically, and FCPX is not running during the export, you’ll see this error:
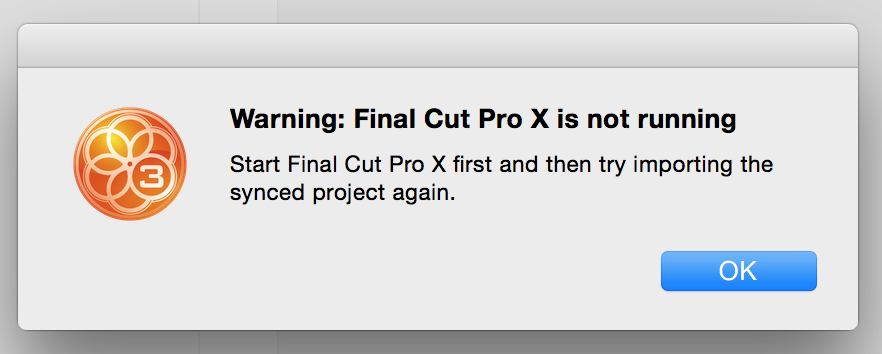
If this happens, it means the file won’t be imported automatically. No problem, you can do it manually. Open FCPX, and go to File > Import XLM.

This will create an event which contains your exported files.
Sometimes PluralEyes gets confused. If you are attempting to sync the same footage repeatedly, it’s a good idea to throw away the temporary files that PluralEyes creates. Look inside the directories containing the audio and video files, and throw away the folders called PluralEyes Synctemp.
What if you have video clips that are recorded at different frame rates? Will that cause sync issues? Sometimes, but if that happens, try again. In the project used for this post, the three cameras were all shooting different frame rates: 23.976, 24, and 29.976. On the first sync attempt, it came out scrambled. So I tried again after throwing away the temp files, this time adding each camera one at a time instead of dragging them all in at once. The second time, everything synced fine.
Here’s how the multicam clip looked after importing correctly:
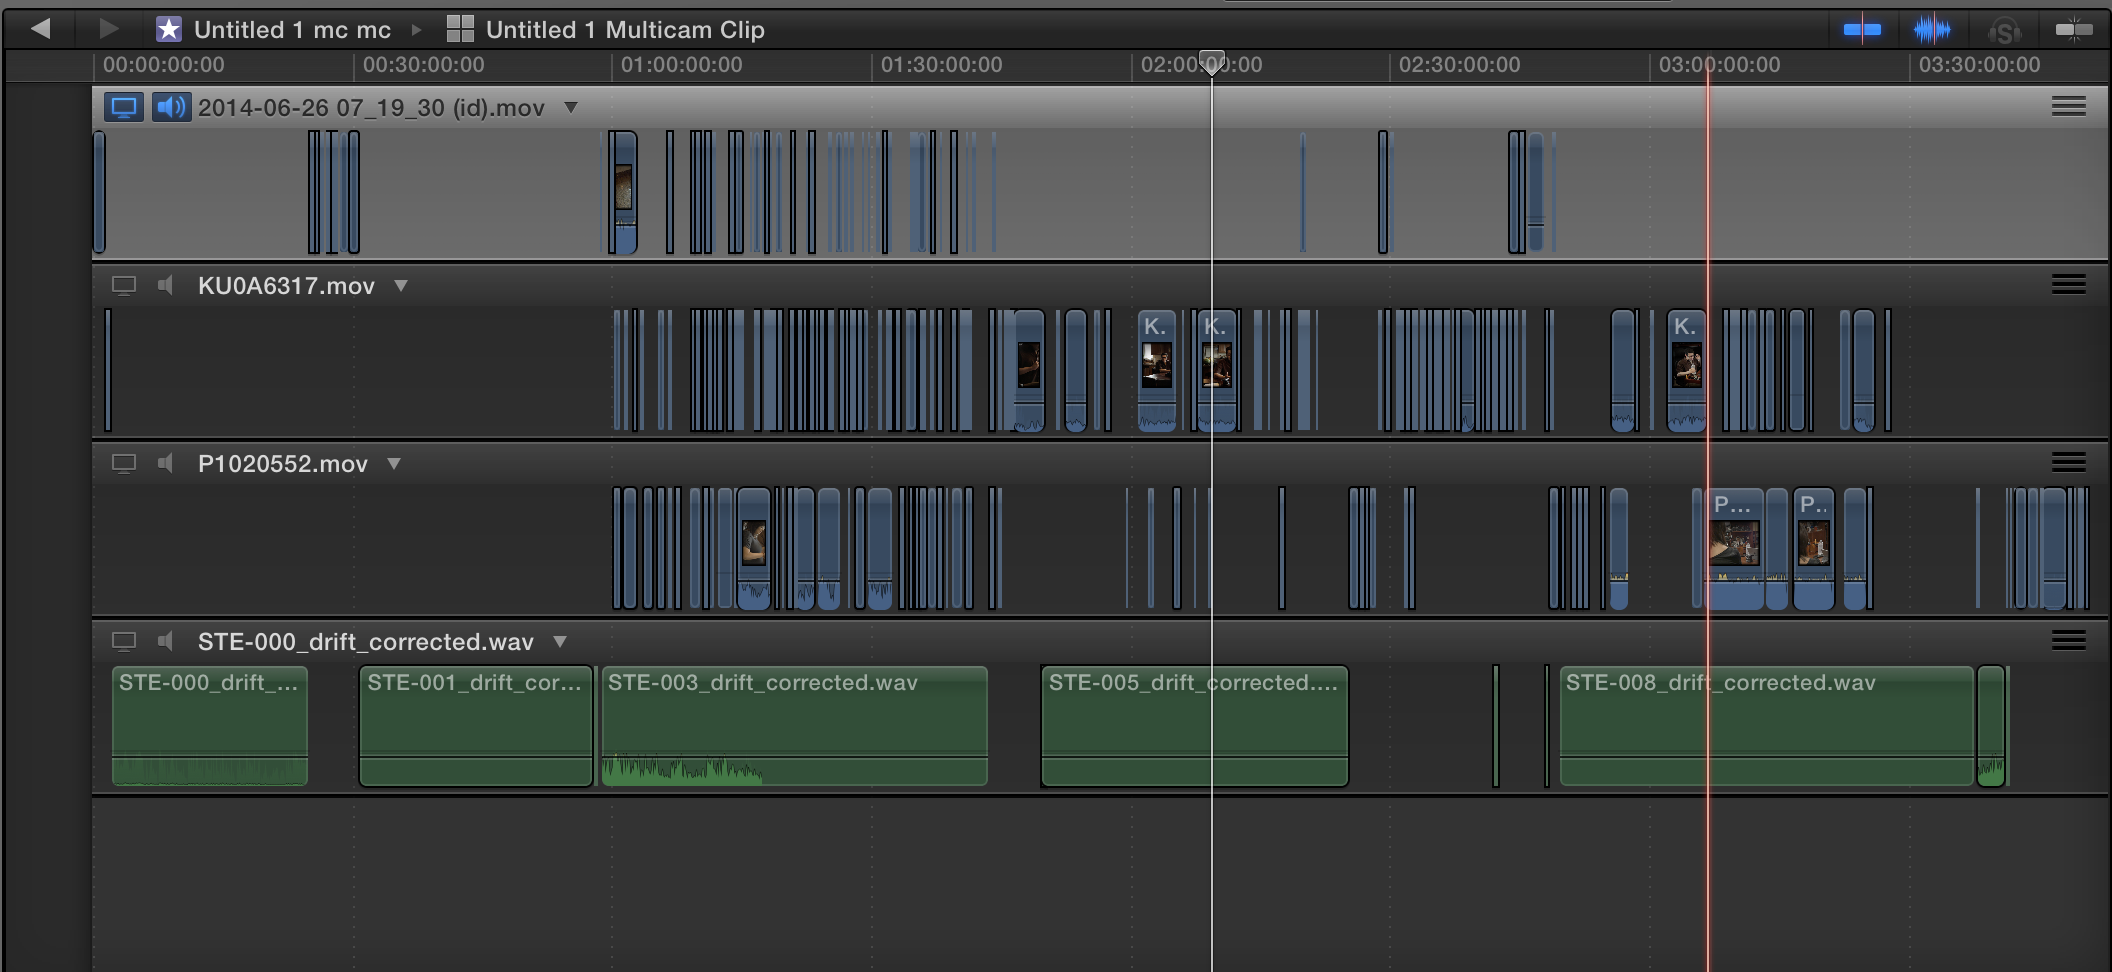
Notice the audio files starts with 000, and count up sequentially as you go from left to right in the timeline. That’s what you want – file names in order. Notice that the audio file names include “drift corrected,” which means PluralEyes had to do a little work to make them match exactly.
PluralEyes has earned a place at the heart of my workflow, freeing me of the tedium of slating and the complexity of genlock. If you hear the sound of clapping on my sets, it’s because someone is happy.
 Red Giant’s Shooter Suite 12.6 is a powerful set of six stand-alone applications that are bundled to address common production challenges faced by filmmakers. I’m going to take you on a guided tour of these applications in separate reviews, starting with the first step in post-production: importing your footage.
I’m a fan of simple. And for the past five years, importing footage for me has been very simple indeed: insert card into reader, create a folder to hold the contents, and drag files into it. Done!
This has worked ALMOST flawlessly for me. In those five years (which included making a feature-length documentary), I can think of only two occasions in which files were corrupted in the process of copying.
Nevertheless, my experience does point out an important fact: if you’re laying off a lot of footage, it’s only a matter of time before an error DOES happen.
If you’re interested in reducing your chance of errors to zero, without having to learn obscure terminal commands, you’ll be very interested in two applications bundled in Red Giant’s Shooter Suite: Offload, and BulletProof. Both use a byte verification of CRC-32 (Cycle Redundancy Check) that makes sure the media copy always matches the original source. This additional step means that importing files takes longer than Finder copying, but you can have full confidence in the result.
Offload, the most elegant of the two apps, offers a minimalist interface that prompts you to do just two things: offload your files, and back them up at the same time.
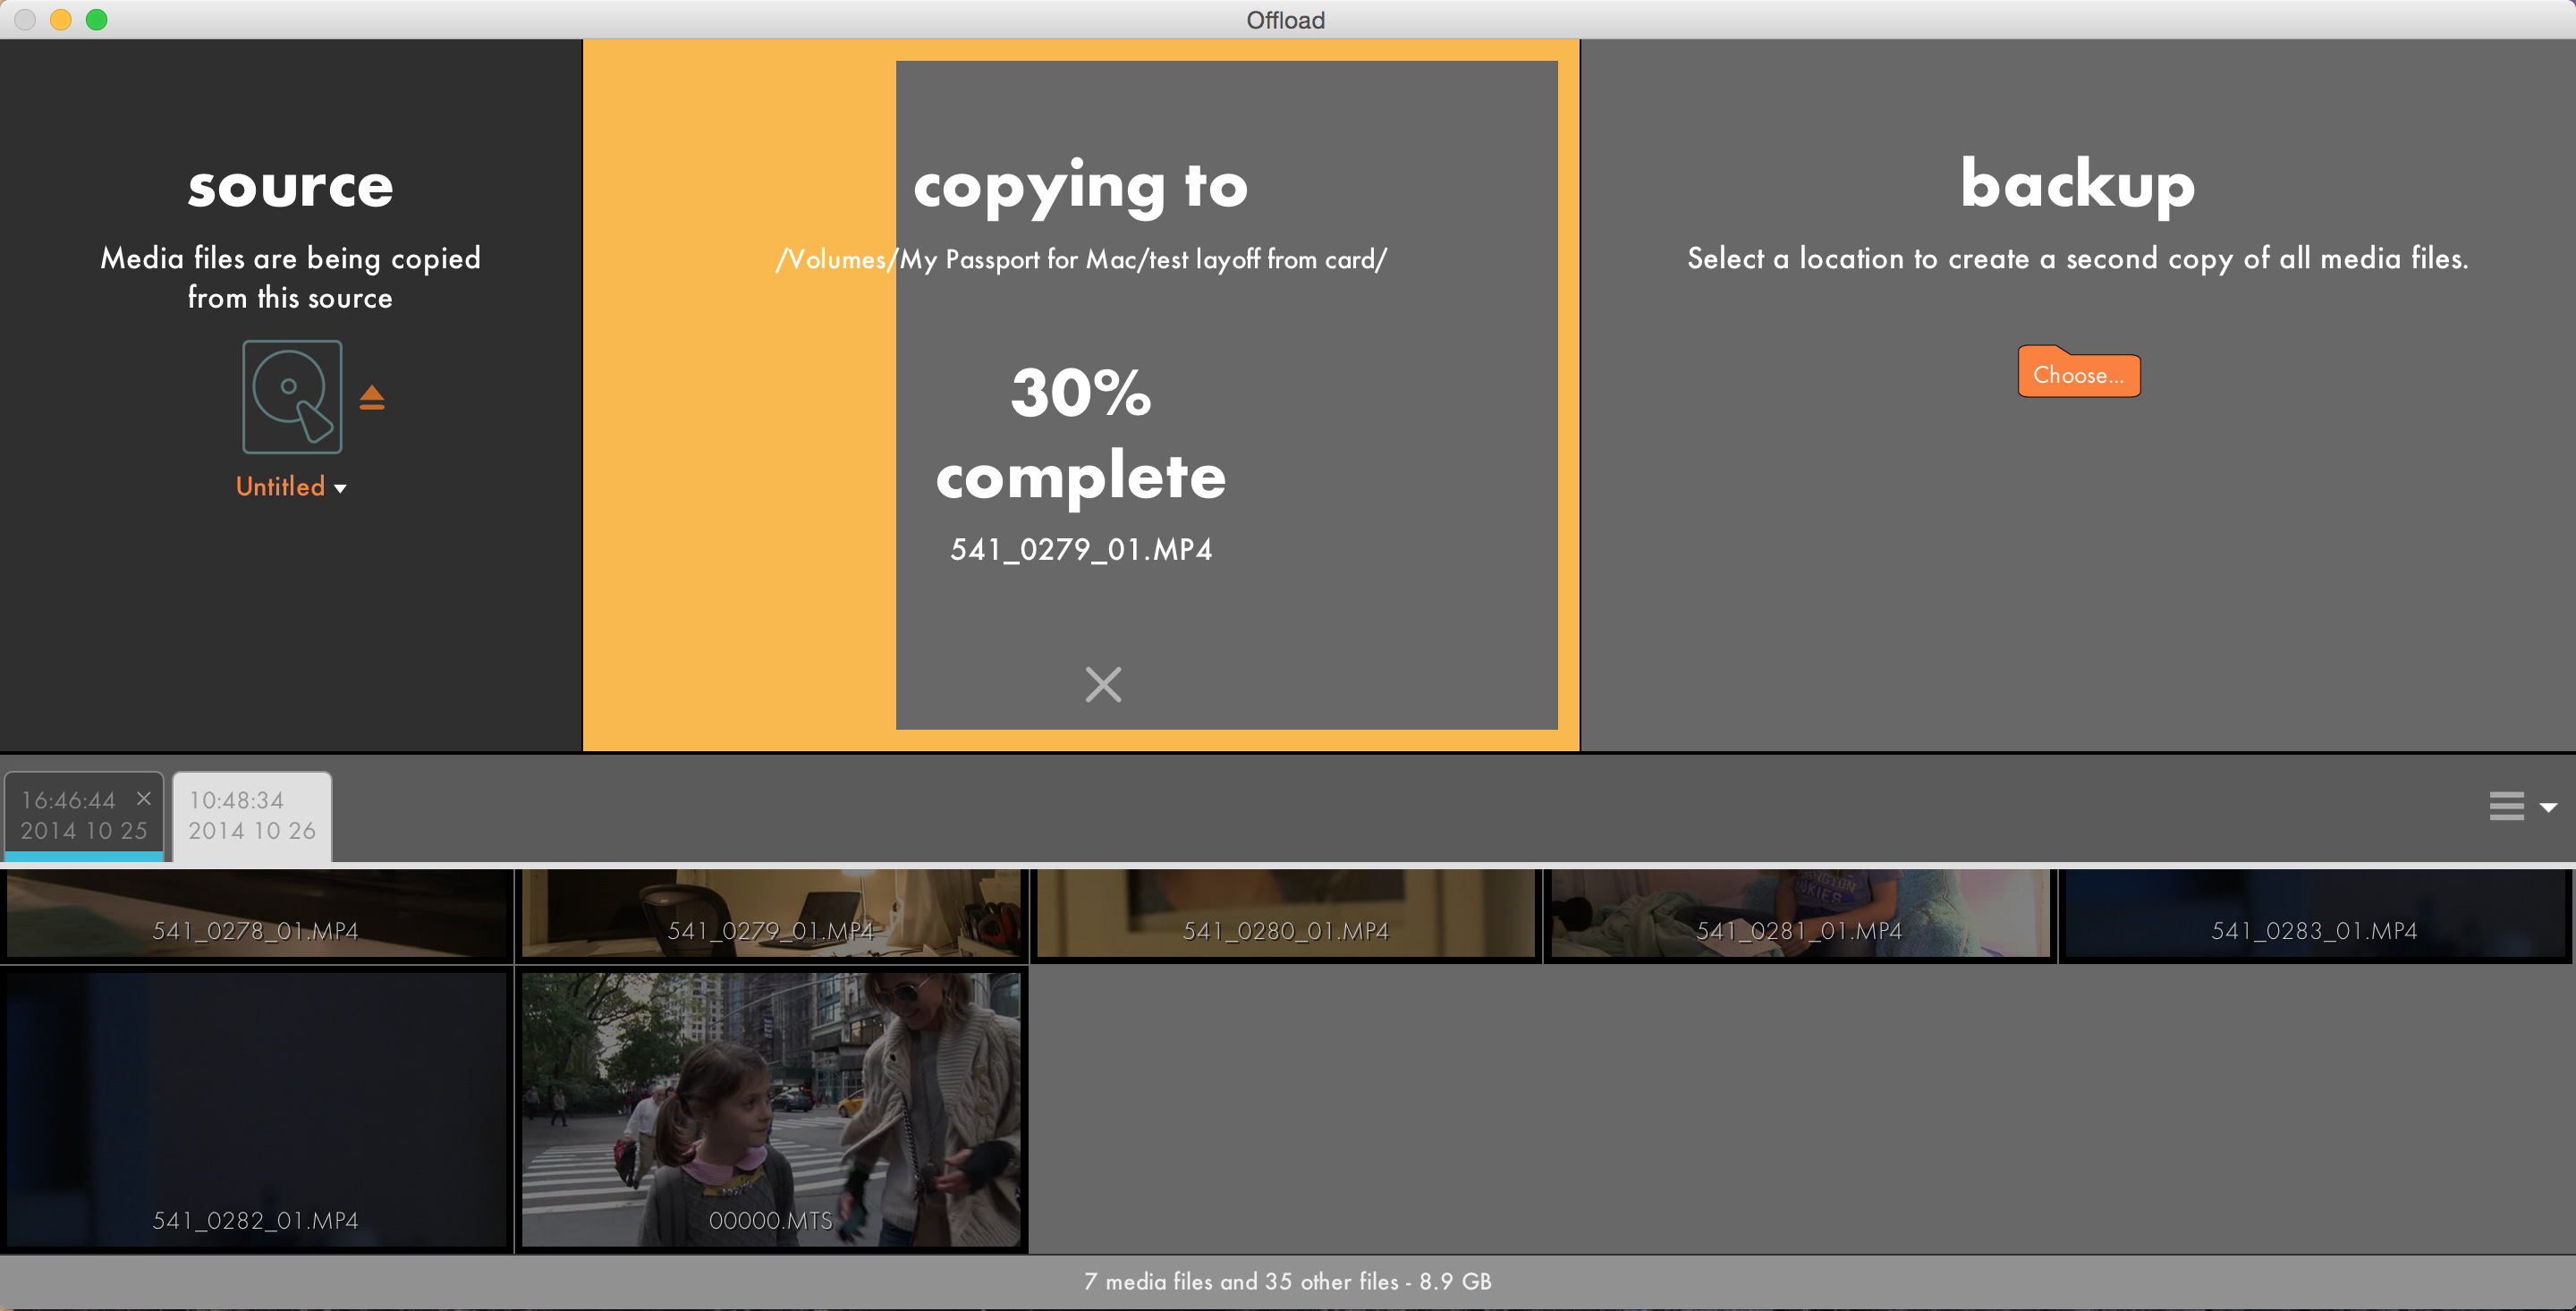
It’s always best to back up your footage from the original media, rather than copies. Offload prompts you to do it the right way, and right away.
BulletProof offers many more options and support for complex workflows, at the price of increased interface complexity (read: it’s harder to learn to use it, and you might not need all those bells and whistles).
But before we get into BulletProof, let’s take a closer look at Offload.
When I import my footage, that’s really all I want to do: get it from the card safely onto my RAID for editing. I don’t want to begin color correction, generate multiple copies, add metadata, or anything else, thank you very much. So if you just want to know it’s safe to wipe your card after import is complete, Offload is the tool for you.
But Offload doesn’t give you ANY options. In fact, you can’t even choose which files to import or skip. Every file on the card will be imported.
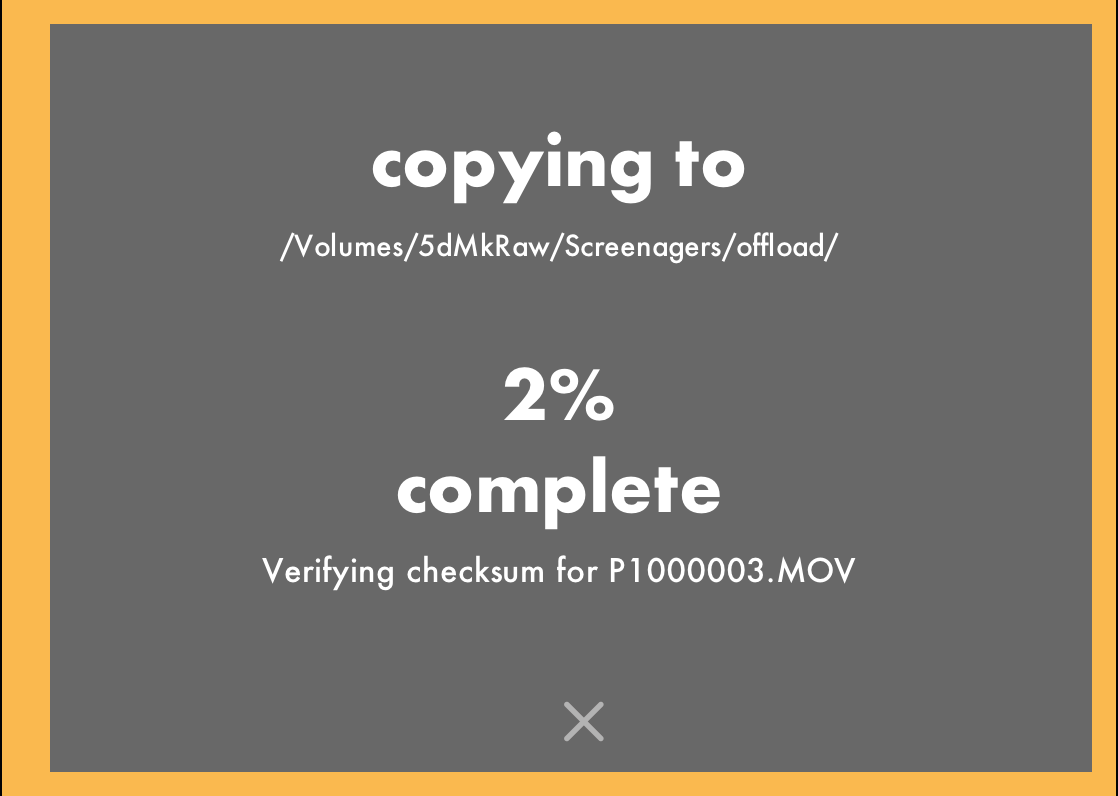
During import, Offload tracks progress with a large yellow border that fills up from left to right, with onscreen feedback for both copy and verification steps. It couldn’t be simpler.
If anything happens to interrupt the import, of if you cancel midway, it’s impossible to miss that your files haven’t successfully copied: bright red warning marks appear on every file that failed to import.

What more could you possibly want? Well, how about automatically detecting spanned clips and combining them into a single, edit-friendly clip during import? Or the ability to assign metadata such as roll number during import? With BulletProof, that’s just the tip of the iceberg.
BulletProof breaks all of its many capabilities into five steps:
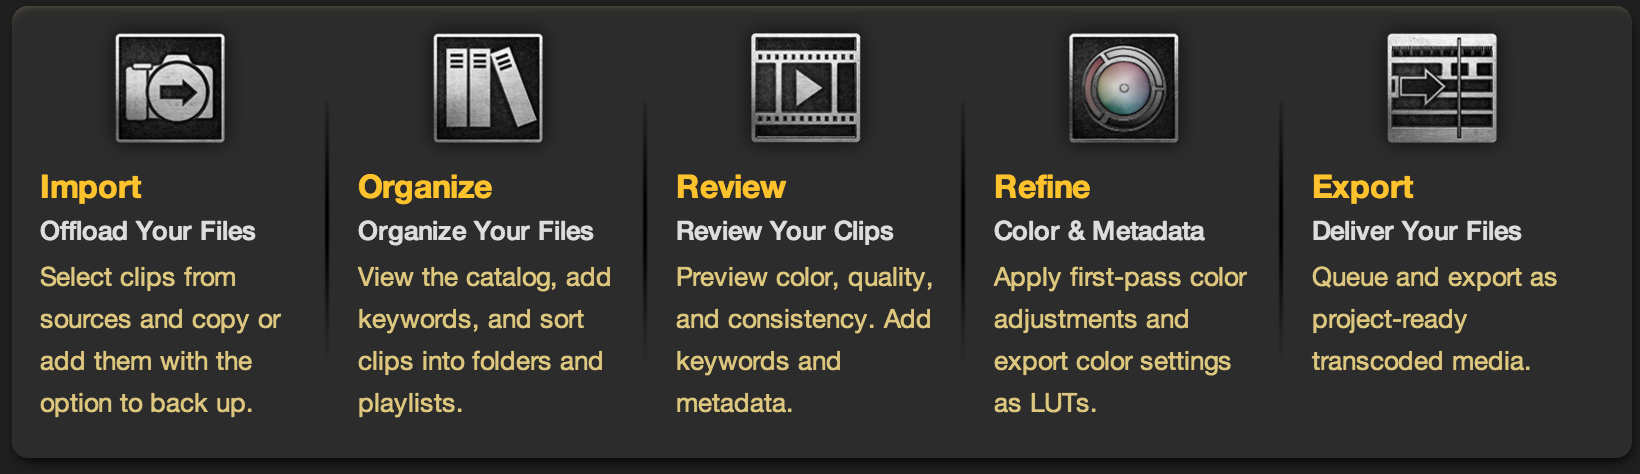
BulletProof offers the ability to do things on set that previously were the realm of NLEs or tools like Davinci Resolve: metadata tagging, LUT application, and generation of dailies. In effect, BulletProof provides an easy way for an on-set DIT to take over some of what previously was an assistant editor’s job – and that in many workflows, should probably remain their job! But if you’re working in teams where everyone has to do a lot with a little, it’s got the potential to be a tremendous timesaver.
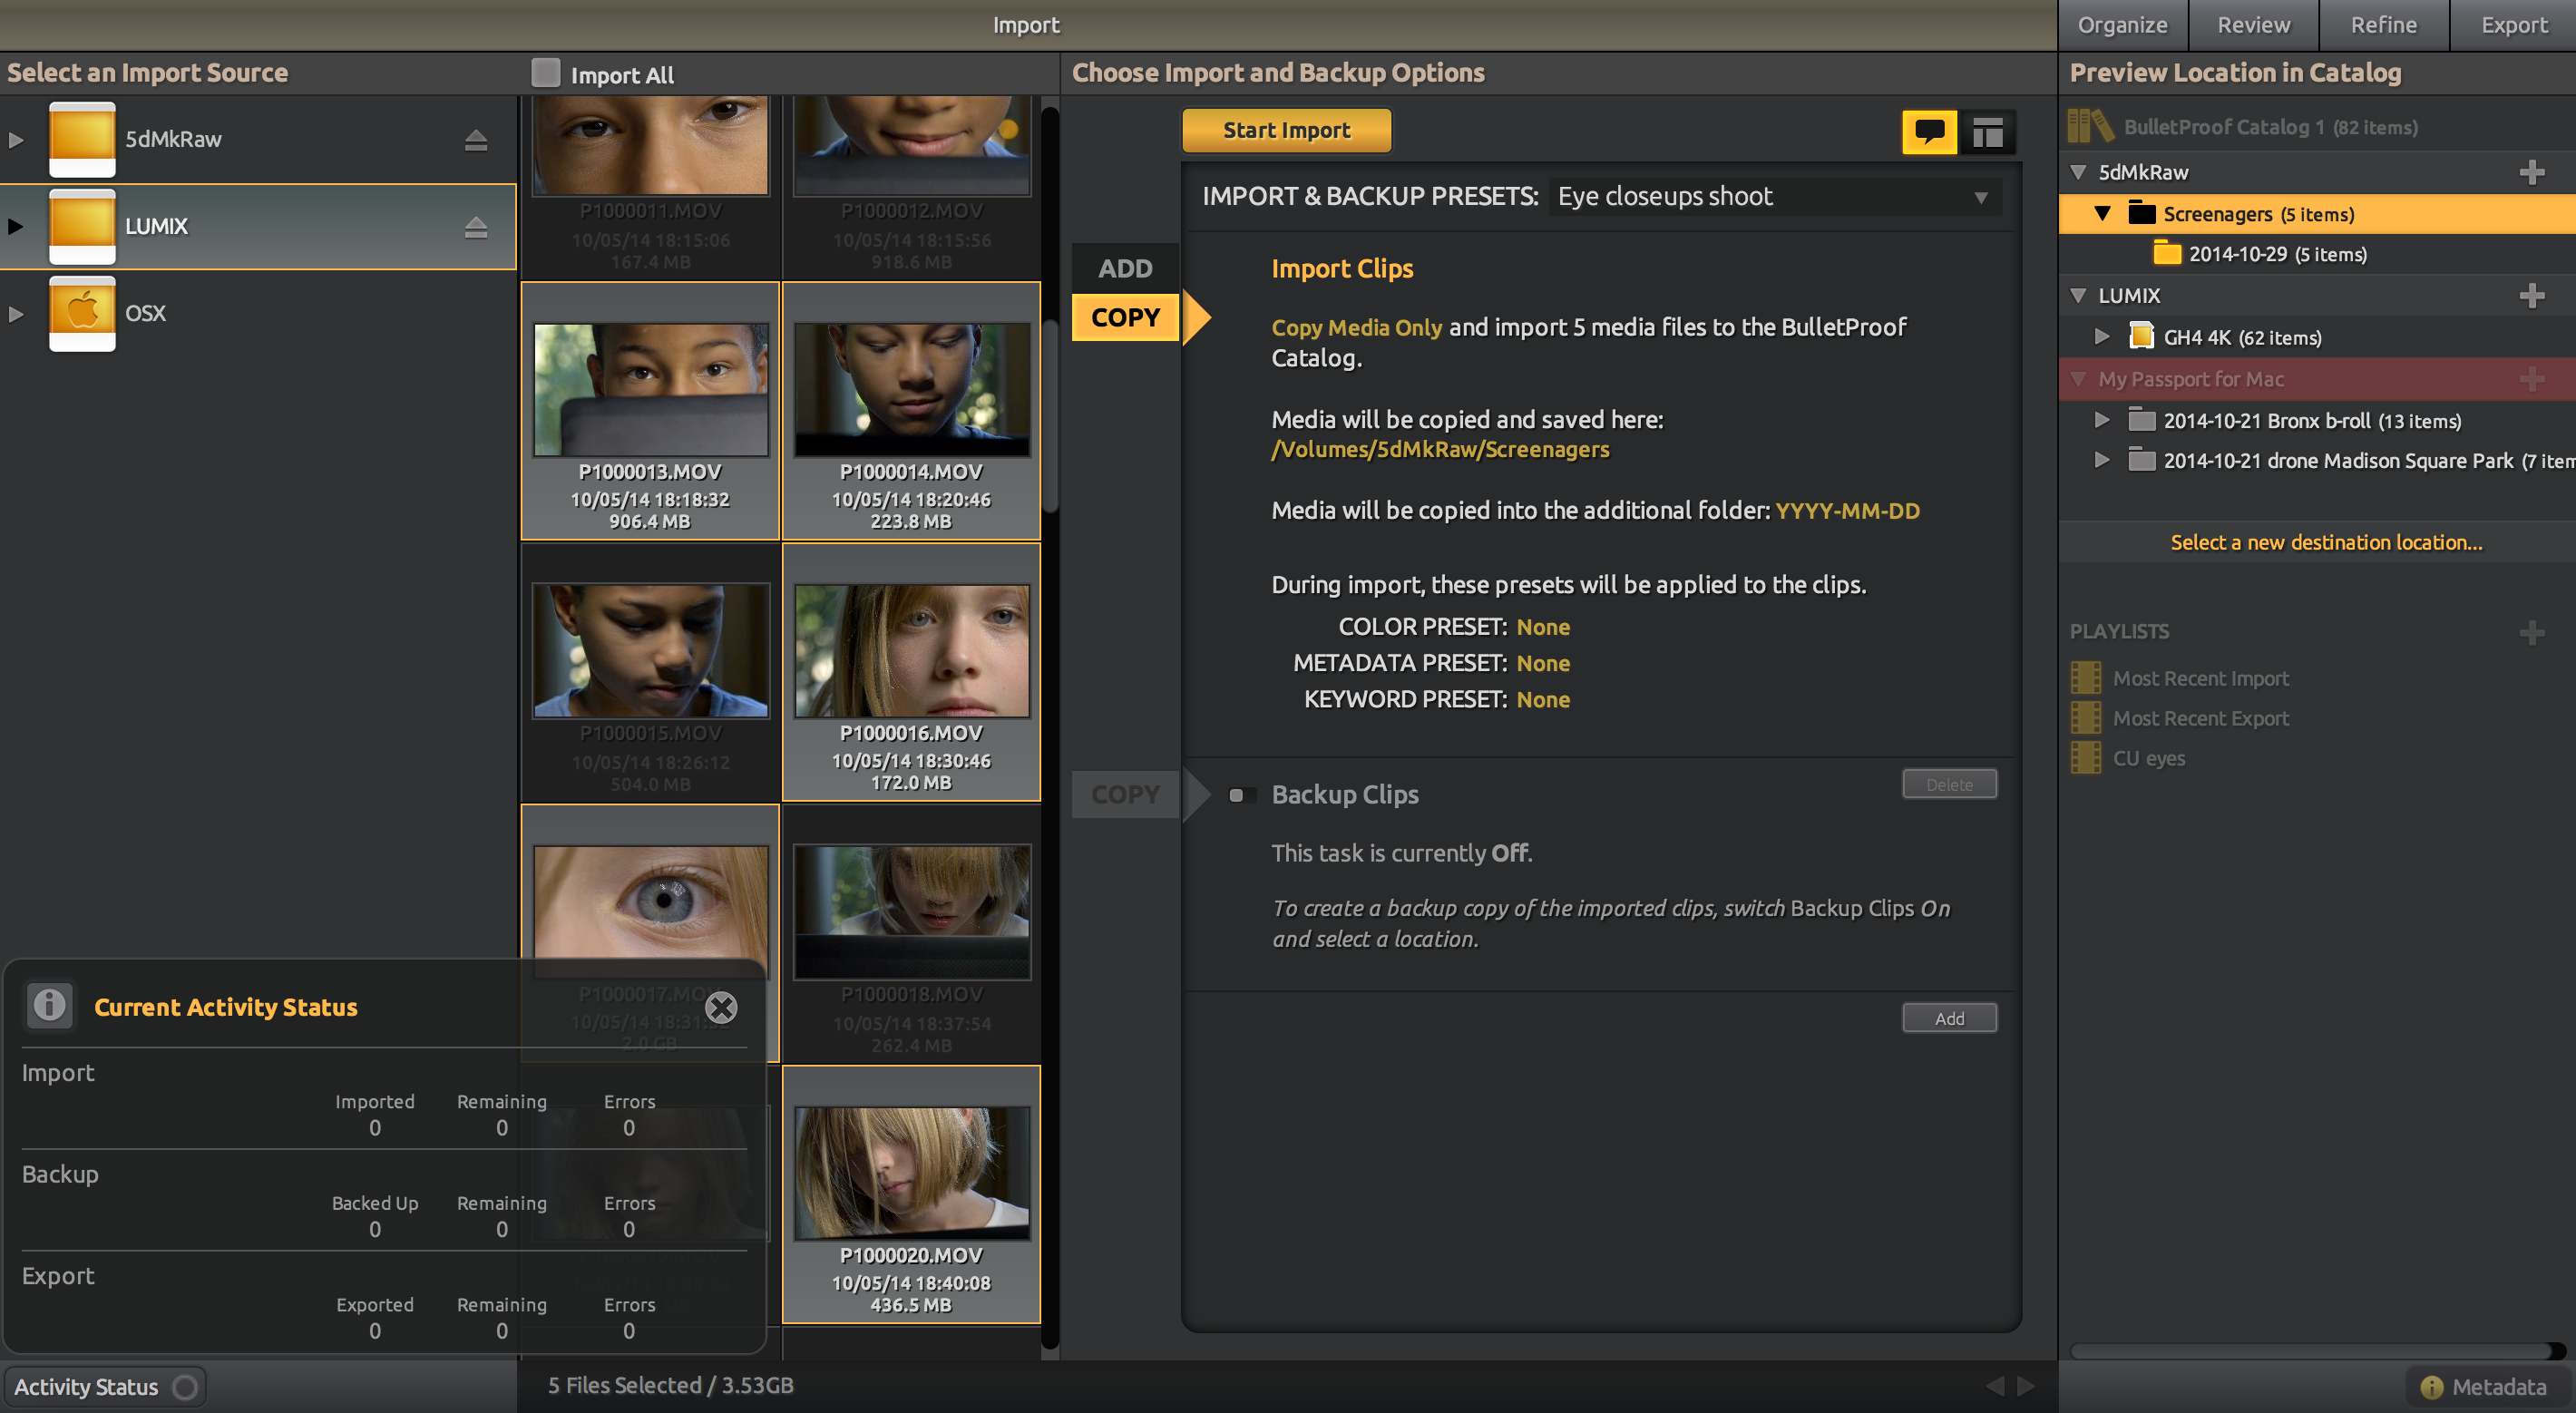
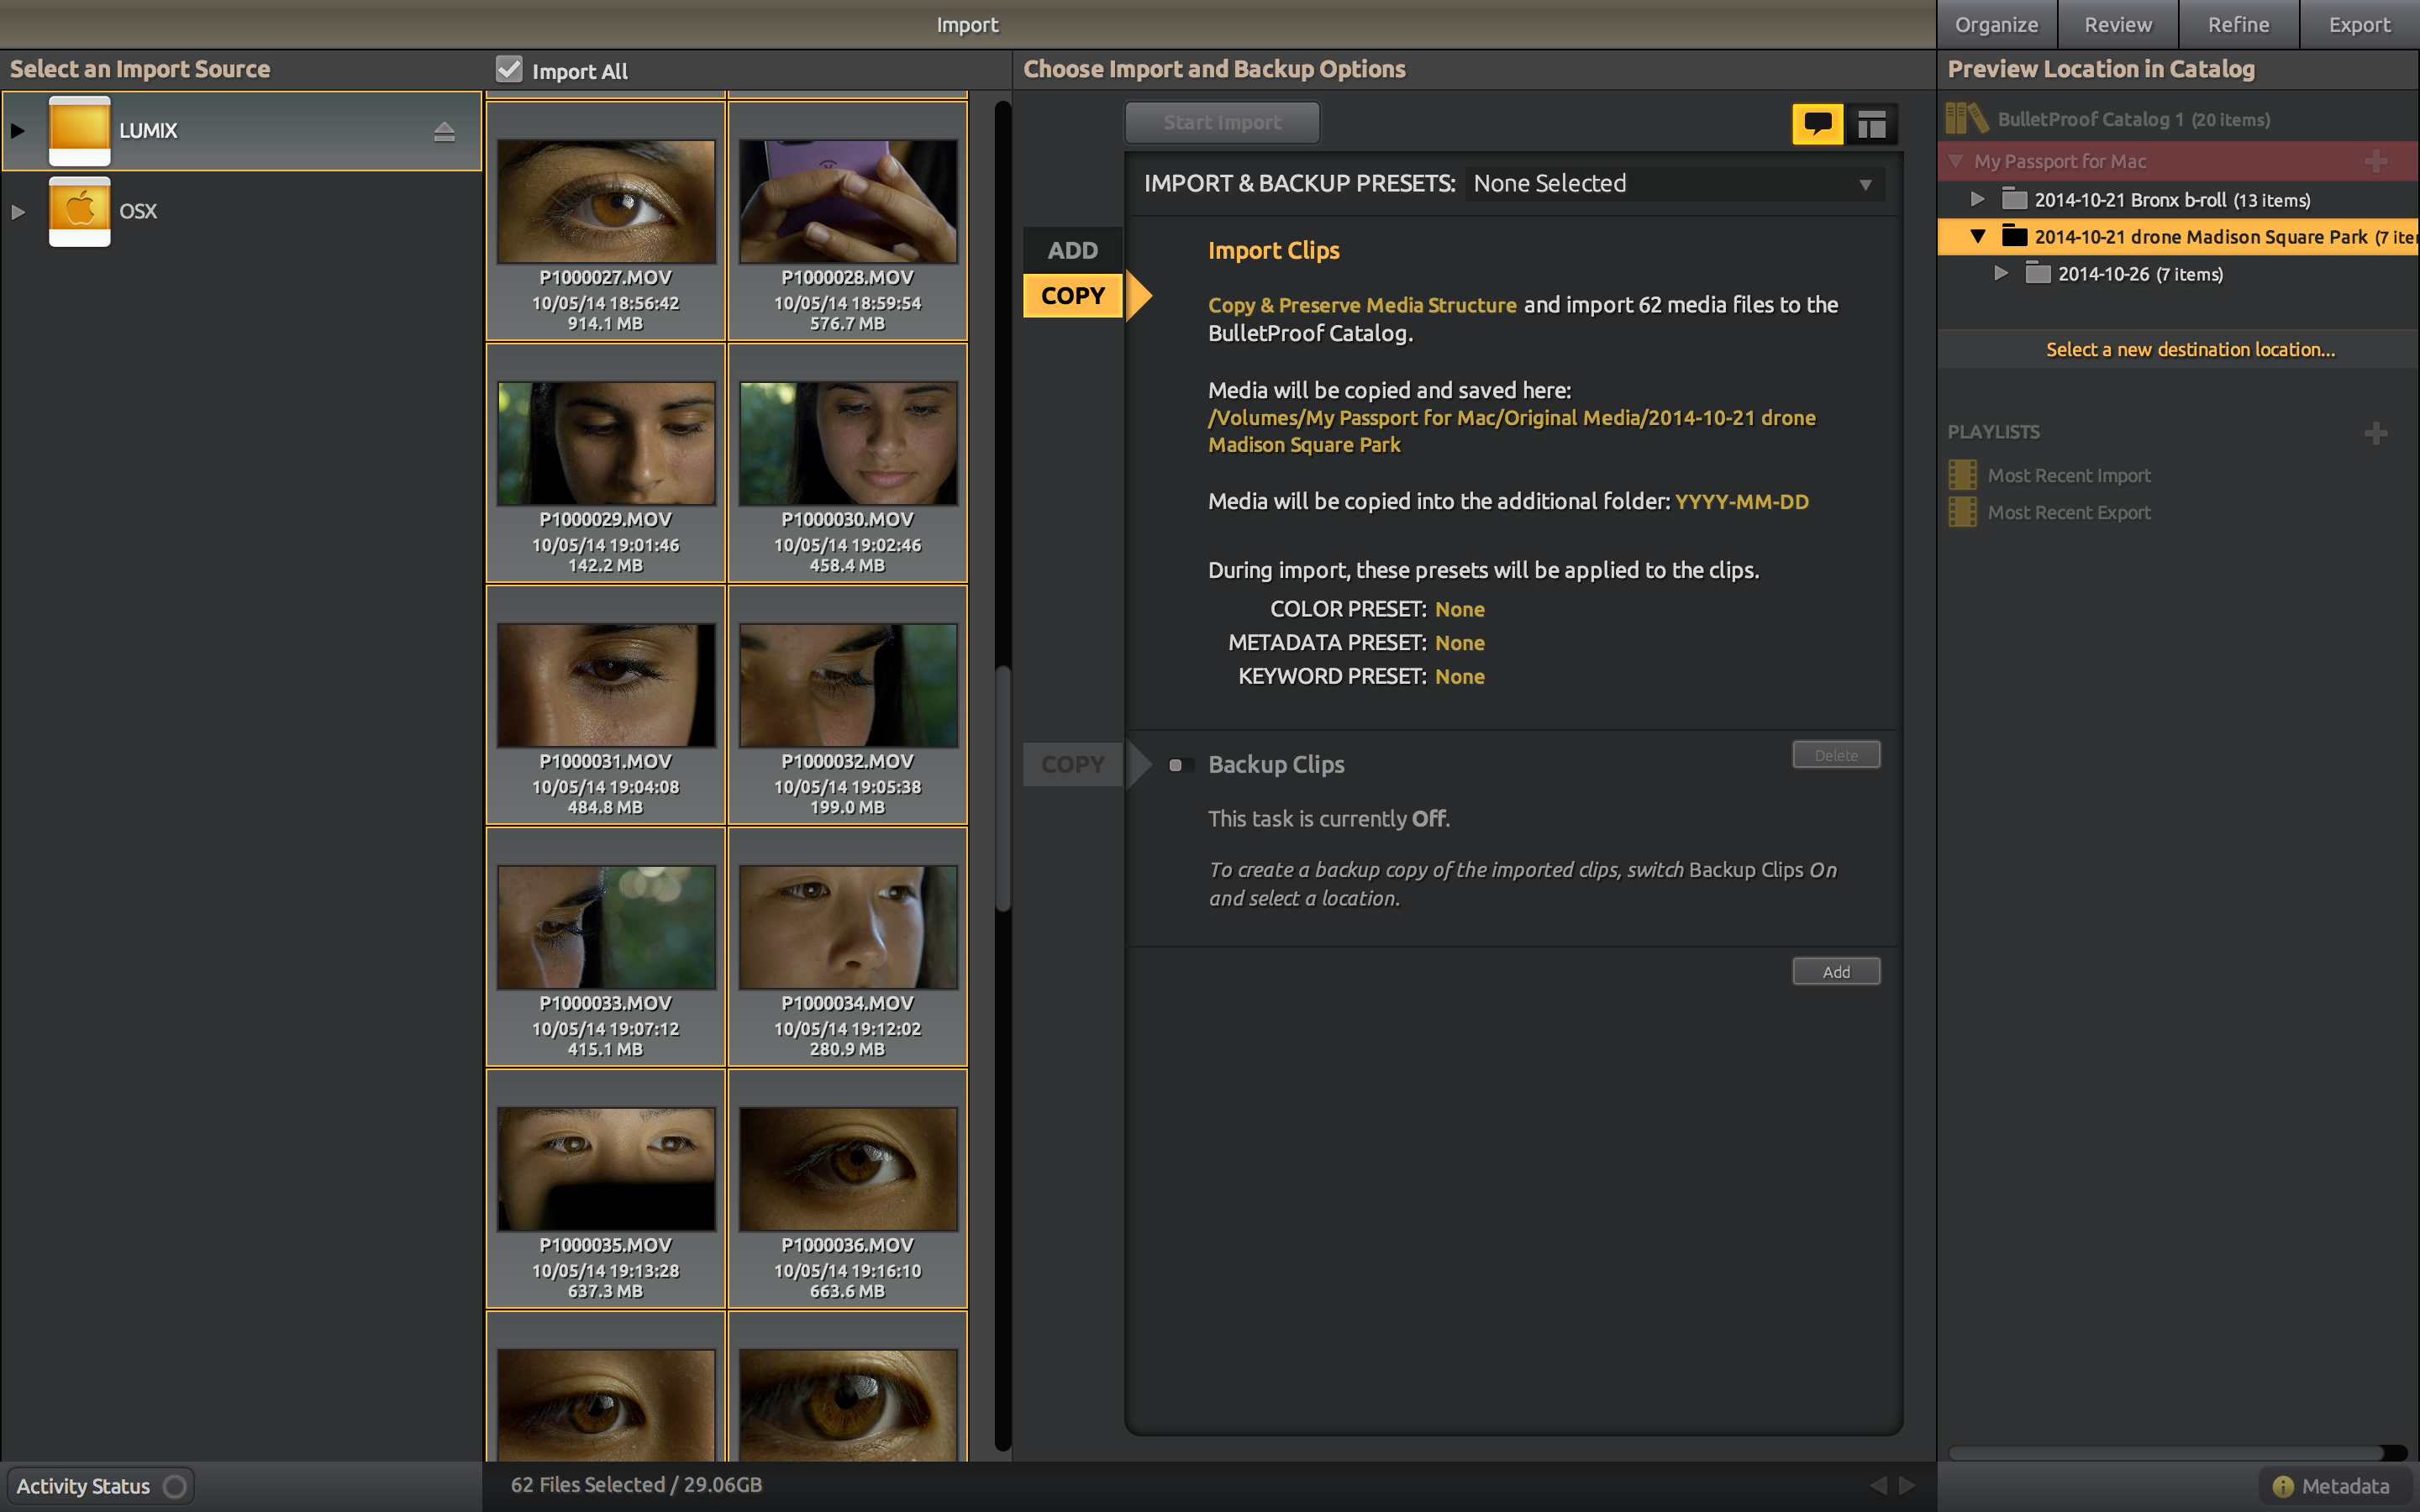
The Import tab provides options to either Add or Copy files into your Catalog (hint: choose copy unless you want to leave the files where they are – almost never a good thing if you’re importing from a card, but makes sense if you are prepping dailies that have already been saved to a hard drive).
 To streamline repetitive tasks, you can save presets that will remember your settings for future sessions.
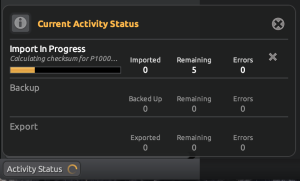
After you’ve started the import, an Activity Status button reveals where you are in the process. This lets you see at a glance where you are in the process, and gives you the option to cancel.

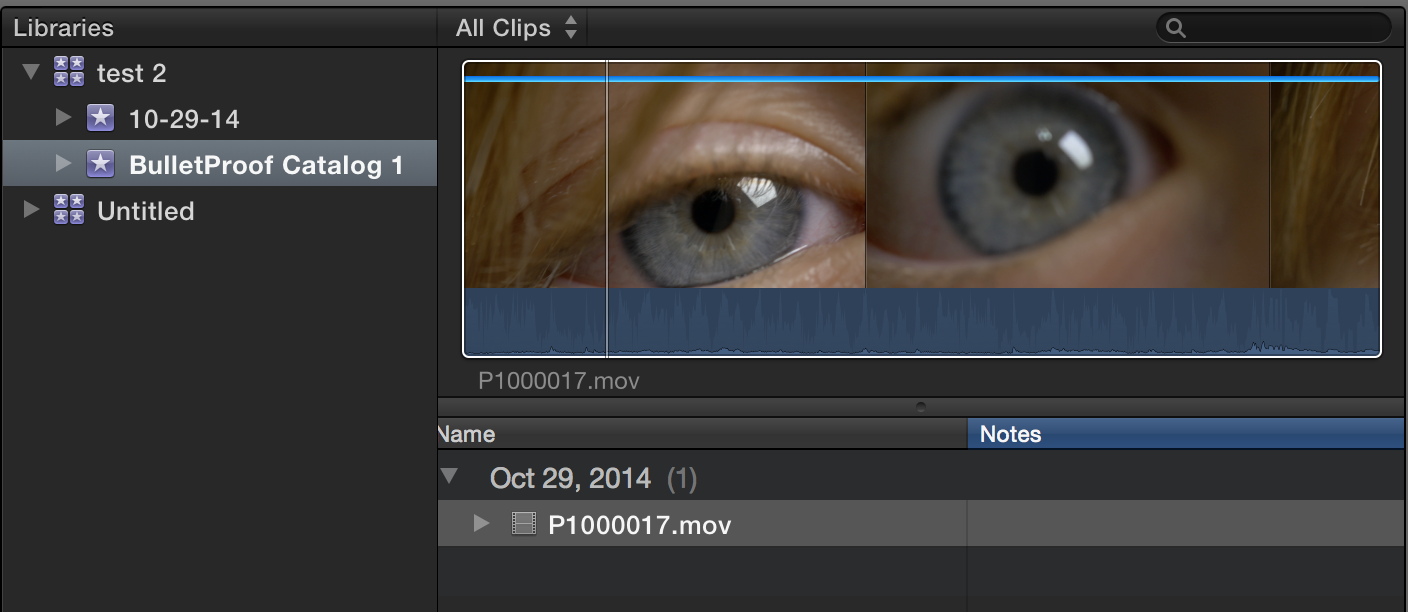
After your files are successfully imported, you can move to the Organize tab (above). This gives you the option to create iTunes-like Playlists, useful to streamline tagging files with metadata. For example, in the example above, I’ve created a playlist which contains only closeup shots of eyes. This allows me to apply the shot type keyword “CU” to all files at once.
So where does this metadata end up? It would be nice if it were immediately stored with the clip file. That way, you wouldn’t have to export again to get the tags to stick. But that isn’t quite how it works. Metadata is stored within a BulletProof catalog file, and in Final Cut Pro X (my NLE of choice) it is only associated with the clip upon import. There is an option to apply the settings to your media without exporting new files – more on that below when I discuss Export options.
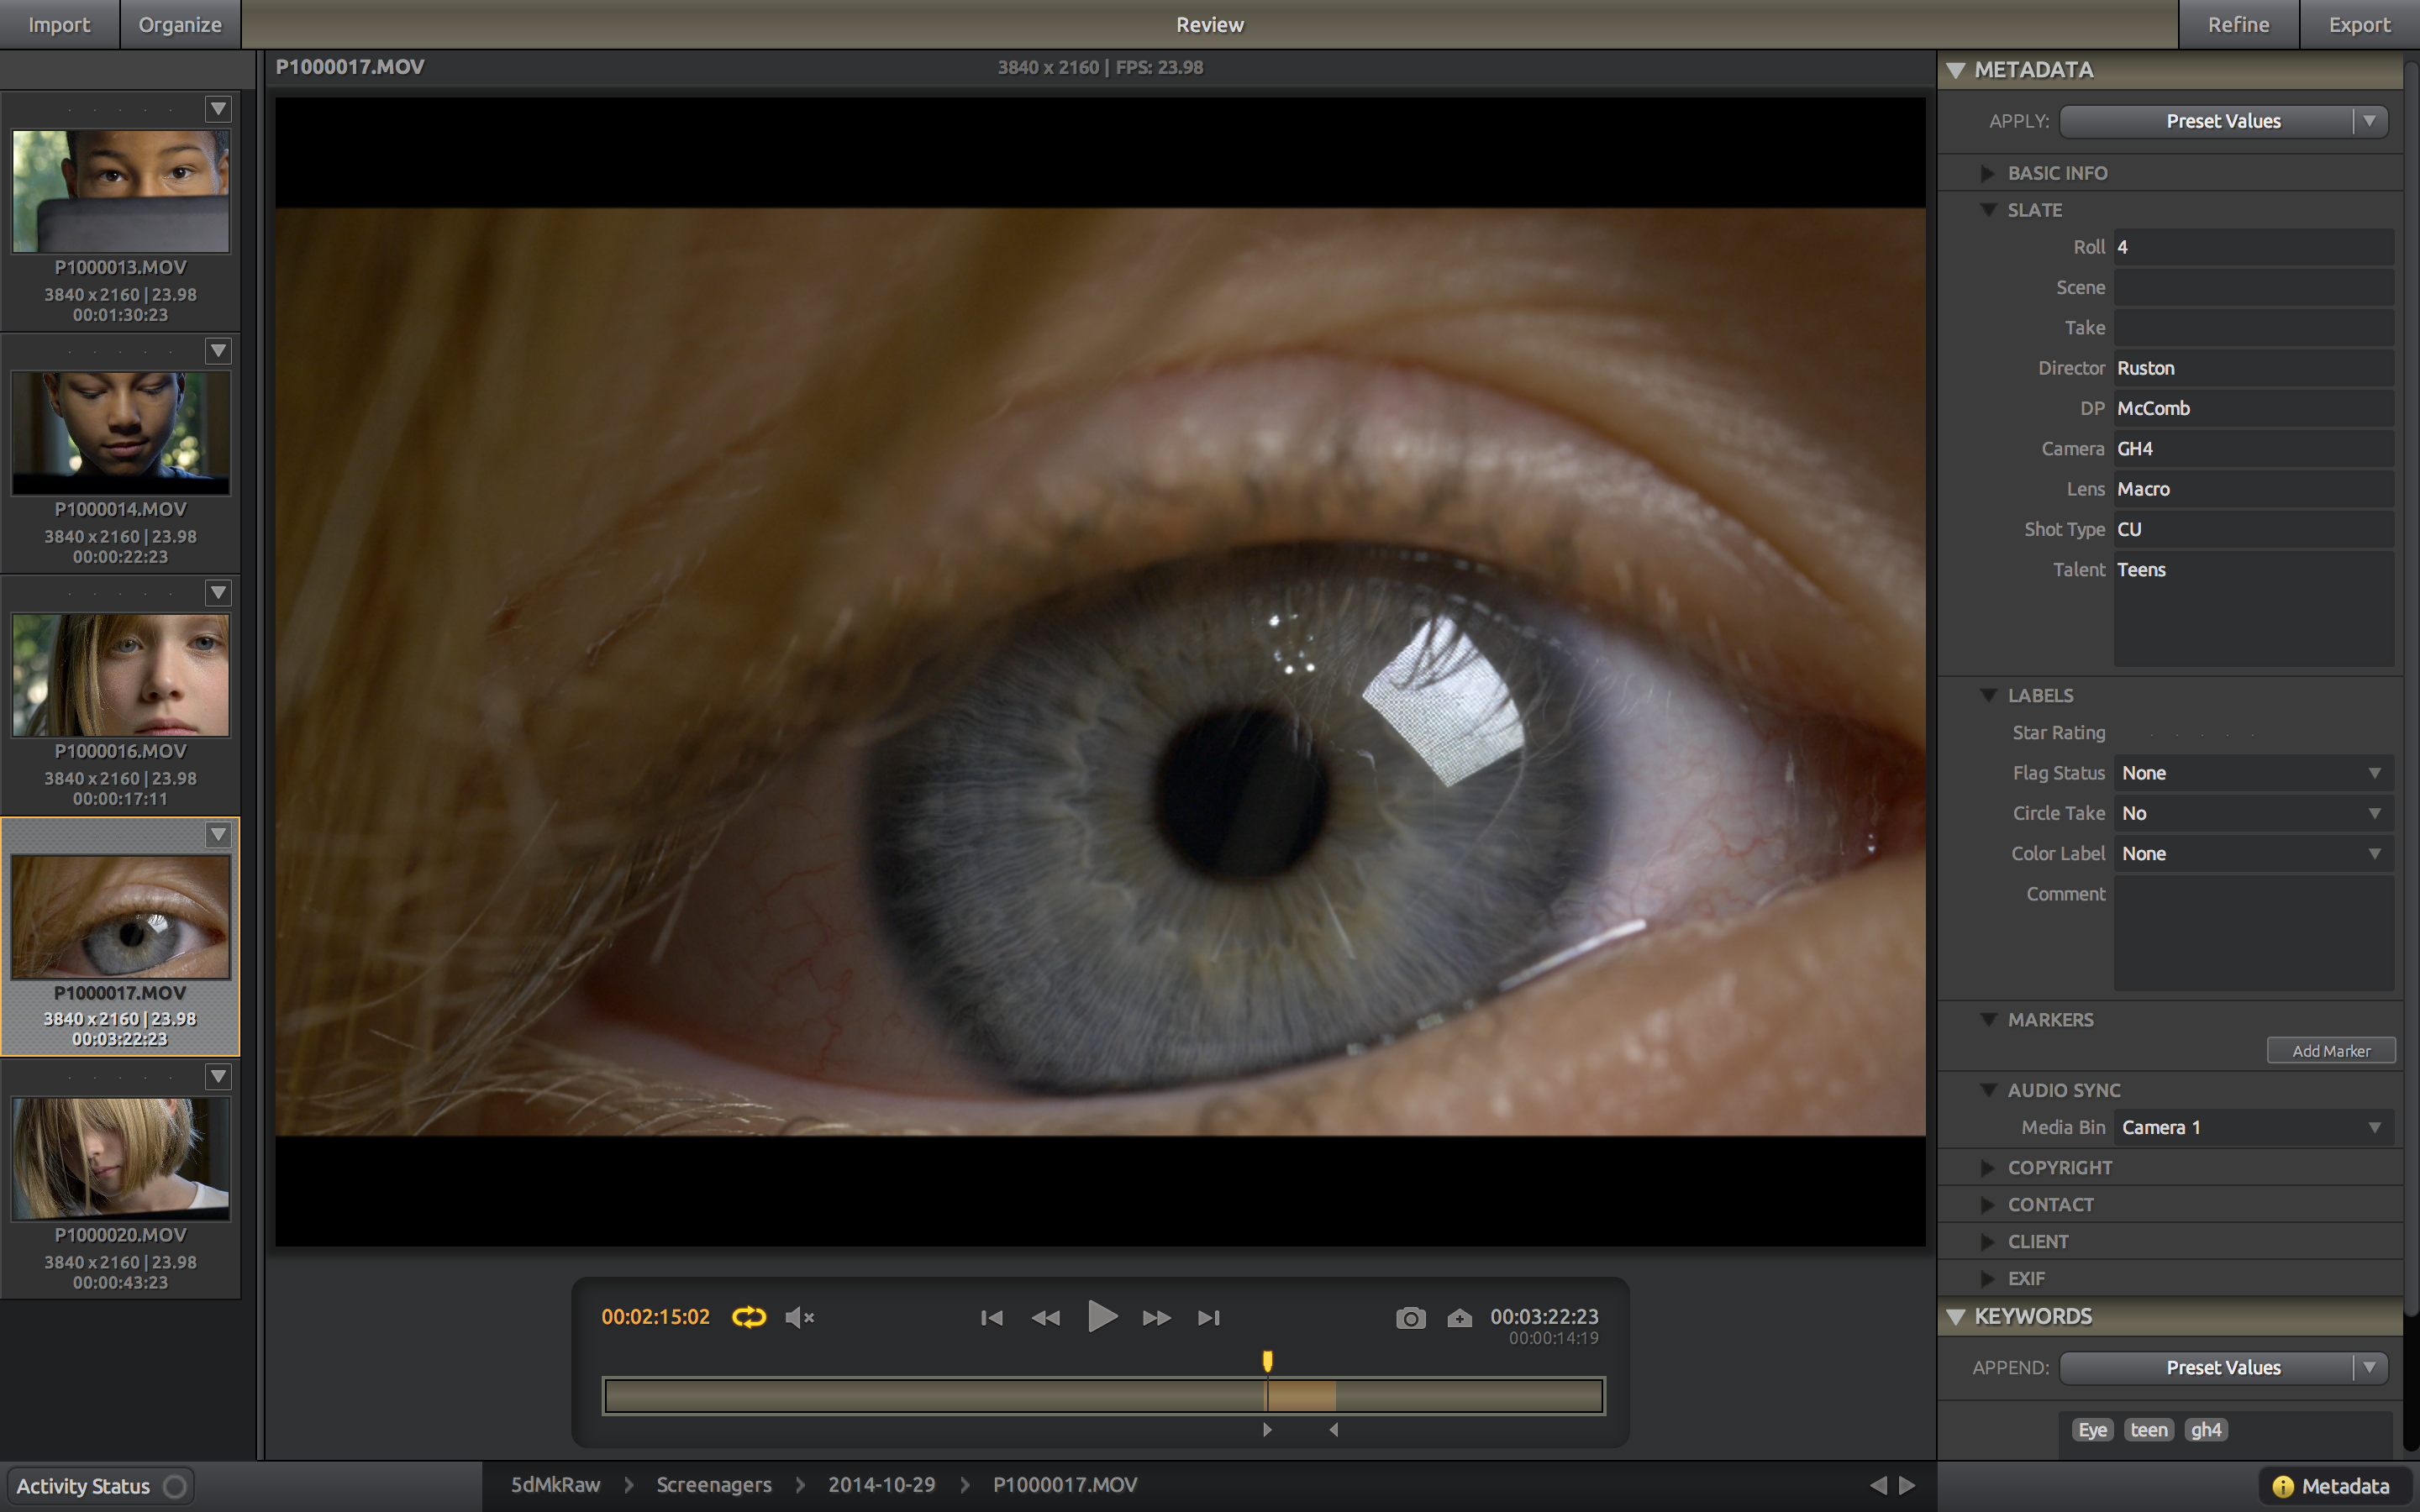
The Review tab (above) gives you the option to play each clip, and set in and out points that control which footage gets exported when generating dailies in the Export tab. You can also access the metadata from within this area. Why you would want to set in and out points at this stage of the game is beyond me, but hey, options are good.
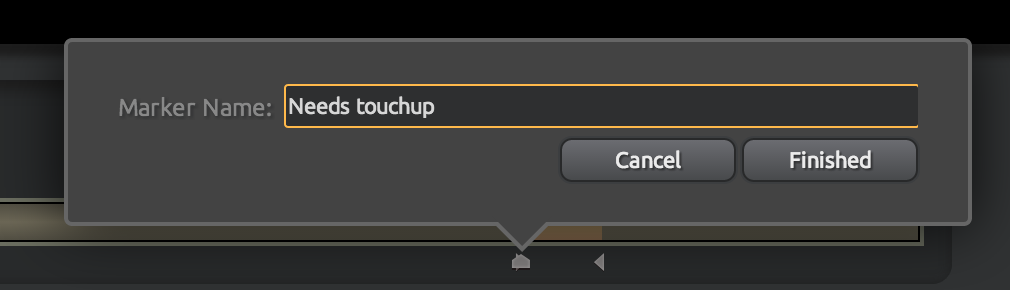 It’s also possible to place markers within the clip, which will be transferred into your NLE when you export the clip.
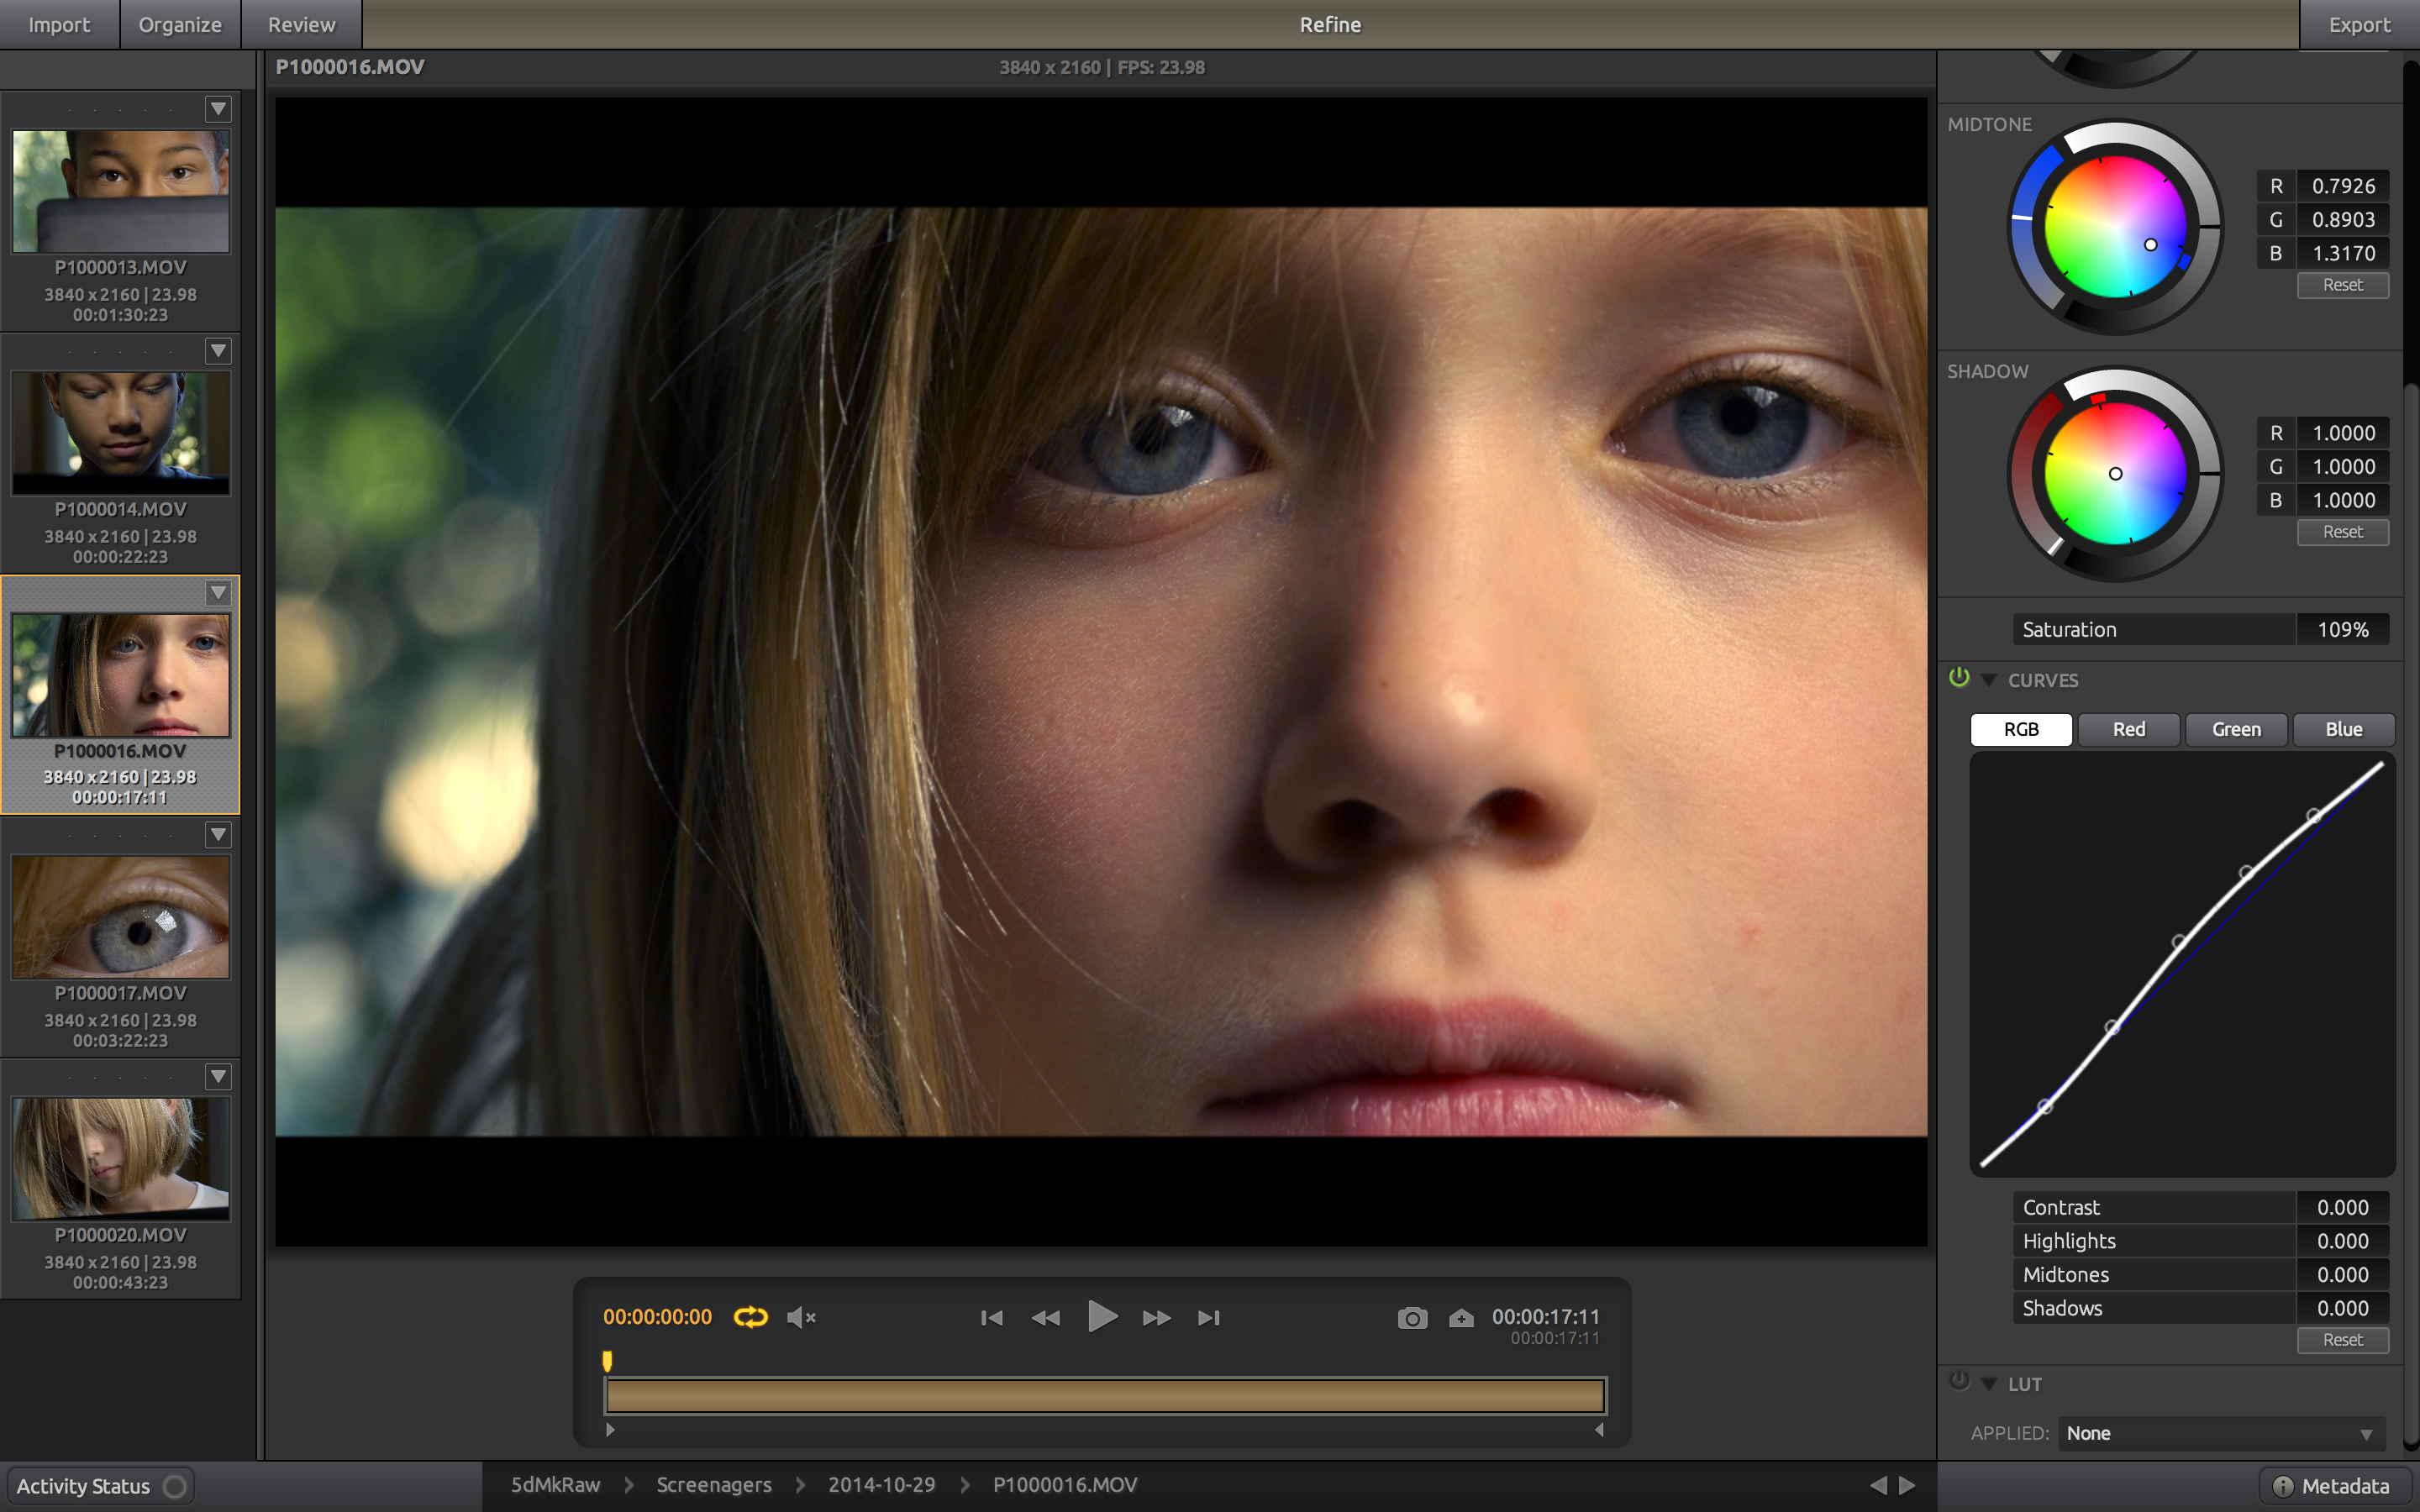 The Refine tab (above) allows you to apply color corrections or LUTs to your clips using a color tool that will be familiar to Red Giant users – Colorista wheels. You can also set a curve, and use a color picker to set white balance (a tool I’ve always loved).
 A powerful feature is the ability to export your color choices as a LUT, which could be passed to your colorist as a reference and used in Davinci Resolve, or any NLE that supports LUTs. In FCPX, LUTs are supported with an excellent $29 tool called LutUtility.
If making color decisions at this stage of the game feels like putting the cart before the horse, it probably is. In my workflows, color grading decisions are almost always deferred until AFTER the edit has been made and picture is locked. But if you’re shooting LOG footage, for example, and need to generate a daily that will look good for cutting with, applying a LUT at this stage and doing a minimal color pass makes sense.

Opening the Export tab (above), allows you to set the destination, and control things like the frame rate and timecode values.
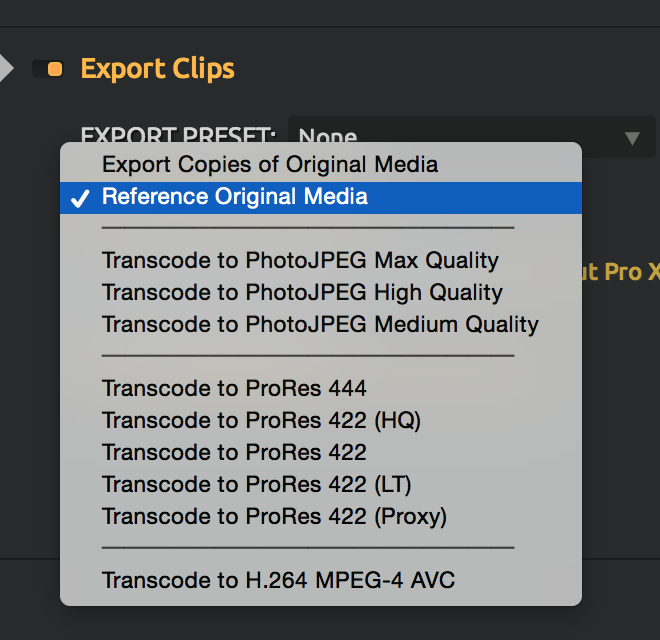 In the “Export Clips” section, you can choose from a short list of editing codecs you’d like to export to. If you select “Reference Original Media,” metadata is NOT embedded in the clip at time of export. Further, importing the XML file into FCPX resulted in a broken link to the clip in my testing.
The only way I was able to get metadata to transfer reliably, and unbroken links to footage, was by choosing to export AND transcode. This creates a new clip that will be referenced by the XML file used to import the metadata.
To open the clips in FCPX, go to the File > Import > XML.
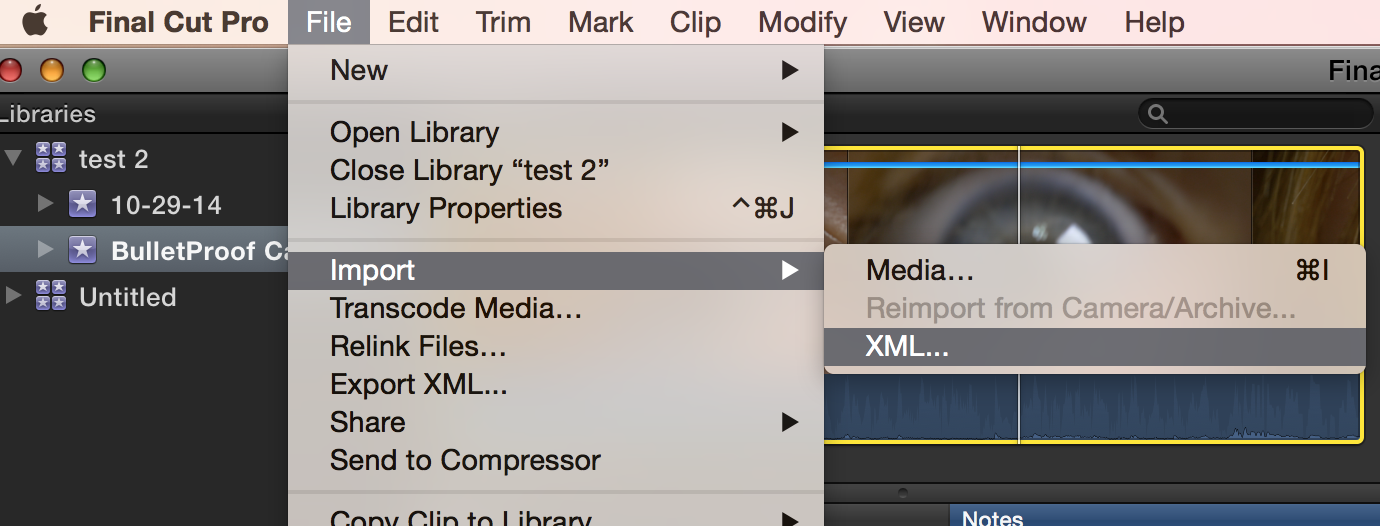
Browse to the location of the XML file generated by BulletProof during the export. Opening it should create an Event named after your BulletProof catalog name.
All of your media should be there, and the metadata should have been imported along with the clip.
I observed that if I imported the clips directly, bypassing the XML, FCPX could not read the metadata. This indicates that, in FCPX at least, the metadata is not actually embedded in the clip, but gets associated with each clip at time of import via the XML file.
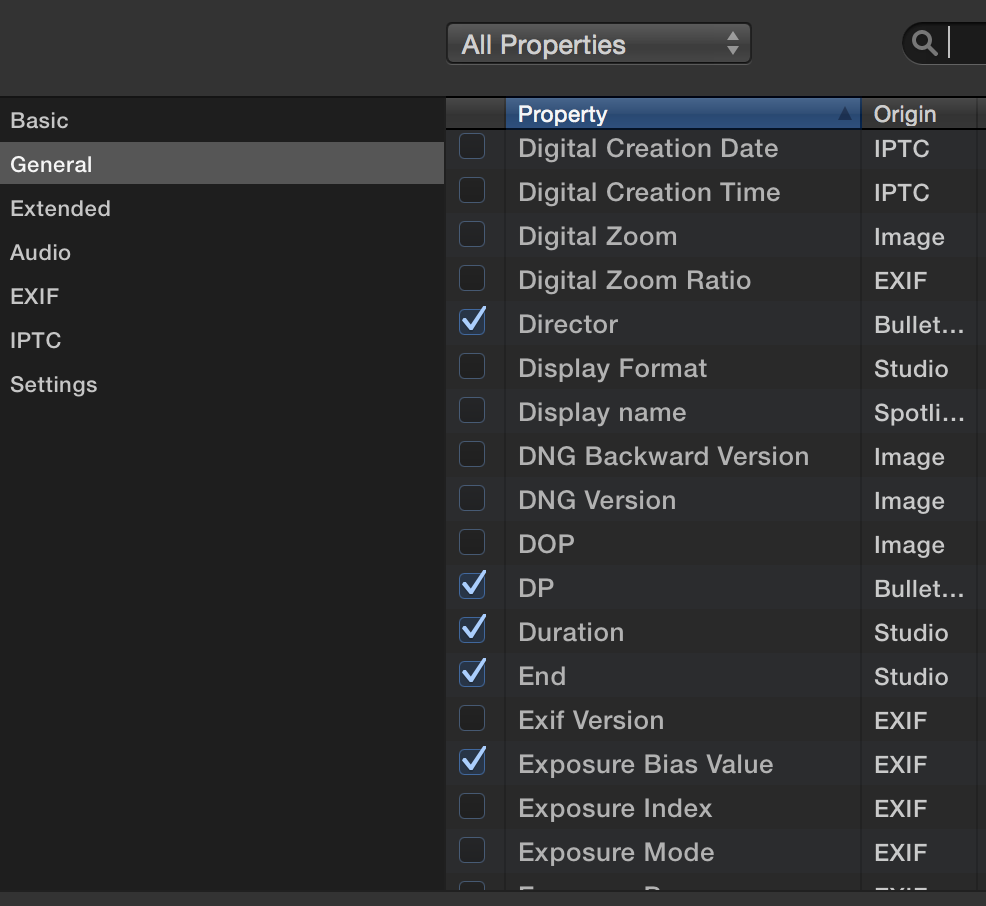
For any custom metadata fields that aren’t displayed by default in one of FCPX’s standard views (in this case, the Director, DP, Lens and Shot Type fields), you will need to open FCPX’s Metadata Views Editor. Check each field you wish to see (above).
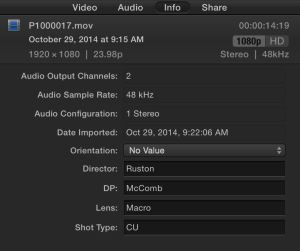
Now, when you open the Info tab in FCPX, your metadata shows up. I wish there were a metadata view in FCPX that automatically looked to see which metadata fields contained data, and made them all visible. That would be a nice timesaver.
BulletProof provides a robust set of tools that can be adapted to your requirements, and is especially well suited to complex workflows requiring dailies generated with LUTs and on-set metadata entry. If your needs are simply to import footage securely, Offload is the elegant choice. Either way, you’ll rest assured that your footage is securely imported and ready to edit from the moment it hits your hard drive.
Update: Since this post was made, Pearl was fully funded. Huge thank you to everyone who supported our campaign. See you at the screening!
Hey Seattle film fans, here’s a project worthy of your support. Pearl is a film I DP’d for director Amy Sedgwick over the summer, and it’s in the home stretch of a Kickstarter campaign to fund its completion. Check it out:
The film is about woman who works in an oyster factory and dreams of a life outside her small town. But what price is she willing to pay to break free?
Please consider backing this project! We need your support to keep growing our talents right here in Seattle.
UPDATE: Pearl is within $250 of being funded with 12 hours left to go in campaign. Help us get across the finish line!
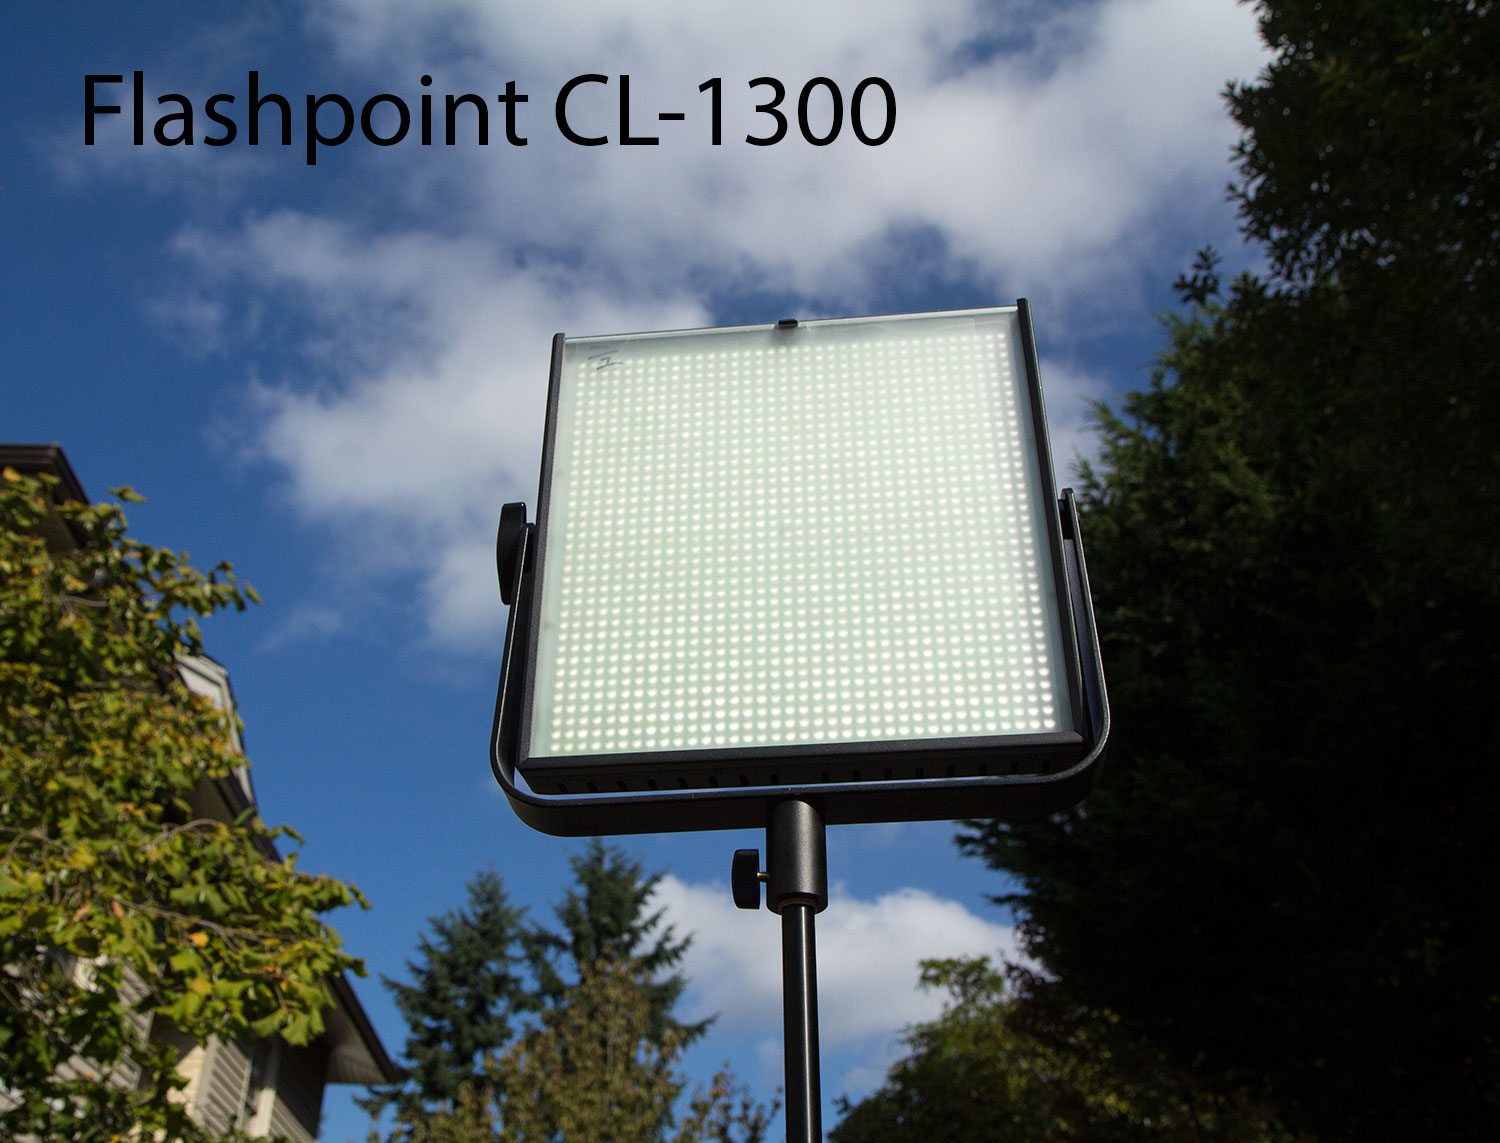
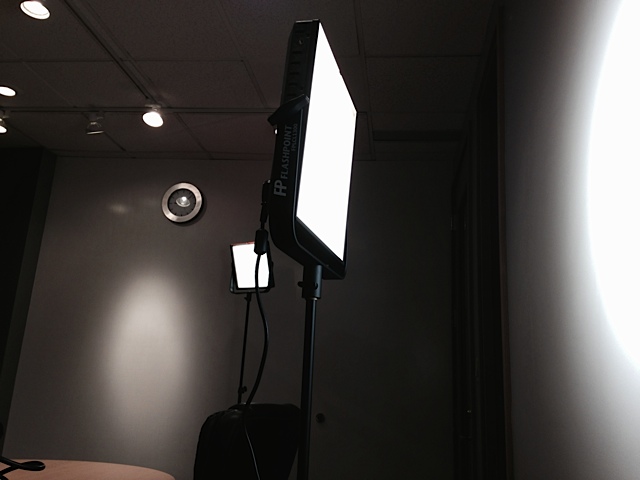
As someone who shoots a ton of interviews on location, I am on a never-ending quest to find a powerful lighting kit that will pack down into a carry-on sized bag. So when I was asked to review the Flashpoint CL-1300 LED panels, I got a little excited.
On paper, these lights look amazing: weighing just 4 pounds each, they are as small as LitePanels, but MUCH brighter; feature a built-in v-lock battery plate for cordless operation, and are priced just over $400. They come in two flavors: a 5600K daylight version, and a bi-color 3200K-5600K rated model. And they are made by Adorama, a brand with a lot more cred than the Chinese knockoffs I bought a few years back.
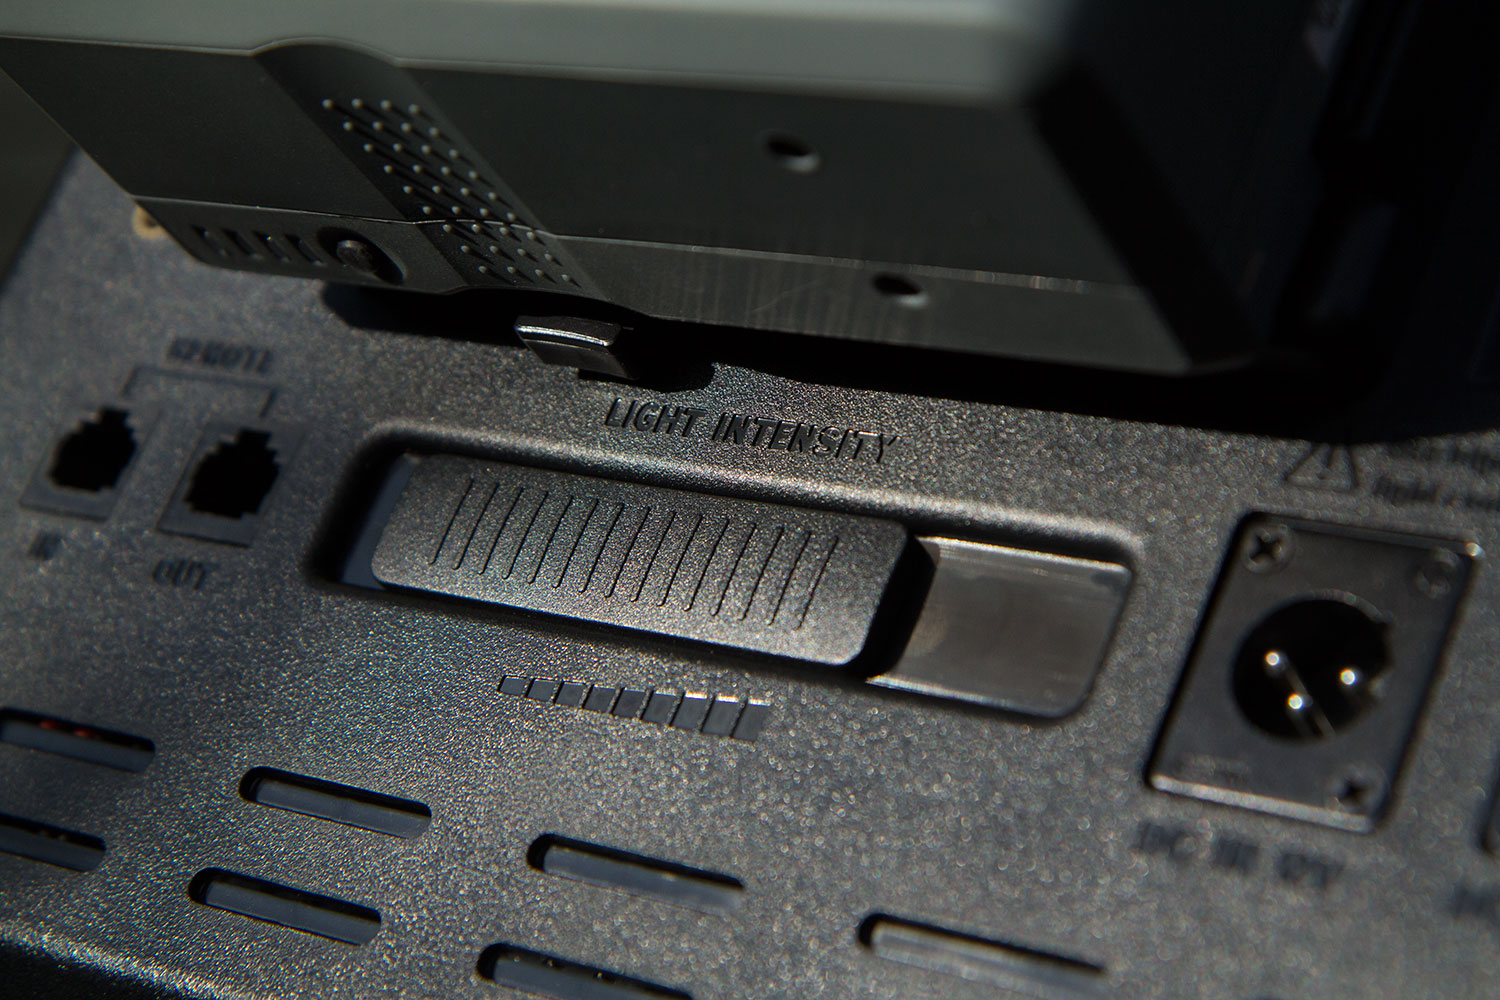
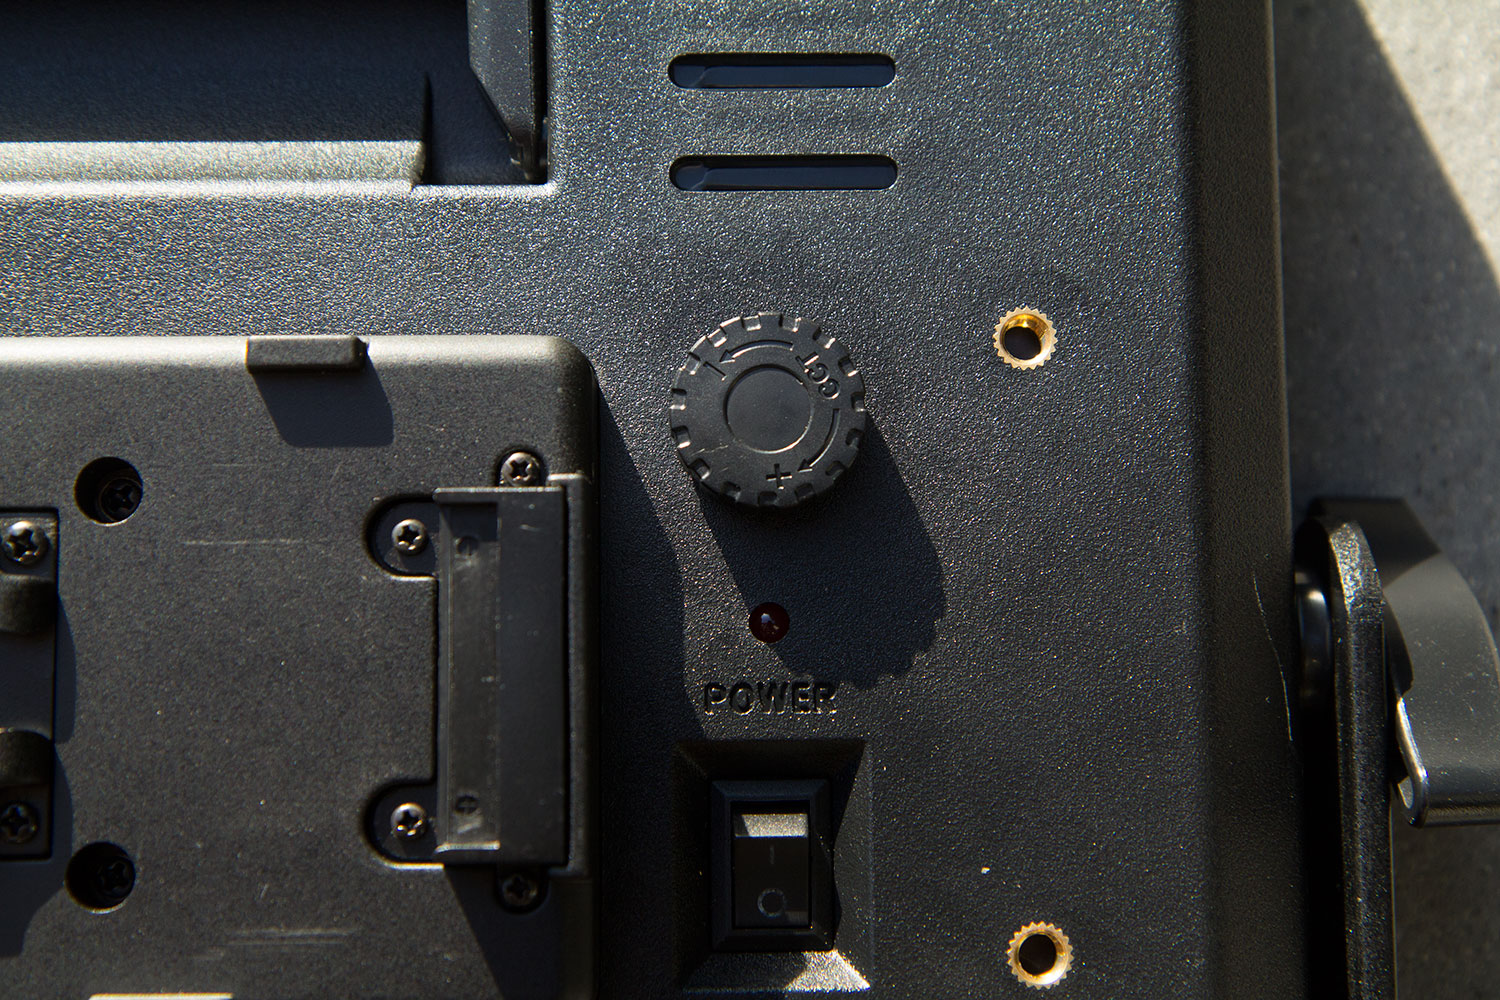
Dimming is controlled from 10 percent to 100 percent via a slider.
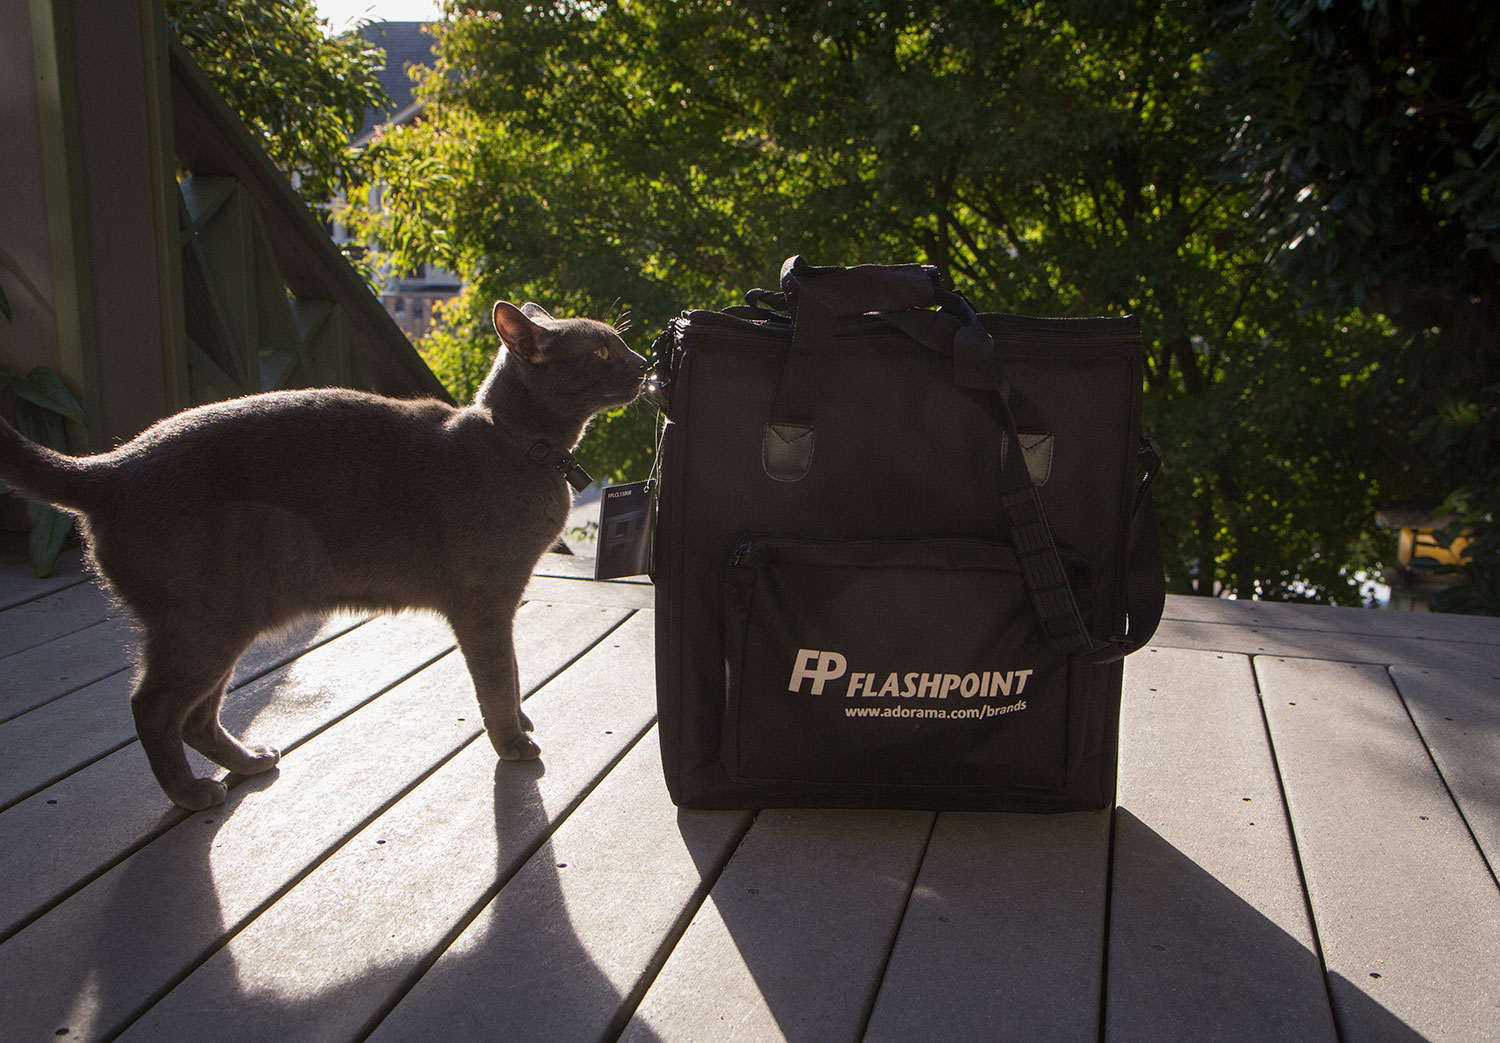
When my test unit arrived, the first thing my cat, Dolce, and I noticed was the handsome bag that was included. It is lightly padded for protection, features a shoulder strap, a pocket for the gels, and a front zipped pocket for the power cord, with room left over for a v-lock battery.
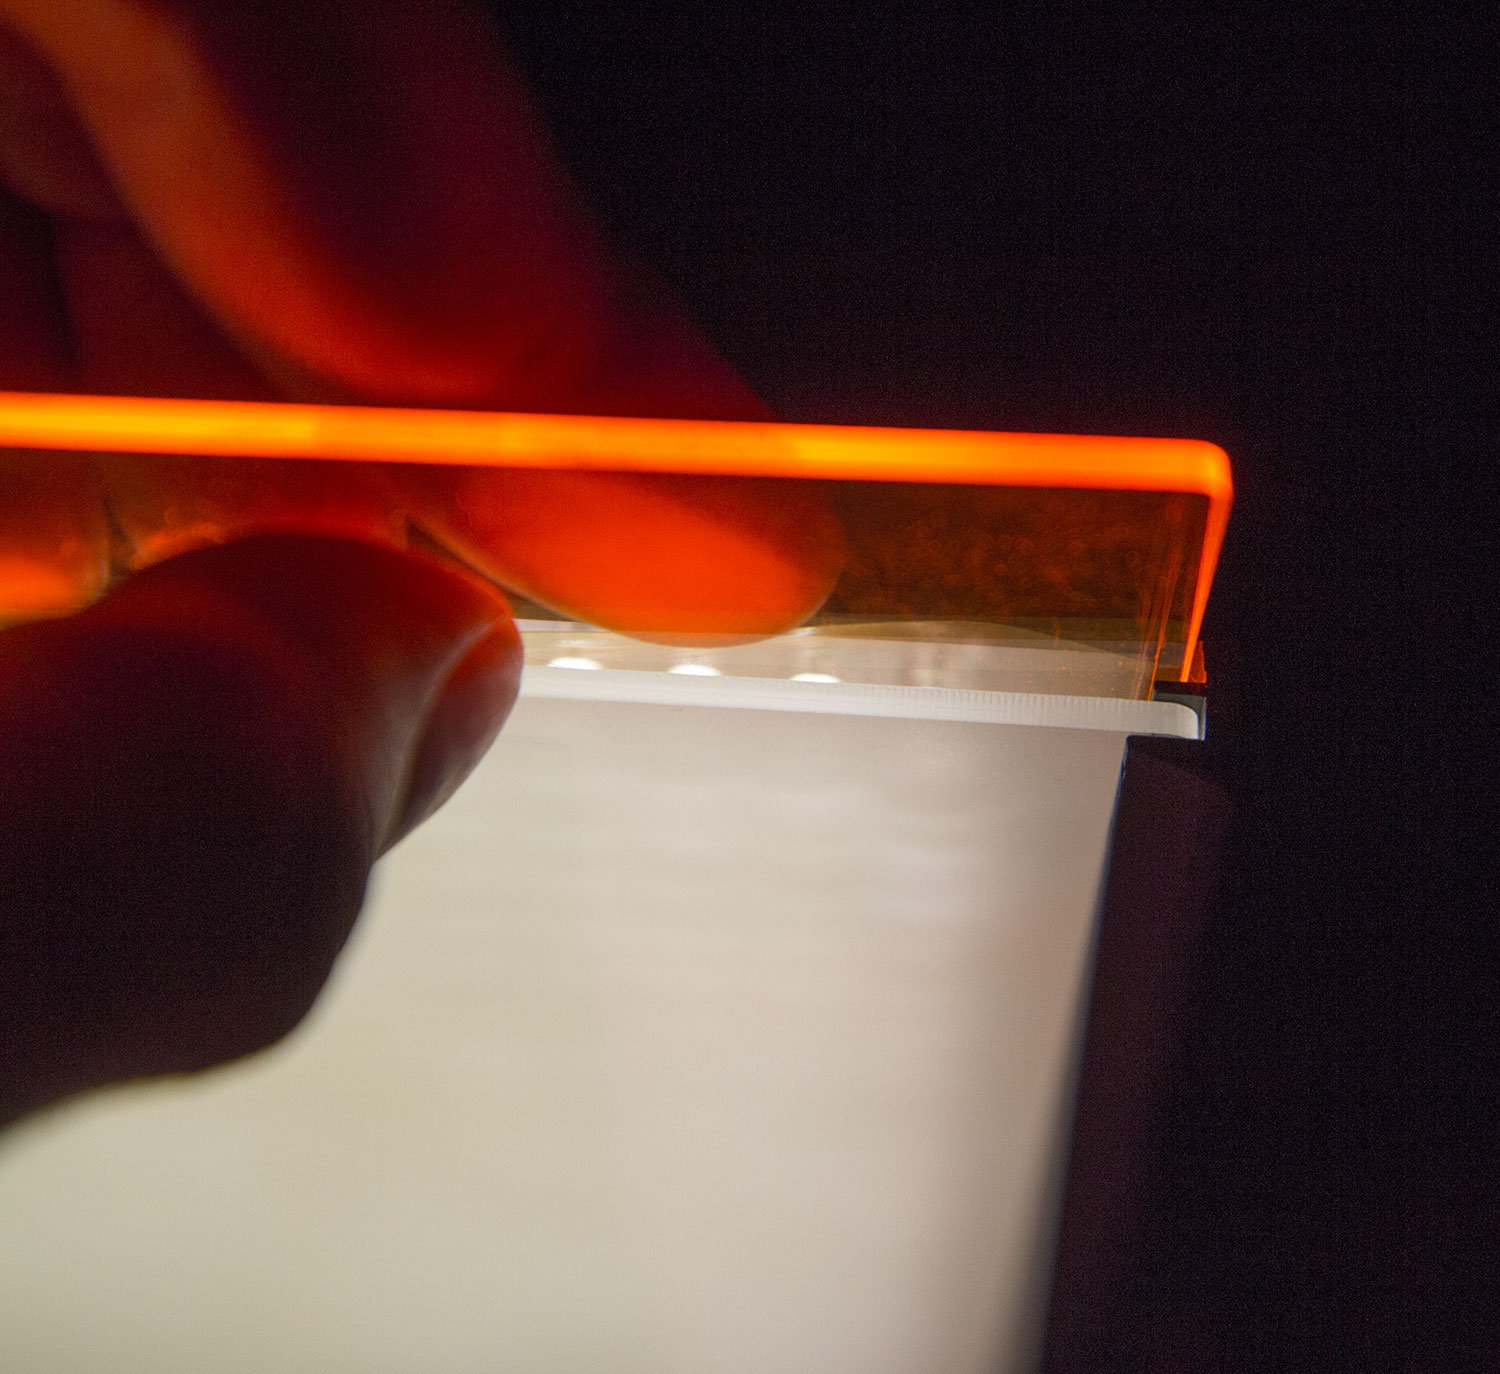
The CL-1300 ships with two plastic gels, one a diffuser, and the other an orange-yellow color that I assumed (incorrectly, as we’ll see in a minute) would get me in the ballpark of 3200K. Also included was a very nice, very long, 16′ power cord, which terminates in a 3-pin female XLR for attaching to the light. With that cord length, it’s almost possible to skip lugging an extension cord!

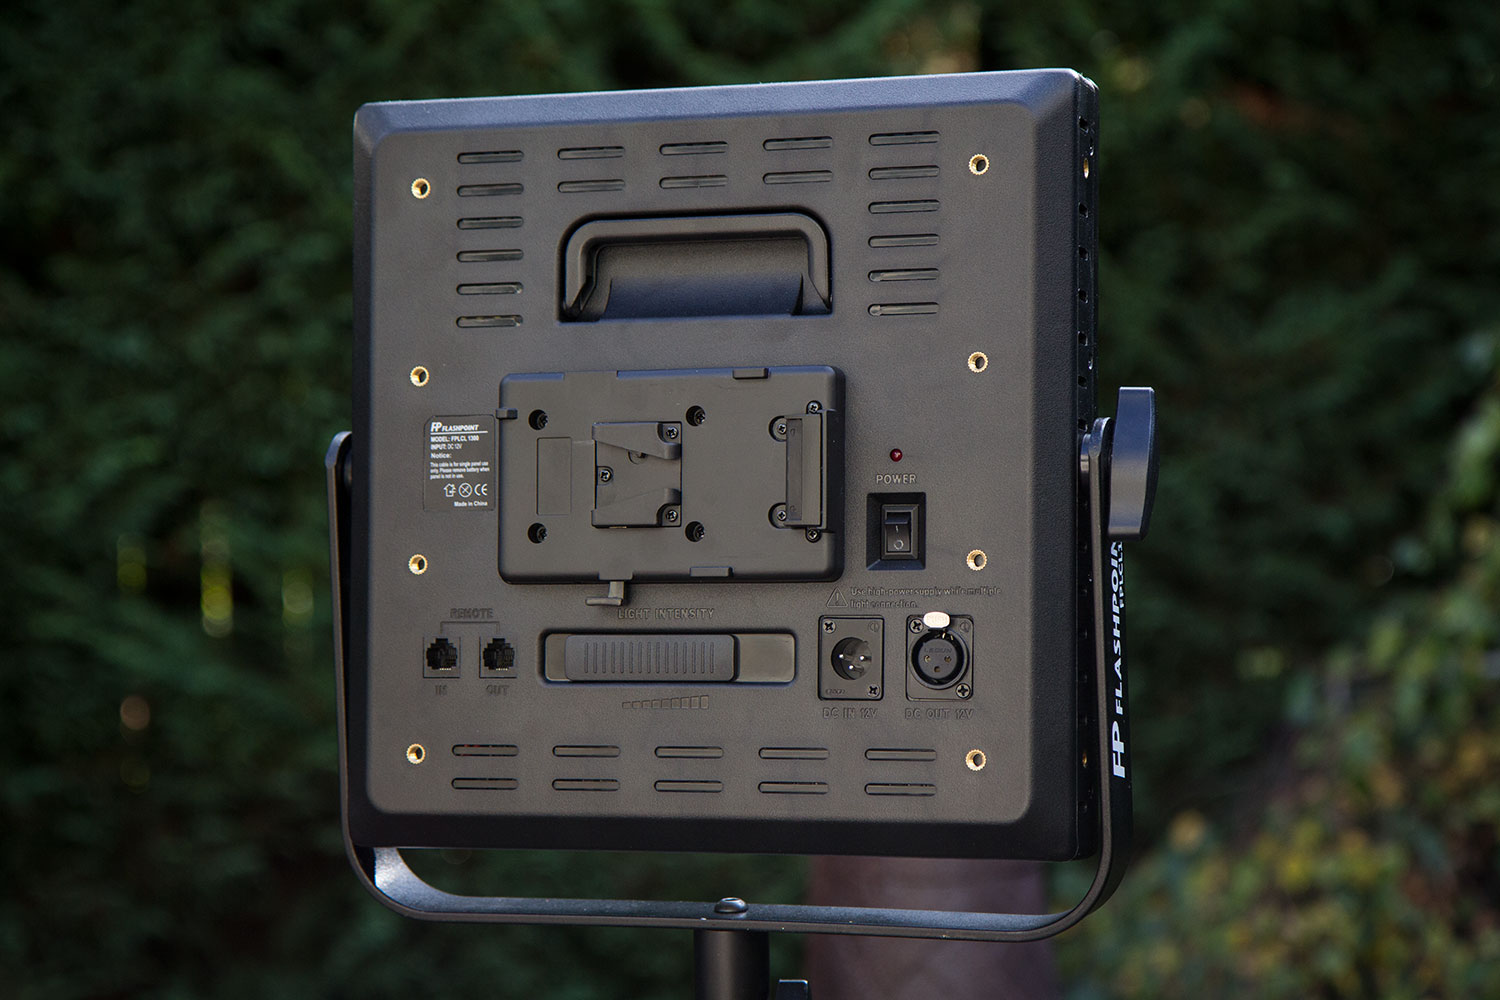
This is a huge step up from the TRS jack that my old knockoff lights are powered with. The XLR locks into place, so it will never fall out during operation, and you don’t have to worry about the weight of the cable bending anything on the unit.
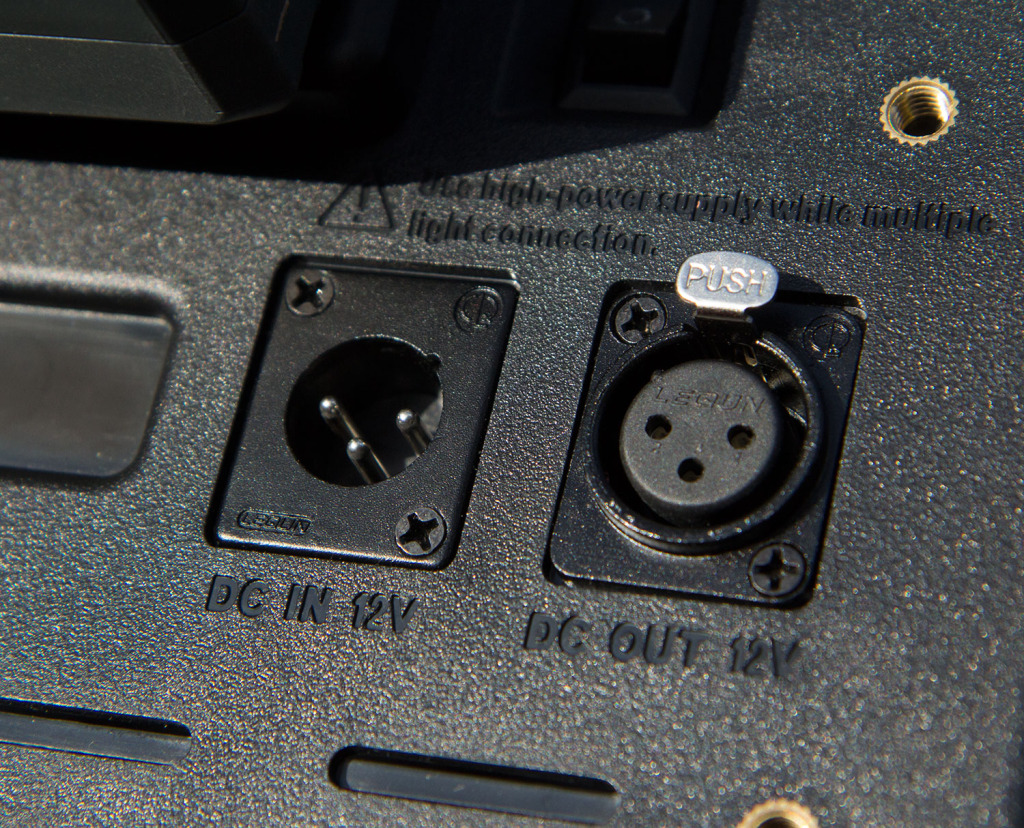
There’s even a DC-out port, which allows you to daisy-chain several units together to create a larger panel, and control the dimming simultaneously using a dimmer attached via a RJ45 remote. I did not test this feature.

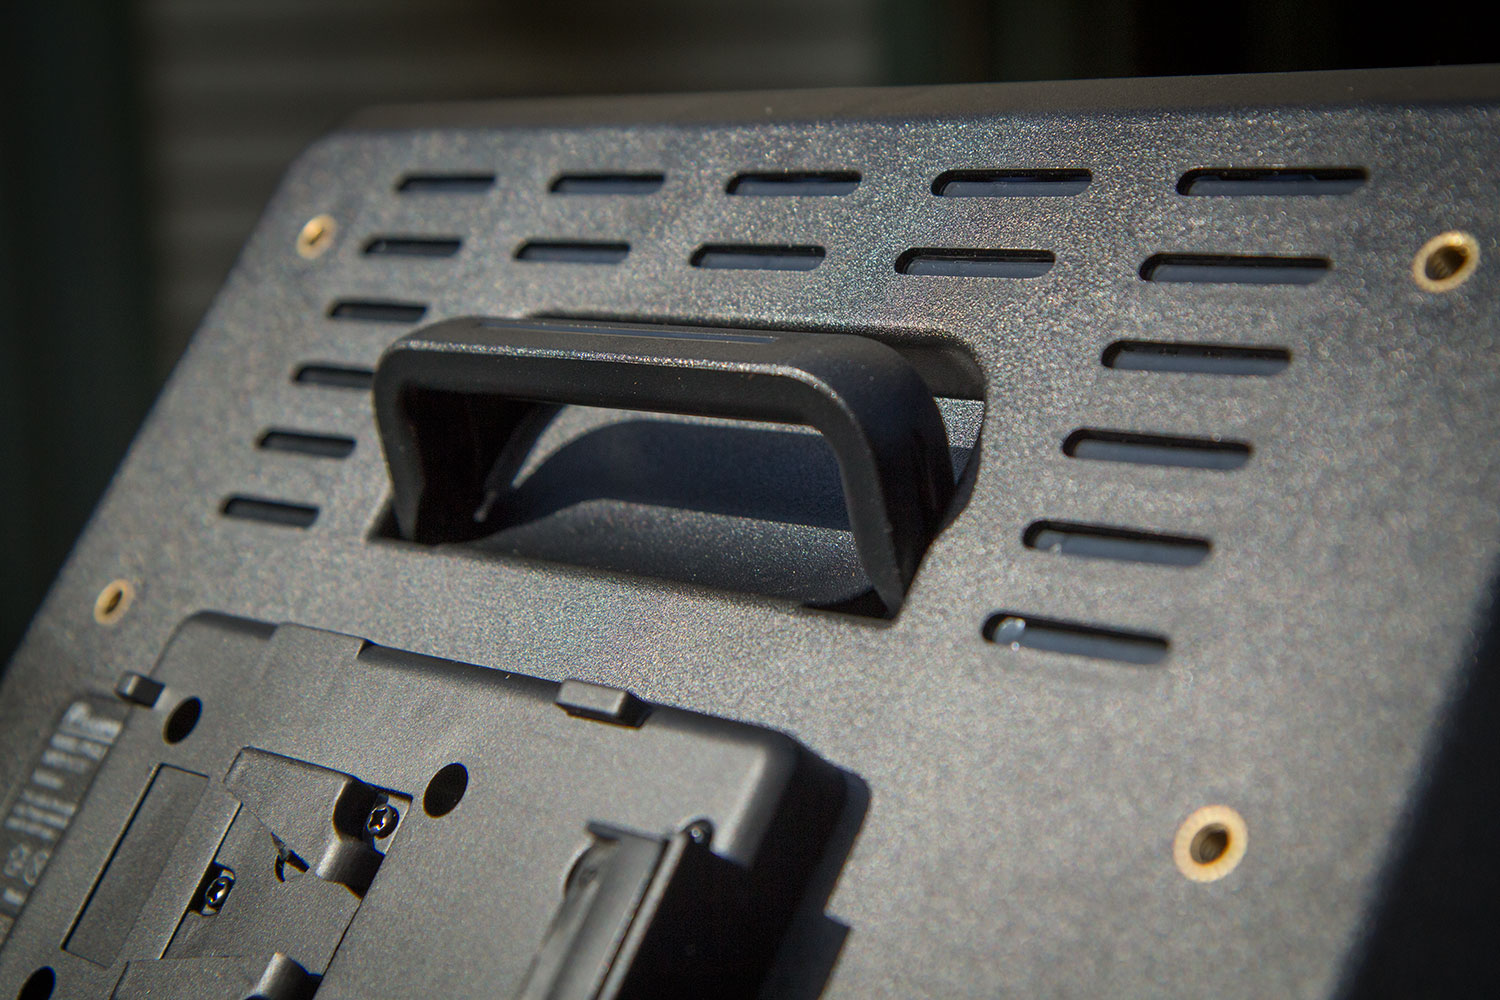
The plastic folding handle on top assists with hand-holding the light when needed.
The first thing I wanted to test was how powerful this light is, in a real-world situation. For sit-down interviews, I generally place my key light no more than 8 feet from my subject. So I placed the light 8 feet from my light meter, and took the following readings @24fps (48th sec. shutter):
Without diffusion or filter 8′ from subject = f/5.6.4 at iso 400.
With included diffusion gel (which I definitely recommend to eliminate the multiple shadow effect of bare LED panels): f/5.6.1, about a third of a stop light loss.
Battery life. Using my Switronix 14.8 volt v-lock battery on the light, I was able to get an average of 2 hours and 30 minutes with the light set at half brightness. Going to full brightness drains it in under an hour. Because the unit is so bright, it’s totally feasible to work in the half-dimmer position for all but the longest of interviews, without interruption. Sweet! One thing to note: when the power dies, it dies suddenly. It goes from being fully bright, to being out, just like that. I’m glad it does that rather than slowly dip, because this way as long as the light is on, you know you’re getting a consistent level of output.
So this is a very bright little light. But is it, as advertised, 5600K?
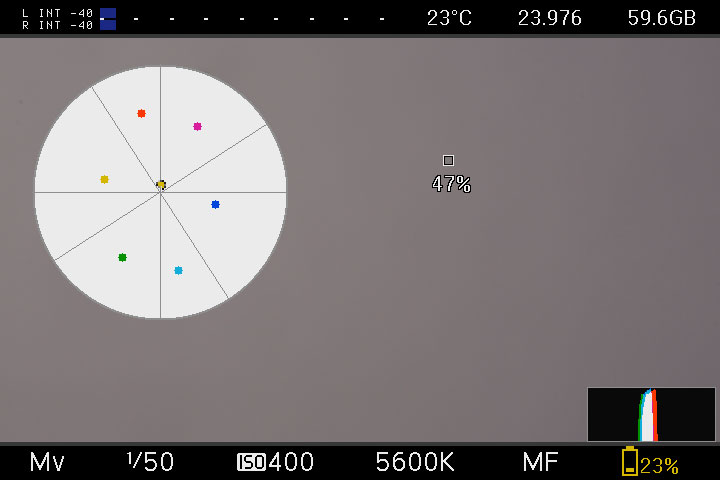
To determine color temperature, I clipped a Kodak 18 percent gray card to a stand, in a gray room with gray carpet, and pointed my 5dmkiii running Magic Lantern at it, with vectorscope enabled. I set the camera’s white balance manually to 5600K, and I SHOULD have seen a tight dot in the very center crosshairs of the scope. But this is what I saw instead:
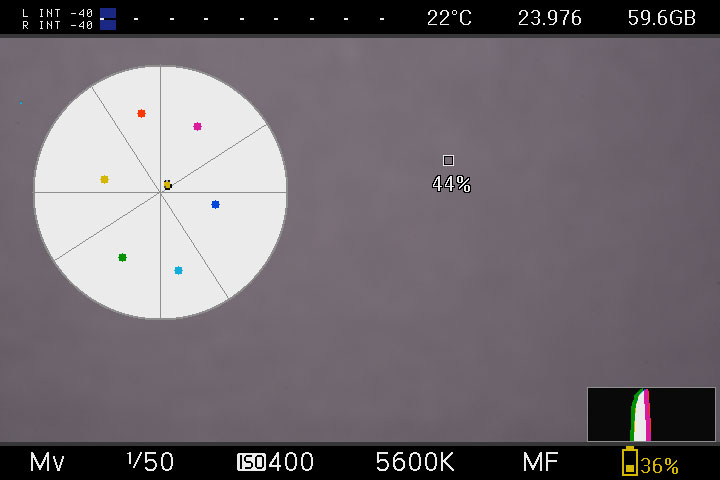
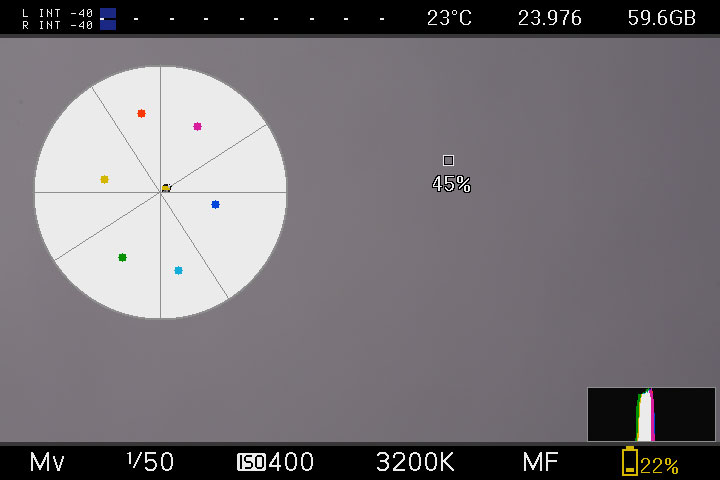
Way too much magenta! To correct this, I added a 1/4 +green gel, and a 1/8 +green gel, which took us to here:

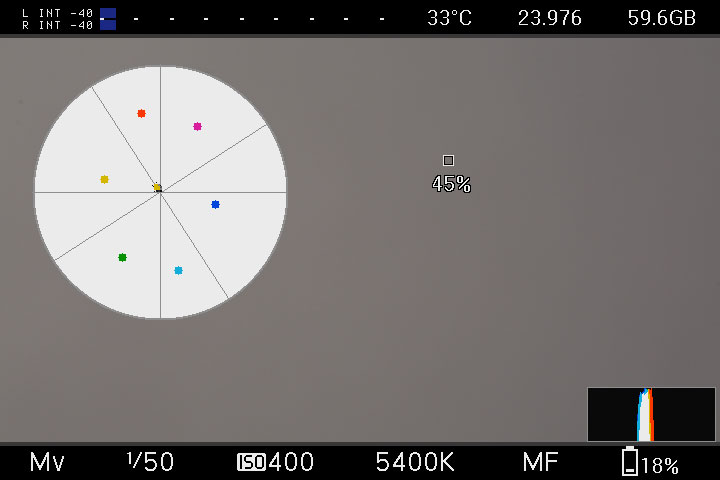
It’s too warm now, but adding 1/8 blue took us too far toward blue, to about 6000K. So I settled for rating this light at 5400K, which yields this result on the scope:

It’s still a tad on the warm side, but I prefer a little warmth in my daylight balanced lights. With a little filtration, and some tweaking of the advertised color temp, we’re good to go.
You can assume that this is a step you would need to perform for every light you purchase in the CL-1300 series – getting the temp spot-on at the factory clearly wasn’t a top priority with these units.
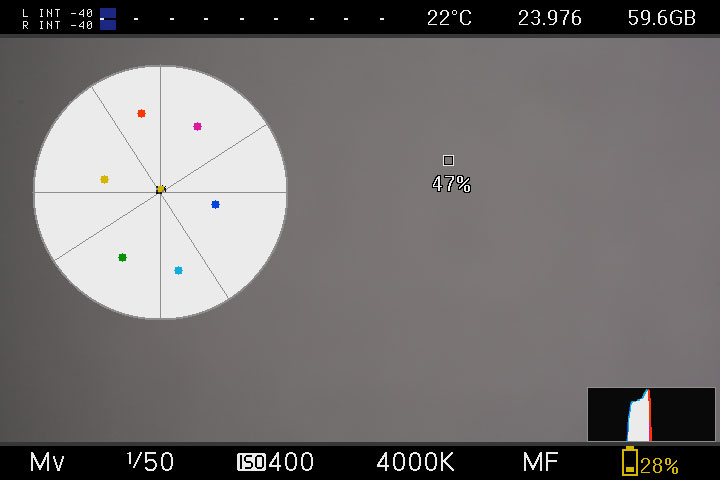
Now that we’ve dialed in our daylight setting, what about 3200K? You might think that it would be as simple as sliding on the included orange plastic gel into the second slot provided (a very nice design touch).
But that turns out not to be the case. Adding the orange gel takes us only to 4000K:
We’ve got some more gels to add…and perhaps take away…to reach 3200K. With a little trial and error, I discovered that the formula is: remove the 1/8 +green, and add 1/8 CTO, and 1/4 CTO, which gets us close to the mark as possible, with just a bit of extra warmth:
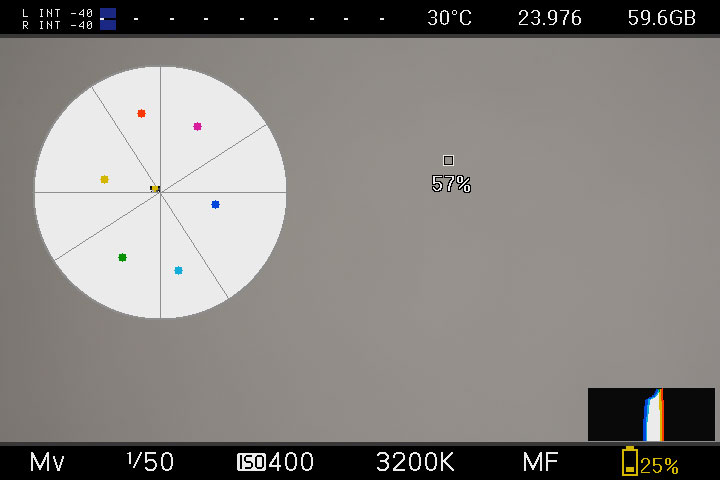
(Note: dialing my color temp on the camera to 3100K put the dot squarely in the crosshairs, so technically the light gelled thusly should be rated 3100K. But as I said above, I prefer that slight bit of warmth so this is how I will rate the light and it matches well with my 5400K setting above).
Recommended additional filtration to carry with this light:
1/2 Plus Green – stacking this with the included 4000K filter gets you a ballpark fluorescent balance.
ND gels – the light is advertised as dimming to 10 percent of power. That turns out to be a lot of light – sometimes too much if you’re looking for subtle fill. Adding at .6 or .9 ND gives you the ability to dim the light further.
Size to cut: 11.5 x 11 3/8. It would be much simpler to cut these if the filter trays were actually square, but they’re not quite.
So we’ve found the formula to make THIS individual CL-1300 look good in tungsten, fluorescent and daylight. But…
In practice, this is a royal pain. Fiddling with adding multiple CTO gels, while remembering to take out 1/8 +green… you can see how complicated this could get on location. If you wanted to add the equivalent of 1/4 CTO, what would you do?
This is the accusation that DPs and gaffers have been hurling at LEDs since the beginning: that they don’t play well with the other lights on set. You can gel any tungsten light, and it will produce a predictable result that will match with other manufacturers tungsten lights, as long as the color temps are the same. But try that with inexpensive LEDs, and you get these weird color shifts that have to be individually corrected for.
So this got me wondering. Would the bi-color version of this light solve this problem?
There are so many things to like about this light, that I decided to put down my money and take a chance on it. The dream of compact, inexpensive, powerful, finger-tip adjustable lighting just won’t die in my head. So I ordered a 1300B unit, and awaited delivery.
Meanwhile, I had already ordered an additional CL-1300 for use on a documentary shoot with L.A. based director Michael King on his latest film, Intrepid. The film explores what happens to soldiers returning from combat and the challenges they face with post traumatic stress. For this shoot, we had two days of back-to-back interviews, and very little time to set up, very little budget, and very little crew. Here’s a couple iPhone snaps I was able to grab during production:
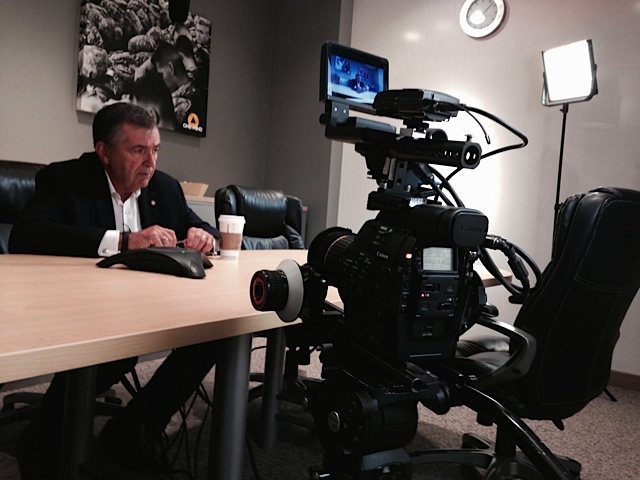
This interview with a former general is an example of where these lights shine: quick setups with busy people who can’t grant time for more elaborate setups.
This was our setup: two CL-1300s, one bounced into the neutral gray wall to provide strong fill, and the other keying the general from the side. The resulting wrap-around light looks great and takes almost no time to set up. The lights are gelled for tungsten using the formula I outlined previously in this post.
Unfortunately, the unit I received suffered from a serious issue: it had a noticeable flicker when dimmed below 50 percent. I limped through the shoot with it, and returned it immediately thereafter. Probably just a defective unit, right?
A few days later, the 1300B arrived.
The first thing I noticed after unboxing this light and turning it on? The dreaded flicker. Again. Similar to the previous unit, this one flickers in the low end of the daylight channel. But it also flickers subtly at top end of the tungsten channel. See this video clip:
Another issue: it emits a faint pitched whine that goes from high to low when dialed from daylight to tungsten. It disappears at either end of the scale, but select anything in between, and your sound guy may be ripping his headphones off in protest of your new purchase.
Of course I’m returning it. It’s obviously defective. And I’d like to wait until the replacement unit arrives to post this review. But after having to return two out of three lights that I’ve tested from flicker issues, I think it’s something I have to talk about. Even if the replacement is flicker-free, that will only bring the average to 50 percent. I’ll let you be the judge of whether that’s good enough for lighting gear you rely on.
OK, so flicker aside…
Bi-color is a killer feature. Think about it. If you’re standing on location, and the client is waiting, and you can dial in the color temp, instead of digging through your filter roll, getting out your c-47s and trying one then adding another…Having a light that you can adjust the color instantly is just a huge deal. Especially when you’re working with small crew or one-man mode.
And with LED panels, gelling is more of a pain than with fresnels. You need to either have a bunch of pre-cut pieces which you, or you need the accessory barn doors.
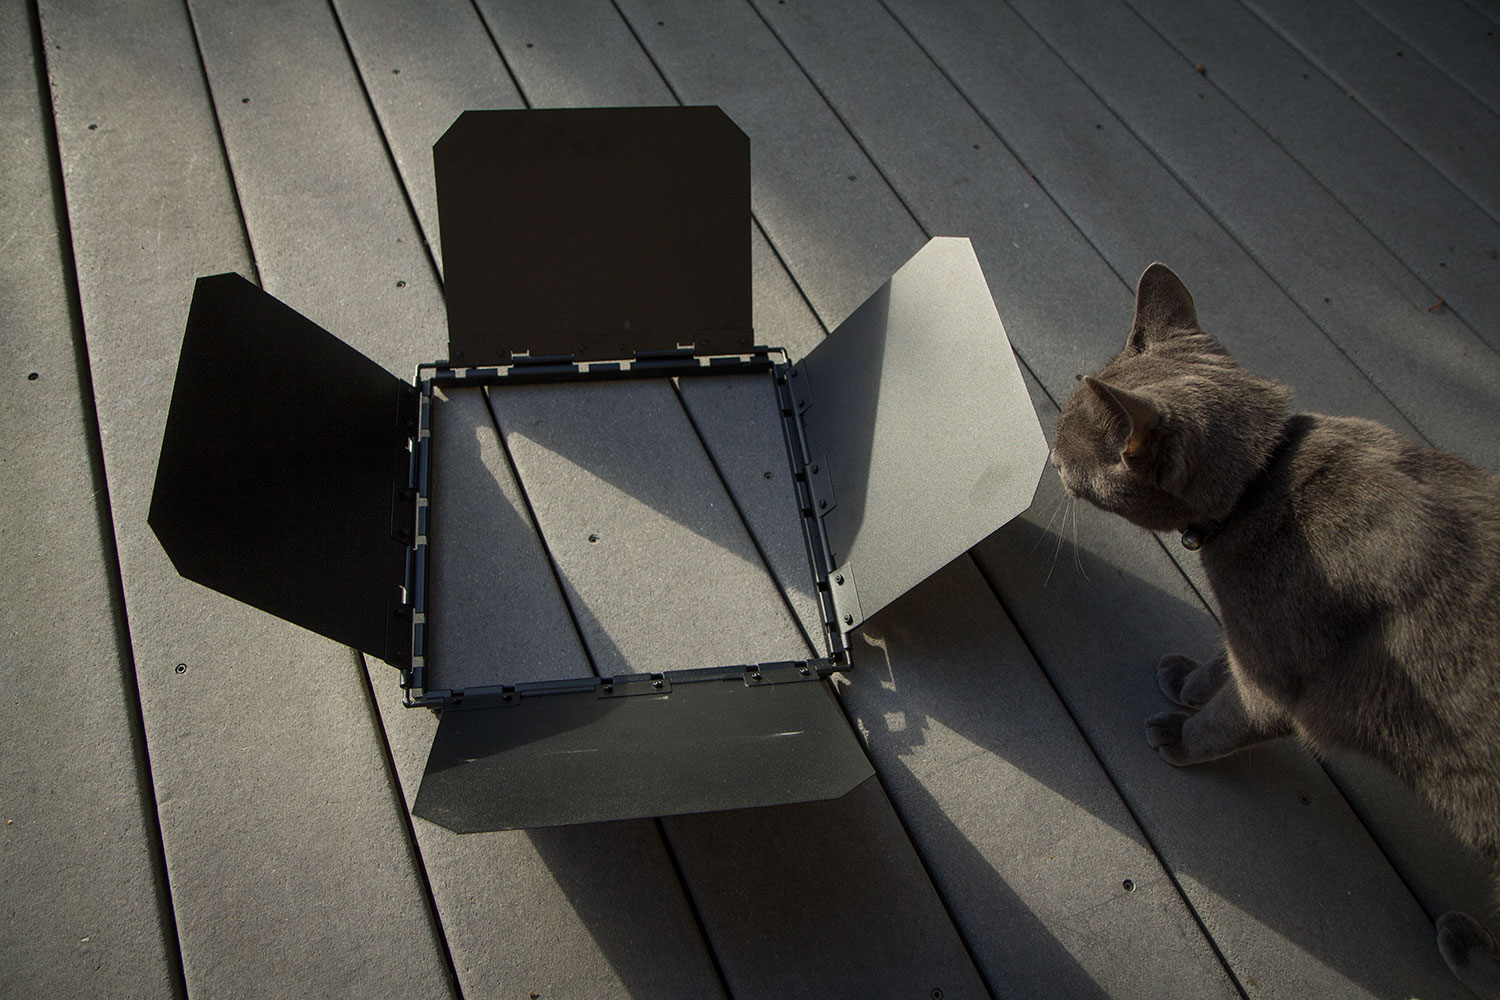
The barn doors do allow you to easily clip gels or diffusion to the light. However, the Adorama CL-1300 barn doors are very, VERY heavy – 3 pounds! The light itself only weighs 4 pounds. But no one can accuse them of being cheaply built – these bar doors are built like a weapon.
One thing I like about the 1300B is that you can dial the color temp independently of the intensity. So it’s easy to find a temperature setting, and then work the dimmer up and down without changing it, an important convenience during a shoot.
The main thing to keep in mind when considering whether to go with the bi-color or daylight version of this light, is brightness. The bi-color unit is half as bright as the daylight, because half the LEDs are tungsten, and half are daylight. Dialing the temperature control wheel sends power into one while subtracting it from the other. Predictably, when I gave the same brightness test as above to the CL-1300B, here’s what I got:
At 8’, light without diffusion or filters yields f/4.0.5 at iso 400 @24fps (48th sec. shutter)
With included diffusion: f/4.0.2, or about a third of a stop light loss.
What about the color temp of the bi-color model? Does it require gelling too?
The bi-color unit is closer than the previous light, but still needs some correction. 1/4 +green, to be precise. Uncorrected, here’s how it looks to the vectorscope:
As the light is dialed from daylight to tungsten, it gets more magenta. My compromise fix: Adding a 1/8th +green, and rating the daylight to 5400 instead of 5600k. This yields almost the same correction as the CL-1300 did, resulting in a pleasantly warm daylight balance:
So what’s the bottom line? There are many things to love about these lights. They pack nice, sip battery power, weigh next to nothing, and are well designed. They are full of promise. But until the flicker issues are addressed, and the color temperatures more precisely match those advertised, my recommendation is “watch, ” not “buy.”
I just finished shooting a short film called Pearl, for Seattle director Amy Sedgwick. It’s a film about a woman who works at a small oyster cannery who dreams of a bigger future for herself. When the opportunity arrises, she seizes it.

When Pro Am gave me a chance to review their new Taurus Jr. heavy duty camera crane, I jumped on it. A jib shot would be the perfect way to establish the first location in the film, as the two women enter the cannery for the first time, by revealing something of the environment and at the same time advancing the story. And there’s nothing like using a piece of equipment on an actual production to discover its strengths and weaknesses.
Here’s the shot:
As you can see from this clip, there was a bit of wind that we had to contend with. And, we had a manual focus pull, too. The camera I shot the film with was a 5dmkiii (shooting Magic Lantern raw) fully rigged up with v-lock battery, etc. So it weighted about 10 pounds.
The Taurus Jr. enabled us to get this shot where many smaller, lighter weight jibs simply wouldn’t have cut it. I own an Aviator Traveler jib, and while it’s an amazing bit of gear, it would have never held steady for a focus pull, much less the wind.
After using this jib, I really appreciate the benefit of a heavy-duty jib for getting consistent, repeatable results on location, on deadline. You don’t get to control the weather. But you still have to shoot your film.
Weather aside, what is it that really keeps filmmakers awake at night? Money. There’s never enough of it. That’s where the Taurus Jr. really shines. At $399, it costs less than a third what comparable jibs do. I get excited whenever I can put more money into paying actors and crew, and the million and one other things that have to get paid for to bring a creative idea to life, rather than sinking it into equipment.
This jib doesn’t quite come with everything you need to get up and running. You’ll need to buy some weights for balancing it. Luckily these are inexpensive and I came home from my local Big 5 sporting goods with everything I needed to get going: a couple of 2.5lb weights, a couple 5lb, and a 10lb. That combination gave me plenty of options to keep various camera rig configurations flying in perfect balance.
At four feet, this isn’t exactly a long jib. Isn’t bigger better? Not for me, it isn’t. I am a real fan of subtle jib moves, rather than the big sweeping ones. A little move can go a very long way. And the ease of transporting and setting up a 4′ jib compared to an 8′ one is like night and day. The best tool is the one you will have with you when you need it.
To keep costs low, presumably, the Taurus Jr. designers cut one corner that I wish they hadn’t. The horizontal brake is really flimsy, and doesn’t precisely stop the jib from moving a little back and forth. If there’s one thing I’d change about this jib, it is this. And, there’s no easy way out of the box to mount a monitor – you need to purchase an accessory arm for that.
So let’s sum it up:
Pros:
Price – it’s just $399. Very affordable for a jib of it’s capabilities.
Solid, multiple-reinforced aluminum construction.
Holds up to 30 pounds of camera with all cinema accessories, no problem (matte box, battery, monitor, etc.)
Cons:
The only major flaw with this jib is the horizontal brake. It is flimsy, and doesn’t reliably work.
Wish it came with:
Monitor mounting point. A monitor arm is available as an accessory.
It’s awkward to transport easily – need to get the optional carrying case, really.
Bottom line:
This jib is a winner for budget productions that need a short jib that can produce consistent, repeatable moves in a variety of conditions. I like it so much I’m probably going to buy one next time I’m on a production that needs a jib. And when you start thinking about shots, it doesn’t take very long to dream up amazing shots that only a jib can bring to life. Thanks to Pro Am and the Taurus Jr., budget-conscious filmmakers can stop dreaming and start shooting.
I’ve been invited to teach a private DSLR cinematography workshop, and I thought, why not add a few more spots and make a day of it? So if you’re looking to get cinematic with your DSLR, consider joining us on May 31!
DSLRs are incredibly powerful filmmaking tools – in the right hands. Why not your hands? Join award-winning Seattle filmmaker Dan McComb, a cinematography instructor at Art Institute of Seattle, for a day of hands-on instruction that will take your DSLR cinematography skills to the next level.
Dan will share techniques and equipment secrets that will empower you to tell stories that connect with your audience.
You’ll get personalized, hands-on training using professional equipment that includes:
You’ll get answers to questions like:
You’ll learn why shooting manual beats autoexposure, and which settings to pay attention to most. Why using neutral density filters is essential for shooting outdoors in daylight, and which ones are the best value (as well as which ones to avoid). Why shooting closeups is different than shooting medium and long shots, and what that means for lighting.
Plus tips on:
We’ll take a look at aspect ratios, and how to shoot widescreen for that super cinematic look and feel. You’ll learn how to build an action-ready camera package from the ground up using matteboxes, baseplates, battery distribution systems, and much, much more, including answers to your questions.
Workshop is limited to four participants.
Learn more and sign up here.
As I’ve moved more and more to a raw workflow with my 5dmkiii, I’ve now got 6 CF cards, all 64gig 1000x. Keeping the same version of Magic Lantern installed on all those cards has become a problem, especially since I like to keep all my cards current with the most recently nightly build. So I was thrilled to discover recently that it’s possible to install Magic Lantern on an SD card, which stays with the camera, and then you just use empty CF cards for recording. A simple tip, but it’s been a big time saver for me. Thanks to the fine folks at Lensrentals.com for sharing this tip.
The Experimental Education Unit is a school, located on the north side of the Montlake Cut just inside the University of Washington campus, that does impossible things every day by putting special needs students into classrooms with their typically developing peers.
This video, which Lisa Cooper and I produced for the University of Washington, was shown at a fundraising auction this weekend. It features founding director Dr. Norris Haring reflecting on his dream for the program, which is today a reality.
This is the second video I’ve made for EEU (the first one you can see here). I wanted to get as close as possible to the amazing faces of the kids, so we shot with 100mm macro and 80-200mm zoom for much of the production. I also shot quite a bit of 60p, which at times I conformed to 24 for some lovely slow motion.