Category Archives: Product reviews

Reviews of filmmaking products or services that I’ve personally used.

PluralEyes 3.5 takes the work out of syncing sound with picture

rdgbundshtd_5
Back in the old days, filmmakers had to clap wooden sticks together to match sound and picture. Then, editors had to meticulously nudge the two together before they could go to work on more creative tasks.

There may still be good reasons for slating your takes, but syncing footage is no longer one of them. With PluralEyes, an application included in Red Giant’s Shooter Suite, all you have to do is record reference audio on your camera, and let software do the rest.

But before I get too far along, let me be clear that what I’m talking about here is dual-system sound. This is sound recorded the right way: by a sound recordist. Someone whose job it is to make your production sound awesome. Many beginning filmmakers think they can cheat and just stick a shotgun mic on top of their camera, and call it good. You can’t. Ninety percent of success in recording dialog depends on getting the mic close. Really close. About 6 inches, in a perfect world. And you wouldn’t want to limit your shot list to 6 inches from your talent, would you?

There are other ways to keep your audio and video in sync, such as using genlock to match the timecode between recorder and camera. But the complexity, not to mention the cost of cameras and recorders that support this method, puts this solution beyond the reach of many smaller filmmakers.

But, if you’re a small filmmaker, why shell out the $199 for PluralEyes to sync audio and video? Isn’t this capability built into Final Cut Pro X? Yes, but FCPX only syncs one clip at a time. That means you have to tell it which clip goes with which audio, and then press the sync command for every clip. If you’ve been shooting all day, this starts to look a lot like syncing the old fashioned way: tedious. PluralEyes lets you batch sync all of your clips at once.

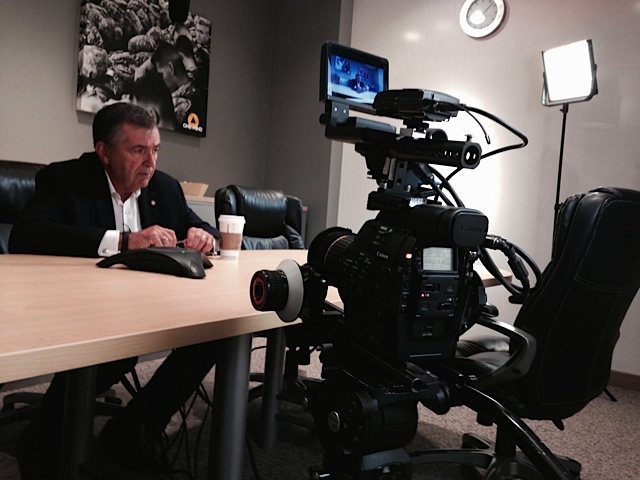
OK, let’s dive in. I’m going to show you how I synced footage on a multi-cam shoot I did to produce this profile video:

My camera assistant shot with a second camera. The subject, a video blogger, also contributed footage that he was shooting himself, for three cameras total. Each camera was recording audio (which I’ll refer to as reference audio, or a reference track.) The high-quality audio was recorded separately with a Tram TR-50 lav mic clipped to the talent, recorded onto a Zoom H4N via a Sound Devices MixPre.

Screen Shot 2014-11-01 at 1.29.33 PM

easy

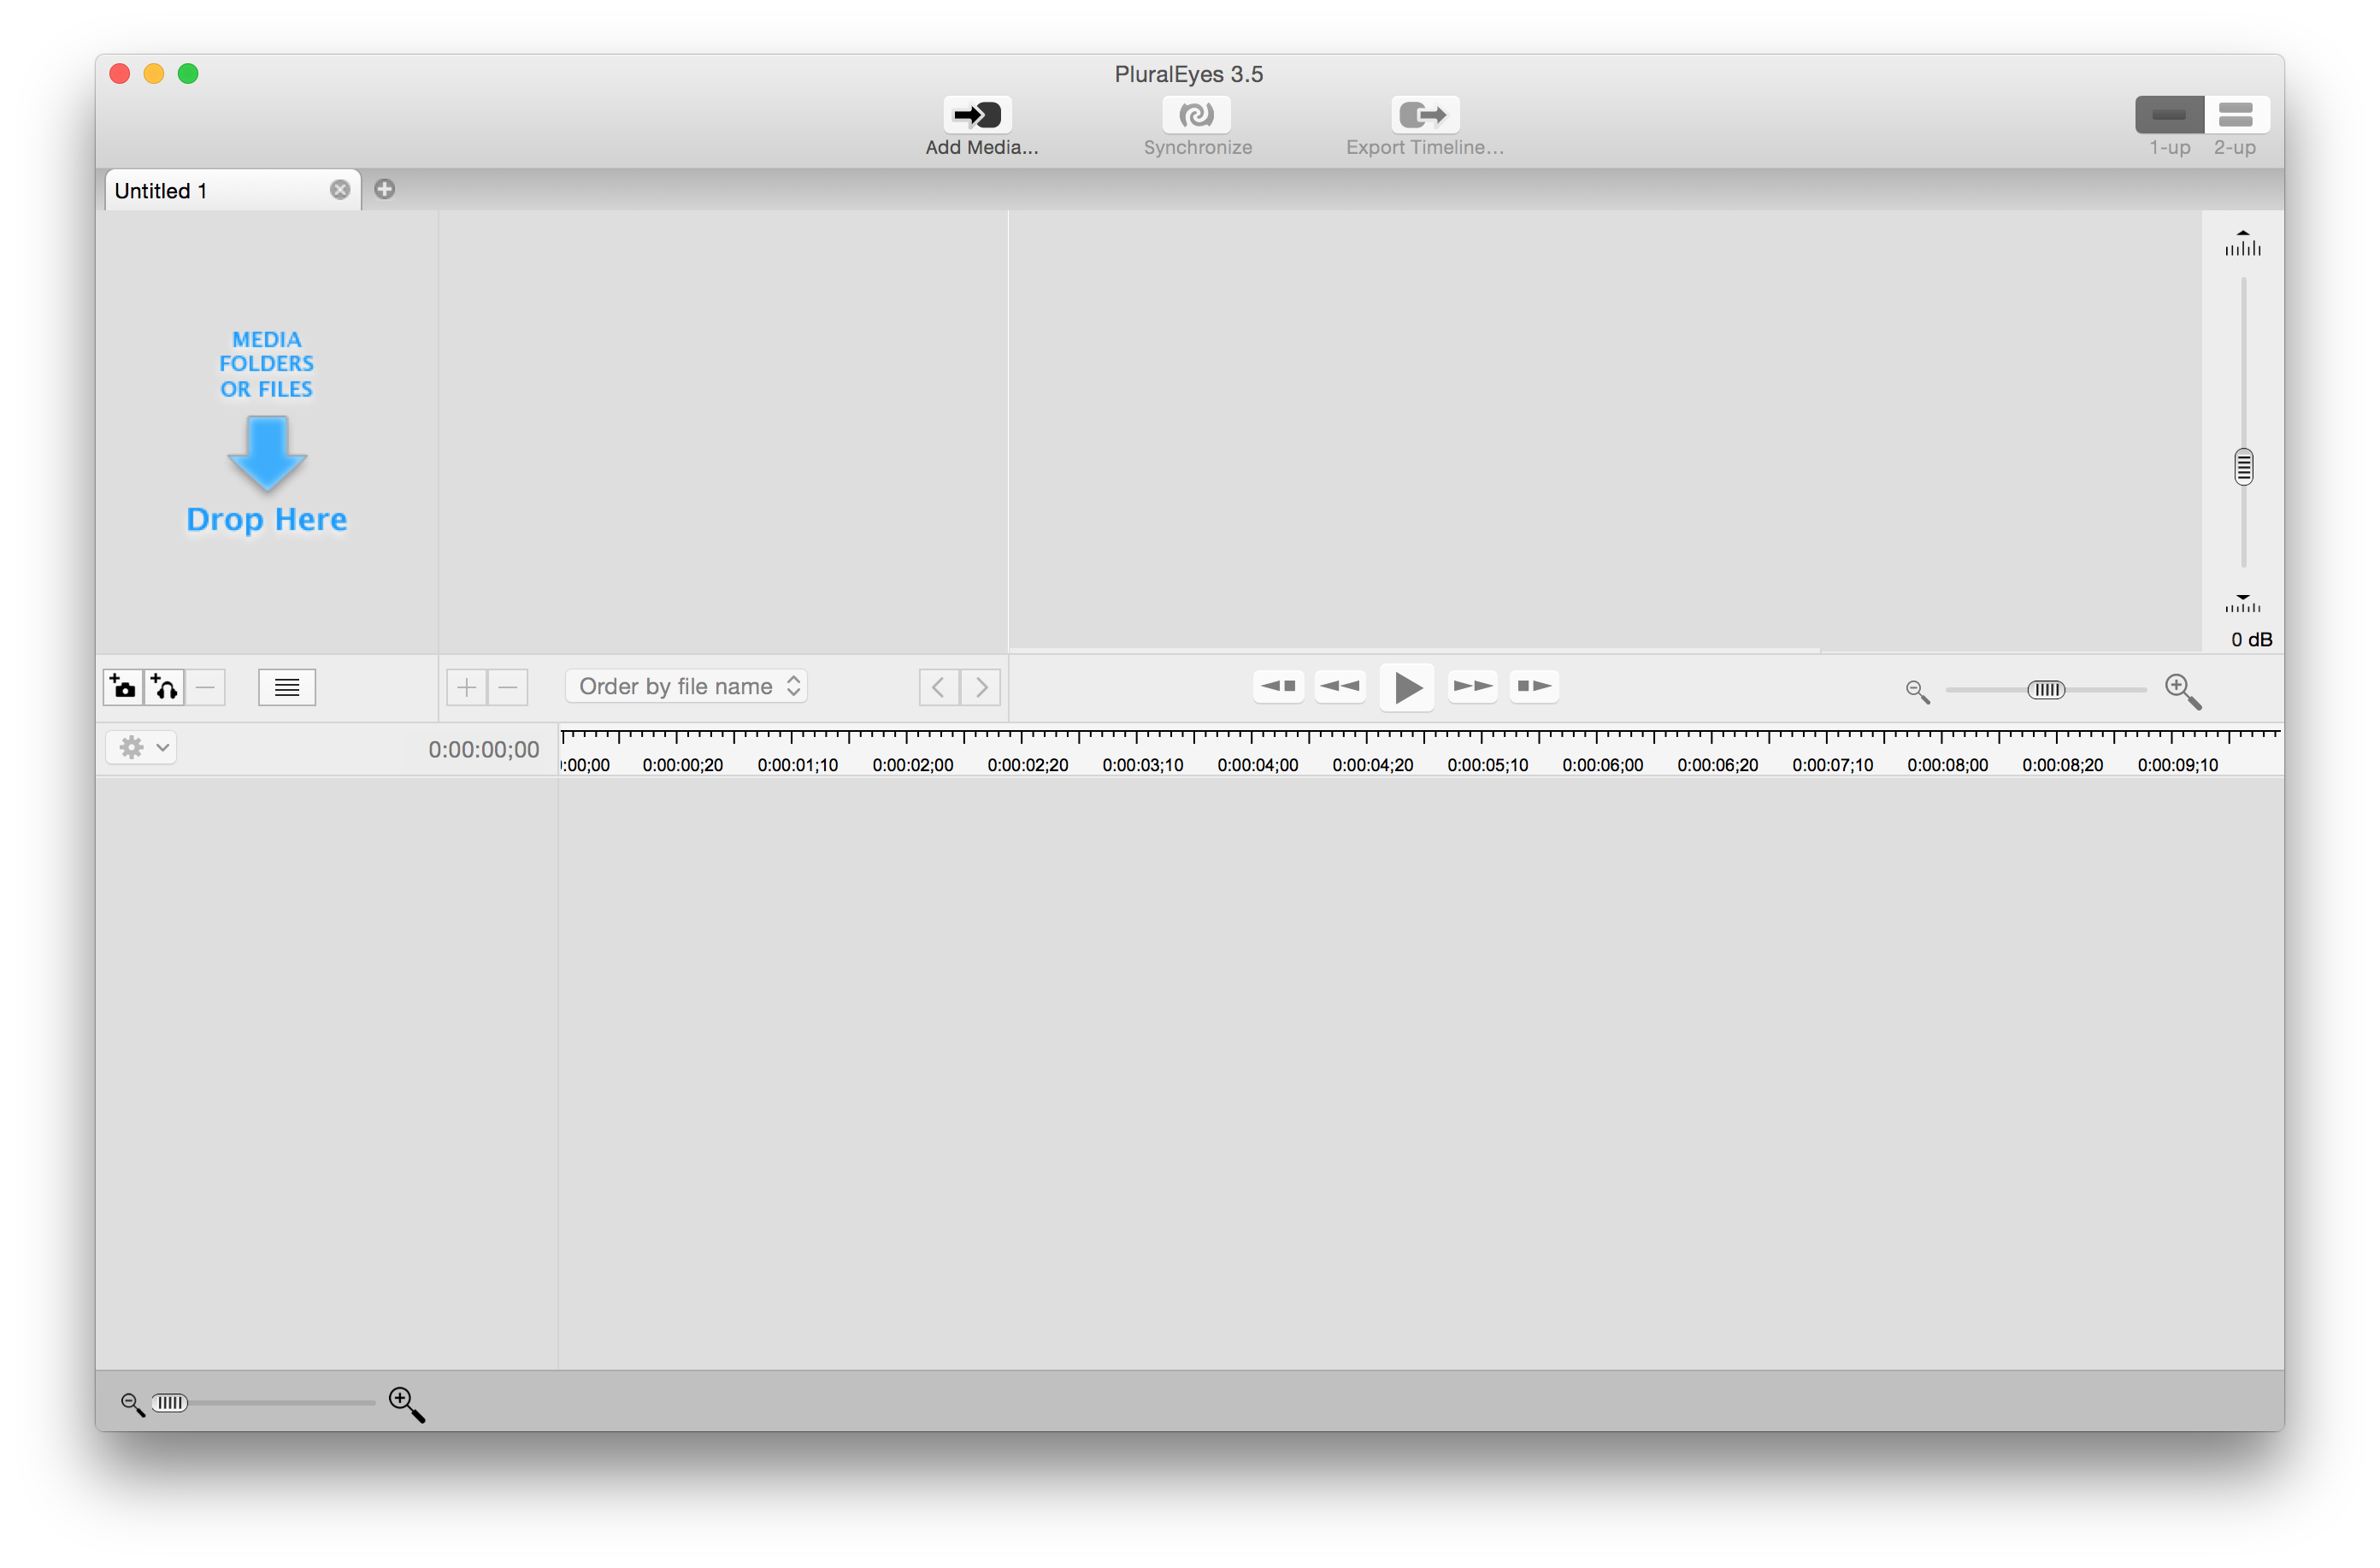
To get started, drag all of the audio files into PluralEyes target window (you can drag them all at once or one at a time). Then drag the video files in. PluralEyes is smart enough to figure out which files are audio files, and which are video files. It will also attempt to figure out whether the video files you’re dragging in are from different cameras. This can take quite awhile.

I’ve observed that PluralEyes can get confused if you drag all of the video files in at once. Try dragging one camera at a time into the window, and wait for it to finish processing, before dragging in the next one.

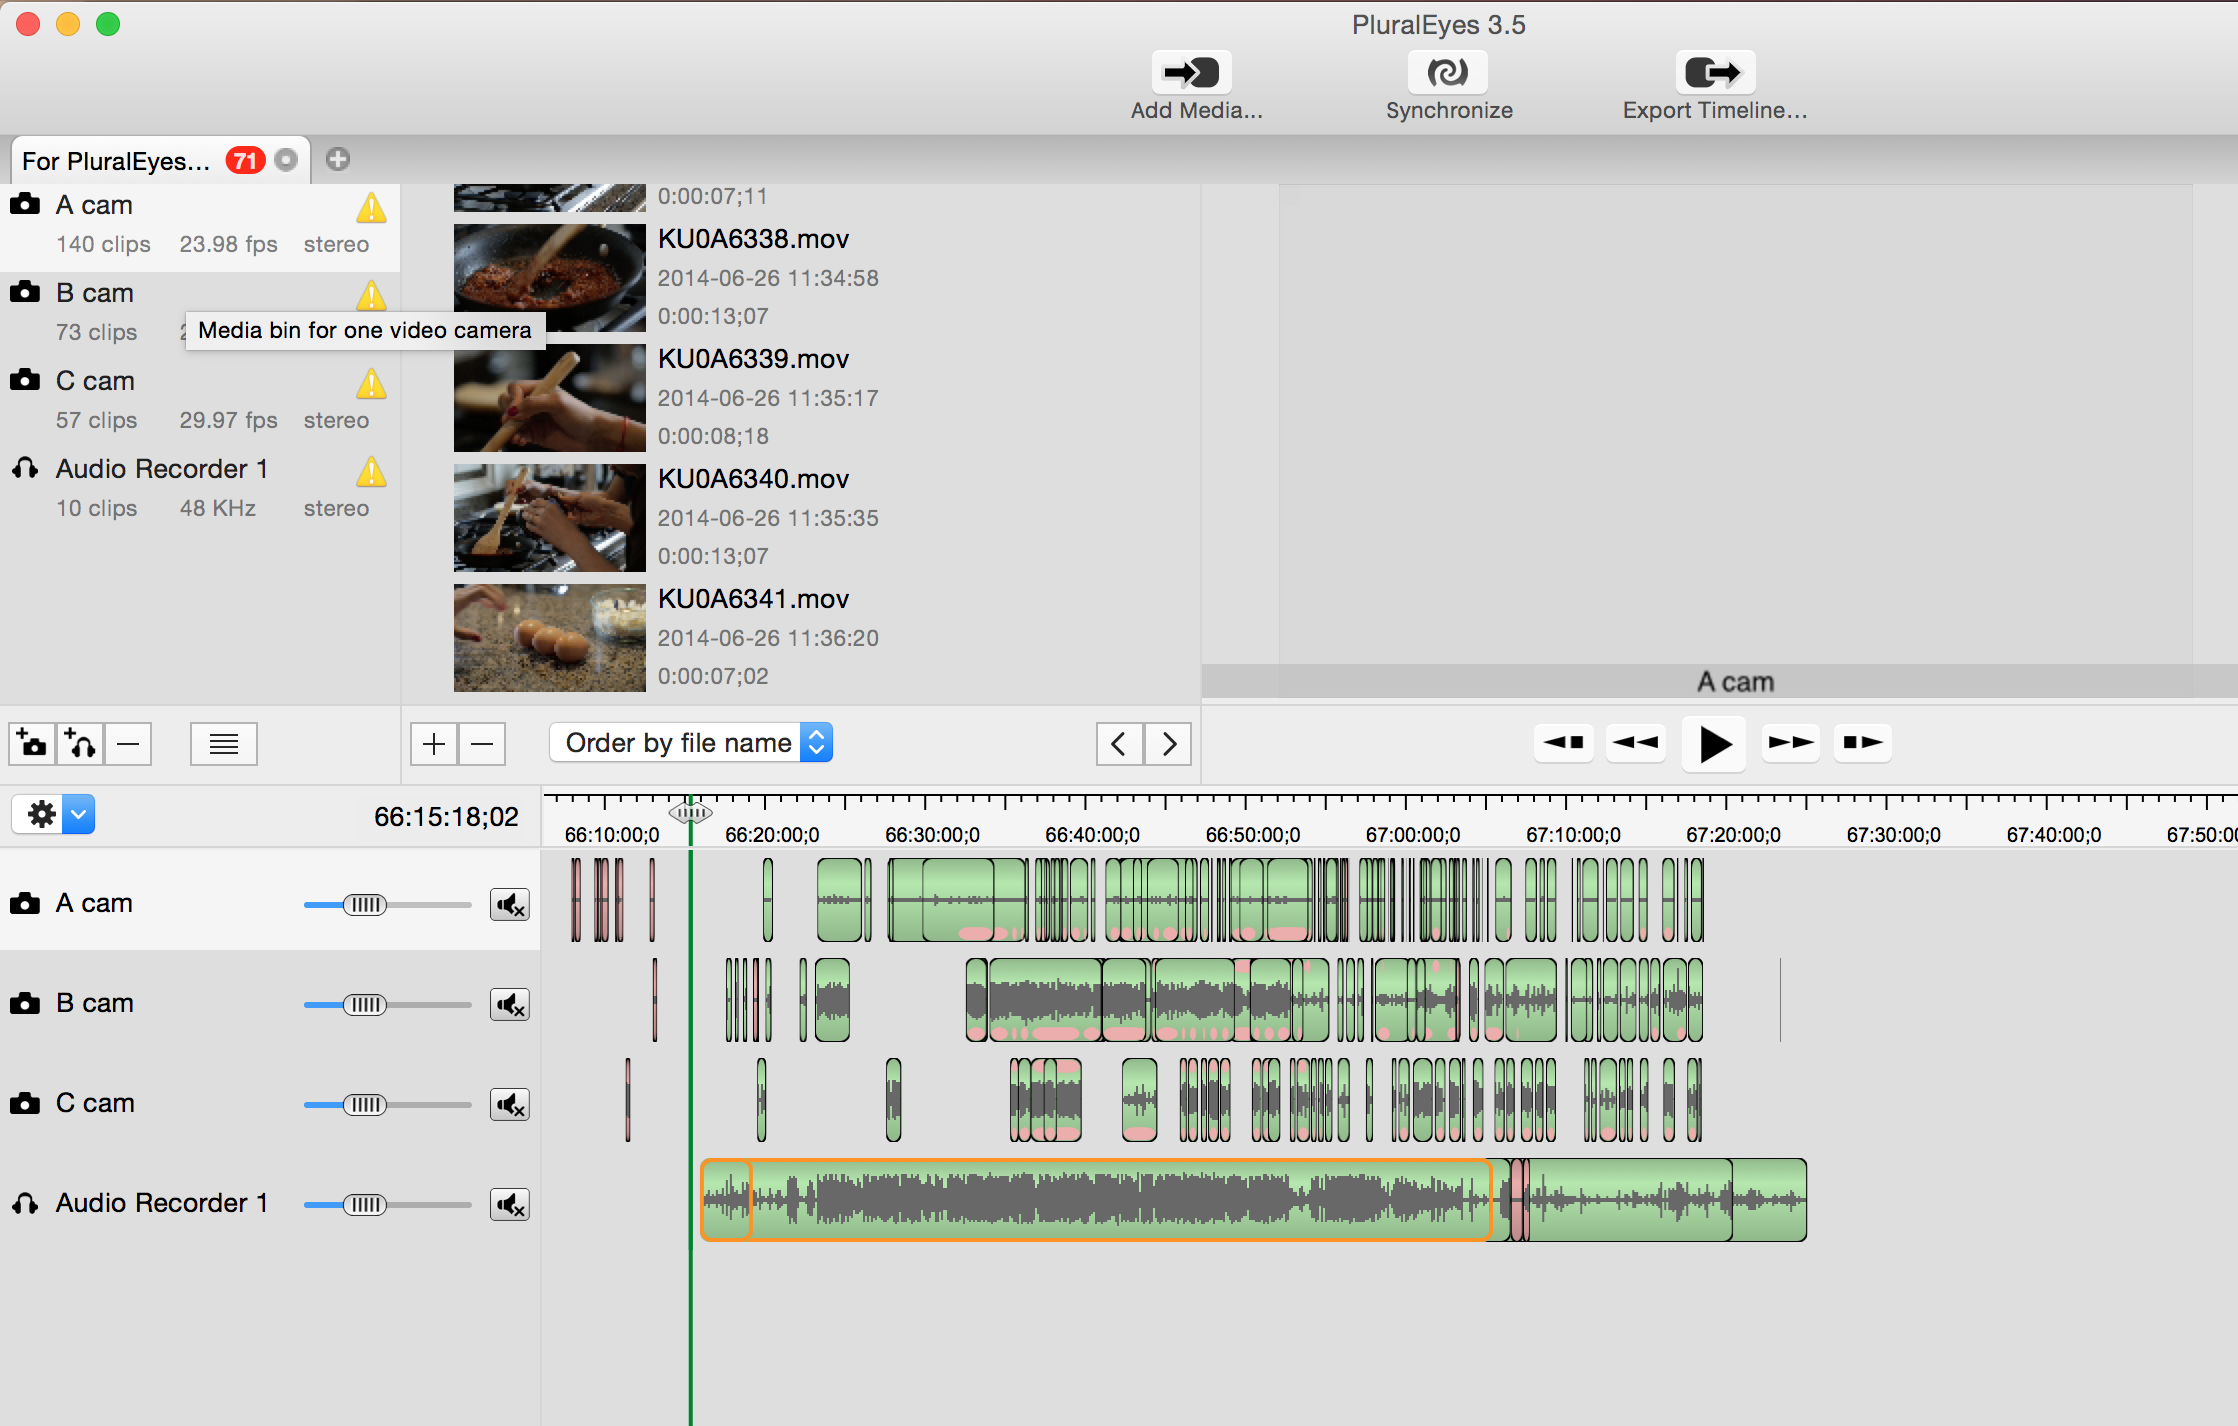
Once you’ve loaded all the files, you should see that PluralEyes has organized each camera’s footage onto its own track, and audio as well, like so:

Screen Shot 2014-11-01 at 1.46.00 PM


So now we’re all ready to sync our footage. But first, let’s take a look at the sync options:

Screen Shot 2014-11-01 at 1.49.24 PM

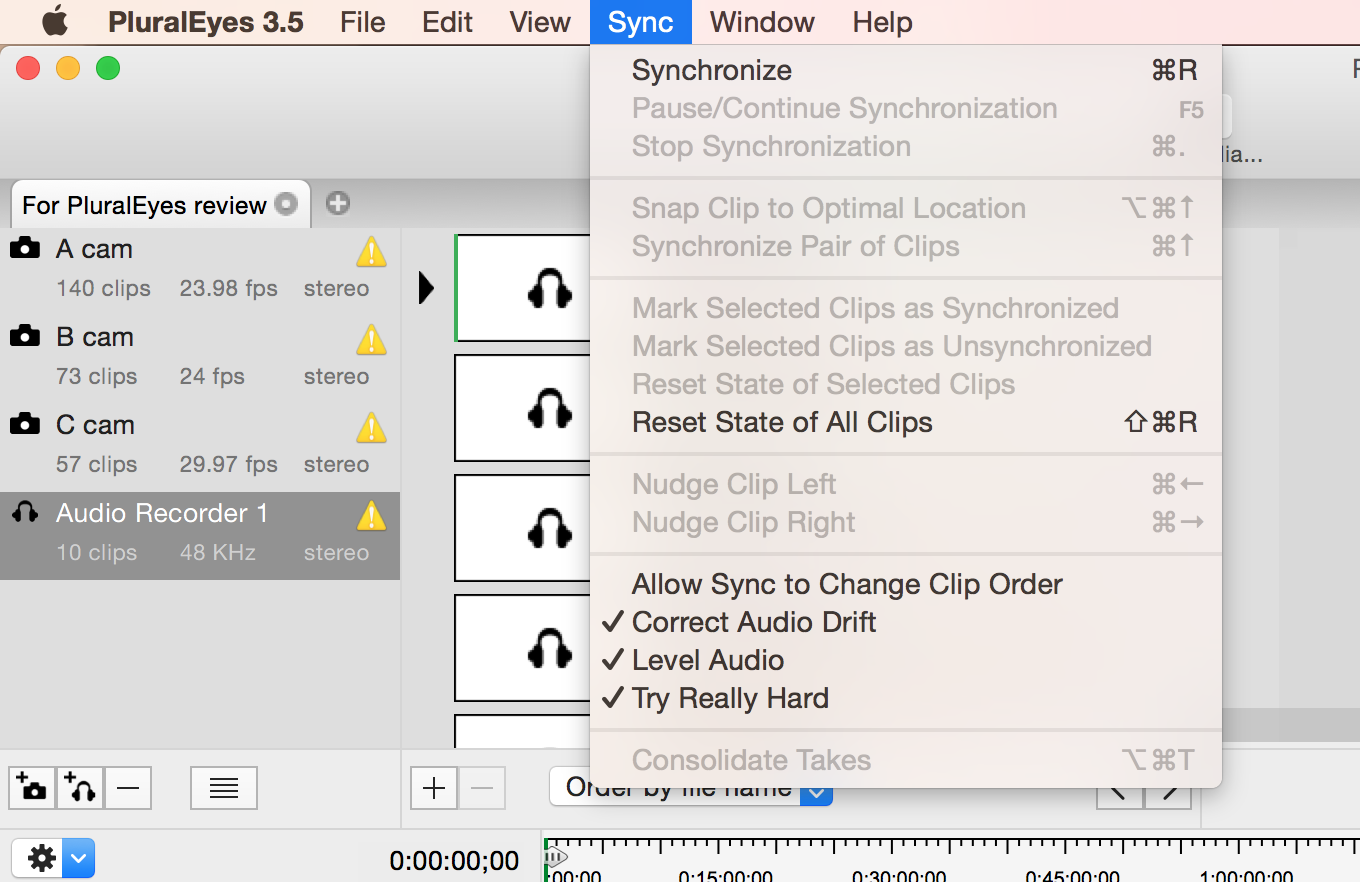
Allow Sync to Change Clip Order. I recommend leaving this one off. Most of the time, your audio clips and video clips are recorded sequentially. So you WANT them in order. The only time I can think of that you’d want to turn this off is if you have named your audio or video files something other than sequential numbers prior to sync.

Correct Audio Drift. This is a killer feature, so be sure it’s turned on. If for some reason your recorder audio doesn’t match the reference audio throughout the duration of the clip, this will fix it by very subtly stretching or shrinking the length of the file so that it lines up.

Level Audio. Sometimes the audio on your reference track will be too low for a good match. Checking this box will raise the levels on your reference track so that it can work with it. Red Giant suggests leaving this one turned off by default, and only using it if you have trouble getting files to sync. But I figure why not start where you’re going to end up? So I leave it on all the time.

Try Really Hard. Of course you want your software to do that, right? Leave it on. It will slow down the time it takes to sync, but do the best job possible.

Now click the Synchronize button at the top middle of the screen. Then sit back and watch your footage move into sync with the audio automagically. When it’s done, you should see something like this:

Screen Shot 2014-11-01 at 2.12.35 PM

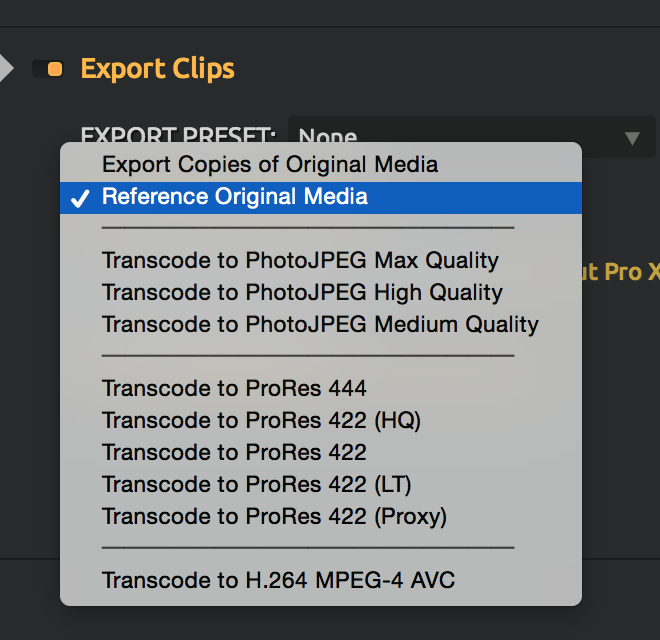
Things are lined up, and now it’s time to export. Click the Export Timeline button, and you’ll get the option to choose your editing format:

Screen Shot 2014-11-01 at 2.16.07 PM

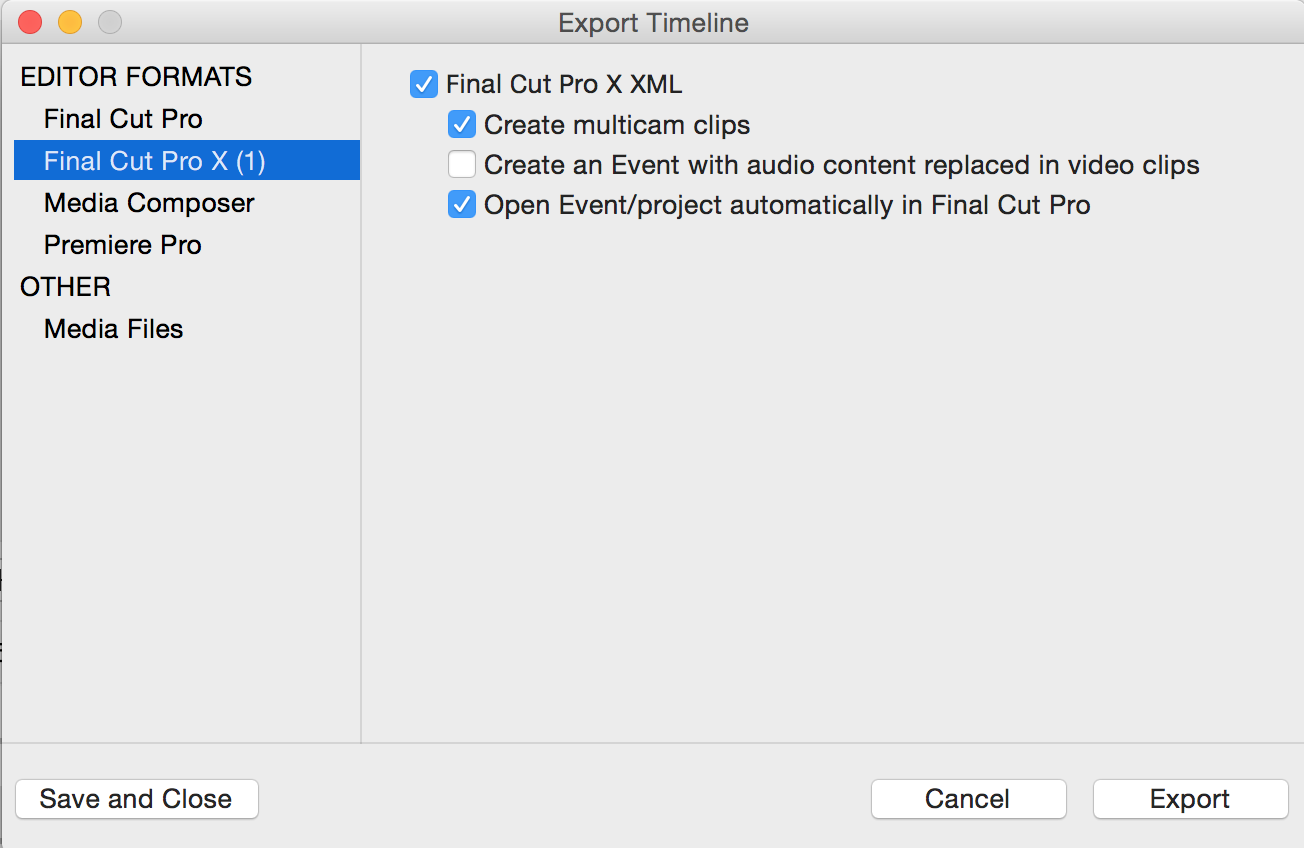
Supported NLEs are Final Cut Pro 7, Final Cut Pro X, Avid, and Premiere. But here’s a power tip: the Other option allows you to create new clips, with the good audio replacing the bad. If you start your project by importing these clips only, and ignoring the reference clips, every clip in your project will be a “good” clip and you won’t have any issues keeping track of which is which.

Screen Shot 2014-11-01 at 2.19.42 PM

I’ve found this is a good choice when shooting with a single camera, and you know you only want to use the sync audio and ignore the rest (as with an interview, for example).

If you choose the option to Open Event/Project automatically, and FCPX is not running during the export, you’ll see this error:

Screen Shot 2014-11-01 at 2.26.47 PM

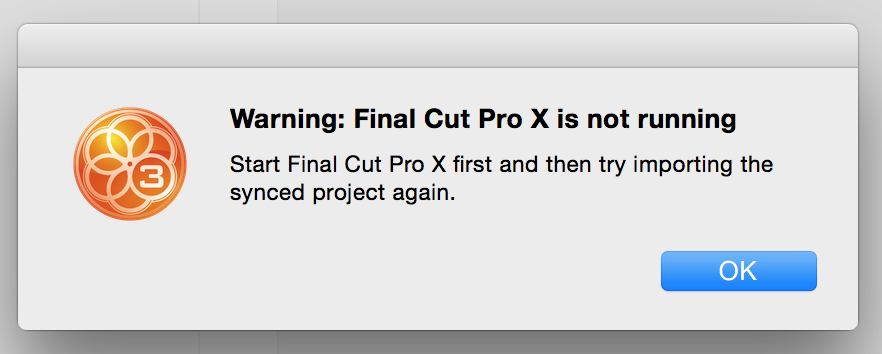
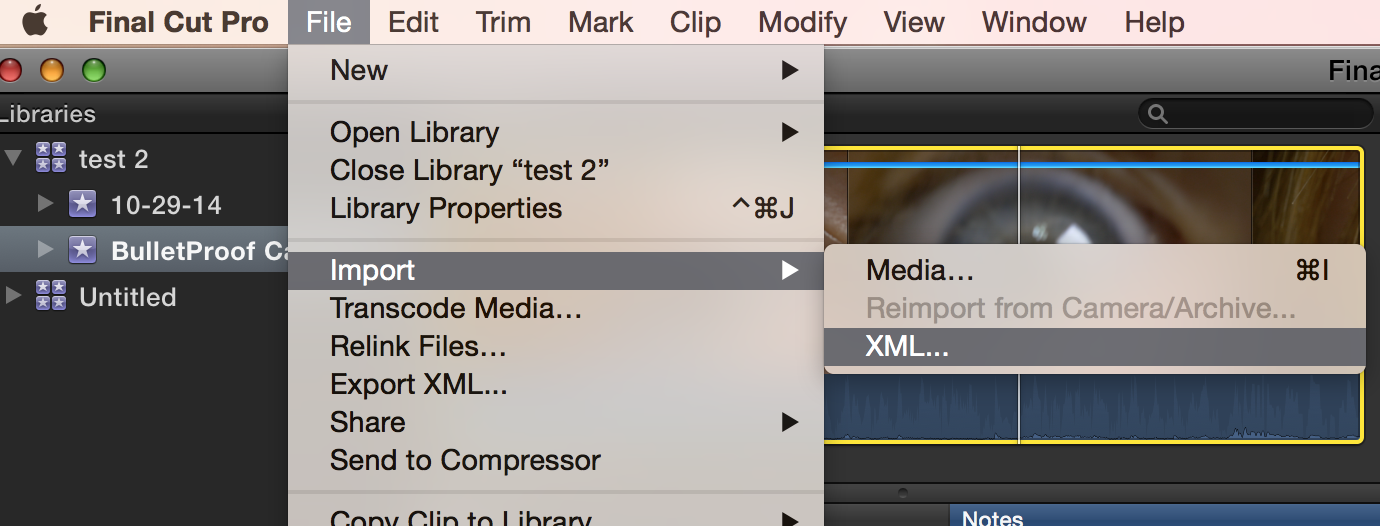
If this happens, it means the file won’t be imported automatically. No problem, you can do it manually. Open FCPX, and go to File > Import XLM.

Screen Shot 2014-11-02 at 5.27.30 PM

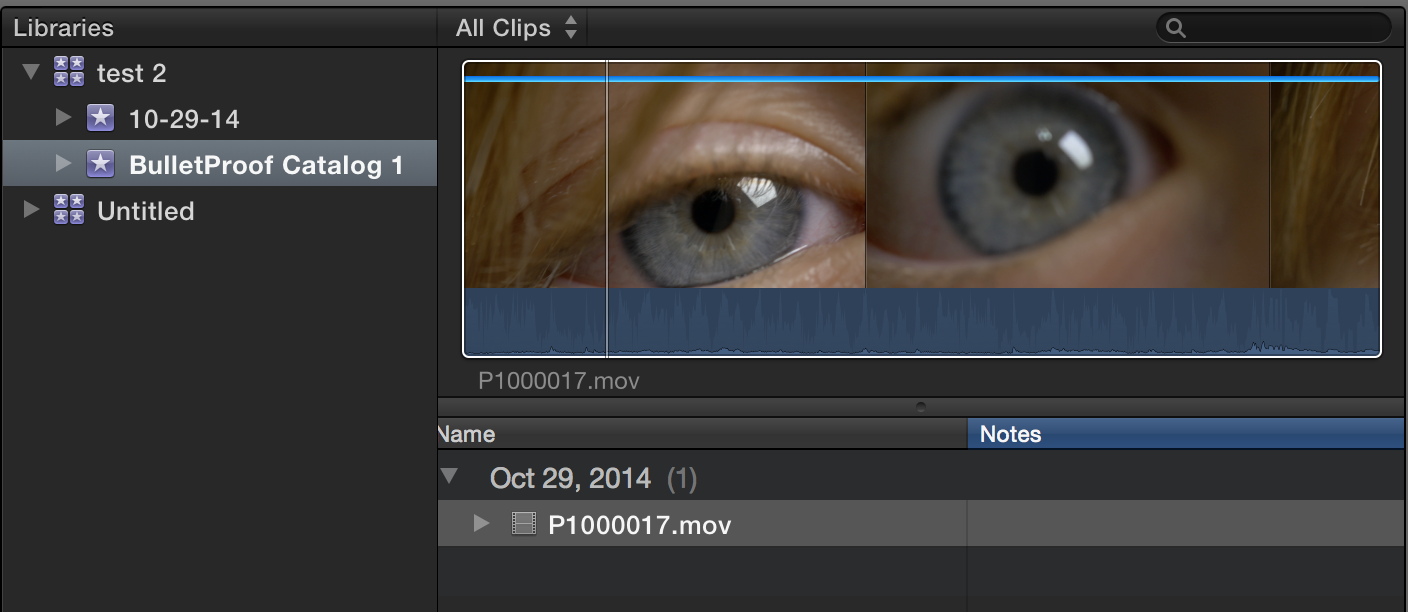
This will create an event which contains your exported files.

Sometimes PluralEyes gets confused. If you are attempting to sync the same footage repeatedly, it’s a good idea to throw away the temporary files that PluralEyes creates. Look inside the directories containing the audio and video files, and throw away the folders called PluralEyes Synctemp.

What if you have video clips that are recorded at different frame rates? Will that cause sync issues? Sometimes, but if that happens, try again. In the project used for this post, the three cameras were all shooting different frame rates: 23.976, 24, and 29.976. On the first sync attempt, it came out scrambled. So I tried again after throwing away the temp files, this time adding each camera one at a time instead of dragging them all in at once. The second time, everything synced fine.

Here’s how the multicam clip looked after importing correctly:

Screen Shot 2014-11-02 at 5.22.11 PM

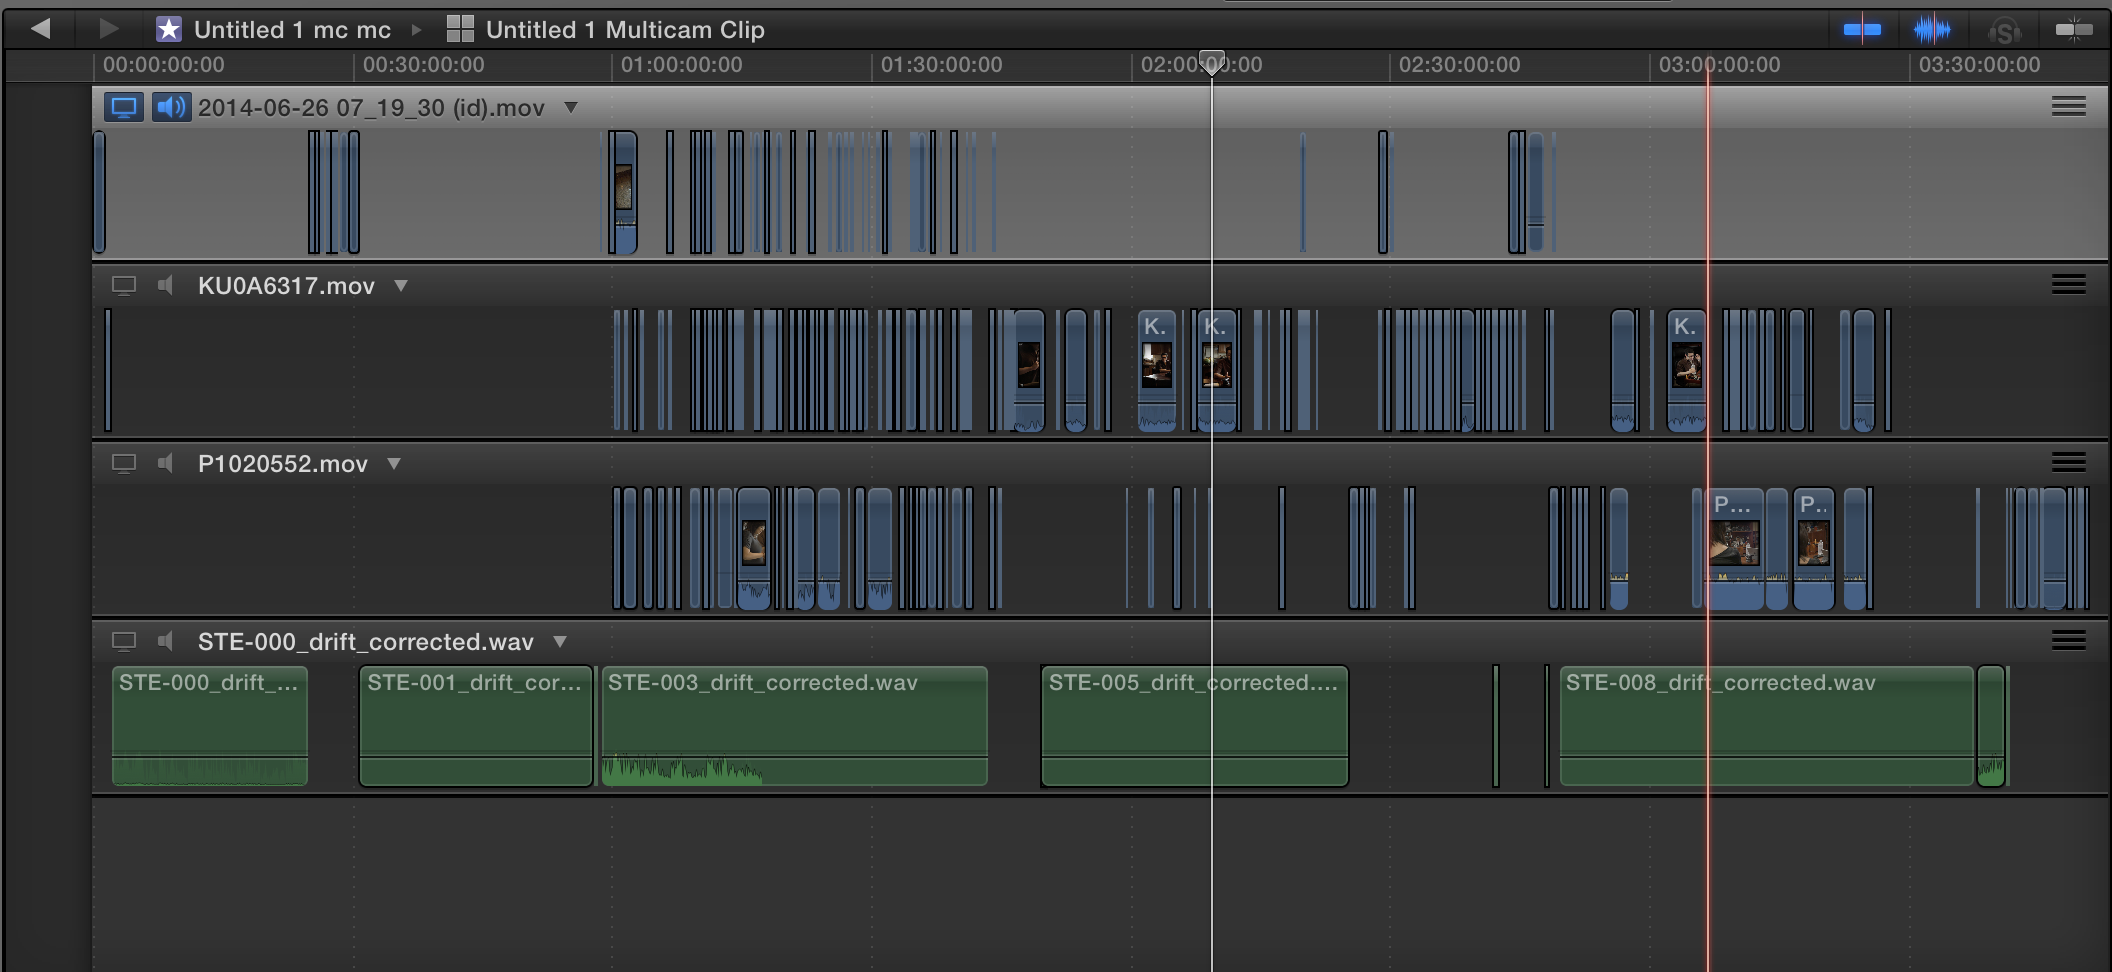
Notice the audio files starts with 000, and count up sequentially as you go from left to right in the timeline. That’s what you want – file names in order. Notice that the audio file names include “drift corrected,” which means PluralEyes had to do a little work to make them match exactly.

PluralEyes has earned a place at the heart of my workflow, freeing me of the tedium of slating and the complexity of genlock. If you hear the sound of clapping on my sets, it’s because someone is happy.

Red Giant Shooter Suite’s Offload & BulletProof

UnknownRed Giant’s Shooter Suite 12.6 is a powerful set of six stand-alone applications that are bundled to address common production challenges faced by filmmakers. I’m going to take you on a guided tour of these applications in separate reviews, starting with the first step in post-production: importing your footage.

I’m a fan of simple. And for the past five years, importing footage for me has been very simple indeed: insert card into reader, create a folder to hold the contents, and drag files into it. Done!

This has worked ALMOST flawlessly for me. In those five years (which included making a feature-length documentary), I can think of only two occasions in which files were corrupted in the process of copying.

Nevertheless, my experience does point out an important fact: if you’re laying off a lot of footage, it’s only a matter of time before an error DOES happen.

If you’re interested in reducing your chance of errors to zero, without having to learn obscure terminal commands, you’ll be very interested in two applications bundled in Red Giant’s Shooter Suite: Offload, and BulletProof. Both use a byte verification of CRC-32 (Cycle Redundancy Check) that makes sure the media copy always matches the original source. This additional step means that importing files takes longer than Finder copying, but you can have full confidence in the result.

Offload, the most elegant of the two apps, offers a minimalist interface that prompts you to do just two things: offload your files, and back them up at the same time.

Screen Shot 2014-10-26 at 11.08.10 AM

It’s always best to back up your footage from the original media, rather than copies. Offload prompts you to do it the right way, and right away.

BulletProof offers many more options and support for complex workflows, at the price of increased interface complexity (read: it’s harder to learn to use it, and you might not need all those bells and whistles).

Screen Shot 2014-10-29 at 5.42.37 AM

But before we get into BulletProof, let’s take a closer look at Offload.

When I import my footage, that’s really all I want to do: get it from the card safely onto my RAID for editing. I don’t want to begin color correction, generate multiple copies, add metadata, or anything else, thank you very much. So if you just want to know it’s safe to wipe your card after import is complete, Offload is the tool for you.

Screen Shot 2014-10-29 at 6.14.36 AM

But Offload doesn’t give you ANY options. In fact, you can’t even choose which files to import or skip. Every file on the card will be imported.

During import, Offload tracks progress with a large yellow border that fills up from left to right, with onscreen feedback for both copy and verification steps. It couldn’t be simpler.

If anything happens to interrupt the import, of if you cancel midway, it’s impossible to miss that your files haven’t successfully copied: bright red warning marks appear on every file that failed to import.

Screen Shot 2014-10-29 at 6.18.00 AM

What more could you possibly want? Well, how about automatically detecting spanned clips and combining them into a single, edit-friendly clip during import?  Or the ability to assign metadata such as roll number during import?  With BulletProof, that’s just the tip of the iceberg.

BulletProof breaks all of its many capabilities into five steps:

Screen Shot 2014-10-29 at 6.33.39 AM

BulletProof offers the ability to do things on set that previously were the realm of NLEs or tools like Davinci Resolve: metadata tagging, LUT application, and generation of dailies. In effect, BulletProof provides an easy way for an on-set DIT to take over some of what previously was an assistant editor’s job – and that in many workflows, should probably remain their job! But if you’re working in teams where everyone has to do a lot with a little, it’s got the potential to be a tremendous timesaver.

Screen Shot 2014-10-29 at 7.06.00 AM

The Import tab provides options to either Add or Copy files into your Catalog (hint: choose copy unless you want to leave the files where they are – almost never a good thing if you’re importing from a card, but makes sense if you are prepping dailies that have already been saved to a hard drive).

Screen Shot 2014-10-29 at 7.07.08 AMTo streamline repetitive tasks, you can save presets that will remember your settings for future sessions.

After you’ve started the import, an Activity Status button reveals where you are in the process. This lets you see at a glance where you are in the process, and gives you the option to cancel.

Screen Shot 2014-10-29 at 7.16.58 AM

After your files are successfully imported, you can move to the Organize tab (above). This gives you the option to create iTunes-like Playlists, useful to streamline tagging files with metadata. For example, in the example above, I’ve created a playlist which contains only closeup shots of eyes. This allows me to apply the shot type keyword “CU” to all files at once.

So where does this metadata end up? It would be nice if it were immediately stored with the clip file. That way, you wouldn’t have to export again to get the tags to stick. But that isn’t quite how it works. Metadata is stored within a BulletProof catalog file, and in Final Cut Pro X  (my NLE of choice) it is only associated with the clip upon import. There is an option to apply the settings to your media without exporting new files – more on that below when I discuss Export options.

Screen Shot 2014-10-29 at 7.24.09 AM

The Review tab (above) gives you the option to play each clip, and set in and out points that control which footage gets exported when generating dailies in the Export tab. You can also access the metadata from within this area. Why you would want to set in and out points at this stage of the game is beyond me, but hey, options are good.

Screen Shot 2014-10-29 at 7.29.33 AMIt’s also possible to place markers within the clip, which will be transferred into your NLE when you export the clip.

Screen Shot 2014-10-29 at 7.35.09 AMThe Refine tab (above) allows you to apply color corrections or LUTs to your clips using a color tool that will be familiar to Red Giant users – Colorista wheels. You can also set a curve, and use a color picker to set white balance (a tool I’ve always loved).

Screen Shot 2014-10-29 at 7.42.21 AMA powerful feature is the ability to export your color choices as a LUT, which could be passed to your colorist as a reference and used in Davinci Resolve, or any NLE that supports LUTs. In FCPX, LUTs are supported with an excellent $29 tool called LutUtility.

If making color decisions at this stage of the game feels like putting the cart before the horse, it probably is. In my workflows, color grading decisions are almost always deferred until AFTER the edit has been made and picture is locked. But if you’re shooting LOG footage, for example, and need to generate a daily that will look good for cutting with, applying a LUT at this stage and doing a minimal color pass makes sense.

Screen Shot 2014-10-29 at 7.55.03 AM

Opening the Export tab (above), allows you to set the destination, and control things like the frame rate and timecode values.

Screen Shot 2014-10-29 at 7.57.10 AMIn the “Export Clips” section, you can choose from a short list of editing codecs you’d like to export to. If you select “Reference Original Media,” metadata is NOT embedded in the clip at time of export. Further, importing the XML file into FCPX resulted in a broken link to the clip in my testing.

The only way I was able to get metadata to transfer reliably, and unbroken links to footage,  was by choosing to export AND transcode. This creates a new clip that will be referenced by the XML file used to import the metadata.

To open the clips in FCPX, go to the File > Import > XML.

Screen Shot 2014-10-29 at 9.26.23 AM

Browse to the location of the XML file generated by BulletProof during the export. Opening it should create an Event named after your BulletProof catalog name.

Screen Shot 2014-10-29 at 9.26.40 AM

All of your media should be there, and the metadata should have been imported along with the clip.

I observed that if I imported the clips directly, bypassing the XML, FCPX could not read the metadata. This indicates that, in FCPX at least, the metadata is not actually embedded in the clip, but gets associated with each clip at time of import via the XML file.

Screen Shot 2014-10-29 at 9.51.15 AM

For any custom metadata fields that aren’t displayed by default in one of FCPX’s standard views (in this case, the Director, DP, Lens and Shot Type fields), you will need to open FCPX’s Metadata Views Editor. Check each field you wish to see (above).

Screen Shot 2014-10-29 at 9.27.12 AM

Now, when you open  the Info tab in FCPX, your metadata shows up. I wish there were a metadata view in FCPX that automatically looked to see which metadata fields contained data, and made them all visible. That would be a nice timesaver.

BulletProof provides a robust set of tools that can be adapted to your requirements, and is especially well suited to complex workflows requiring dailies generated with LUTs and on-set metadata entry. If your needs are simply to import footage securely, Offload is the elegant choice. Either way, you’ll rest assured that your footage is securely imported and ready to edit from the moment it hits your hard drive.

Flashpoint CL-1300, 1300B LED PanelLights review

flaspointcoverart

As someone who shoots a ton of interviews on location, I am on a never-ending quest to find a powerful lighting kit that will pack down into a carry-on sized bag. So when I was asked to review the Flashpoint CL-1300 LED panels, I got a little excited.

On paper, these lights look amazing: weighing just 4 pounds each, they are as small as LitePanels, but MUCH brighter; feature a built-in v-lock battery plate for cordless operation, and are priced just over $400. They come in two flavors: a 5600K daylight version, and a bi-color 3200K-5600K rated model. And they are made by Adorama, a brand with a lot more cred than the Chinese knockoffs I bought a few years back.

backofunit

dimmer

Dimming is controlled from 10 percent to 100 percent via a slider.

catbag

When my test unit arrived, the first thing my cat, Dolce, and I noticed was the handsome bag that was included. It is lightly padded for protection, features a shoulder strap, a pocket for the gels, and a front zipped pocket for the power cord, with room left over for a v-lock battery.

The CL-1300 ships with two plastic gels, one a diffuser, and the other an orange-yellow color that I assumed (incorrectly, as we’ll see in a minute) would get me in the ballpark of 3200K. Also included was a very nice, very long, 16′ power cord, which terminates in a 3-pin female XLR for attaching to the light. With that cord length, it’s almost possible to skip lugging an extension cord!

jack-in

This is a huge step up from the TRS jack that my old knockoff lights are powered with. The XLR locks into place, so it will never fall out during operation, and you don’t have to worry about the weight of the cable bending anything on the unit.

power-jack

There’s even a DC-out port, which allows you to daisy-chain several units together to create a larger panel, and control the dimming simultaneously using a dimmer attached via a RJ45 remote. I did not test this feature.

remote-plug

handle

The plastic folding handle on top assists with hand-holding the light when needed.

The first thing I wanted to test was how powerful this light is, in a real-world situation. For sit-down interviews, I generally place my key light no more than 8 feet from my subject. So I placed the light 8 feet from my light meter, and took the following readings @24fps (48th sec. shutter):

Without diffusion or filter 8′ from subject = f/5.6.4 at iso 400.

With included diffusion gel (which I definitely recommend to eliminate the multiple shadow effect of bare LED panels): f/5.6.1, about a third of a stop light loss.

Battery life. Using my Switronix 14.8 volt v-lock battery on the light, I was able to get an average of 2 hours and 30 minutes with the light set at half brightness. Going to full brightness drains it in under an hour. Because the unit is so bright, it’s totally feasible to work in the half-dimmer position for all but the longest of interviews, without interruption. Sweet! One thing to note: when the power dies, it dies suddenly. It goes from being fully bright, to being out, just like that. I’m glad it does that rather than slowly dip, because this way as long as the light is on, you know you’re getting a consistent level of output.

So this is a very bright little light. But is it, as advertised, 5600K?

To determine color temperature, I clipped a Kodak 18 percent gray card to a stand, in a gray room with gray carpet, and pointed my 5dmkiii running Magic Lantern at it, with vectorscope enabled. I set the camera’s white balance manually to 5600K, and I SHOULD have seen a tight dot in the very center crosshairs of the scope. But this is what I saw instead:

base-light-temp

Way too much magenta! To correct this, I added a 1/4 +green gel, and a 1/8 +green gel, which took us to here:

5600-corrected

It’s too warm now, but adding 1/8 blue took us too far toward blue, to about 6000K.  So I settled for rating this light at 5400K, which yields this result on the scope:

5400k

It’s still a tad on the warm side, but I prefer a little warmth in my daylight balanced lights. With a little filtration, and some tweaking of the advertised color temp, we’re good to go.

You can assume that this is a step you would need to perform for every light you purchase in the CL-1300 series – getting the temp spot-on at the factory clearly wasn’t a top priority with these units.

Now that we’ve dialed in our daylight setting, what about 3200K? You might think that it would be as simple as sliding on the included orange plastic gel into the second slot provided (a very nice design touch).

orange-gel

But that turns out not to be the case. Adding the orange gel takes us only to 4000K:

4000k

We’ve got some more gels to add…and perhaps take away…to reach 3200K. With a little trial and error, I discovered that the formula is: remove the 1/8 +green, and add 1/8 CTO, and 1/4 CTO, which gets us close to the mark as possible, with just a bit of extra warmth:

3200k

(Note: dialing my color temp on the camera to 3100K put the dot squarely in the crosshairs, so technically the light gelled thusly should be rated 3100K. But as I said above, I prefer that slight bit of warmth so this is how I will rate the light and it matches well with my 5400K setting above).

Recommended additional filtration to carry with this light:

1/2 Plus Green – stacking this with the included 4000K filter gets you a ballpark fluorescent balance.

ND gels – the light is advertised as dimming to 10 percent of power. That turns out to be a lot of light – sometimes too much if you’re looking for subtle fill. Adding at .6 or .9 ND gives you the ability to dim the light further.

Size to cut: 11.5 x 11 3/8. It would be much simpler to cut these if the filter trays were actually square, but they’re not quite.

So we’ve found the formula to make THIS individual CL-1300 look good in tungsten, fluorescent and daylight. But…

In practice, this is a royal pain. Fiddling with adding multiple CTO gels, while remembering to take out 1/8 +green… you can see how complicated this could get on location. If you wanted to add the equivalent of 1/4 CTO, what would you do?

This is the accusation that DPs and gaffers have been hurling at LEDs since the beginning: that they don’t play well with the other lights on set. You can gel any tungsten light, and it will produce a predictable result that will match with other manufacturers tungsten lights, as long as the color temps are the same. But try that with inexpensive LEDs, and you get these weird color shifts that have to be individually corrected for.

So this got me wondering. Would the bi-color version of this light solve this problem?

There are so many things to like about this light, that I decided to put down my money and take a chance on it. The dream of compact, inexpensive, powerful, finger-tip adjustable lighting just won’t die in my head. So I ordered a 1300B unit, and awaited delivery.

Meanwhile, I had already ordered an additional CL-1300 for use on a documentary shoot with L.A. based director Michael King on his latest film, Intrepid. The film explores what happens to soldiers returning from combat and the challenges they face with post traumatic stress. For this shoot, we had two days of back-to-back interviews, and very little time to set up, very little budget, and very little crew. Here’s a couple iPhone snaps I was able to grab during production:

IMG_4965

This interview with a former general is an example of where these lights shine: quick setups with busy people who can’t grant time for more elaborate setups.

IMG_4966

This was our setup: two CL-1300s, one bounced into the neutral gray wall to provide strong fill, and the other keying the general from the side. The resulting wrap-around light looks great and takes almost no time to set  up.  The lights are gelled for tungsten using the formula I outlined previously in this post.

Unfortunately, the unit I received suffered from a serious issue: it had a noticeable flicker when dimmed below 50 percent. I limped through the shoot with it, and returned it immediately thereafter. Probably just a defective unit, right?

A few days later, the 1300B arrived.

The first thing I noticed after unboxing this light and turning it on? The dreaded flicker. Again. Similar to the previous unit, this one flickers in the low end of the daylight channel. But it also flickers subtly at top end of the tungsten channel. See this video clip:

Another issue: it emits a faint pitched whine that goes from high to low when dialed from daylight to tungsten. It disappears at either end of the scale, but select anything in between, and your sound guy may be ripping his headphones off in protest of your new purchase.

Of course I’m returning it. It’s obviously defective. And I’d like to wait until the replacement unit arrives to post this review. But after having to return two out of three lights that I’ve tested from flicker issues, I think it’s something I have to talk about. Even if the replacement is flicker-free, that will only bring the average to 50 percent. I’ll let you be the judge of whether that’s good enough for lighting gear you rely on.

OK, so flicker aside…

Bi-color is a killer feature. Think about it. If you’re standing on location, and the client is waiting, and you can dial in the color temp, instead of digging through your filter roll, getting out your c-47s and trying one then adding another…Having a light that you can adjust the color instantly is just a huge deal. Especially when you’re working with small crew or one-man mode.

And with LED panels, gelling is more of a pain than with fresnels. You need to either have a bunch of pre-cut pieces which you,  or you need the accessory barn doors.

barndoors

The barn doors do allow you to easily clip gels or diffusion to the light. However, the Adorama CL-1300 barn doors are very, VERY heavy – 3 pounds! The light itself only weighs 4 pounds. But no one can accuse them of being cheaply built – these bar doors are built like a weapon.

colordial

One thing I like about the 1300B is that you can dial the color temp independently of the intensity. So it’s easy to find a temperature setting, and then work the dimmer up and down without changing it, an important convenience during a shoot.

The main thing to keep in mind when considering whether to go with the  bi-color or daylight version of this light, is brightness. The bi-color unit is half as bright as the daylight, because half the LEDs are tungsten, and half are daylight. Dialing the temperature control wheel sends power into one while subtracting it from the other. Predictably, when I gave the same brightness test as above to the CL-1300B, here’s what I got:

At 8’, light without diffusion or filters yields f/4.0.5 at iso 400 @24fps (48th sec. shutter)
With included diffusion: f/4.0.2, or about a third of a stop light loss.

What about the color temp of the bi-color model? Does it require gelling too?

The bi-color unit is closer than the previous light, but still needs some correction. 1/4 +green, to be precise. Uncorrected, here’s how it looks to the vectorscope:

b-5600

b-3200

As the light is dialed from daylight to tungsten, it gets more magenta. My compromise fix: Adding a 1/8th +green, and rating the daylight to 5400 instead of 5600k. This yields almost the same correction as the CL-1300 did, resulting in a pleasantly warm daylight balance:

b-correctedfordaylight

So what’s the bottom line? There are many things to love about these lights. They pack nice, sip battery power, weigh next to nothing, and are well designed. They are full of promise. But until the flicker issues are addressed, and the color temperatures more precisely match those advertised, my recommendation is “watch, ” not “buy.”

Taurus Jr. heavy duty 4ft camera crane reviewed

I just finished shooting a short film called Pearl, for Seattle director Amy Sedgwick. It’s a film about a woman who works at a small oyster cannery who dreams of a bigger future for herself. When the opportunity arrises, she seizes it.

When Pro Am gave me a chance to review their new Taurus Jr. heavy duty camera crane, I jumped on it. A jib shot would be the perfect way to establish the first location in the film, as the two women enter the cannery for the first time, by revealing something of the environment and at the same time advancing the story. And there’s nothing like using a piece of equipment on an actual production to discover its strengths and weaknesses.

Here’s the shot:

As you can see from this clip, there was a bit of wind that we had to contend with. And, we had a manual focus pull, too. The camera I shot the film with was a 5dmkiii (shooting Magic Lantern raw) fully rigged up with v-lock battery, etc. So it weighted about 10 pounds.

The Taurus Jr. enabled us to get this shot where many smaller, lighter weight jibs simply wouldn’t have cut it. I own an Aviator Traveler jib, and while it’s an amazing bit of gear, it would have never held steady for a focus pull, much less the wind.

After using this jib, I really appreciate the benefit of a heavy-duty jib for getting consistent, repeatable results on location, on deadline. You don’t get to control the weather. But you still have to shoot your film.

Weather aside, what is it that really keeps filmmakers awake at night? Money. There’s never enough of it. That’s where the Taurus Jr. really shines. At $399, it costs less than a third what comparable jibs do. I get excited whenever I can put more money into paying actors and crew, and the million and one other things that have to get paid for to bring a creative idea to life, rather than sinking it into equipment.

This jib doesn’t quite come with everything you need to get up and running. You’ll need to buy some weights for balancing it. Luckily these are inexpensive and I came home from my local Big 5 sporting goods with everything I needed to get going: a couple of 2.5lb weights, a couple 5lb, and a 10lb. That combination gave me plenty of options to keep various camera rig configurations flying in perfect balance.

At four feet, this isn’t exactly a long jib. Isn’t bigger better? Not for me, it isn’t. I am a real fan of subtle jib moves, rather than the big sweeping ones. A little move can go a very long way. And the ease of transporting and setting up a 4′ jib compared to an 8′ one is like night and day. The best tool is the one you will have with you when you need it.

To keep costs low, presumably, the Taurus Jr. designers cut one corner that I wish they hadn’t. The horizontal brake is really flimsy, and doesn’t precisely stop the jib from moving a little back and forth. If there’s one thing I’d change about this jib, it is this. And, there’s no easy way out of the box to mount a monitor – you need to purchase an accessory arm for that.

So let’s sum it up:

Pros:
Price – it’s just $399. Very affordable for a jib of it’s capabilities.
Solid, multiple-reinforced aluminum construction.
Holds up to 30 pounds of camera with all cinema accessories, no problem (matte box, battery, monitor, etc.)

Cons:
The only major flaw with this jib is the horizontal brake. It is flimsy, and doesn’t reliably work.

Wish it came with:
Monitor mounting point. A monitor arm is available as an accessory.
It’s awkward to transport easily – need to get the optional carrying case, really.

Bottom line:
This jib is a winner for budget productions that need a short jib that can produce consistent, repeatable moves in a variety of conditions. I like it so much I’m probably going to buy one next time I’m on a production that needs a jib. And when you start thinking about shots, it doesn’t take very long to dream up amazing shots that only a jib can bring to life. Thanks to Pro Am and the Taurus Jr., budget-conscious filmmakers can stop dreaming and start shooting.

One ring to rule them all: seamless focus gears by mechanical engineer Sean McCurry

First you get a DSLR, then you get a follow focus unit. Then a bunch of stuff happens, and you end up with a pile of this on your living room floor:

Today I’m happy to report that such bandaids for dslr lenses are no longer necessary, thanks to a mechanical engineer named Sean McCurry, who is quietly revolutionizing the follow focus gear, one perfectly printed lens gear at a time. Wait, printed? But before we get into that…

I guess you could say that I’m a focus gear whore. I feel like I’ve tried just about everything on the market in hopes of finding one that worked seamlessly (so to speak) with my set of Zeiss/Contax primes. But every one I’ve tried has left me cold. To be specific:

Redrock Micro gears are nice because they give some autofocus lenses some much-needed extra throw. But with my Zeiss primes, I found the extra throw to be too much. And the ergonomics suck: too big to store in my lens case, they have to be assembled before every shoot. Major bummer. I want gears that I can buy and forget about,.

Zacuto Gears are basically thin bands of plastic that have a big awkward bump. They get the job done, but I’ve had them slip off my lenses more than once while running and gunning, because the bit that holds the two ends together gets caught on things. Oh, and they aren’t cheap.

If you want cheap, you want Jag35 zip-tie gears. But like the Zacuto, they catch on things, and they don’t add any throw diameter to your lens, either.

Genus gears are one-size-fits all, which makes them great for larger diameter lenses like my 300mm f/4 Nikon. It’s the only gear I could find to fit it. But not at all great for more standard size lenses, where the tightening screw gets right in the middle of your business. Plus, they tend to loosen up during use, and you have to remember to keep retightening them.

One thing I have never tried: Duclos cine-mod. This is the gold standard of lens gears. And by gold, I mean $105 a pop. But what’s prevented me from going Duclos is that you have to send your lens away for an unknown length of time to have the mod done. That more than anything has been the deal-breaker for me. I need my lenses.

Above: iPhone pano of my set of Zeiss primes, with Sean’s gears.

So. Is it too much to ask to have something as perfect as the Duclos mod, for a third of the price, that without any tools, I can install myself?

Enter a mechanical engineer named Sean McCurry. I accidentally discovered his brilliant work while surfing on Ebay a few weeks ago, when I was startled to see a listing for “Seamless follow focus gears” specifically made for Contax-Zeiss primes. I have a lens set that ranges in size from 25mm – 135mm, and Sean had each of my focal lengths covered. For $35, I took a chance and ordered one for my 50 f/1.7 prime. It arrived three or four days later, and with great curiosity I took it out of the box. Four pages of instructions on lens fitting were included, but were unnecessary: the gear fit PERFECTLY. I simply had to very carefully and slowly wiggle the gear on, until it seated firmly into the spot where I wanted it to stay on the focus barrel of the lens. The fit is so tight that it doesn’t slip at all, doesn’t require glue, and feels like it was made for my lens. Which, in fact, it was.

I’m not 100 percent sure how Sean is able to make such killer gears. But I’m confident it’s because he’s 3D printing them. A close examination of the gears reveals telltale patterns, strata in the plastic that are consistent with 3d printing (click image to enlarge):

One great thing about these gears is that I was able to place them at approximately the same position on 4 of my 5 lenses, so that when swapping lenses, I don’t have to adjust the focus puller position on the rails. Also, my previous gears would ride up and down the lens as they came in and out of their foam Pelican case, requiring constant readjustment, often in the middle of a shoot. These gears stay put.

Need more amazing? Beyond the great ergonomics, these gears producer smoother more predictable and repeatable pulls than I’m used to getting from my previous gears. Maybe it’s the extra gear depth, maybe it’s the precision of the printing, maybe it’s the Delrin they are made from. Whatever it is, these gears have taken my focus pulling to the next level.

Sean is currently making the gears for popular DSLR lenses that include the following:

Sigma 18-35mm f/1.8

Set for Contax Zeiss Lenses

Canon 100mm Macro lens

Nikon 105mm f1.8 AI-S Lens

Canon 24-70mm Lens L Series F2.8

Canon 70-200mm f2.8 L IS Lens

Tokina 11-16mm f2.8 IF DX II Lens

You can see the full list (currently 105 items) to see if your lenses are on it.

Don’t see your lens on the list? Sean welcomes custom orders. You can measure the circumference of your lens, and email your request to helicoptersean@gmail.com. Or contact him via his Ebay shop.

So here we are. Living in a world where the best stuff can come out of a printer. Welcome to the future.

Flashpoint 180 Monolight is a low-budget cord cutter

Speedlites are great for shooting on the go. And monolights and power packs are great for studio work. But what if you seek the flexibility of a monolight (i.e. you can use it with soft boxes or beauty dishes), with the portability of a battery powered flash, for half the cost of a Speedlite? Would that be too much to ask?

Consider the $250 Flashpoint 180 battery powered monolight. I’ve been using one for the past six weeks, thanks to a loaner from Adorama, and I’d like to share what’s great about this unit, along with a couple things that could stand improvement.

Cords suck. Even if you’re working in a location that has power, it’s often much faster, easier and safer to shoot from battery power. If nothing else, going cordless saves you from running extension cords, which people can trip over. And this unit gives you approximately 700 full-power flashes – more than enough for all but the most demanding assignments. I found that at full power, it took between 4 and 5 seconds to recycle. That’s long enough to seriously take you out of the moment if you’re shooting a portrait, though, so I recommend dialing it back to around 1/2 power, which gives you a much snappier recycle time of about 2 seconds. At 1/3 power, you get a 1-second recycle time.

One of the things that is brilliant about this unit is the choice of commonly available NP-F960 batteries for power. I already own a bunch of these for my Switronix Bolt LED lights, and they are quite affordable if you pick up the knock-off NP-F960s, which work fine for me and can be had for about $25.

It’s important to note that this unit does not come with an AC power option. So if you do run the batteries down, you will need to carry backup batteries.

This monolight is compatible with Bowens-style modifiers such as soft boxes, beauty dishes and such. It also has a friction-based receiver for an umbrella, which I wished could have gripped a little stronger. It was struggling to hold my 60″ umbrella securely, but just managed. It’s really designed for use with small to medium sized umbrellas, one of which is included with the kit. The included shoot-through umbrella is very compact, and features a telescoping core.

Seattle photographer John Cornicello recently pointed out that it’s more than just size – it’s what you put into light modifiers that counts. You CAN use a Speedlite with your 7′ umbrella, but you may not be getting the same light quality as you get with a studio head. This head certainly doesn’t come close to the power of the 2400-watt/second head that John was using in his test, but it IS a monolight. I found I was able to get fantastic results with up to a 60″ reflector.

However, I was a little disappointed when I tried it out with my 47-inch Grand Softbox. Not because the quality of the light suffered, but because the plastic stand clamp on the 180 Monolight isn’t strong enough to support the weight of the Grand. I had to considerably overcrank it to get it to hold the nose up even temporarily. I’m pretty sure it would break if I did that more than a few times. So I wouldn’t recommend this unit for large light modifiers. I wish this light used a stronger metal stand clamp. I’m sure the choice of plastic was dictated by price, but I’d be willing to pay a few more bucks for a clamp that would hold larger modifiers.

Another thing I found myself wishing for was a sync cable longer than the included 10′ one. I don’t know about you, but I need more than 10′ to work with. I have some longer ones, but they use standard phono plugs, and this unit uses a non-standard 1/8″ plug (see photo). So your longer cords won’t work.

Tip: Use a SCRIM BAG to hang the battery pack. This one, which fits the battery pack perfectly, is a Lindcraft SB2 scrim bag, available from Filmtools.com.

The DC power cable that runs from battery to the light head is also a very short 5 feet, which means you’ll need to devise a way to hang the battery pack from near the top of the light stand. My solution is to use a scrim bag (see sidebar).

The battery pack does have a belt clip, but it’s useless for attaching the battery pack to a light stand, which is where it needs to go. There’s a blue-handled attachment for handheld use of the strobe, but it doesn’t extend at all, limiting its usefulness.

You might think that because it’s battery powered, the modeling light would either be missing or would be a big power drain. The engineers have finessed this by including an small LED modeling light, which isn’t very bright, but gets the job done. It’s an elegant compromise.

On the top of this monolight, like a small rotating periscope, is the optical slave. Its so sensitive that I never needed to mess with it, but if necessary you can rotate the cover to point at your master strobe (or to hide it from some other strobe source that you don’t want as a trigger).

The power knob allows you to steplessly adjust between 1/16th and full power. There is of course no TTL control of this unit, so I did find myself wishing I could dial in even LESS power occasionally. I often want just a tiny bit of fill, something Speedlites are great at providing. I find myself shooting all the time at higher ISOs, to take advantage of natural light. I’d welcome the ability to dial down to 1/64 power.

The bottom line: For traveling light and shooting on location with small to medium Bowens modifiers, this monolight is a winner. It’s price, small size and power-cord-free operation put it within the reach of just about anyone looking to take their still photos up a notch from Speedlites.

A grand improvement on the one-light portrait

It’s the bread and butter of location photography: the one-light portrait. There’s a million ways to get it right–and a million ways to get it wrong. I’ve discovered one way of pushing the odds heavily into your favor. It’s called the Glow 47″ Grand Softbox.

Small enough to take on location, yet big enough to flood a whole room with light, the Grand is an extremely forgiving and totally flattering way to make a portrait when you don’t have the bandwidth to deal with more than one light. Let me explain.

I’m currently working on a short doc called We Make Seattle. My primary role at this stage is to record sound only during the early interviews. Additionally, I’ve been tasked with getting a still of each participant. Should be easy to do both, right?

It’s possible, but it’s not easy. There’s a reason why you most often find a sound recordist and a still photographer occupying two different bodies. Even though you may be able to do a great job in either role, being asked to do both in rapid sequence is a potential disaster if you care about quality. You have to use very different gear, and approach each creative challenge with a different set of eyes (or, um, ears).

To do both well, I recommend cheating. And the way I’ve learned to cheat on the photo side is to pack a light modifier that does most of the thinking for me: the parabolic 47″ Grand Softbox.

What do all of the following portraits have in common? They were all made with just one light. The subject and the background and the fill side are all being illuminated by the same source.

Parabolas punch out a special quality of light that a soft box can’t quite match. It’s hard to describe it exactly, but I’ll take a stab at it.

The first thing that’s so great is that it’s big. So you don’t have to occupy your brain with whether the subject is in the sweet spot of the light. You can focus on getting a good performance out of your subject rather than niggling with the technical stuff. Light it, shoot it, and forget about it.

Another benefit of using this light is that it focuses and propels the light further than a soft box. A parabolic reflector puts out “collimated light,” which means will travel farther, and more evenly. Add to that the fact that the 47″ box is BIG, and you begin to see why you can do no wrong with this source. If you place it close to your subject, it both keys them and wraps around to fill them.

Finally, using a parabolic reflector produces a signature round catchlight. Notice the eyes:

In many portrait situations, I think this feels more organic than a box catchlight. Less artificial. Less square. It’s a small thing, but photographs are all about details, aren’t they?

The Grand includes a Bowens-type speedring. A large variety of other types of speed rings are available separately. I think supporting Bowen’s style light modifiers was a great choice, because they are ubiquitous at rental houses and among the most affordable professional monolights.

With 16 spokes, it’s a bit of a challenge the first time you fit the Grand on a speed ring. Here’s a tip: don’t insert one spoke after another. Instead, after seating the first spoke, grab one approximately 180 degrees on the opposite site, and fit it into place. Don’t worry if it’s in the right spot – just seat it temporarily to hold the shape as you work your way around sequentially.

A minor irritation about this light is the fitted external diffuser, which you have to stretch over the tips of the box to attach. It’s held in place with elastic fabric inside the stitching, not velcro, so it’s easy to ALMOST get the diffusion on, only to have it come tumbling off before you complete the stretch into place. I’d rather focus my creativity on making the picture, than on assembling the light diffuser. A little velcro on every other fit point would resolve this.

The build quality is excellent, as I would expect for a big soft box that will set you back nearly $250. It’s heavy enough that you need a medium- or heavy-duty monolight to support it. Lightweight monolights with plastic stand receivers, such as the Flashpoint 180 monolight which I tested it with, simply aren’t strong enough to support the weight of the 47″ Grand. But a 10-lb shot bag is enough to anchor your light stand in normal shooting conditions.

5 location lighting problems solved with Switronix TorchLED Bolt

Last summer I DP’d a short film written by Persephone Vandegrift. I’m in the basement preparing to shoot the scene we’ve been saving to the very end, in which Telisa Steen’s character destroys a dollhouse in a fit of grieving for her lost daughter. I’m a little nervous for three reasons. One, there would be no retakes, because the prop would be destroyed. Two, the home owners want us gone in an hour. And three, the ceiling in this bedroom is so low that I can reach up and touch it. So hiding a light is going to be a bitch. And I need something, fast, to separate Telisa from the background. What am I gonna do?

I reached for my “Peacemaker,” the sun gun that’s always within reach: a Switronix TorchLED Bolt. I’ll explain what I did with it in a moment. But first, I’d like to state that this post covers the TorchLED 200. I just learned that Switronix has announced an updated version, the TorchLED Bolt 220, that is 10 percent brighter, $120 more expensive (although B&H has steeply discounted it to $279 through dec. 4), and claims to fix a color mixing issue I discuss below.

The Switronix Bolt LED is hands down the most versatile video light I’ve ever used. In the 9 months since I got my hands on one, I’ve used it like a monkey wrench to fix all kinds of lighting problems. Here’s why:

  • It’s powerful for its size.
  • It’s tiny. So it’s easy take with you.
  • It’s controllable. It throws a tightly focused beam a long way without interfering with other lights.
  • It’s color adjustable. Two knobs allow you to select between 3200k tungsten and 5600k daylight.
  • It’s strong battery powered. L-mount Sony batteries keep you going for more than two hours at full blast, or more than twice that when dialed down a bit. Connect them to a Switronix V-lock battery using the included adapter cable, and you can run all day.
  • It’s inexpensive. About $250 including battery and cables.
Distance TorchLED LitePanels MicroPro
3 ft. f/11 f/2.8
6 ft. f/5.6 f/1.4
12 ft. f/2.8

Just how powerful is it? Take a look at the numbers to the right. I broke out my light meter and compared it to a venerable LitePanels Micro Pro, and got these light meter readings at 50th/shutter at ISO 640.

I recently bought a second one and they go everywhere with me in my camera case. Maybe that’s why they get used so much – they are always handy when I need them. And because they are battery powered, with batteries that last for hours, I don’t have to think about running extension cords when I want to deploy a light. Sometimes that’s the difference between adding a light and getting by without it.

OK, so let’s go back to that low-ceilinged room and see what we can do with it.

Problem 1: Low ceiling – no room for placing backlight without getting it into the shot.

Solution: Hang a Bolt from an autopole.

With the clock ticking, my camera assistant David Fareti was able to attach a Bolt to an autopole with a Matthelini clamp. The only other light with us that might have worked was a Lowell ProLight, but it would be so close to the ceiling that it might have caught the place on fire. And there’s the time it would have taken to hide the power cable. So it simply wasn’t an option. In the end, our shot come up looking like this frame from the film:

Problem 2: Talent shows up for interview wearing wide-brim hat. No time to re-light.

Solution: Place Bolt on stand close to camera lens, at eye level with talent, and dial it to provide -2 stops fill.

We’re filming a series of interviews with legendary graphic designers for the Seattle Design Lecture Series. Our first interview was with April Greiman, who arrived an hour late for the interview wearing this huge hat. We had to roll almost immediately because she was due to deliver her speech in about an hour. Gulp. I knew her eyes would go black under that hat, but I didn’t just want to lower the key and blast light up in there – the only thing worse than under lighting is over lighting. I have learned to keep a spare Switronix pre-mounted on a light stand for just kind of situation. I simply placed it just to my camera left at lens height, and dialed in about -2 stops of light. Like so:

Instantly, her eyes come to life with the catch light in them, and her expression emerges from beneath the brim. Yet, a sense of mystery is preserved. Despite the fact that the Bolt is a small hard light, you can get away with using it undiffused as fill. Oh, and that’s my other Swit sketching her hat and shoulders with rim light.

Problem 3: Strong sunlight on subject needs a quick fill.

Solution: Put Bolt on camera and crank it all the way up.

OK, so I wouldn’t normally light an interview like this. I’m showing you this to prove a point: for ENG-style interviews, the Bolt IS bright enough to fill direct sunlight…if you keep the subject within about 3.5 feet of the camera. For this selfie shot on my 5dmkiii, the Bolt was set to full power at 5600k, the aperture was at f/4.5 with a .9 ND filter (-3 stops) on 50mm lens, at ISO 160. Take that, sunshine!

Problem 4: Need a hair light but must avoid window reflections.

Solution: Clamp Swit Bolt to ceiling-mounted light track.

I recently had the pleasure of interviewing New York graphic designer Stefan Sagmeister for the Design Lecture Series put together by Civilization. I used quite a few tungsten lights gelled at 1/2 ctb, to get good color contrast with the blue window light that surrounded him. I couldn’t do what I normally do – place a light on a Manfrotto 420B boom arm for a backlight, because it would have been visible reflected in the glass windows behind him.

Luckily, there was some track lighting in the ceiling behind him, which wasn’t very sturdy. But it was strong enough for me to clamp a Bolt to it with a gaffer’s clamp. Lighting accomplished.

Problem 5: Need a quick kicker to add a little zest to otherwise good looking frame.

Solution: Swit on stand behind and beside talent.

Here’s a shot that already looked pretty good with key light from a softbox, and background light pouring through a doorway window illuminating the books. But this UW professor wasn’t separating enough from her background. The solution was, you guessed it, two Bolt LEDs. The first I hung on a Manfrotto 420B arm which gave her a nice hair light, also illuminating her camera-right shoulder. Then I put a second Bolt on a light stand behind and beside her to camera left. This provided a kicker that also filled in the shadow side of her face a bit, and penciled out her shoulder. Roll camera.

A Phottix FTX2 Flash Bar allows placing two of these lights on a stand (this flash bar, which articulates at base, also allows mounting these lights inside an Apollo soft box). Conveniently, there’s a couple of slots for attaching a shoot-though umbrella. Pairing two lights through an umbrella, at 50th shutter and ISO 640, I get f/5.6 at 3 feet, f/2.8 at 6 feet, and f/1.4 at 12 feet. In practice, though, I rarely use them doubled up – that’s what my other lights (Arri 650, etc) are for, and these little problem solvers are better suited for use as kickers, rim and fill.

The Swit ships with a flimsy shoe-mount adapter, but for use on a light stand, you’ll need a stand adapter that has a ball head, like one of these. The one on the right is a flash swivel tilt bracket that you can pick up for about $12. And the other is a beefier 3/8″ stand adapter paired with a Manfrotto ball micro head that will run you $12 and $99 respectively.

One more small accessory that’s worth having with this light: to soften the light, check out the Airbox.

In practice I tend to use the Swit without diffusion, because I appreciate the beam that it throws. Putting any kind of softener on this light really cuts its output. But, there are times when I just want some soft fill up close, and this has come in handy.

I have found that I need to tuck a sheet of 1/2 white diffusion gel into the sleeve on the front of the box, to get good diffusion. The clear vinyl alone doesn’t quite do it.

So, is everything amazing about this light? Almost. But there are a few things that I’m hoping will be improved with the next version of this light.

Drawbacks:

The batteries don’t exactly lock into place. You have to be very carefully placing these lights, or the batteries can fall out. I wish it had a positive locking mechanism.
Color mixing isn’t exact. The twin color-temperature dials on the back aren’t spot on with regard to color temp. I’ve noticed that I need to dial up about 1/3rd tungsten to 100 percent 5600 to get good daylight results – otherwise it’s too blue. The 5600k dial should be labeled the 6000k dial.
The diffuser card falls out. As with the batteries, there’s no way to lock the diffuser into place. Both of mine went missing very quickly. The same person at Swit seems to have designed this as and the battery plate. Seems like a small design change could fix both. My email to Switronix asking how to purchase a replacement has gone unanswered.

Bottom line:

Owning this light won’t make you a better filmmaker. Or will it? It’s made me a better one, because now it’s so easy to do the right thing – add that rim light, dial in that fill, tweak that color temp – that I’m actually doing it, instead of thinking about it. Having a Bolt in your bag arms you with a powerful light that delivers on the promise that LED lighting has been whispering for years: cool light when you need it, where you need it, no cords attached.

Beauty lighting on the go with Hexapop Glow

When I was working as a professional photojournalist back in the mid 90s, I hated using on-camera flash. It produced harsh, flat light that I used only when I had no other choice to get the picture. But when it comes to photographing women, I’ve had to learn a new rule: flat light is flattering light.

The simplest way to get flat light is to get the light close to the lens. But then you need to soften the light. And there are plenty of fantastic studio tools for doing this, such as a beauty dish. But what if you’re working on the go? Wouldn’t it be great if there was an extremely portable, roundish light modifier that mimicked a beauty dish, that you could literally pop together in seconds?

Well, now there is. The Hexapop, part of the Glow series of light modifiers made by Adorama makes the old photojournalist in me happy. It hits the sweet spot between light quality and portable convenience.

Here’s a few photos I was able to make with a single speed light and a 20″ Hexapop (actually there was one additional LED light illuminating the background in the red photo-the rest were all just the Hexapop). I really love the hexagonal shaped catchlight that illuminates her eyes. You can tell I had the light very close to the model by the size of the catchlight (the light was within 4′ in all photos).


The Hexapop is right at home on a light stand, too. I like to use it with a Manfrotto 420 combo boom stand, because it’s light enough to hang out on the end of the arm. Used this way, I find it easy to stand just under the light, and then direct the subject to move slightly to one side or the other to get the lighting perfect.

Squeezing the release mechanism collapses all 8 spokes simultaneously, making it a breeze to pack away the Hexapop when you’re done shooting. All parts fit into the included travel bag.

I’m looking forward to using this light both on and off camera.

4 Matteboxes compared: Redrock vs Genus vs Flashpoint vs Tilta

What’s the point of a mattebox, anyway? I never bothered with one for years and did just fine, thank you very much. Today I posses four of them. How’d that happen? If I’m primarily a dslr video shooter – why would I need one?

If you’re asking these questions, it’s probably because you haven’t discovered the magic of strong backlighting. See the still below:

Shots like this are why filmmakers love their matte boxes. A mattebox’s primary purpose is to give you godlike backlighting powers. A mattebox with a French flag (also called a top flag or an eyebrow) prevents lens flares and keeps your image at its sharpest contrast. Whenever a light aimed toward the camera hits the lens relatively directly, it refracts and causes a low-contrast effect that can be either annoying as hell OR totally pleasing, if you’re going for an ethereal look. As in:

There’s another reason (far less interesting to most dslr filmmakers) to use a matte box: it allows use of 4×4 or 4×6 glass and resin filters. If you’re like me, though, you may have already invested in 77mm screw-in filters like Tiffen water white ND. These work fine. However, if you’re working in fast-changing conditions, where you can have a case of filters on hand, it’s tough to beat tray-based filters for speedy filter change ups.

OK, so those are the two (and really only) qualitative reasons I can see to use a matte box. Yeah, I know – it also makes your camera look bigger, and some people equate that with looking professional. But I prefer my cameras small and unobtrusive. Luckily, matteboxes are not required to be big and heavy. More on that in a moment.

An aside: you see tray filters on narrative film sets more often than you do in documentary productions. But they CAN be extremely useful on docs. I have a small but growing set of Lee ND filters, which are made out of resin. The reason I love them is that they won’t break like glass can, so I can carry them in a big pocket and knock around with them, and always have an ND within reach when I need it quick.

Matteboxes are like lenses: they all have personalities. Let’s get acquainted with four of them:

I was fortunate enough acquire the Redrock Micro Mattebox earlier this year when I won the audience choice award for my short film The Coffinmaker in the American Photographic Artists Short Video Contest. And Adorama kindly sent me the Flaspoint box for this review. And I’m glad they did, because even though it’s by far the least expensive box of the bunch, in some ways outperforms the others.

Yep. Sometimes the least expensive stuff is the best for your purpose. But let’s see what each has to offer.

Redrock Micro Mattebox

$995
Weight: 3.9 lbs

This box is a beast. A fine beast, if you’re working on a narrative film set and you want a mattebox that will swallow your lens. Of all the boxes in this review, this one gives you maximum protection from backlight.

The swing-away arm makes for fast lens-changing.

It also gives you the option of using 4×5.6 filters, as well as 4×4. But the 4×4 label printed on the box is a little misleading. This box is really designed for use with 4×5.6 filters. To use 4×4 filters with the supplied trays, you have to insert a flimsy plastic mask, which is a serious pain, and feels like an afterthought by the designer.

The mask gets jammed and makes filter changes a chore.

The two filter stages of the Redrock Micro Mattebox are a dream to work with. They drop into place firmly, with great tactile feedback, and and rotate smoothly and securely.

The whole back of the unit rotates, which is incredibly cool. So if you have a need to use 4×5.6 filters, this box is a big winner.

Drawback: having nearly 4 pounds on the end of your rods is a LOT. Too much, in my view. Even though I like how deep this box is, I find I rarely can think of a reason to NOT use one of the lighter, simpler boxes that I’ll talk about next. I don’t like having all that weight to counter balance. Matteboxes don’t have to be that heavy. It’s also much, much bulkier than any of the others, and that means it limits where you can put the camera. If you’re on a proper film set, that’s probably not an issue. But if you’re working on location, rocking a doc, that can be a problem.

Also, for its heft and price, I don’t like the foam donuts on this box. They work well, though. Yet they seem like another design afterthought. I would expect something more elegant from Redrock Micro, like the nun’s knickers that come with the Tilta. Which we’ll see next.

Tilta 4×4 Carbon Fiber Mattebox

$799
Weight: 2 lbs

This is the first mattebox I ever purchased with my own money. The primary reason I bought this one was because it’s HALF the weight of the Redrock (which I’d previously rented). Like the Redrock, it’s got a swing-away arm that is extremely sold, made from milled aluminum. Tilta stuff is bomb proof. You could use this box on a set every day for a year and it would still be going strong. Except for one thing…

The filter trays are NOT great. Just flimsy plastic, which doesn’t match the rest of the box at all. They don’t slot into place convincingly (you have to hunt for where they are supposed to stop – there’s no audible or physical “click” into place when it’s seated). The rotating stage is also STICKY. I would avoid this box if you plan to use it primarily for filters. Otherwise, it’s light weight, solid build and great looks are winners. This is the second-most frequent box that I reach for.

My last gripe about the Tilta is that the mechanism to adjust box height is awkwardly designed, making it difficult to adjust without using a tool to pry the small arms loose. It sure is a beautiful blue, though. But this is a case of form beating function.

Genus Mattebox Lite

$219
Weight: 1 lb

I bought this mattebox because I needed an extremely lightweight box that did one thing: keeps backlight off my lens, mostly in outdoor shooting scenarios. I wanted a box that I could attach to a zoom lens and work with it all day without thinking about it. This one fills that bill perfectly.

No rods are required to use the Genus Lite, which makes it very flexible for run-and-gun shooting. I use it for shooting stills, too.

Best use: I’ve used this box to keep light off my lens in situations that otherwise would be impossible, like the establishing shot on the couch in Mr. Famous, which was made with an Aviator travel jib. The light jib simply isn’t capable of handling the weight of any of the other boxes compared here, which all require rods.

The way this box attaches to your lens is unusual: it requires a screw-on ring that allows the box to clamp on. This is a great if you’re going really light – ie, without rods. But I discovered one potential problem with this design while using this box on my 50mm Zeiss f1.7 prime. As I was shooting, I suddenly noticed that I couldn’t focus to infinity. WTF?

A few more attempts and I realized my lens had slipped it’s calibration and was out of tune. I took it to Ballard Cameratechs and they were able to retime it for about $60. It took two tries for them to get it right. They told me that most lenses would probably be OK, but that some don’t hold up well to having even small amounts of weight on them when the barrel is rotated. Result: I won’t use this box on any of my Zeiss primes. I have, however, used the Genus Lite with a rented Canon 24-70 f/4 zoom for three days with no problems whatsoever.

The Genus has just one tray, and it rotates! (a pleasant surprise on such a tiny mattebox). So you can use it with a polarizer such as this Lee resin pola.

Flashpoint Mattebox System II

$189.95
Weight: 1.2 lb

For me, this box is the most flexible of the lot. It is extremely lightweight. It has side flags, if you need them (rarely). And it attaches via rods and a clever slider that gives lots of height options. It’s really quick to slide up and down, too.

The primary tradeoff with this box is that it’s not as deep as the Tilta or Redrock. And it’s not as well made. But for me, it’s compact size, light weight, and flexibility means that it’s the box that goes on my camera if I’m running out to grab a shot that might be backlit.

This box somehow squeezes in two stages, and one of them is rotating.

They seat into place and rotate smoother than the much more expensive Tilta mattebox!

The aluminum flags are very thin, but I find this to be an advantage here. All the flag has to do is block light – so in my view, the thinner the better, because it makes them lighter. And the aluminum is plenty strong. One thing I have noticed is that these flags really show fingerprints!

The side flags have a clever method of attaching securely.

Drawback: It’s made of lightweight plastic and thin aluminum, so you have to be careful with it. But describe for me what camera gear you own that you are NOT careful with? So I don’t find the build quality to be a deal breaker. For the price, I am inclined to use the heck out of it until it breaks, then get a new one and call it the price of admission.