Nordstrom's windows

Our most recent commercial piece is up today on Nordstrom’s Facebook Page. Lisa and I shot this piece primarily with three GoPros, all running concurrently in timelapse mode, one frame every two seconds. We repositioned the cameras a couple times to get more angles covered. But I think what makes it especially fun is the very brief moments of dslr footage intercut with it.

Some frame grabs:

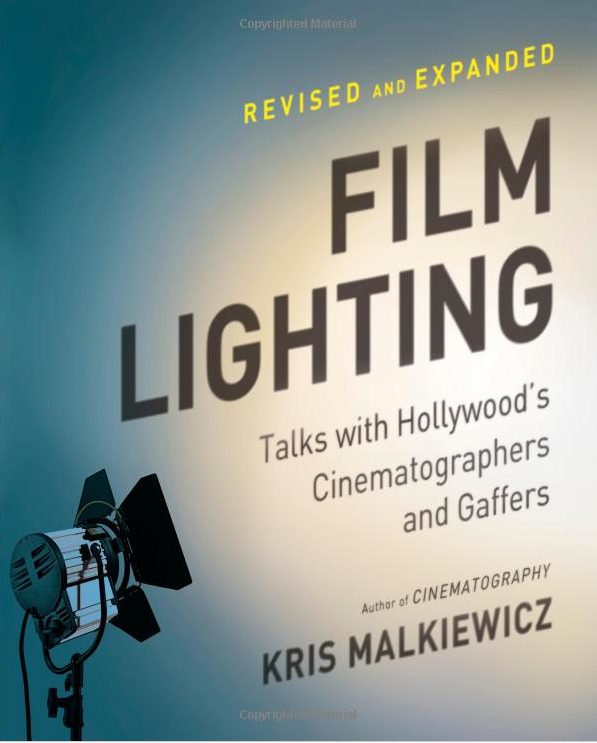
Great read: Film Lighting by Kris Malkiewicz

I was at Barnes and Noble a few weeks ago, poking around in the filmmaking section, and discovered a book that I almost couldn’t put down: Film Lighting by Kris Malkiewicz. I did, however, put it down long enough to find out whether it was cheaper to buy on my iPad. It was. So I downloaded it on the spot and walked out the door, past the Nook display, glad that physical bookstores still exist, and excited to be living in a world where this kind of instant comparison-choice-delivery is possible.

This is a new version of a classic book that has been revised to include coverage of digital video and new developments like LEDs. It’s a series of conversations with mostly Hollywood DPs and gaffers. But what surprised me is that much of the advice they give applies to tiny budget filmmakers like me. Who knew, for example, that using a Leko stage light is a great way to target bounce light? Yep. The venerable ellipsoidal spotlight is still a killer tool, because it’s infinitely controllable, equipped with shutters that allow you to shape the light without having to use cutters or barn doors. You can aim it at a bounce card across the room, and entirely eliminate any light spill. It’s the guided missile of lighting. And I was able to pick one up on ebay for $80.

Haskell Wexler shared this tip: “I find that I learn the most when working on documentaries. When the budget is minimal, you are forced to look at light as you find it and to make it look good.” There’s a big chapter in the book about how to light car interiors, and some of it gets pretty complicated. But Wexler is a fan of keeping it simple. “A lot of the equipment that we use when lighting inside cars is basically unnecessary to get good results. If you can control the intensity of the background with neutral density gels on the windows in the shot, it is possible to use the natural existing daylight in the car to make perfectly acceptable shots.”

That prompted me to pick up a 4’x25′ roll of .3 ND gel, which I’ve begun using everywhere. It’s a lot easier to pack that roll and a pair of scissors and tape than it is hump lights and the stands, sand bags, power cords, batteries, etc. to power them.

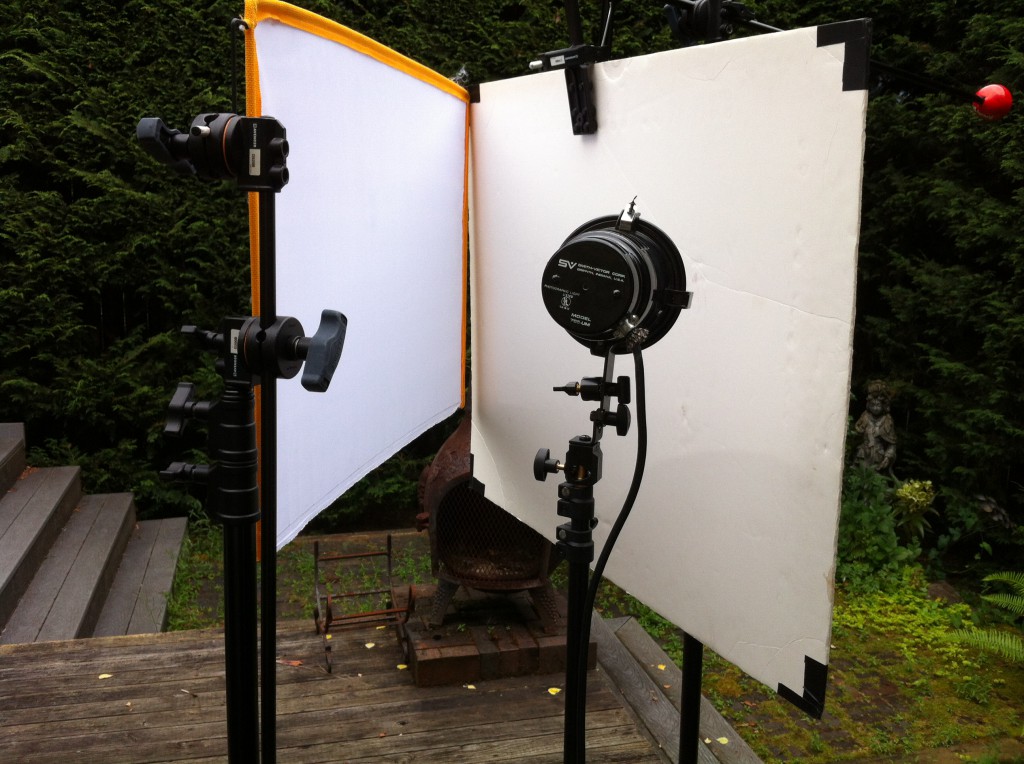
And speaking of books, ever heard of a book light? It’s a staple soft light in the film industry, what gaffers call the “seven-minute drill,” because it can be assembled very quickly. You take a big bounce board, and angle a light into it. Then, you place some diffusion such as a silk in front of the bounce, so that it connects with the bounce at the far end from the light, opening like a book toward the light. Like so:

This book is full of similar tricks from masters like gaffer James Plannette, who recommends improving car scenes by putting pieces of white sheet on the hood of the car to bounce light into actor’s faces. And, he says “it’s good to be shooting toward the south side of the street, so the fronts of the structures are not very bright.”

Robert Elswit offered a great tip that he learned on the set of There Will Be Blood. Because the characters were wearing hats, there was a lot of dark shadows that needed to be filled in. He took sheets of bleached muslin and laid them on the ground. This exaggerated the natural sun light just enough to perfectly light the faces.

What emerges from this book is that much of lighting is basic problem solving using a variety of tools, many of which are within reach of anyone. Reading it has helped me to become more conscious of the light everywhere: morning light, street light, breakfast table light, I notice all of it now.

I recently started a “light journal” which I’m slowly filling with snapshots of interesting light, grabbed with my iPhone. I’m also making screen grabs of nice lighting when I see it in videos and in stills. I plan to use it as a reference, a cook book of sorts that I can refer to when I’m planning shoots.

Better film lighting starts with Omnigraffle iPad app

I’ve tried out a lot of filmmaking apps since I began using an iPad last December. But so far only one has become a fixture on nearly every shoot. And it’s not even specifically a filmmaking app. It’s a $49 business app called Omnigraffle.

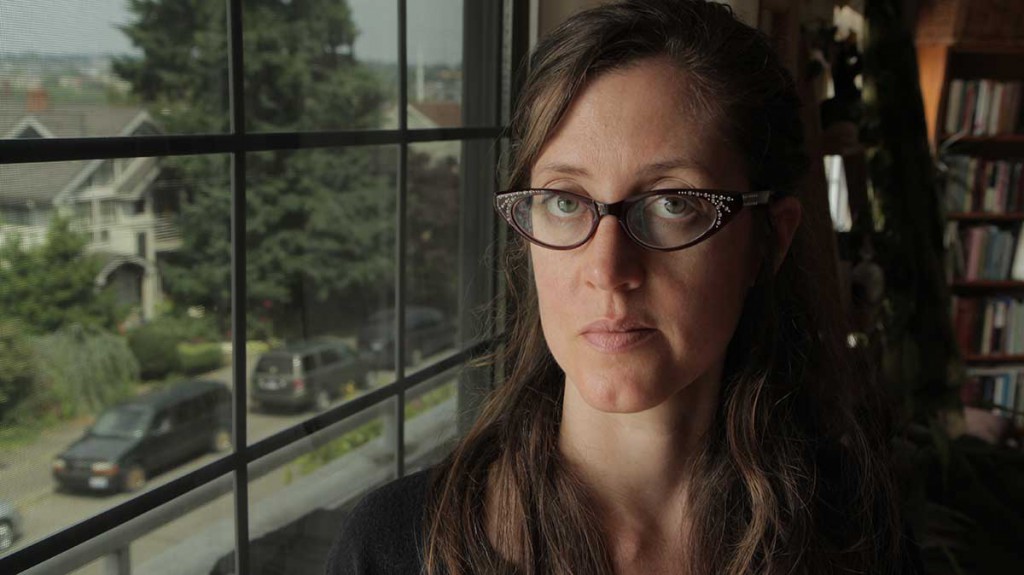
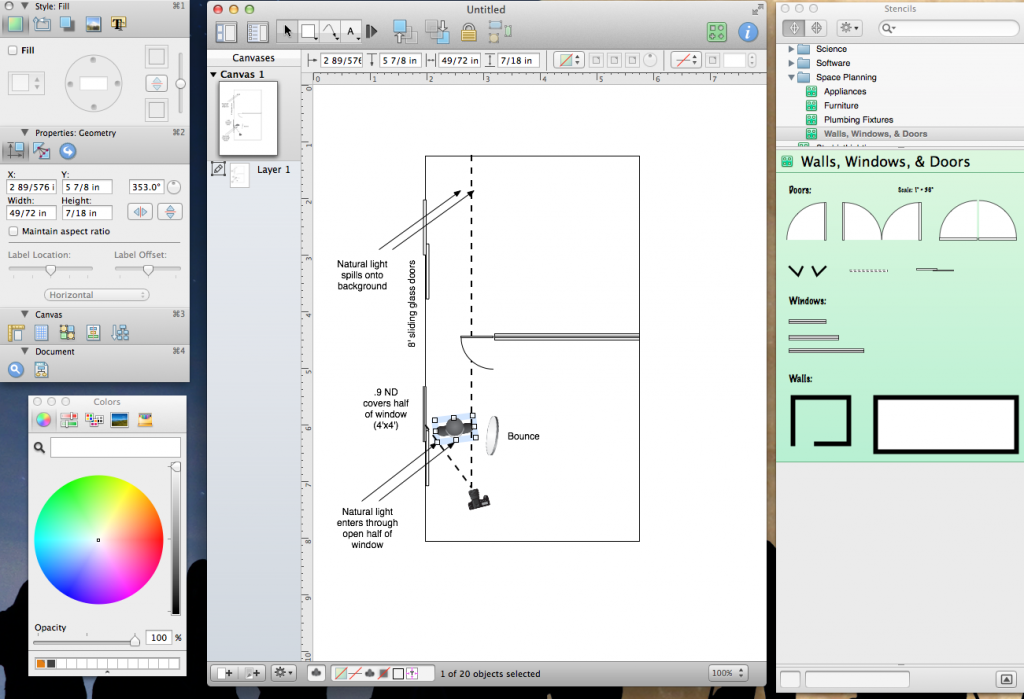
I use Omnigraffle to plan my lighting, even on simple interview setups like this one, which used simply window light. But it’s never as simple as it looks, is it. Here’s the process that works for me.

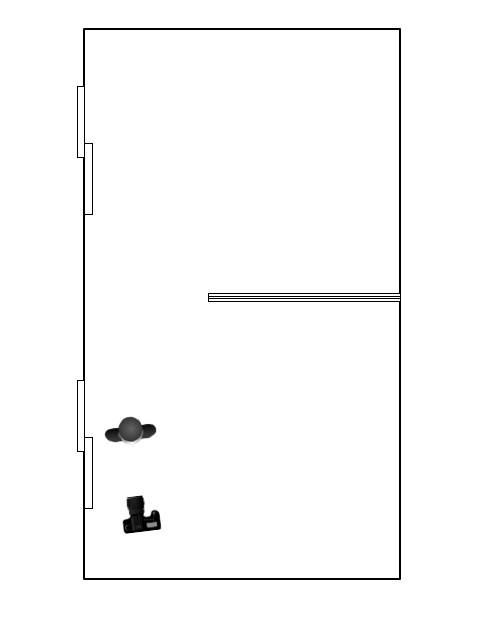
While I’m location scouting, I begin to sketch my plan on the iPad version of the app. It can be very simple, like so:

Then, I’ll email the file to myself via the built-in share tool (under Diagrams, press and hold the diagram icon to call it up). Then, I’ll open it with the more powerful desktop version of the app (which costs $99) where I’ll revise and enhance the plan (see below).

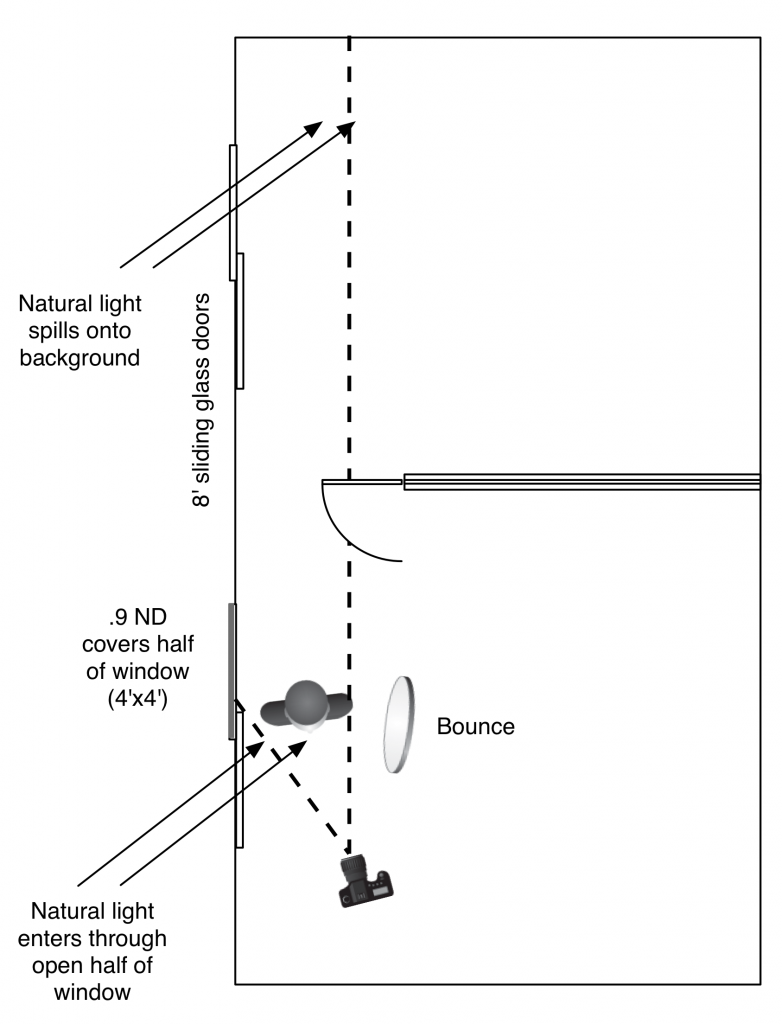
This is a lighting plan so simple that it doesn’t contain any artificial lighting! I used just two things to augment the lighting in this shot: a 4′ wide roll of Lee ND .9 filter gel, and a collapsible reflector disc. Check it out:

The trick to this natural lighting setup is to have a window that is large enough to split in half: one half you allow light to come through, the other half you cut down 3 stops by covering it with the roll of .9 ND gel. Place the subject just at edge of the ND covered portion of the window, so that the full daylight washes over her, but behind her, in the background, the camera sees only through the filtered area. Note that this wouldn’t work if direct sunlight were streaming into the window – in that case, you’d have to place some diffusion over the open side of the window first.

Omnigraffle helps me to previsualize lighting, and it also helps me share the plan with crew.

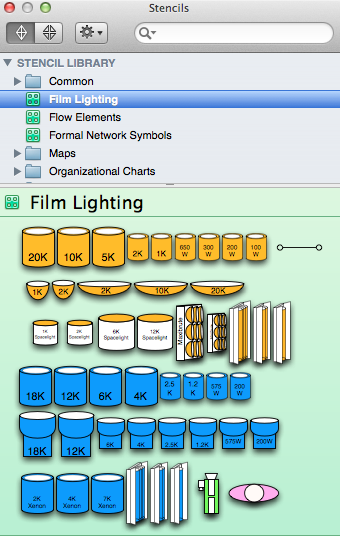
What’s powerful about Omnigraffle is that you don’t have to be an artist to draw complicated diagrams. The app allows you to install free plugins, called Stencils, which contain objects that you can combine to create your plans. You can find dozens of them at graffletopia.com. Check under the Film and TV category to find the most relevant ones. To install, just double click after downloading and they are automatically loaded. Here’s three of my favorites:

1. Film Lighting

2. Strobist Lighting

3. Space Planning > Walls, Windows and Doors (already installed by default).

One bug that I’ve encountered: I can’t begin a file on the desktop app, email it to my iPad, and open it. Every time I try, I get this error:

Is it worth the substantial $150 to buy both apps, when free alternatives are available? For me it is, because the free diagraming apps that I’ve tried have no support for downloadable stencils, which is what makes both versions of Omnigraffle so useful to me. I do think that $49 is a lot to pay for any app. But until something equally capable and more affordable comes along, Omnigraffle is the way to go.

If you had 6K to spend and didn't own any lenses, what would you buy?

A friend facebooked me this multiple-choice question this morning: If you had 6K to spend and didn’t own any lenses, what would you buy?

A) Canon 5d mk3 and used lenses from craigslist
B) Used Canon 5d mk2 and more lenses
C) 2 used canon 5d mk2 and less lenses
D) 1 canon 5d mk2 and 1 7D and lenses
E) Blackmagic Cinema Camera
F) Something else

I run everything at Visual Contact with a pair of Canon 60Ds, and quite a bit of used Nikon glass. In practice, I actually just use two things for probably 85 percent of my shooting: one Canon 60D and one Canon Zoom lens, the EF 18-55mm f/2.8. Having the second 60D body is great, and I do sometimes use it. But more often than not, it’s there just in case something breaks on my A camera. Which hasn’t ever happened. Yet.

So my snap answer, based on my experience and shooting style: I’d pick one camera and one sweet zoom that covers (in 35mm equivalent terms) the 24-70mm range (which is good for everything from establishing shots to interviews). I’d buy that lens new, because great used glass holds it resale so well, so you’re not saving much, and you’ll be able to sell it for most of what you paid for it.

Which camera to buy is a tougher question.

I’ve used the Canon 5dmkiii twice, and I really like it. In addition to being exquisitely sensitive to low light, it gives me the option to go really wide with my 20mm Nikor lens, the widest prime lens I own, which on my 60D equates to just a 32mm lens. But my favorite thing about the 5dmkiii is that Canon has fixed the moire issues that plague all first-generation DSLRs. Is it worth $3,500 just for that? Maybe.

Ever since their big announcement at NAB, I’ve been trying to figure out how to justify spending $3,000k on the Black Magic Design Cinema Camera. It’s not very much money for what you get, of course, but it’s a lot for me. I’m going to start out by renting it. It looks like an amazing camera. But with a 2.4 crop factor, finding wide glass for this camera could be a bitch. And after shooting on APS-C, I’ve got reservations about the Super 16 sensor size that I look forward to exploring when I get my hands on the camera. What’s most promising about this camera to me is the purported 13-stops of dynamic range. That’s very attractive to my style of shooting, which depends on doing a lot with minimally augmented lighting.

I quite like the APS-C sensor size of my 60Ds. It’s very close to Super 35 film size, and it gives all my glass extra reach, turning my 300mm Nikor into a far-seeing 480mm lens. And in the two and a half years that I’ve been shooting on my 60D, I’ve never once had a client complain about the image. When I compare the 5D image next to the 60D image, however, I do love the extra smoothness, color fidelity and shallow depth of field that I see. It also produces a slightly sharper image. The one Achilles heel of this camera is moire. I have to deal with it all the time and it drives me nuts.

I’m curious to see what Canon has up its sleeve with the next generation of the 60d, which some people are referring to as the 70d. Canon didn’t fix moire in the T4i, so it’s possible they won’t fix it in the new version of the 60D. If that’s the case, I won’t buy it and I’ll lean more heavily toward the BMDCC. There’s also rumors that Canon will make an entry-level full-frame camera soon, possibly in September. If they could bring the price of that down to something closer to 60D territory, and still fix the moire issues, I’ll probably buy one and use it a lot.

So there you have it. I’d spend about half of the money on a camera, and half on the best zoom lens you can afford in the 24-70mm range. And any money I had left over I’d spend on renting the specialty lenses you need only when you actually need to use them.

Visual Contact welcomes intern Alex James

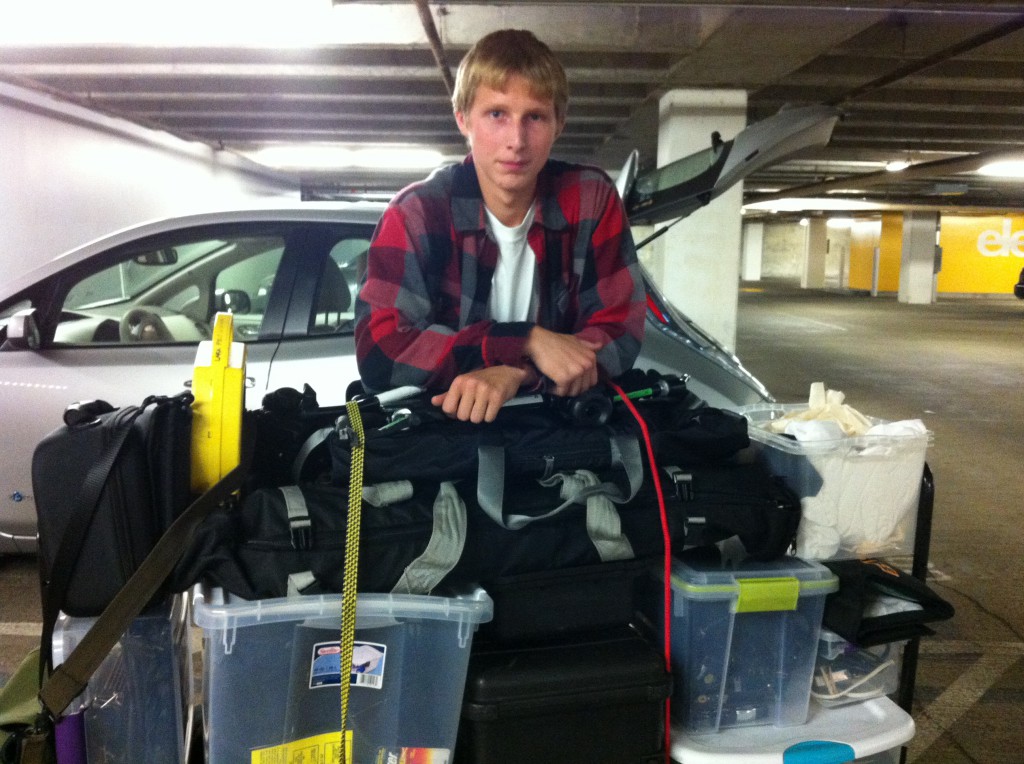
Today was our first shoot with Alex James, who is interning with us at Visual Contact. Alex passed the “how the hell can you fit all this filmmaking equipment into the back of this Nissan Leaf” test today, and we’re thrilled to have him on the team this summer. Alex is a senior at Ballard High School, where he recently got his hands on the Oscar won by Undefeated director TJ Martin, who spoke to his class. “It was very, very heavy,” he said. Welcome Alex!

Overcast lighting tip: take it off the top with negative fill

A quick way to make the most out of overcast lighting is to place your subject against a darker background, add some bounce for the eyes and a bit of negative fill on one side. But why stop there? Let’s say you’re shooting an interview outdoors on a profoundly overcast day. And you don’t have any lighting to punch things up. Here’s something simple you can do to add some seriously directional quality to the light.

Let’s start with a baseline shot: overcast day, soft Seattle light raining down from above, guy with shockingly white hair (me!), shot against some foliage.

Fly a piece of 4×4 foam core up on a c-stand directly over subject’s head. Drop the flag down until you’re subtracting some light off the top of his head, and you’re seeing the light coming in primarily from the sides. You’ll have to open up a couple stops to maintain the correct exposure. Like so:

That guy’s hair isn’t so white. Really.

Now, add another a flag on the non-key side. You might need two of them (I did).

Check out the way things look now:

If this had been a real shoot, I’d have fiddled with it a bit more, bringing the flag closer to the camera-left side to block more light, and opening the camera-right side of his face to a bit more light. Also, I’d have opened the camera aperture from f/5.6 f/2.8, to throw the background more out of focus. Oh what the heck, as long as I’m talking about it, I might as well actually do it. Like so:

Regardless of how far you take it, the result is clear. Using this simple technique, light is pulled off the top, and wrapped around the side. On an overcast day, enough light will find its way past your flags to provide plenty of fill, but you’ll get this nice soft directional quality.

DocForest is September 14-16

Seattle documentary filmmakers will gather again this year for SeaDocs annual meetup in the Kitsap Peninsula. It’ll happen Friday, Sept. 14 through Sunday the 16th. There will be lots of opportunities to screen your work in progress and get feedback from a supportive audience. And the location is magical: the Kitsap Mountaineers’ Forest Theater. Camping will be available, as well as summer-camp style cabins.

Lisa Cooper and I have been invited to teach a 90-minute workshop about DSLR filmmaking, which we’re looking forward to. We’ll cover all the basics: the DSLR’s strengths and weaknesses, how to resolve the challenges of dual-sound recording, how to get a big-film look on a lunch-money budget, and much more.

I’m told more details will be posted on the SeaDocs Facebook page as they become available.

Filter: We've Got Your Back

Our most recently completed and published project is a 1-minute promotional video for the fab folks at Filter, a Seattle-based creative firm. Filter provides staffing as well as creative for clients that include Nike, Disney, Xerox, Google, and many others. This piece was screened at a conference in LA to inform attendees about Filter’s services. This video is an example of the type of work we do best at Visual Contact: taking a documentary approach to crafting a corporate message.

6 cheap travel tricks for DSLR filmmakers

Recently one of this blog’s readers asked me: “Can you do a post about something that everyone does–but nobody talks about? Which is: packing and traveling with all of your stuff?” So here I am, ready to share some tips about how to get your gear on location without breaking the bank.

(Click twice on images for larger version.)

But first, a couple of assumptions. Before I started making purchases about how to cart my gear around, I took a look at how I was currently using the equipment, and where I was using it. And I recognized that 95 percent of my travel is local travel – within 50 miles of home. It’s tempting to buy with the assumption that you will be hopping on a plane any moment. But that would be to make the mistake that many car buyers make when they pass over electric cars “because they don’t have enough range.” The fact is, the average American drives about 35 miles per day. But they want what economists call “option value:” the feeling that they can drive anywhere, any time. Gas cars give you that, even though most rarely exercise that option in practice. I bought a Nissan Leaf a year ago, so you know where I fall on this spectrum.

So when I was planning my gear purchases, I decided to focus on stuff that was more affordable than sexy, stuff that would gave me quick and easy access to my stuff both when I’m hunting for it in my office, that would help keep things organized while on location, and would keep my equipment safe without being overly (costly) protective.

So here’s what I discovered.

1. Plastic tubs (the kind with lids that stay closed) are your friend. The transparent ones are also great for helping you see at a glance what you’re looking for, just by looking. Use small tubs for organizing smaller items: lights, mics, etc. I find that my lights travel very well and safely this way, by car, where I can load everything myself with relative care. I put foam in the bottom of some of the tubs, which adds enough shock absorbing quality that I’ve yet to break any thing carried this way.

But what I find most useful about stashing my stuff in plastic tubs, is that I can use them to group accessories with the item being transported. For example, my ProLight is almost always used with a snoot and a dimmer. But almost as often, I’ll want it with barn doors and a dichroic filter. And almost certainly I’ll need blackwrap to kill any stray spill. So I store all of these items in the plastic tub with the ProLight. That way, everything is in the same place when I need it. Sweet.

2. Milk Crates. They are great for carrying grip equipment: clamps and weights not only fit into them, but can hang off the rim for quick access during a shoot. Bonus: you can dump everything out and use it as a light scrim to liven up a boring interview background by projecting light through it.

3. Get a cart. At least start with an inexpensive dolly like one of these. But trust me, go with the cart. The small dolly and truck wheel don’t cut it on rough terrain like Seattle sidewalks. Go for a cart with fat, curb-crawling tires. Mine is a Multi-Cart R12 that I found at Glazers Camera. Worth every penny, and small enough to fold up and fit into my Leaf. I can’t imagine showing up on location without it.

4. Gels are a pain in the ass: always somewhere else when you need them, rolled up with elastic bands. The solution: use a Gelly Roll for packing your gels. You cut your gels, tuck them into the Gelly Roll, and roll them up. They pack small and the tube carries clothes pins (film industry calls them c-47s, but I always feel ridiculous calling them that – sounds like an airplane or a form of plastic explosive to my ear)

5. Have at least one really good Pelican case for your truly breakable and expensive stuff (lenses, for example). You can find them used on Craigslist any day of the week, and even though they are relatively expensive used, they are indestructible. I have a small one for my prime lenses, which helps them stay organized on location, as well as safe. I’ve got a medium sized one that I carry my follow focus, long glass, and small LED light around in. It helps me stay organized while I’m on location. For quick white balance, I keep a gray card taped in a plastic sleeve inside the lid, under the padding (see photo).

TIP: when working out of a Pelican case on location, make sure you latch at least one of the cover lockdowns. Otherwise, someone will sooner or later come along, think that it’s latched, and pick it up, sending the contents of the case cra$hing.

My favorite Pelican trick is to carry a gray card behind the foam liner of the cover. That way, I can always have a gray card within reach when on location. I used to carry a few gels there too, before I started using the superior Gelly Roll for that.

6. Get a used hard-plastic golf club case. It’s great for hauling a tripod and light stands around. I found a used SKB case on Ebay like this one for around $60. Bonus: most airlines won’t charge you oversize fees when you have a golf case. Apparently golfers are customers they want to keep happy. So there, you see the thought of air travel did at least cross my mind! But this case is really awesome for schlepping in the back of the car, too. I can fit two c-stands, a glide track, several light stands AND my tripod in there. In practice I usually leave my tripod in its travel bag because it makes the SKB case too heavy to carry. But it’s an option if needed.

So there you have it: my tips for local travel. How about you? Got any tips to share?

3 location scouting tips for shooting better interviews

For making films, my background in photojournalism turns out to be both a blessing and a curse. On the plus side, I know plenty about cameras, optics, and how to compose a shot. But photojournalism is a reactive game. A photojournalist’s instincts are to show what she sees rather than what she imagines. This is a huge skill: the ability to react almost instantly, to maneuver the camera into the best place to capture the defining moment as it happens.

But making films, I’ve discovered that approach rarely works. There are just too many variables coming up at once that you have to be on top of: sound, light, motion, schedule pressures, crew questions, etc. To find my footing in this related but very different terrain, I’ve had to learn to be proactive. Even for a basic filmmaking task like shooting an interview.

What I’ve discovered is that the simplest and best way to get better interviews is to scout every shooting location. Yeah, I know, probably not news to anyone who’s attended film school. Or like my partner Lisa Cooper, who knew this instinctively. But for me it’s a hard-won lesson. So…

Here’s what works for me:

1. Visit location at least a day in advance of a shoot.
2. Take stills at the location.
3. Review stills, and make a lighting plan.

What happens for me when I walk through a location without the immediate pressure of shooting is awesome. Curiosity becomes my guide. Without the pressure to start shooting in 20 minutes, I see things I wouldn’t otherwise see: a frosted glass window suggests possibilities as a background, for example. But what about that open doorway? Sound might be a problem here…so how about the conference room?

Here’s some shots I took on a recent walkthrough of an office space where we would be shooting two interviews:

As I visit the space, I take pictures. Lots of pictures. I explore every possible interview room from multiple angles. Even if I don’t think a room is going to work, I take pictures. And what often happens is that when I’m reviewing the shots later, the idea comes to me. Hits me right between the eyes, actually.

An iPhone is ok if you don’t have anything else, but I’ve found that shooting stills with my DSLR is much better. Sometimes background details will provide clues to how best to frame the interview. With the DSLR, I’m able to blow them up and see the detail.

In the case above, my walkthrough began with shots of the employees open office space, and ended up in a conference room that had some frosted glass panes. It was possible to close the blinds on all outside windows. Initially I thought I wanted to do something with window light, possibly with the subject framed in the open doorway so we could see some out-of-focus workers in the background.

Later, when I was reviewing the photos, it occurred to me that the better way to do it was to use the frosted glass as a background, because the topic of the piece was about transparency in business practices. Even though the glass is opaque, the idea of transparency (or lack thereof) is at least hinted at. Here’s what the final interview, which was shot in the conference room, looked like:

Having this plan allowed me to mentally prepare to shoot the second interview, so that it would also match visually. For scheduling reasons, this second interview had to be shot in a totally different location at the same business, a small interior room without any windows. Lucily, however, it had one frosted glass wall, which faced a hallway. To recreate the daylight filtering through glass, I simply placed a daylight-balanced LED light outside and aimed it into the glass. It ended up matching pretty well:

I don’t know if I would have been able to come up with this approach on the spot. But because I had time to plan, I had figured out how to do this in advance, which made for a much more relaxed shoot day.

Another office location that we visited recently presented similar challenges. We walked through a busy office space and found a quiet editing bay, which caught my eye because of the interesting circular patterns. I had Lisa sit in approximately the place where I imagined setting up a soft box to light the subject.

We ultimately shot two interviews in the space, changing them slightly to get each subject on opposite sides of the frame:

In my next post, I share how I use my two favorite iPad tools to make and share my lighting plans: Omnigraffle, and Lighting Designer.

Update: Here’s the post about using Omnigraffle as a tool for planning your lighting.