Category Archives: Tips

How to film an iPhone screen like a Pro

Ever wonder how those simple looking iPhone ads are shot? We recently solved this puzzle to create an iPhone app commercial for a client. The challenge: make iphone screen/hand interaction look fantastic on camera. Let’s start with a look at the finished video, and then jump into how it was shot. Later this week, I’ll post a followup with information about how we cut it.

In preparation for this project, I did some Googling and found much disagreement in the pro video forums on how to approach shooting an iPhone screen. Some recommended filming the screen live, others suggested painting green paint over the phone face, and one person said it couldn’t be done without complicated compositing software like Mocha.

We spent a full day of pre-production testing different approaches, and hit on a relatively simple way to do the job, with post-production handled almost entirely within Final Cut Pro X. Here’s how it works.

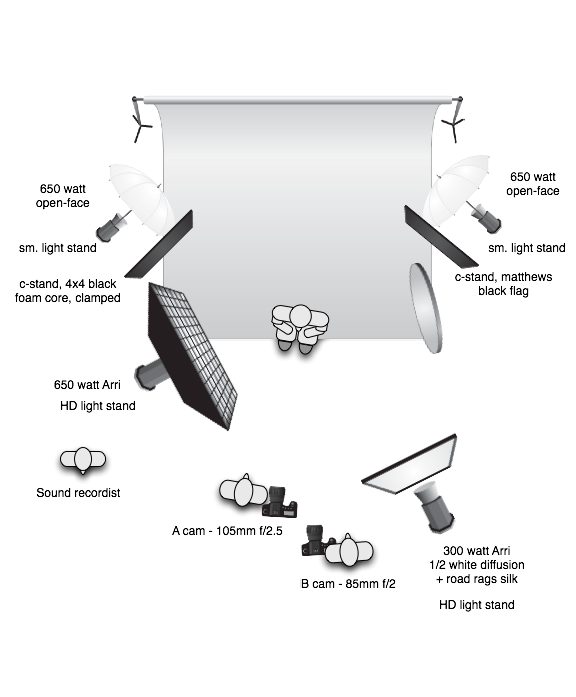
First up: overall lighting. Our first pass at lighting the hand holding the phone was a little too dramatic – we discovered it’s important to fill at almost a 1:1 ratio, otherwise the shadows cast by the finger on the screen area will be way too dark to key easily, as will be seen later. I’ll cut to the chase and share our lighting diagram, as well as the fact that we ended up using two setups: a white background to capture the establishing shot with the hand and phone, and green screen for everything else.

First, let’s briefly look at what doesn’t work. We initially tried shooting the app off the phone itself, but I suspected it wouldn’t look good enough to stand up to close inspection. I was right. Not only was the screen subject to moire patterning, but it was difficult to get the color temperature of the screen’s LEDs to match with the lighting in our studio environment. It just didn’t look professional. So we knew we would need to do some kind of masking or keying to show a screen capture of the phone in the display area.

Next, we needed to determine whether the talent could hold the phone still enough. It’s unlikely that anyone has more steady hands than my partner Lisa, but close up with a 100mm lens, it wasn’t possible for her to hold the phone even close to steady. We next tried making a cradle for her hand. But within a few minutes of holding the phone, she was getting really tired and that translated to more shake. Scratch that idea.
A close screening of this Apple ad reveals that after the hand comes into the shot, it settles quickly into complete stillness. That is, a still photo. Or in our case, a freeze video frame The only hint of motion in the talent’s left hand during the remainder of the shoot is a shadow falling on his fingers caused by the movement of the right hand approaching the screen. So I thought: let’s just have the talent move the phone into the shot, freeze the frame, and use that for the duration. Then we’ll composite the right hand doing the manipulations.

We solved this problem by doing a frame grab, but we couldn’t get the hand to come to rest naturally. So we ended up introducing the hand and phone by using and using Apple’s Slide transition to slide it into the frame (slide-push, to be precise: you access these options by control-clicking on the transition in the timeline, and selecting from among the options in the Inspector). I go into more detail about how we cut the ad in Final Cut Pro X in part II of this post, coming later this week.

Ultimately what we realized is that it’s all about the app, not about the hand. On screen, anything that moves gets our attention. So the hand shouldn’t move after it’s introduced. Just doing a freeze frame accomplishes everything that needs to happen, and keeps the attention where it belongs. Left hand with phone, as shot and ready for luma key (discussed below in Editing):

Next problem: how to composite the right hand into the scene. The further problem, of course, is that the talent needs to hit very specific buttons and perform actions like pinching on precise points on the screen. It seemed we would need to keep the phone there for reference, but we weren’t sure how we’d key it out in that case.
We tried displaying a green screen on the phone. But that tended to illuminate the talent’s hand, making it harder to key. I hit on the idea of taking screen shots of the app, converting them to black and white, then colorizing them and shifting them all to green.
Recording screen captures: an app for that?

Around the middle of last year there was an app called Display Recorder available. However, it has been pulled from the App Store for some reason, so there’s currently no app that does this directly.

The good news is that there IS an app for capturing iPhone screens, indirectly, via Airplay on a Mac. You don’t even need an AppleTV to make it work: just a Mac and an iPhone 4s or newer (sorry, it won’t work with older iPhones). It’s called Reflector, and it costs just $15.

If you’re shooting an iPhone ad, you want this app. Not only does it allow you to mirror the contents of your phone’s screen, but it has a robust set of preferences that seem designed with filmmakers in mind.

First exhibit: Built-in video recording capabilities (no need to use Quicktime 8 or third-party screen capture tools) that allow you to record in the highest possible resolution supported by your hardware.

Next: the option to wrap the contents of the screen in an iPhone frame (you can choose white or black).

But wouldn’t be even cooler if you could have the video output against a green screen, so you could just drop a key on it and away you go? No problem. Just select this preference:

And tell it to output in full screen mode:

This will output a file that looks like this:

Armed with this tool, you’re able to capture a screen recording of all the on-screen action you will need for your final piece. But’s only half of the battle. We now need to turn our attention to figuring out how to add finger gestures into the mix.

For that, we need green screen. And a way to ensure that the talent’s fingers would be pointing to the precisely correct location on screen, so that when we composite everything in post, it lines up.

After a lot of testing, we hit on a way to do it. In Photoshop, we created a 2″x3″ file (the dimensions of an iPhone screen) which we filled with bright green (make sure it’s not a yellow-green, but rather pure green or slightly blue-green, because any yellow can start to overlap with skin color making it difficult to key).

We created a file for each set of actions (analogous to a “scene” in film terms). The idea is to create buttons using a darker shade of the same green color, to show the talent where the button is. Each button is then numbered in the order in which they are to be pressed, swiped, or pinched. We used stroked rectangles to indicate swipe regions. But how to know exactly where to create the buttons? We took screen shots of the iPhone app screen (by simultaneously pressing the phone’s home and on-off buttons), and copied these files into our green file, placing them on the bottom layer. We then made the green layer half transparent, so that we could see through it enough to trace the outline of each spot, and make precise marks.

Then, we printed out each screen on regular paper. The first time they came out way too dark, so we had to go back and choose an even lighter shade of green. Once we got the color looking something like a green screen, we cut each out of paper using a ruler and exacto knife, and taped it to a piece of piece of green foam core about 1.75″ wide by a few inches tall.

To put this together requires shooting in front of a green screen, and holding the cardboard screens suspended vertically on a clamp using a c-stand, so that they are positioned comfortably for the hand talent. Here’s how our setup looked:

Some gotchas to watch out for:

Reflections. Our hand talent had received a manicure the morning of the shoot, so his nails were nearly perfect – for reflecting light. This caused us a lot of grief.

We ended up scrubbing his nails with a kitchen sponge, the only thing we could find, until they were dulled down a bit. A good reason to have a makeup person on set!

Above: Fingernail with reflection reduced after roughing up surface of nail with kitchen sponge.

Shadows on the green card. As the talent’s hand comes into contact or near-contact for each button press, shadows will be cast. We had to set up a third fill light just behind and above camera to cut these down enough so that we could get a clean key. This caused the right hand to be lit a little brighter and more directly than the left hand had been, but we found a mid-point that we could live with.

Using this approach involves the following steps:

1. Script it. We created a storyboard for every screen. Know in advance exactly what the voiceover will be, and which graphic will be displayed on screen, and what gestures you will need.

2. Build green

Location

We rented studio space at The House Studios in Queen Anne for this shoot. Their rates are not prohibitive, and the place is spacious, clean, even a bit swanky.

There is a kitchen area, changing rooms, and comfortable waiting area with couches and tables. It’s no good for sound recording, with lots of HVAC white noise. But it’s great for MOS projects like this one. Having the extra space made everything go smoother and faster.

Equipment List

Here’s a list of all the equipment we used to pull off this shoot, starting with the pile my front porch on the morning of, ready to load:

  • Tripod: Vinten Vision Blue
  • Camera: Canon 5dmkiii
  • Lens: Canon 100mm f/2.8L macro.
  • SmallHD DP6 field monitor, with Zacuto Zamerican Arm
  • ChromaPop green screen
  • Tilta Matte Box
  • 2 Arri 650 lights
  • 2 Smith-Victor 650 open-faced lights, with shoot-through umbrellas
  • Lowel Pro-Light 250-watt
  • 2 c-stands, 3 light stands
  • 5 pelican cases for above; 1 golf club case for transporting above stands.
  • 2 extension cords with 4-outlet terminals
  • Multi-cart R-12
  • 24×36 silk, 24×36 flag, 4×4 foam core with roscoe reflector glued to one side.
  • 5×8 sheet of bleached muslin
  • 8×10 sheet of blackout cloth
  • Milk crate loaded with pair of 15lb Matthews sand bags; handful of 10lb shot bags for anchoring light stands.
  • Misc A clamps and background stand clamps.
  • Background stand.
  • 15″ 2012 Macbook Pro
  • Lexar USB3 CF card reader
  • 4TB Lacie 2big Thunderbolt hard drive for on-set data backup.
    Studio supplied gear:

  • Traveling wall (for white background)
  • c-stands, a clamps, grip clamp, heavy duty extension cords

OK, so we’ve got all the footage dialed. How does this all come together in post? Join me later this week for part II of this post, where I’ll explore how to edit an iPhone app commercial.

Documentary Data wrangling demystified, part III: Organizing for the Edit in FCPX

In part I of this post about data wrangling a feature-length documentary, we covered protecting your footage. In part II, we took a look at documentary film storage requirements. Today I’ll explain how we organized our footage in preparation for editing in Final Cut Pro X.

Here’s an overview of the workflow we used during production to get footage off our cards, stored safely, and organized for retrieval. Note that this is a dual-system workflow – we always recorded audio separately from video, requiring us to sync clips later in post in a workflow that I’ve previously covered.

1. Copy contents of video SD card into a new folder located within the project’s “Footage” folder (using naming convention below).
2. Copy contents of audio SD card as above into project’s “Audio” folder.

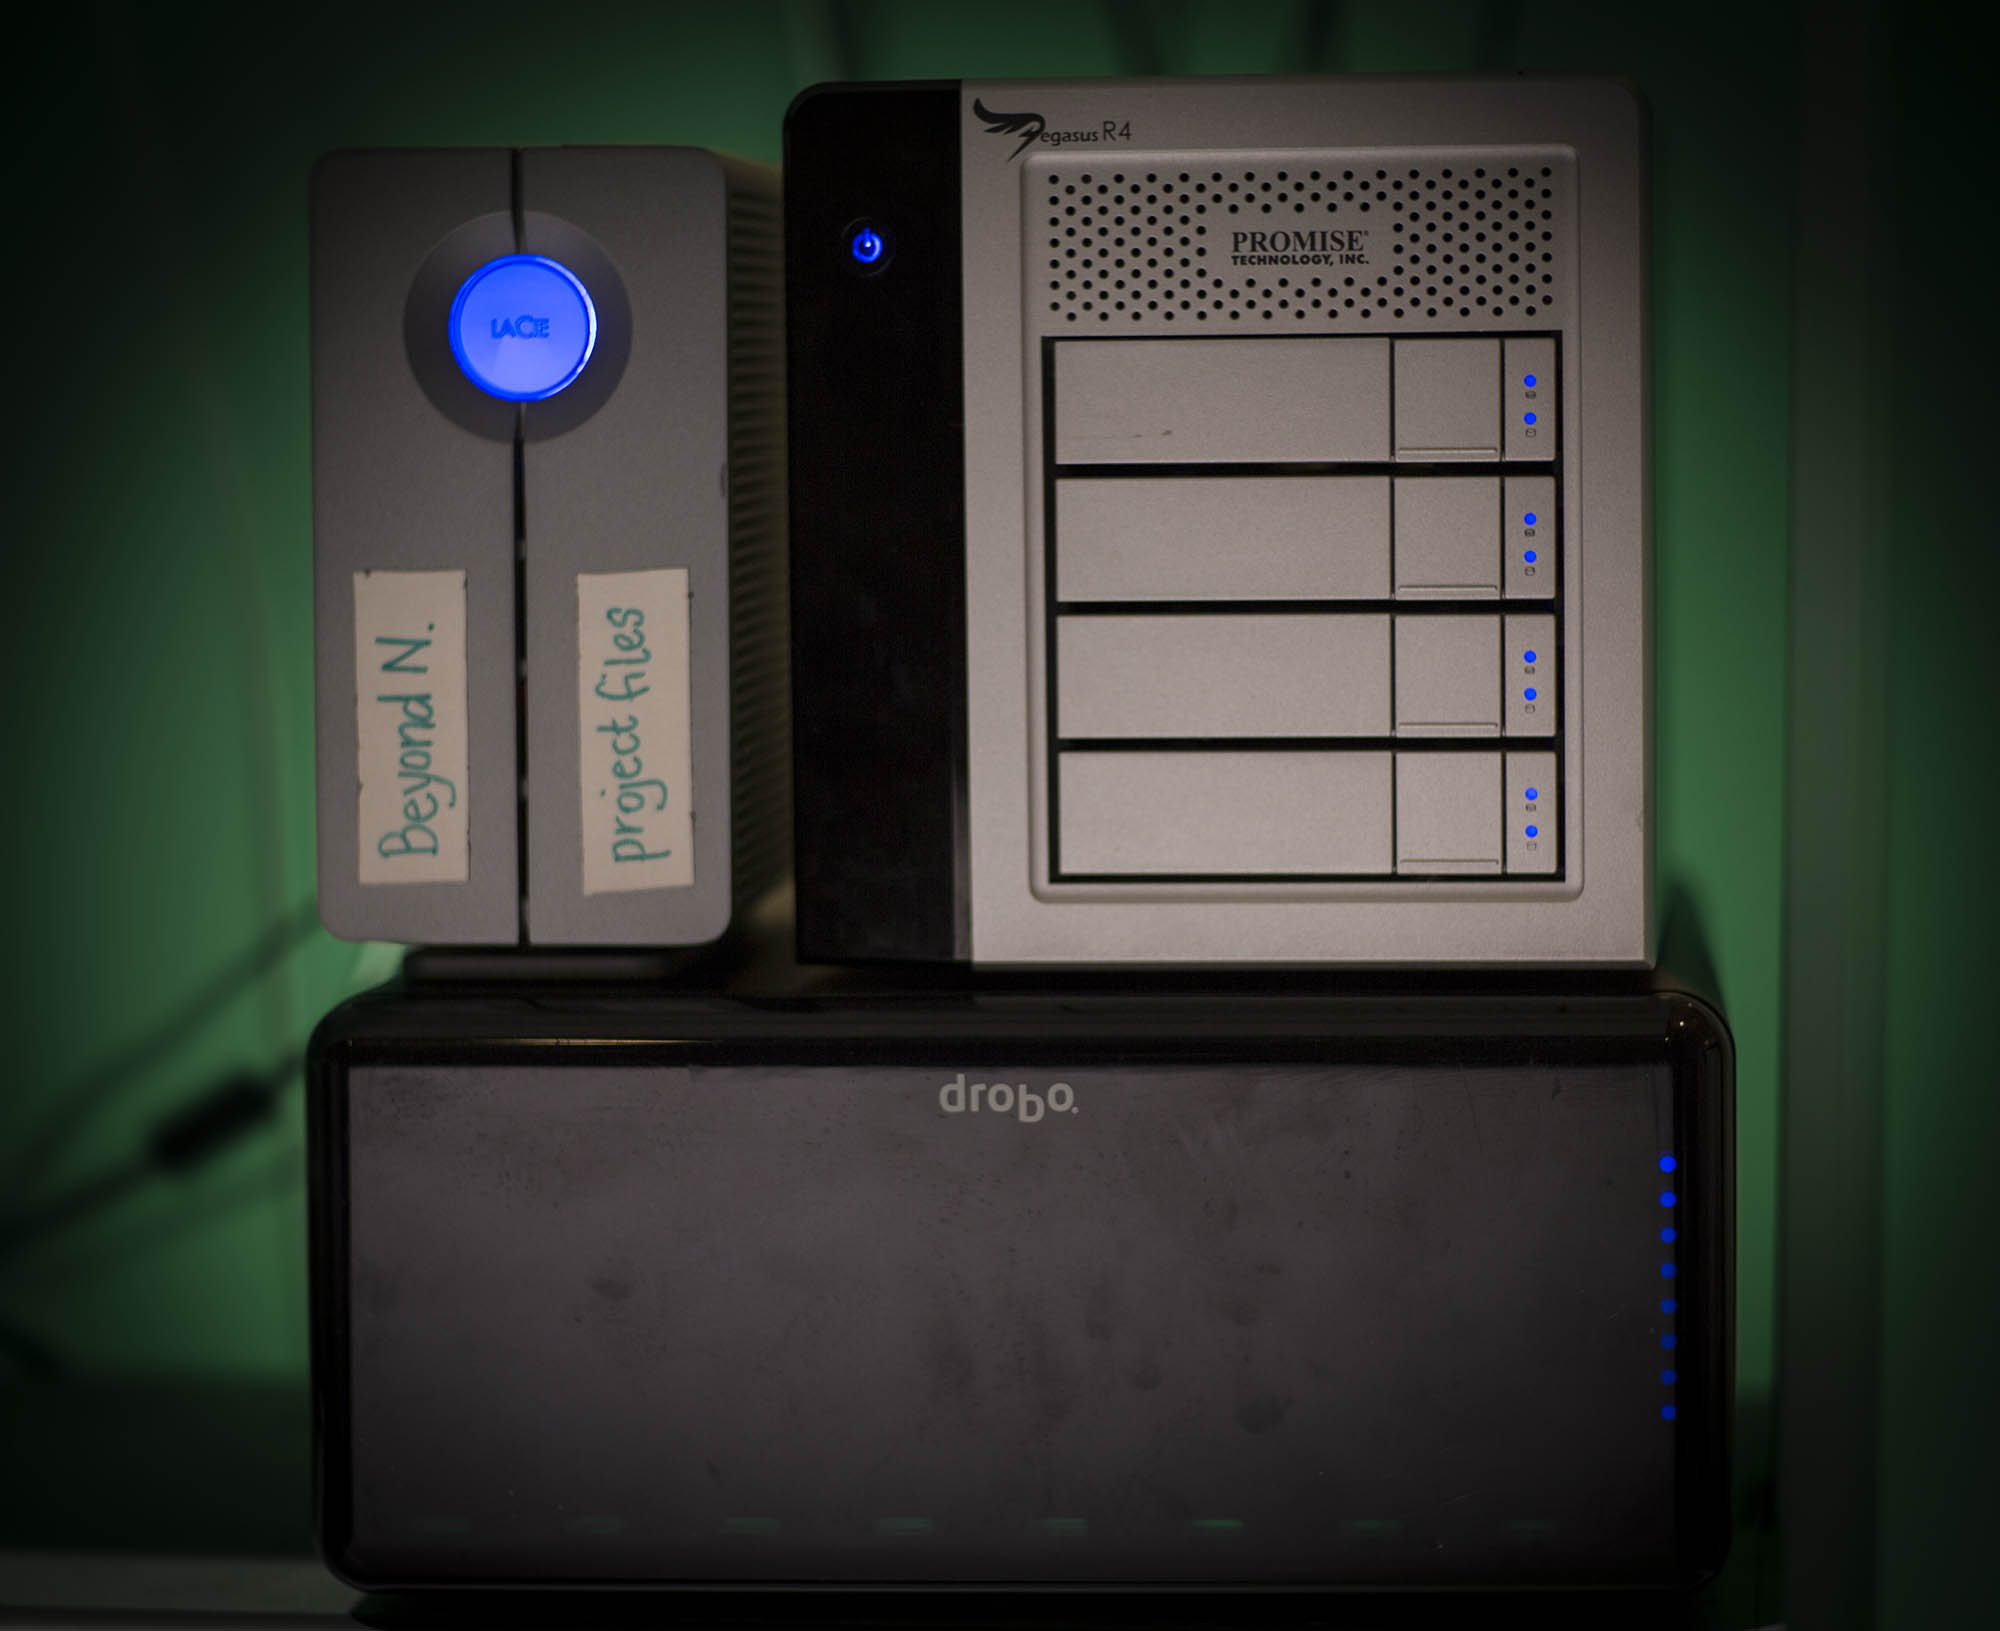
We stored the media on our Drobo Pro, a raid-like system that protects data in case of a drive failure.

Folder Structure for Organizing Media. The foundation of our organizational work begins at the Finder level, with a simple but powerful folder naming convention:

“YYYY-MM-DD two to four keywords”

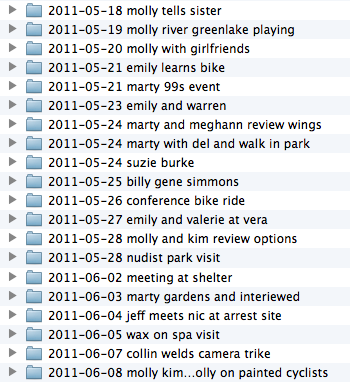
Here’s a partial snapshot of our film’s audio folder:

You’ll notice that some dates have more than one folder. We created a new folder for each shoot, which helped immeasurably to quickly find footage later in the project.

The nice thing about using this date format as a prefix to tagging is that your folders will always sort in order. If you put the tags first, that wouldn’t be the case. And adding two to four keyword tags that succinctly describe the shoot allowed us instantly identify the contents.

3. Stills, if any, are copied into “Stills” folder, using same naming convention.
4. Back up data onto another hard drive which is stored at another location.

Item 4 is the hardest bit to keep up. In practice we tended to copy and move the files offsite at milestones in the project – after a particularly big shoot, about midway, after wrapping, etc.

In hindsight, our biggest workflow mistake was neglecting to view dailies. Most often, we would simply skim through footage after a shoot to ensure it was looking OK. But we never made time to properly review dailies. We figured we’d do that when it came time to edit. And that was a mistake.

One of our lavs developed a short halfway through production, and we never discovered the problem until post. Everything recorded in the second half of production with this mic sounded tinny. It required heroic EQ work to make it usable. Luckily we were paranoid and almost always recorded with a lav AND a boom mic.

Further, I wish we had begun to edit a few sequences together soon after shooting, instead of months later. That would have helped us discover whether we were covering scenes well enough to cut them together easily. Instead, we had to learn all of this the hard way months later when we finally got down to serious editing. Too often we discovered that we didn’t shoot enough b-roll (people without their lips moving, or just their hands, or ANYTHING that we could cut away to) to build the dialog easily.

Prepping for editing in Final Cut Pro X The day we wrapped production was the day Apple shipped Final Cut Pro X. We dove right in and never looked back. But it was difficult at first to understand Apple’s new “Event” and “Project” terminology.

I initially thought that it made the most sense to create one monolithic Event, and import the entire film into it. Wrong! Final Cut loads all open Events and Projects into memory, so everything slows to a crawl if too many clips are open concurrently. It’s best to have as few Events and Projects as possible open at a time.

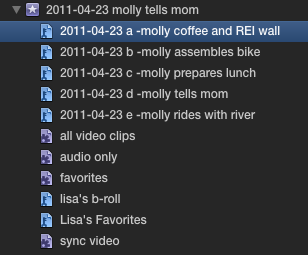
So what we ended up doing, which worked very well, was to create an Event structure that mirrored our folder structure almost exactly. We created a new Event for every shoot, titled YYYY-MM-DD plus two or three descriptive keywords. So after import, like so:

Importing and organizing into FCPX is not trivial when you’re talking more than 4 terabytes of footage. It took us about a month and a half of work to get all of our footage moved over from raw storage and organized the way we wanted them in FCPX Events. Seriously, it was a LOT of work. It wasn’t as simple as hitting the “import” button.

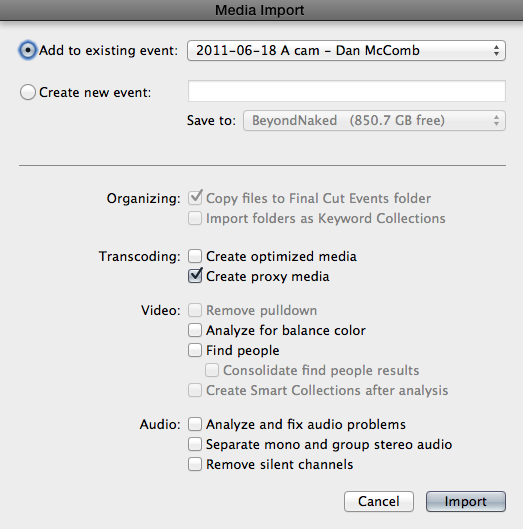
To Proxy or not to Proxy? Proxy media is 1/4 resolution ProRes files, which FCPX can create for you on import. With FCPX, it’s a dead-simple process to create and use proxy media. When importing, just check the “proxy” box.

It takes quite awhile to generate proxy media, though, so with serious amounts of footage, be prepared for some lengthy transcode times. With Final Cut Pro X, you can be doing other things at the same time, albeit a bit sluggishly.

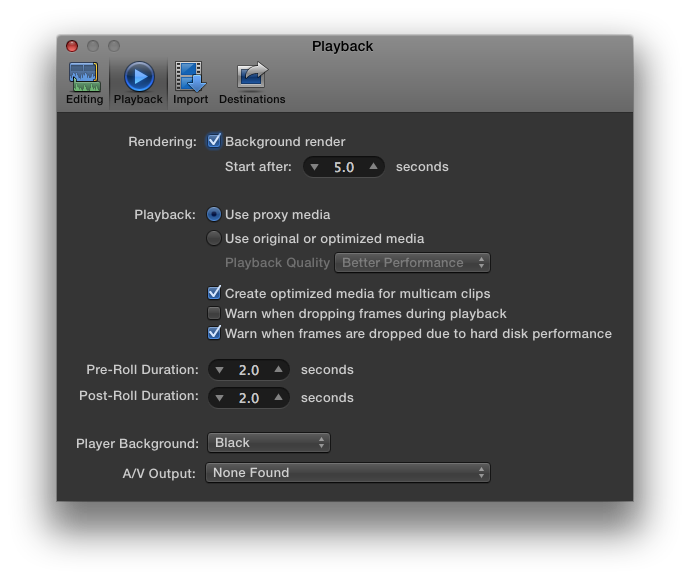
I would argue that it’s almost essential to use proxy media on a feature-length project, because you’ll likely need to have many Events open at a time. And proxy will give you the ability to open many more than you would with full resolution media. Luckily, it’s easy to switch back and forth between proxy and full resolution at any time. Press cmd-, to call up preferences, select Playback, and choose “Proxy.” We didn’t have to switch back to Original Media again until we were ready to start creating assemblies.

After making proxies, our next step, and the most tedious and time-consuming part of our workflow, was audio syncing. I’ve outlined our audio syncing process and it worked very well, but it added a lot of time to the process. I really wish Final Cut Pro X had a way of batch syncing audio automatically. You can use PluralEyes, but I’m not crazy about the mess it leaves behind. It requires a lot of cleanup if you like to maintain, as I do, a clean separation between media and projects. So I prefer DualEyes.

A note about this workflow. If we had been on FCPX from the beginning of our film, this process would have been much smoother, because we would have been doing this import > transcode > audio sync process daily, instead of facing it all at once at the end. I definitely recommend making this a part of your dailies ritual it time allows.

The most significant improvement for Final Cut Pro X to add, from my feature-length perspective, would be to make it possible to load an entire film all at once. I simply couldn’t do it with my hardware (3.4 GHz Intel Core i7 2011 iMac, 16GB ram, AMD Radeon 2 gig graphics card). Attempting it just displays the spinning beach ball. I’ve since tried it on my new 2012 MacBook Pro, on which I can just get the entire film to load. Even then, it’s too sluggish to make it practical. But it makes me suspect that Apple’s playing the long game with FCPX – by the time next year’s Macs are released, the hardware may well have caught up with the software on this, allowing FCPX to work acceptably well feature film situations.

As a result of this, we spent a stupid amount of time over the life of the project just moving Event and Project folders back and forth between Final Cut Events and Final Cut Events – Hidden folders. Each time, we had to restart FCPX. Tick, tick, tick…

It wasn’t until the very end, when I was audio mixing the film, that I discovered Event Manager X, a $5 utility that makes this process relatively effortless by allowing you to create lists of Projects associated with Events. It let’s you move them and restart FCPX with a single click. If you’re cutting your feature doc on FCPX, this app is indispensable.

Getting organized inside of Final Cut Pro X With everything imported, audio synced, and proxified, a final step remains: adding metadata. Final Cut Pro X provides a two incredibly powerful ways of organizing footage: Smart Folders and Keywords.

Smart Folders

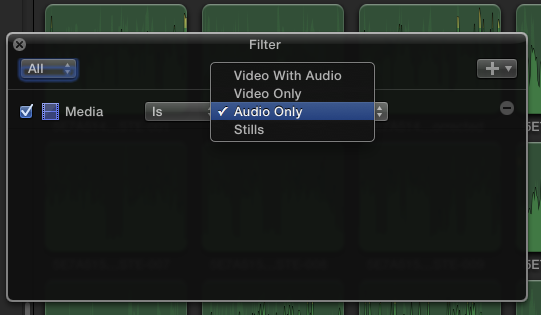
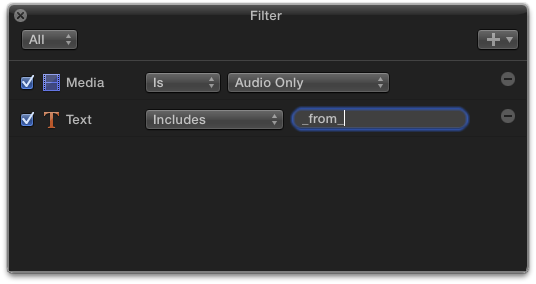
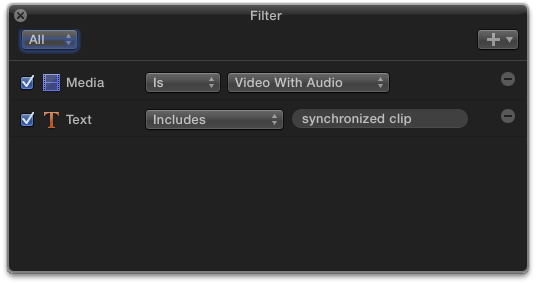
Our first step is to create smart folders that split our media into types: audio only, video only and sync video. Smart folders are just standing searches, or filters, that allow you to display everything that matches your query. When you create a smart folder, you can specify what you’re looking for. In the case of our Audio only example, it looks like this:

For our Events, we generally wanted to be working on sync video when we got down to editing, because that was the best sound. But sometimes we had video for which there was no audio recorded separately. It’s easy to set up a Smart Folder that will tell you at a glance which files are which, by adding additional qualifiers to the search:

You can take this pretty far, but we found that for most Events, we could find everything we needed with just three or four smart folders.

Event structure for sharing Projects between editors As the project took shape over time, we shared Project files back and forth between two editors, my partner Lisa and I. We discovered that it’s very important to “lock” Events and add the inevitable new media that become necessary during post (such as sound effects, archival footage, archival stills, etc) to a new Event, rather than adding them to existing Events. That’s because if they’re added to existing Events, it’s too hard to keep track of who has the most current Event. Then, when you share a Project, you don’t know if there will be missing media when the other editor opens it.

Our solution was to create an Event called “BN Additional Footage” and another called “BN Music and SFX.” We added all the new files to the appropriate folder, and then whenever we shared a Project, we included just these two Events to ensure no missing media. This made Project sharing much more manageable.

Keywords

Keywords are the second most powerful way to organize footage in FCPX. I reach for Keywords whenever I can’t figure out a way to do it with a Smart Folder. For example, this shoot was rather long, and consisted of five different “scenes”, as follows:

Tagging each part of the shoot with a descriptive keyword gave me a way to instantly find only those clips. I tend to use Keywords to break apart Events into chunks like this. My partner, Lisa, tends to use them to identify her favorites, and clips that would make good b-roll. You can use Keywords however you like.

Favorites The last step of getting organized might actually be considered the first step of editing: making favorites. My process for this involved standing at a desk, with my finger hovering over the “i” and “o” keys, as I played back the footage. Whenever I saw or heard something that looked promising, I’d make a selection and press the “f” key to mark it as a favorite.

To make it possible to find your favorite later, it’s essential to add a text descriptor. I add mine by typing it into the “notes” field, which I reposition to display just to the right of the “name” field in the Event Browser (click and drag on the field to move it).

If the favorite is extra special, I use a simple notation I learned from Werner Herzog at Rogue Film School. Herzog has a notebook open on his lap when reviewing footage. When he sees a favorite, he writes down the timecode, with some brief descriptive notes. If thinks it’s pretty good, he adds a * with it. If he likes it a lot, he puts two, **. Finally, for footage that he “would have lived in vain if it doesn’t make it into the film,” he puts ***. I do the same, substituting the notebook with FCPX’s notes field.

So there you have it: what worked for us. Yet there are many different ways to accomplish the same thing in Final Cut Pro X. What’s your favorite organizational technique?

Documentary data wrangling demystified, Part II: Choosing storage

In this multi-part post, I share how we managed digital media on a feature-length documentary project. In Part I – Securing Your Footage, I covered how to prevent data loss. Let’s continue today with a look at primary storage for a tapeless workflow. Next time, I’ll cover organizing your media for editing in Final Cut Pro X.

Primary storage. On a documentary, it’s typical to shoot for a long time before production wraps. In our film Beyond Naked, two years elapsed from first shot till locked picture (nearly a year in production, and more than a year in post). The amount of resulting footage can easily surpass that of a narrative film. So if you’re making a doc, you’re likely to have some serious data demands.

On my first short film a few years back, I solved storage problems by simply filling up individual external hard drives. Then I’d back them up by mirroring them to other drives. The problem with this approach is that it’s a pain to perform this backup every time you add new media, and so like anything that’s a pain, you end up putting it off. Before you know it, it’s been weeks since you backed up. So when a drive fails, you’re really going to be screwed. And as the old data wrangler saying goes, “it’s not whether a drive will fail, but when.”

So forget primary storage on individual hard drives. As a first line of resistance against data loss, you MUST be able to replace a defective drive without losing anything. That means selecting a RAID. Or something like it. (For a thorough discussion of RAID types as they apply to video editing, check out this post by Larry Jordan.)

Throughout the production of Beyond Naked, we used a Drobo Pro for our primary storage. It uses a proprietary RAID-like system (called “Beyond RAID”) that has some advantages over traditional RAIDs. By default, it’s configured so that if one drive fails, you can replace it without any data loss. You can even configure them so that two drives can fail simultaneously. The tradeoff is that you get less storage space.

Drobos are also hot swappable, so recovering from a drive failure is as simple as pulling the failed drive, and shoving in a new one. Everything will magically pick up right where you left it (although it takes a few hours of read/write time before the recovery is complete). During production, our Drobo experienced a massive failure that prevented it from booting up. It was heart-stopping, but all we had to do was remove all of the hard drives, and send the unit back to Drobo. Even though it was a few months out of warranty, Drobo sent us a replacement Drobo Pro, no questions asked. When it arrived, we very carefully plugged the drives back in, held our breath, and turned the power on. The lights blinked on, red at first, then green. Good to go.

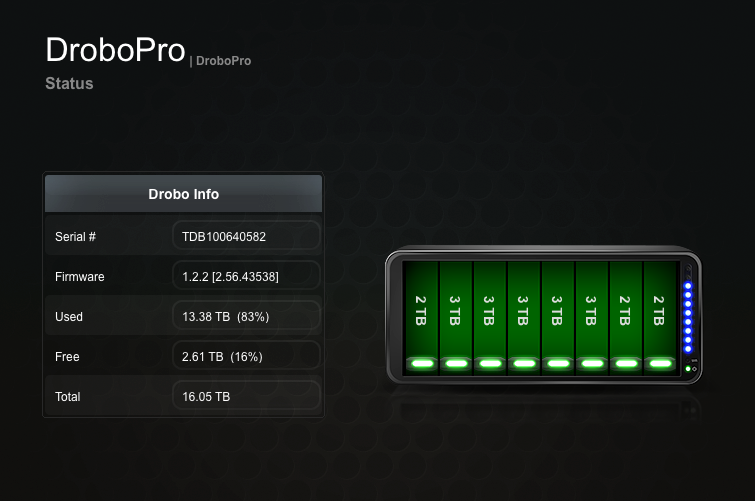
Another benefit of Drobos is that they can handle any type and size of SATA drive you can fit into them, including SATA 3. So as drives get bigger, faster and more affordable, you can replace smaller ones with bigger ones (if you have an older Drobo, a firmware upgrade is required to recognize drives larger than 2TB). We started with 4TB of storage on our Drobo when we purchased it in 2009, and today it’s grown to 16TB. We’ve still got plenty of room to expand.

But there is a major down side to using Drobo Pro: it’s slow. Really slow. Despite being advertised as connecting at up to 100MB/sec via gigabit ethernet, I have found this connection to be totally unstable. Using it invariably causes my 2011 iMac (as well as my previous Macbook Pro) to freeze and require a force-reboot. Repeated support tickets to Drobo have yet to resolve the issue.

So for Drobo Pro, Firewire 800 is the fastest connection I can count on. Here’s what that means on my editing suite:

Unfortunately, that’s nowhere near fast enough to edit HD video. As a safe place for simply storing media, though, it works fine.

If I were purchasing a primary storage today, I would stay far away from any system that didn’t support a Thunderbolt connection. If you want a recommendation, I would heartily recommend the Pegasus Promise R6, after the great experience we’ve had with our Pegasus R4, which I’ll elaborate on shortly).

Storage for Editing. By coincidence, the day we wrapped principle photography on our film was the same day that Apple released Final Cut Pro X. As a frustrated Final Cut 7 user, I made a snap decision to switch. I don’t regret that decision for a minute, despite all the venom that oozed from the professional editing community. FCPX has given me (an artist, not an engineer) god-like powers to skim through mountains of data, and has put wings on my editing. Still, there were challenges.

It turns out that in order to live up to its billing, FCPX demands fast everything (a newer computer, a Thunderbolt connection, and zippy drives). We couldn’t afford to purchase a Thunderbolt RAID that would hold all 4.5 terabytes of original media for the film, but we did scrape together enough cash from our remaining Kickstarter funds to purchase a 4TB RAID.

Calculating storage space. This raised a question: If we used FCPX to create proxy media for us, would the entire film fit on a 4TB RAID with enough free space left over for editing?

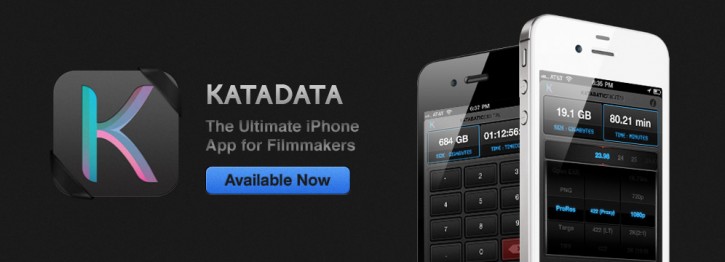
You guessed it, there’s an app for that. The best one is called Katadata. AJA Datacalc also works, but with a more rudimentary UI. The beauty of Katadata is that you can select your camera type, and options narrow immediately to those supported by your camera, making the menus much easier to navigate. The app also automatically adds multiple shoot info, and offers the option to email the results of your calculation. Katadata costs $4.99 in the App Store.

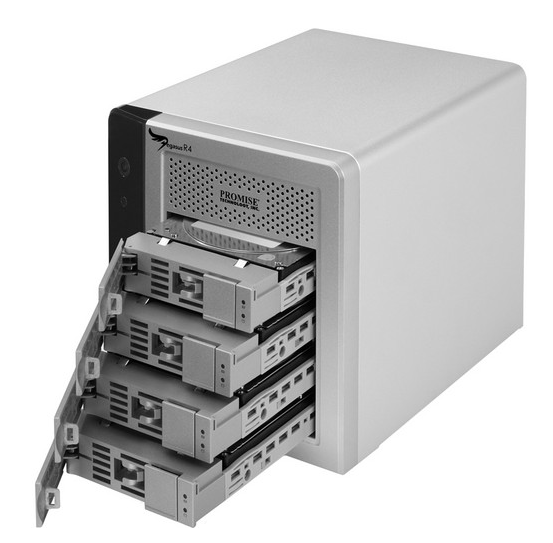
We calculated that after converting to proxy, we could fit the entire project into about 2.5 terabytes of proxy footage. So with the last of our Kickstarter funds, we purchased a Pegasus Promise R4 (the only Thunderbolt drive manufacturer actually shipping drives at the time) and set about the task of importing and organizing our footage for editing within FCPX. I’ll cover how we handled that task in part III of this post.

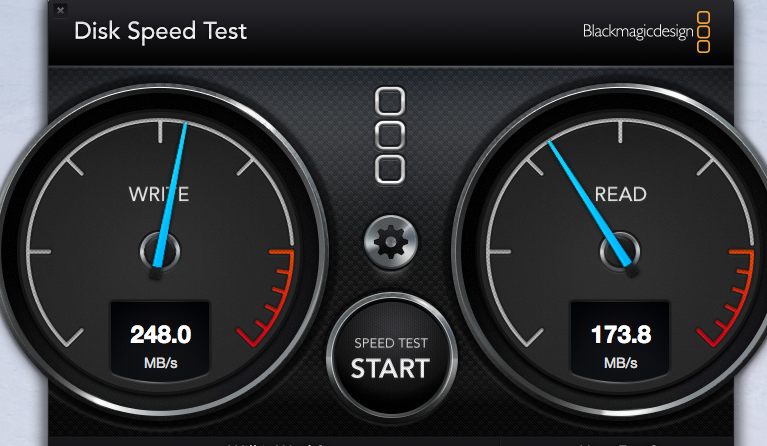
The Pegasus R4 turned out to be amazing for us. Just take a look at the performance we’re getting with ours today, with the project finished editing, and the drive way more than 3/4 full:

An important aside: avoid letting your drives grow beyond 3/4 full for best editing performance. Hard drives require some headroom in order to perform at their peak. Things can really slow down as a drive approaches getting full, so just be keenly aware of that and never let your editing storage drives get too full.

Another Pegasus R4 plus is that it’s relatively small, about the size of a toaster. At least, as long as this drive was parked on my desk, it seemed small. But after a month of daily packing it up and transporting it to my co-editor’s place for work, it began to seem rather large. The cardboard box that it shipped in began to fall apart, and I searched in vain for a Pelican case that would neatly contain it for secure travel. I looked everywhere, and discovered they don’t make one.

As an aside, if you’re thinking “I’ll just use my internal hard drive for editing storage,” that probably won’t work. On all but the newest computers with SSD drives or Apple’s new Fusion drives, an internal drive’s bus connection is slower than it will be via an external connection like ESATA or Thunderbolt. You’re better off using external storage for another reason, too: inevitably at some stage of the film, you will need to take your media with you (to a colorist like John Davidson or an audio mixing facility, for example). However, if you have a 2012 iMac, you might want to forget everything I just said and use your screaming fast Fusion drive to edit on, as long as you’re backing up regularly.

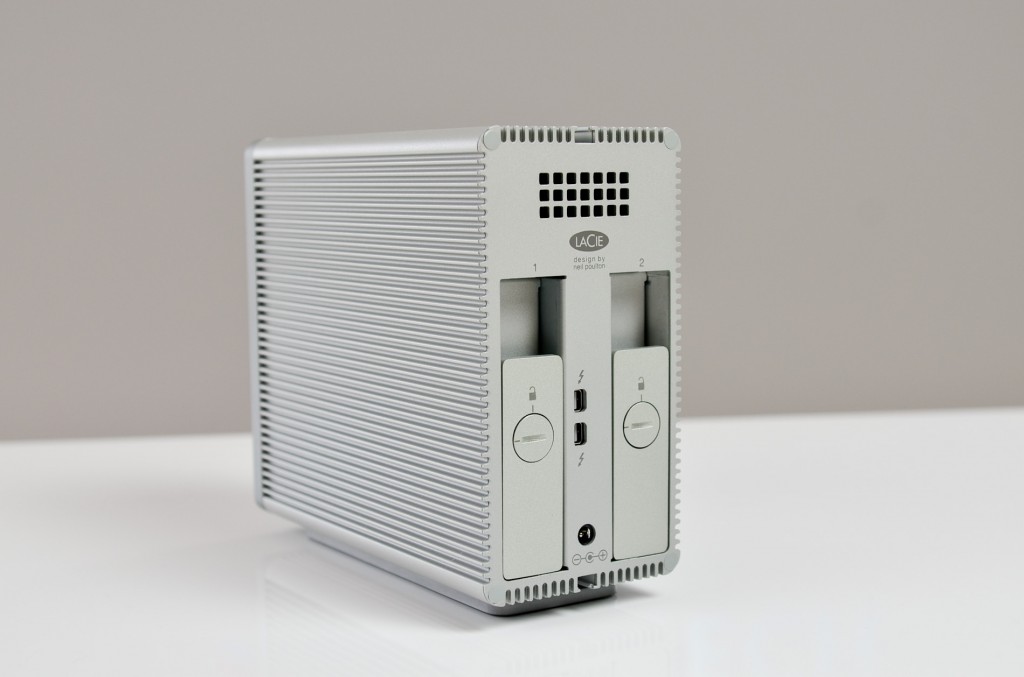
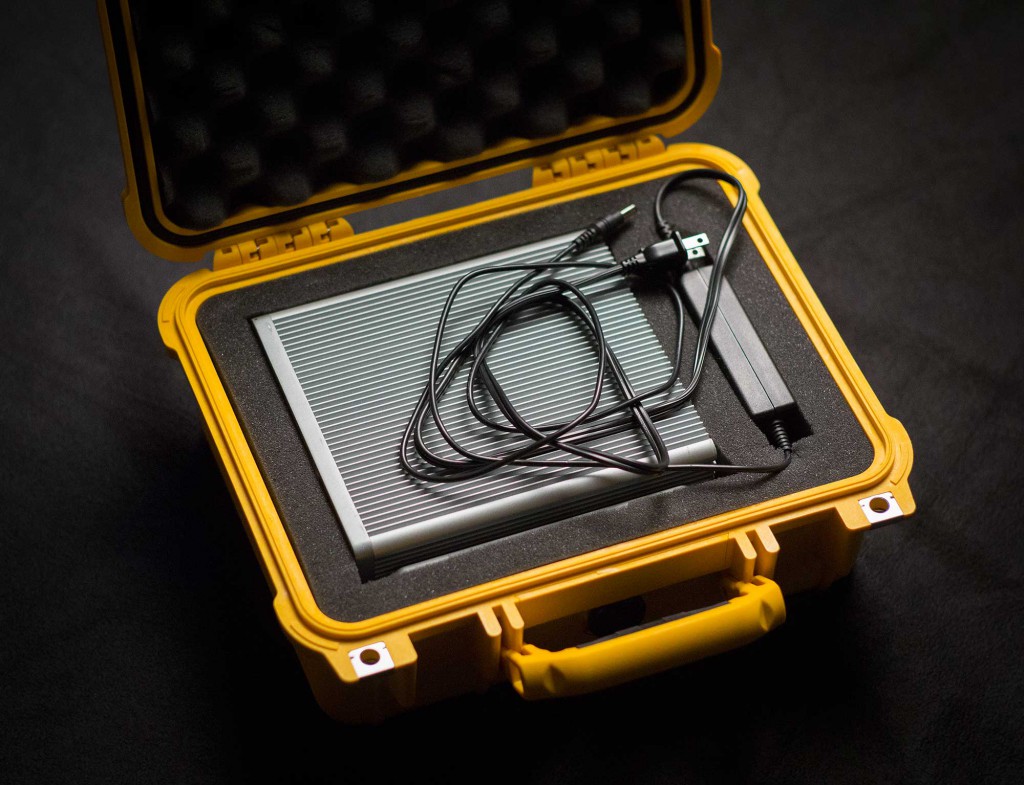
Fast, portable storage. As we got deeper and deeper into editing, Lisa and I needed to share files more and more often. We opted for Lacie 2big 4TB Thunderbolt drives. The most economical place to purchase them, we found, is MacMall, which routinely sells refurbished ones for under $300. We got two of them. We were initially reluctant to buy refurbished drives, but our budget constraints forced our hand, and they have performed flawlessly. You can fit one into a Pelican 1400, with room for the Thunderbolt cable stowed in the top lid under the foam, with the power cable off to the side below.

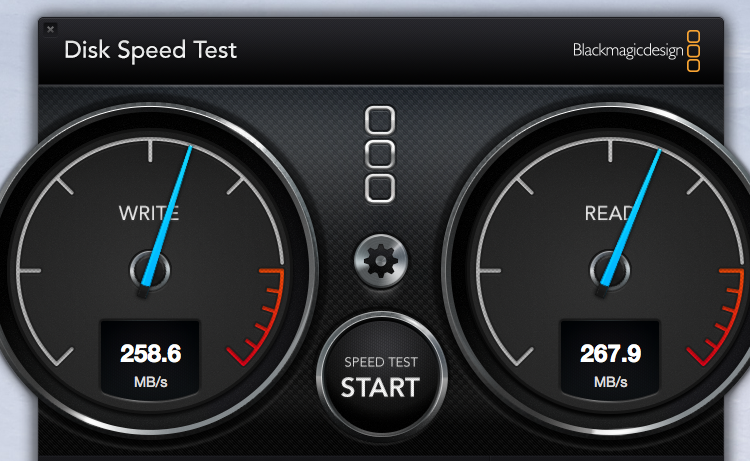
Because we wanted maximum performance, we left them at Raid level 0, their default. Which yields this:

At RAID 0, if one of the drives fails, you lose everything on the drive. But as long as you remember this is editing storage – not primary storage – it’s less scary. If something fails, you don’t lose footage – just the work you’ve done in editing it. So of course, regular backups are absolutely critical. It would be far more secure to set these drives to RAID level 1, but this results in significantly slower editing response times in FCPX. And I’ve found that if I have to wait for my hard drives when I’m editing, I get distracted, and pulled out of “the zone.” So we committed RAID 0 and to making regular backups.

Storing in more than one location. Having all the original media stored on the Drobo meant our footage was safe if one hard drive failed. But what if the house caught on fire? It’s a common-sense good idea to have your film media in two places just in case. We couldn’t afford to buy a second Drobo. So we simply filled up a bunch of older 1 and 2TB Lacie drives from our previous project. We copied all our original media onto these, and put them in a box in Lisa’s closet. Offsite backup – check.

Is this archival? No, but… for our purpose, it doesn’t need to be. Studies show that disconnected hard drives in storage lose about 1 percent of their data-holding capacity per year. But experts say that you can safely store data for 2-5 years without danger. So as a good, short-term solution, it works. Just don’t put them in a drawer and forget about them, or you may be sorry in 10 or 15 years.

Ultra-portable storage. One final note about storage. When I was in the UK over the holidays last year, I took the film (proxy only) with me on a single Lacie 2Big Lacie, intending to do first pass sound mix and color correction on my MacBook Pro. I realized after I arrived that I had forgotten about 1/4 of the files! Altogether they totaled about 600 gigs. Way too much to transfer over the sketchy internet connection at the place I was staying.

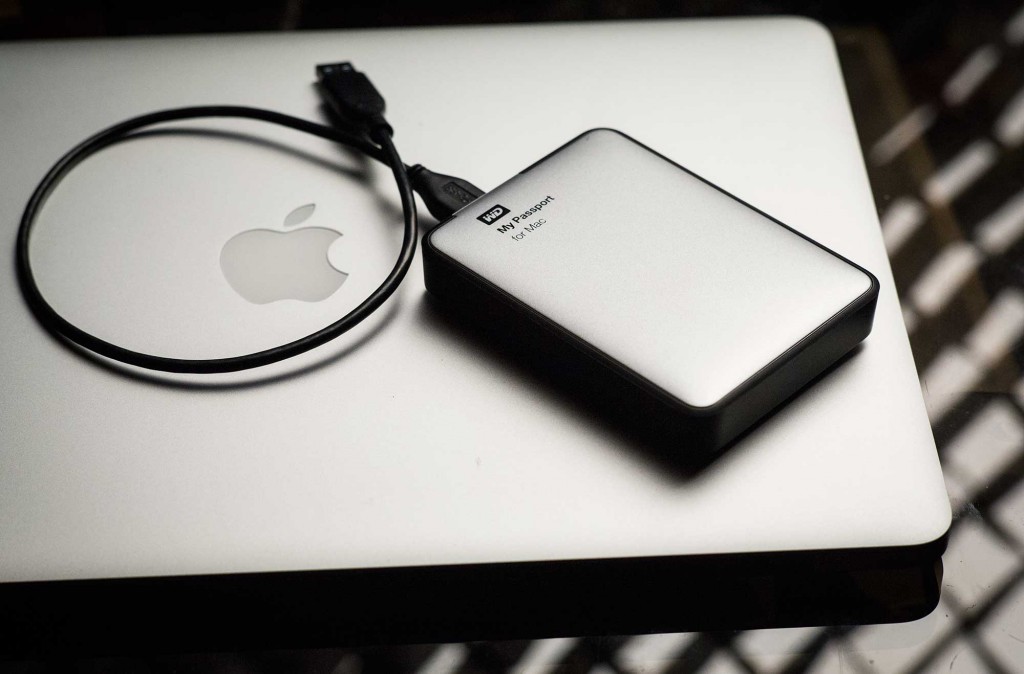
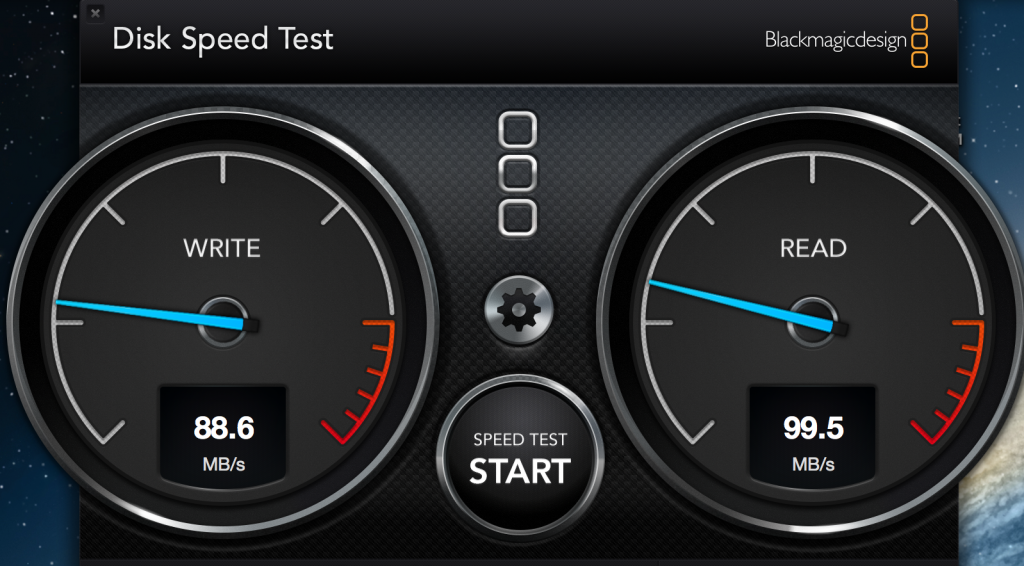
So Lisa, back home in Seattle, simply loaded the missing files onto a USB 3 2TB WD My Passport for Mac portable external hard drive. It is so tiny it fit into a DHL envelope. The cost of shipping from Seattle to England ($100) was almost as much as the cost of the drive ($150).

WD claims the drive is “ulta fast,” but even on my MacBook Pro 2012, with USB 3, it clocks modestly compared to Thunderbolt:

We will be tasking this drive with doing on-set file backups on many of our shoots in the coming year.

OK, so we’ve got storage covered. Next question: How does one organize media for feature-length documentary film editing? I’ll address that in my next post.

Documentary data wrangling demystified, Part I: Securing your footage

Our first day of shooting Beyond Naked dawned with great promise. On Dec. 21, 2010, the sun broke through a thin layer of clouds and climbed over Seattle’s Kite Hill, where I was waiting with my camera. I knew that in 6 months, on this spot, we would shoot the final climactic scene in the film. This morning, however, alone with the crows, I tilted my camera down into a puddle and captured a timelapse of reflected orange clouds that would eventually become the title shot in the film.

A few hours later, I shot another promising event. This one, however, would not make it into the film. In fact, no one would ever see it. That’s because, less than 24 hours into production, I had already begun to lose footage.

We had 3 shoots that day, which resulted in quite a few sd cards to keep track of. As I was offloading media, I probably mistook one of the full SD cards for an empty one. I didn’t even realize it was missing until weeks later, because we hadn’t created a “dailies” plan to review our footage as it was shot. If we had, we almost certainly could have recovered it. Even if we had formatted the cards, it would have been a simple matter to recover them before they were used again using inexpensive recovery software.

This was the first of many data wrangling lessons we learned while shooting what ended up to be 4 terabytes of media. In this mutli-part post, I’d like to share the relatively inexpensive but feature-film capable system we devised for storing, organizing, retrieving and editing our media. Our simple system took us all the way from initial import to finished film – without any more lost footage.

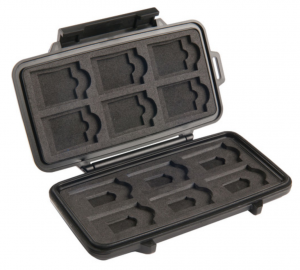
Securing the take. A secure workflow begins with securing your media. And organizing it. As a first step toward doing both, I purchased an SD card Pelican case designed to hold more cards than you’d likely ever use in a full day’s shooting. It resembles a book. On the left side, stored with labels facing up, I inserted formatted cards, ready for use. The right side started out empty. As the shoot progressed, I placed used media, label down, into the right side. This gave me a double safe way of keeping track of which cards contained footage awaiting import.

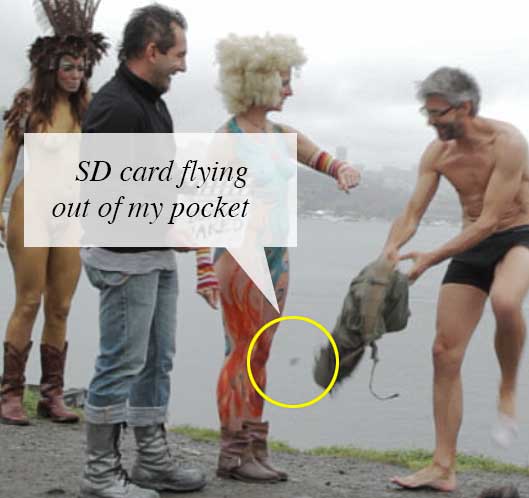
This system worked extremely well – except when I didn’t follow it. This is where I have to tell a brief, unflattering story about the one time I failed to use this system. While filming the most important scene in the film, the climax of the the parade, I was operating a steadicam in a sea of naked cyclists when my SD card ran out of space. I was so eager not to miss the action that I just popped open my media case, grabbed a fresh card, and shoved the full card into my left pocket. A little voice whispered “store it properly in the case.” I didn’t listen.

An hour later, in a euphoric moment atop Kite Hill at the completion of the ride, my cast and crew surprised me by chanting for me to get naked. As a show of solidarity, I caved. I whipped my pants off and danced a brief celebratory jig. As I pulled them back on again moments later, the little voice said. “Check your left pocket.” I reached in and a chill shot down my spine: it was empty.

I lost it. I heard myself yelling at everyone to back up as I desperately scanned the ground around me for the bright blue chip. Nothing. I knew instantly that the card could have fallen out a hundred places as I had jogged down the parade route. What are the odds I would find it? A tiny glimmer of hope – that it had flown out when I pulled off my pants – faded as I searched the muddy, wet ground crowded with naked people.

One of the stars of the film, Molly Meggyesy, was nearby and asked me what was wrong.

“I think I just lost the most important footage of the entire film.”

“I’m going to find it,” she said.

She took one decisive step, leaned over, and came up with it. “Here you go,” she said. “Is it OK?”

Unbelievably, it was.

I suppose the lesson here is that it’s best to keep your pants on when shooting a film. But I’ll let you draw your own conclusions. And I’ll pick up next time with Part II of this article, selecting primary storage for documentary film.

Warp speed at 2fps in-camera using Magic Lantern 2.3

The 2.3 release of Magic Lantern is full of surprises. My most recent discovery: beautiful 2 frames-per-second time lapses, no post-processing required. This is an otherwise impossible frame rate to obtain with my Canon 60D, because even with a fast card it’s impossible to sustain more than 1 frame of shooting per second for more than a few frames in burst mode. For relatively fast-moving action such as storm clouds, sailboats, or to moving cars, 2 frames per second is a sweet spot.

Yesterday morning I had to drive across town at 5:30am to scout a location for an upcoming shoot. To test out the 2fps feature, I sat the camera on the dash of my car on a coat, and let it run. The results were pretty shaky, but promising.

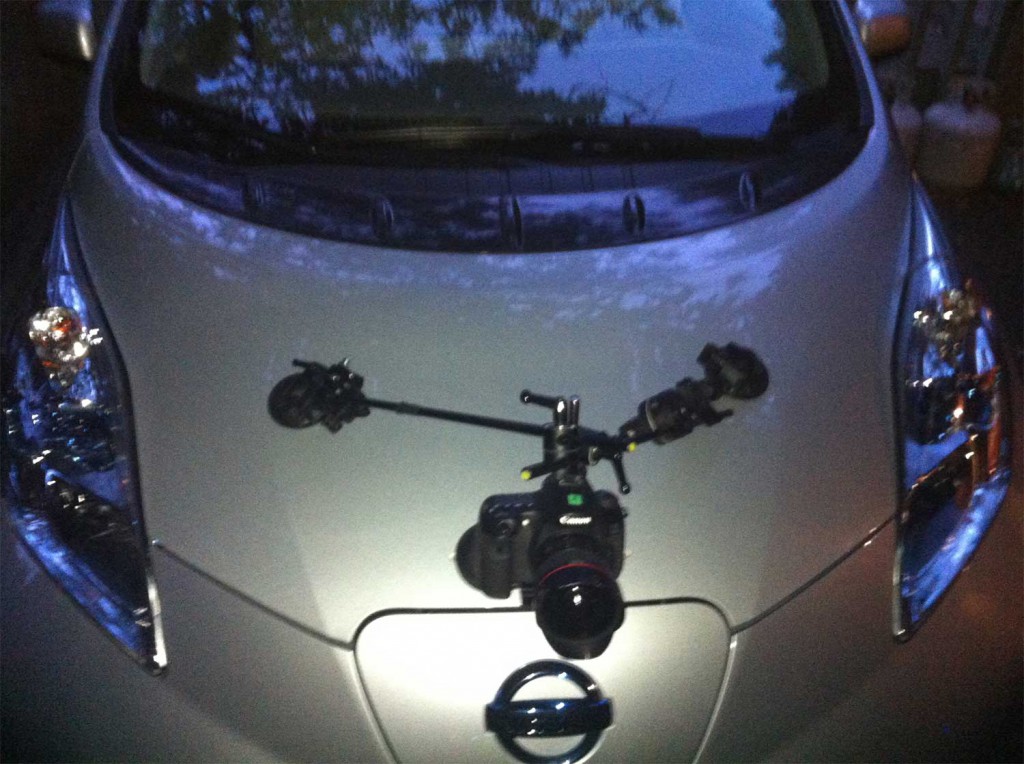
This morning I took a more polished stab at it. This time, I triangulated the camera to my car hood using MicroGrip heads with 3/8 rods, combined with parts from a MiniGrip mounting kit that I picked up at Glazers over the weekend.

The results are smoothest where the highway was smooth. Unfortunately the road is quite rough on the stretch of 99 going past the city skyline. The new tunnel will no doubt be smoother when it’s completed in a few years, and will an exciting (but claustrophobic) place to shoot this kind of footage.

The documentation for using the FPS Override on Magic Lantern is pretty good (see User Guide, page 2). I used the Optimize for Low Light setting, and I’m looking forward to trying out an even slower frame rate such as 1fps using ND filter during daylight driving.

5 dslr rigging tips for smoother video shooting with a tripod and monitor

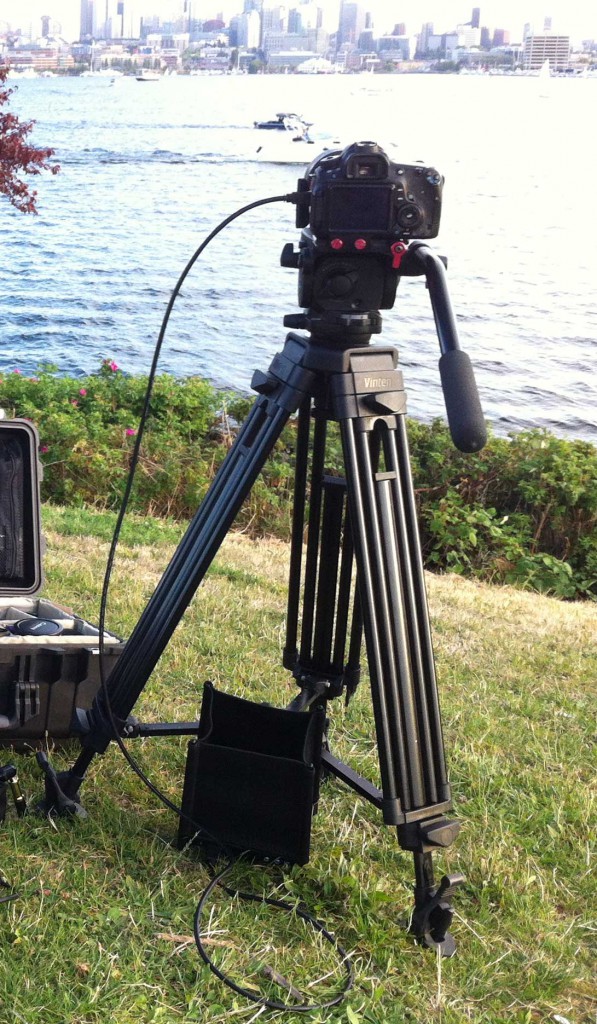
When shooting on sticks with a DSLR and a field monitor, a little attention to detail can go a long way to helping you get smoother shots. Here’s a few things that help me get consistently good results.

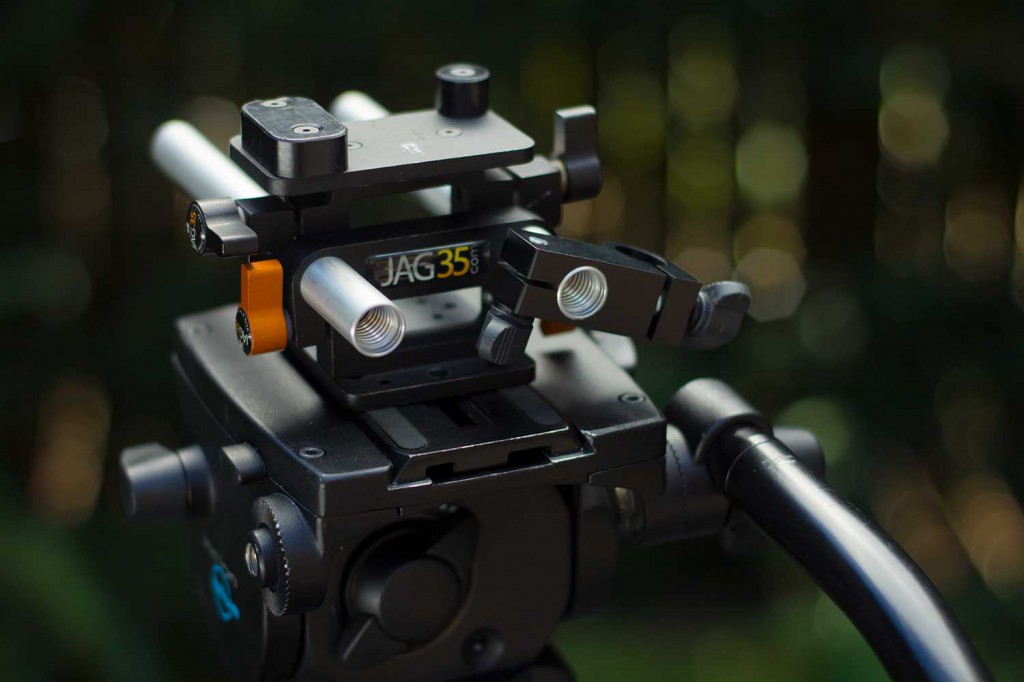
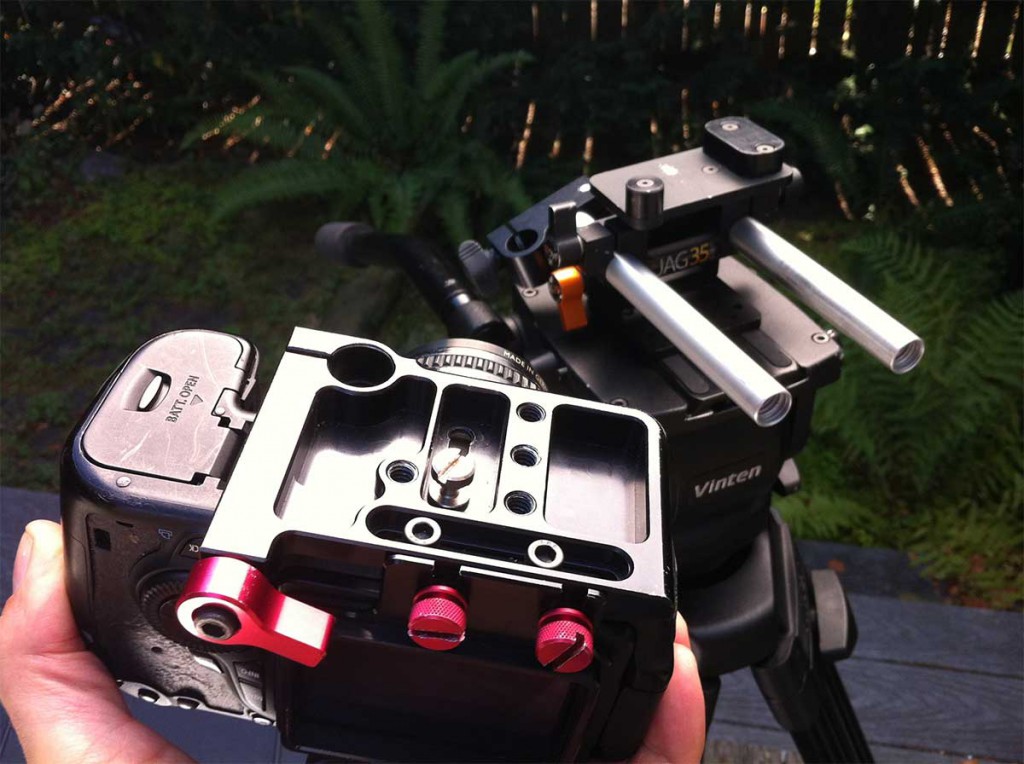
1. Use rails with a bomb-proof quick-release plate. My first rig was built around camera baseplate that required thumb tightening every time I wanted to get the camera on and off the rig. Not only was the connection less secure, but it was daunting and time-consuming to get the thing on and off. The screw-in mounts also won’t hold your camera tightly enough to consistently hit critical focus if you’re using a follow focus. My problems vanished when I upgraded to a Gorilla Stand combined with Zacuto quick-release Gorilla plate.

Above, the camera side of quick release. This Gorilla plate provides excellent stability as well as being instantly releasable from the rig.

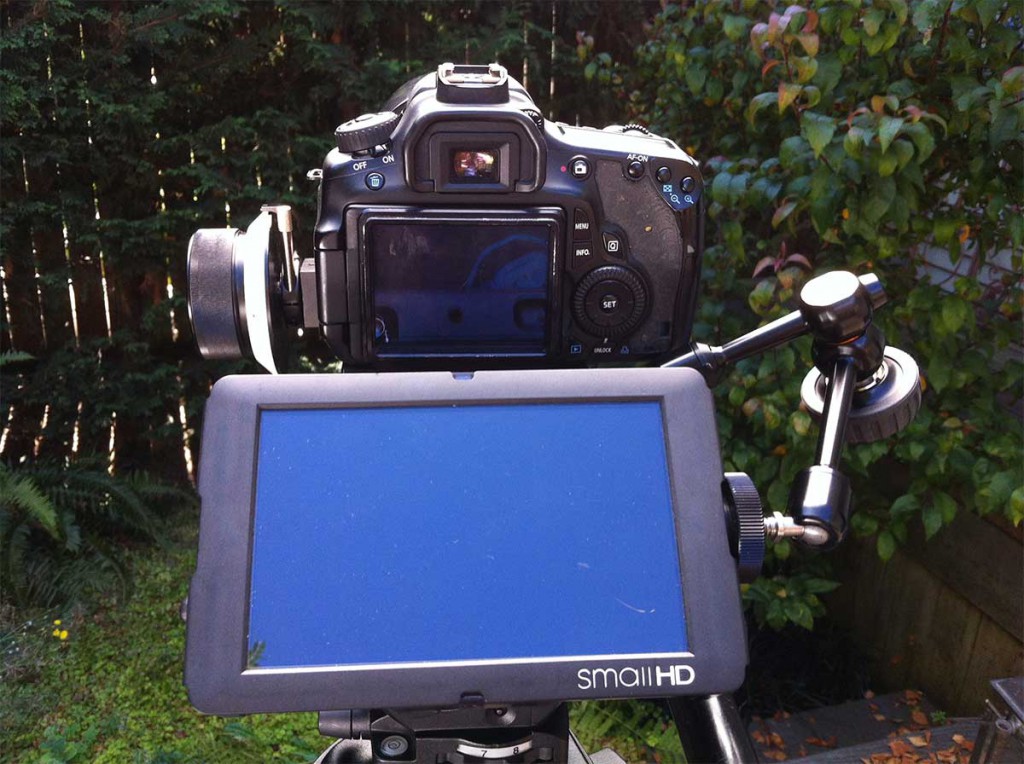
2. Don’t hang your monitor off the hot shoe. It destabilizes everything, so that even lightly touching your monitor (such as to punch up peaking) can introduce jello to your shot. DO find a mount point that keeps the center of gravity low, such as mounting off a rail block (see tip 4 below).

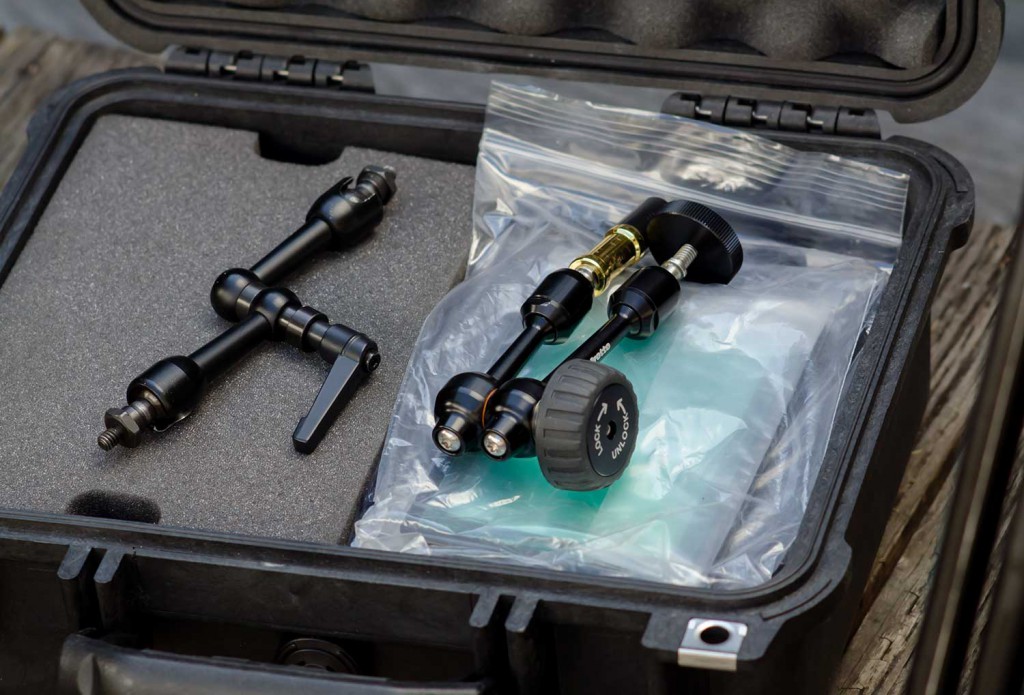
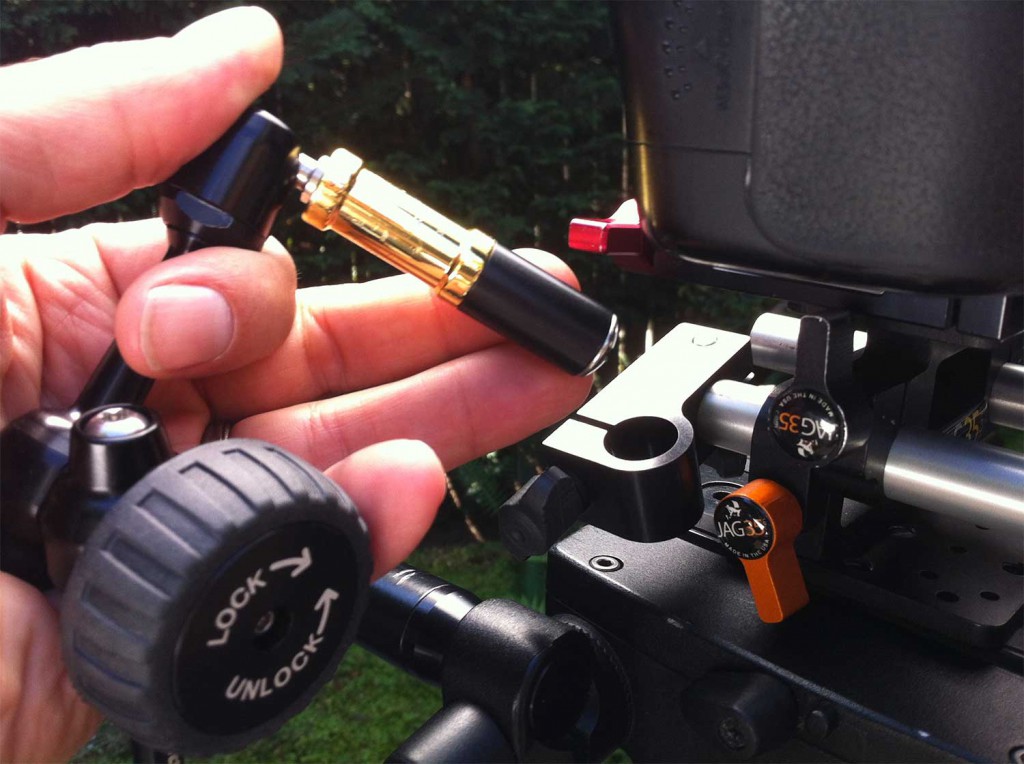
3. Use a good arm. I recently upgraded from the standard Israeli-style arm that I purchased with my DP-6, to a Manfrotto Hydrostatic 7″ arm. And it’s been a revelation the difference it makes. My previous arm needed to be cranked tight, that is, basically over tightening it to hold it in place. Often it would flop over halfway though shoots, and needed frequent re-tightening. My Manfrotto uses hydrostatic technology that makes for an iron grip with minimal tightening. The rubber wheel is a major ergonomic improvement too, making it easy to twist. My feeling now is that a good arm should be so easy to adjust that it practically invites you to fiddle with your monitor angle. Because that’s exactly what you’ll need to do when you’re shooting a variety of shots off sticks.

Above: Old arm, left; new arm, right.

4. Use a quick-relase rail block to connect your arm to your rig. I use a 90 degree accessory mount that I got from Express 35 for $20.29. Combined with the included 15mm to 1/4-20 stud, It does two things: gives you a couple extra inches of reach on your arm, and makes it a snap to get the whole thing on and off your rig. You’ll also noticed in the photo above that I have a brass 1/4″ to 3/8″ adapter that allows the connection between the 1/4″ stud and the 3/8″ arm.

5. In addition to a short 12″ cable, keep a 6-foot length of HDMI cable in your monitor case to give yourself options when shooting for long stretches. One comfortable position, I find, is looking down, rather than out. Yesterday I was shooting on a grassy hillside and simply put the monitor in my lap while sitting cross-legged. I also have rigged the monitor on a light stand beside and below me when I’m seated in a chair behind the camera for long interviews.

How to avoid gamma shift when posting to Vimeo from FCPX

I had to deliver a revised video to a client this morning, which I thought was going to be as simple as navigating to the Replace Video File tab on Vimeo. A half-dozen upload attempts and 3.5 hours later, my 79meg video file finally finished uploading. Is it just me, or is Vimeo running painfully slow lately? But there was an upside to this delay: it forced me to take a close look at how I’m compressing footage for Vimeo. And I learned a few things about prepping files for Vimeo that are worth sharing.

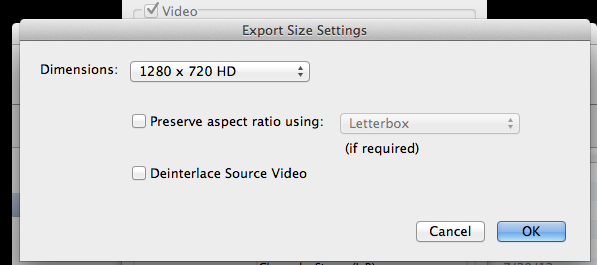
Final Cut Pro X provides a super simple way to export to Vimeo – just hit Share > Vimeo. This works great if you just want to share a file once. But unfortunately, this doesn’t work for me at all, because I have to upload multiple revisions, and FCPX doesn’t support file replacement from within the app. Final Cut Pro X doesn’t have a way of exporting 1080 to 720 from the Share menu’s Export Movie dialog, so in the past I’ve always just exported 1080p and uploaded that to Vimeo, where it’s converted to 720 on their end.

But the slowdown forced me to create 720p files on my end before uploading, and I noticed that converting them using Quicktime 7 to 720p. left the files looking a little washed out and desaturated. I did some digging, and it turns out quite a few others have noticed this gamma shift as well. The good news is it’s fixable, but it requires some work.

The best tutorial on how to fix this is from Transposition Films blog post Best Compressor Settings for Vimeo V2. You don’t actually need Compressor to do this, however, just Quicktime 7. Here’s a simplified, non-Compressor based workflow that gets the job done.

1. Download x264Encoder, a free alternative encoder for use within Quicktime.

2. Open the download and grab just this one file: x264Encoder.component. Copy it to your Macintosh HD/Library/Quicktime/ folder. Make sure it’s the top-level Library, not your User library.

3. Start (or restart if it was already running) Quicktime 7.

4. Select File > Export.

5. Name your file and at the bottom under Export choose “Movie to Quicktime Movie” and click “Options.”

6. Under Video, click “Settings.”

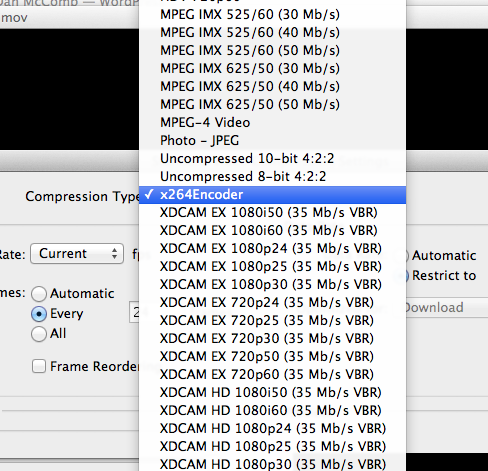
7. Under Encoder, choose X264.

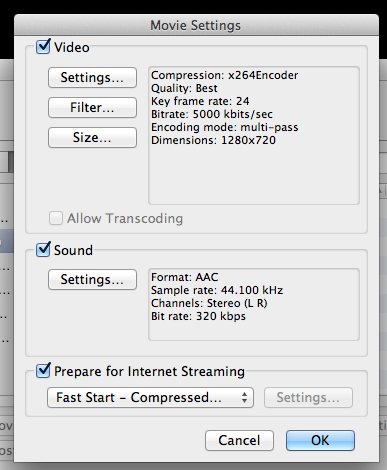
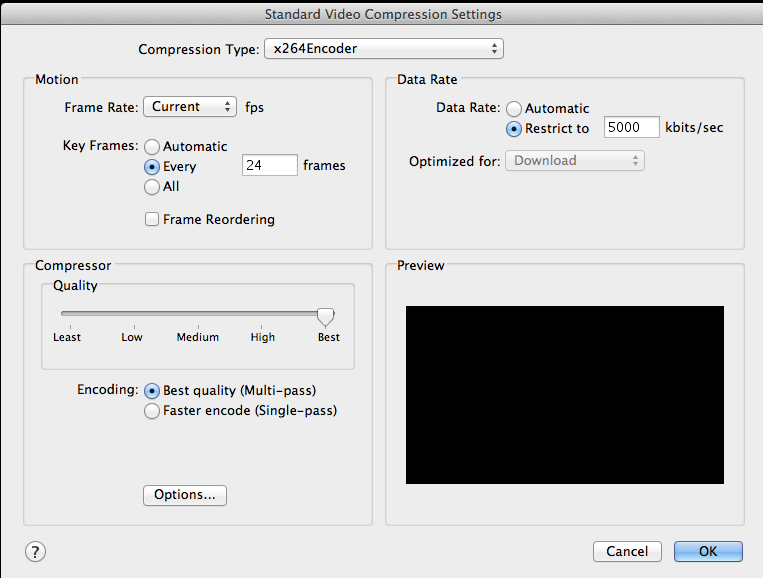
8. Here’s how I set the rest (my clip was 23.987 footage – if you are using a different frame rate, set accordingly, but don’t set higher than 30 frames per second when encoding for Vimeo, even if shot at 60p). Note that I’ve set Restrict to 5,000K per Vimeo’s requested settings. I don’t think there’s any benefit to setting this higher, because Vimeo will recompress it on their end anyway.

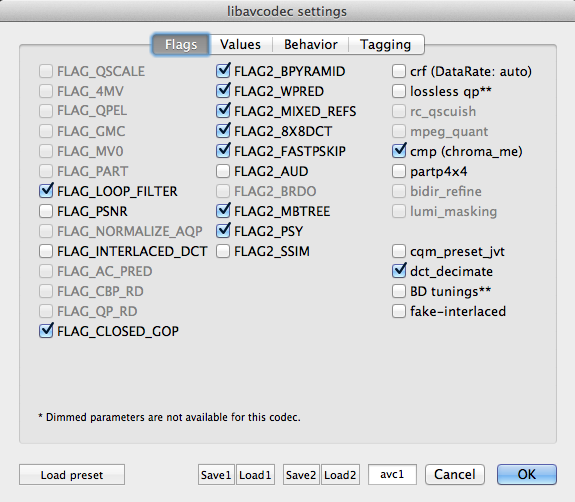
9. Press “Options.” You’ll get a bewildering array of options, but don’t worry – you can accept the defaults on the first tab:

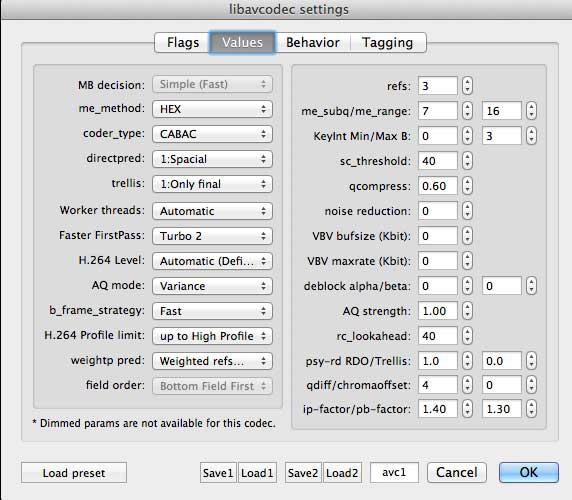
10. Accept defaults on second tab too:

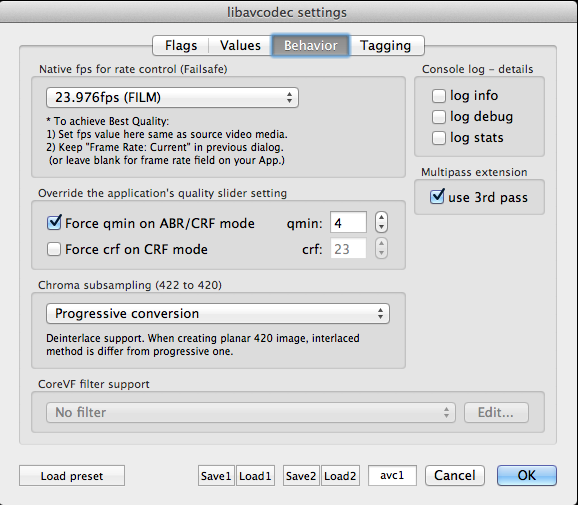
11. On the Behaviors tab, set your native fps according to your footage frame rate. Be sure to check “use 3rd pass.”

12. Under the Tagging tab, select HD 1-1-1 and check Add gamma 2.2.

13. Select 1280×720 as size.

14. Here’s your best sound settings:

Export it!

6-step workflow for pristine interview audio synchronization in Final Cut Pro X

I’ve been cutting on Final Cut Pro X for more than a year now. And during that time, I’ve learned to hate working on rough cuts where the audio levels are too low, clipped, or noisy. It’s too tempting to yank on the volume levels of individual clips and introduce problems that will bite you down the line. So over the past year, I’ve evolved a workflow for prepping interview clips that is pretty close to perfect for us at Visual Contact. In our approach, we make the clips sound good as part of the import process, BEFORE we start cutting. It’s made our work a lot smoother, and ultimately it saves us time (and money). Here’s how we do it.

But first, some background on our production technique. When we shoot an interview, we record dual-system sound (reference audio on the camera, and two mics on the subject: a lav and a shotgun mic, recorded to left and right channels respectively, via a MixPre to Zoom H4N. All things being equal, we usually don’t end up using the lavalier audio, preferring the superior sound of a shotgun mic. But experience has made us believers in redundancy.

After a shoot, I import all of the files (audio and video) into Final Cut Pro X, which places all files into the Original Media folder of the Event. From there, my workflow involves the following steps, each of which I’ll explain below:

  1. Batch-sync audio with DualEyes.
  2. Organize files into Smart Collections.
  3. Change sync audio files to Dual Mono.
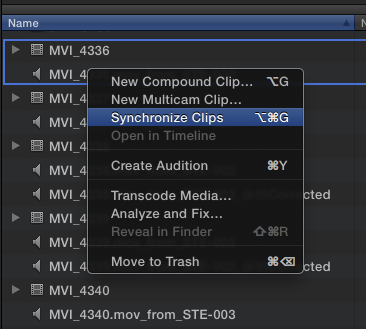
  4. Create synchronized clips.
  5. Assign keywords to synchronized clips.
  6. Fix glaring audio problems.

Step 1: Batch-Sync Audio.

While it’s possible to individually sync audio within Final Cut Pro X by selecting individual files and creating a sychronized clip, this only works when you know which audio file belongs with which video file. If you have a lot of both, you’re screwed. Unless you were slating everything, which we documentarians almost never do (in part because what I’m about to share with you is much faster).

Batch-syncing in our workflow is made possible with DualEyes. It creates audio files that are clearly labeled with both the video clip from which they are derived, AND the audio clip. This makes syncing them in Step 2 a snap. Note, the latest version of PluralEyes can also accomplish this – but the syncing process involves placing files into a timeline, exporting them out via xml, running PluralEyes, and then bringing them back into FCPX. If you use this method, be very sure to delete the project files that PluralEyes creates after the sync, so you don’t get confused about where your files are – they should only ever be in the Event Library.

So let’s get started. First, quit FCPX (so it doesn’t try read in the temp files that DualEyes is about to create). Open DualEyes, and create a new project. I save it to my Desktop, where I can remember to delete the temp files it creates after the sync. Now drag all your interview audio files and video files into the project.

If your shoot included clips unrelated to the interview such as b-roll, you CAN just drag everything in. It won’t hurt anything (unless you have a ton of clips). But it will take longer for DualEyes to run.

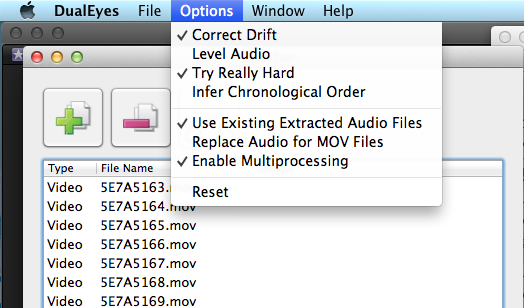
Before you click the scissors icon to begin the sync, check the options. Here’s my settings:

  • Correct Drift: This will create a new audio file that is timed to precisely match the reference audio. Check it.
  • Level Audio: This performs an adjustment to the audio levels, which is probably fine for quick and dirty projects, but if you want to have full control over how your dialog sounds, definitely leave this unchecked.
  • Try Really Hard: Of course you want your software to work hard for you, right? It takes longer, but it does a better job. Check it.
  • Infer Chronological Order: generally your files will be numbered sequentially, but if you are using multiple cameras or different audio recorders, leave this off.
  • Use Existing Extracted Audio Files: This saves time if you are doing a second pass on the files (for example, if it missed some files on first pass, and you’re trying again, it will use the same temp files without having to recreate them, saving time). Check it.
  • Replace Audio for MOV Files: Checking this box will strip out the reference audio from the MOV file and replace it with the good audio. I like to keep my options open, in case I want to use the reference, so I never check this.
  • Enable Multiprocessing: Check it.

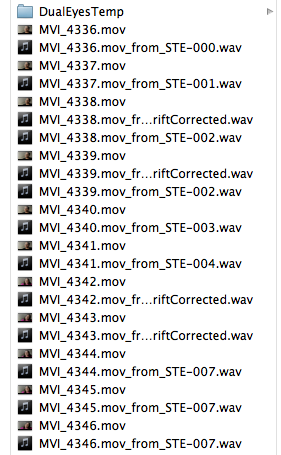
Click the scissors to run the sync. Your machine will churn for awhile. When it’s done, take a look at the new files created in your Original Media folder:

Note that DualEyes has created audio files for you, which are perfectly timed to match the length of the MOV file. And, it titles each file with the name of the mov file AND name of the audio file, important for the next step. You’ll also see that a folder called DualEyes has been created. Delete it, after checking to ensure that a new audio file appears below each video file that you expected to synchronize. If any is missing, run the sync again.

Step 2: Organize Files into Smart Collections.

It’s time to start getting organized. Start FCPX, and open the event. I start by creating a Smart Collection for each of the media types in my project (for example, one called Stills for all the still photos, and one called Audio Only for the audio files.

I also create a temporary Smart Collection called Sync Audio to make the next step faster:

In this collection are listed all of the files that DualEyes created for you. They need some work, which we’ll do next.

Step 3: Change sync audio files to Dual Mono.

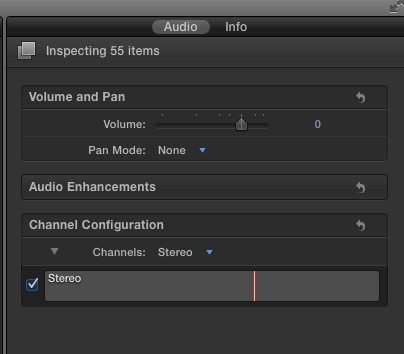
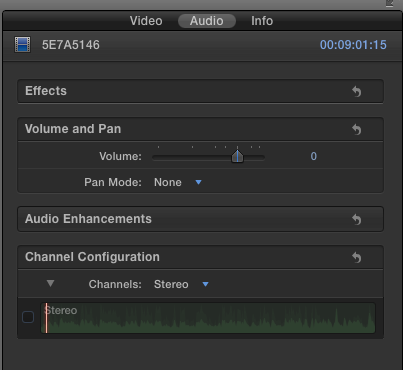
Choose the “sync audio” smart collection. Select them all in the event library (Cmd-shift-A). Then, open the Inspector. You should see something like this:

Notice that the default setting of Stereo. Change this to “Dual Mono.”

This will allow you to choose only the best-sounding mic (or to mix both mics) in later steps. But first, we need to create synchronized clips in FCPX.

Step 4: Create Synchronized Clips

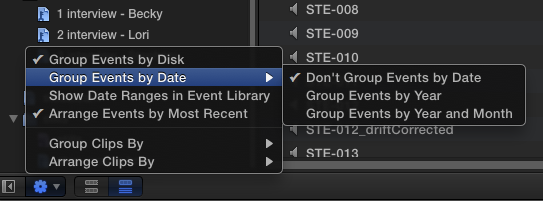
Put the Event Library into list view (opt-cmd-2), and select the event title so that all clips in the event are displayed. At the bottom of the event browser, click the settings gear, and make sure you have selected these options:

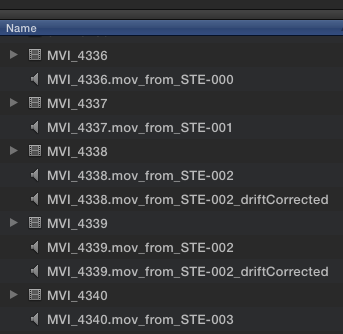
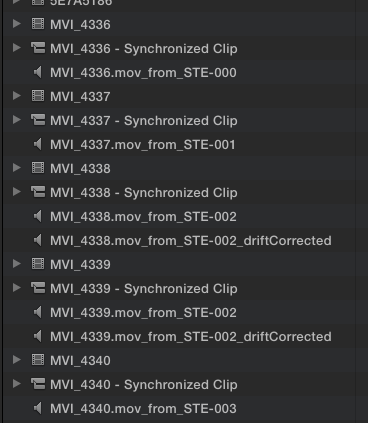
This will ensure that all your clips are displayed by name, next to each other, like so:

Select the first movie file, hold down the command key, and select the audio file immediately under it (select the “drift corrected” version if you have more than one).

Repeat this for each file. When you’re done, your directory will be filled with synchronized clips, which are the ones you’ll be using for the rest of your edit.

At this point, I create a new Smart Collection called Sync Video, so I can keep track of all the new clips and have them all in once place for the next round of work, adding keywords.

Step 5: Organizing with Keywords.

In this example, my shoot included two interviews with different people. Later in the edit I’ll want to quickly find interviews with each person, so I’m going to assign keywords to each. To do this quickly using the files that have the good audio linked to them, I start by putting the Event Browser into Browse view (opt-cmd-1). Now I can see at a glance which clip has which person.

In the image above, you can see I’ve created a folder called “Interviews” into which I’ve created two keyword collections. To assign, I select all the clips with each person and drag them into their respective keyword.

If you’re lucky and your audio levels are perfect at this point, and you like the balance between the lav audio and the shotgun mic, you’re done. But because we live and work in the real world, it probably isn’t quite that neat. Your audio levels, like these, might be too low, and maybe there was an HVAC system running in the background that leaves a low level noise you want to remove. And in my case, the lav audio needs to be turned off altogether, because the shotgun sounds far better. The next step is where we do that, keeping basic adjustments where they belong – with the file in the event library, before editing starts.

Step 6: Fix audio problems.

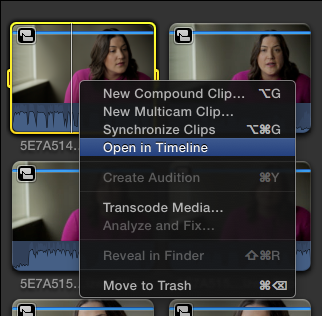
In the Event Library, select the keyword collection with that contains the synchronized clips you want to work on. Select the first clip, and open it in the timeline.

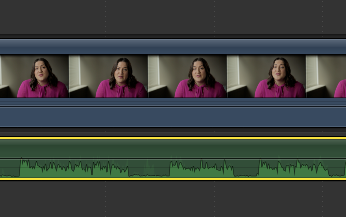
You’ll see the clip above the attached audio below, in green.

Select the blue clip, and make sure you can see the Inspector (cmd-6).

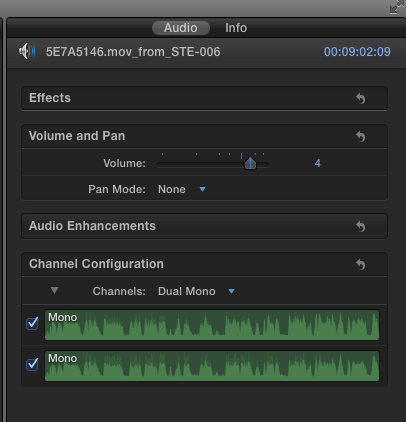
Since this clip contains only our reference audio, turn it off entirely by unchecking the box under Channel Config.

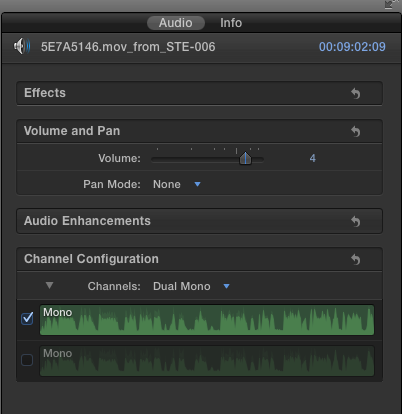
Now go back into the timeline, and click on the green audio file. In the Inspector’s channel config, both tracks are enabled.

In my case, I want to turn off the lavalier track, which is on the right channel, because it is inferior quality to the shotgun mic.

Now that I’ve got the best audio quality, it’s time to check my levels. Here’s how the clip looks. I can see just by looking at the waveform that the volume is too low:

While playing our clip, the audio meters show the levels are bouncing between and -11 and -30 db. That’s too low. A good rough levels setting is between -6 and -20 db. Let’s fix that.

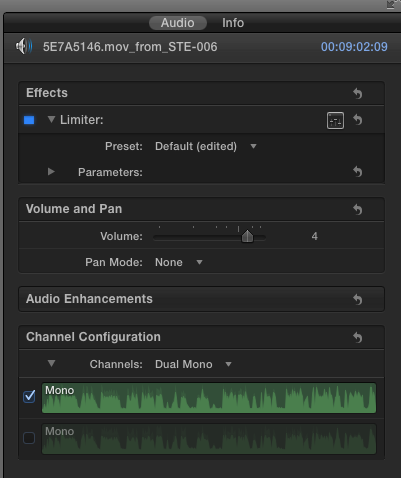
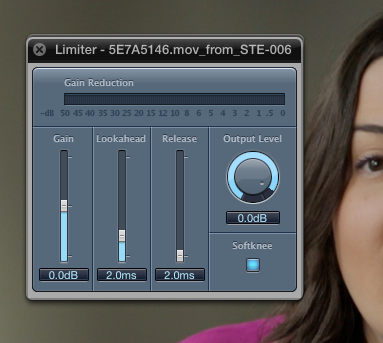
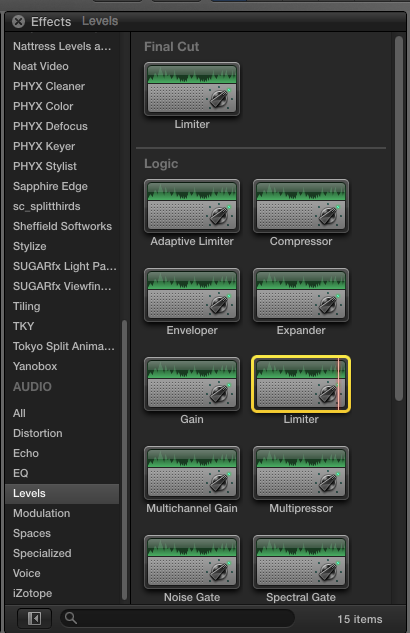
I could just yank up the volume, but that would leave us open to spikes of volume that might clip. I want to raise the levels without the danger of clipping, and leave any micro adjustments to levels to later editing. So I’ll use Final Cut’s Limiter effect, located in the Effects Browser, under Audio > Levels.

With the audio clip selected, double click the Limiter effect to apply it. It now appears in the Inspector.

Click the slider icon to bring up the HUD controls for the Limiter.

Here’s how I set mine:

Output Level: -3.5db. This means that the Limiter will “limit” the volume level to -3.5db, no matter how loud the clip gets. This is the correct setting if you don’t plan to use music under the piece. This is a pretty good baseline setting. If you know for sure that there will be music under the dialog, set it to -4.5.

Release: set to about 300ms for dialog.

Lookahead: leave it set to 2ms.

Gain: This will depend entirely on your clip. Drag the slider upwards until you are seeing levels that sound good, that range between -6 and -20 or so.

You will likely see some peaks reaching into the yellow in the timeline:

Listen to your clip one more time. In my case, I’m hearing an annoying HVAC system in the background that needs to be cleaned up. For that, I use iZotope RX, an insanely useful suite of audio repair plugins that work within FCPX. If you routinely work with dialog recorded on location, you won’t regret shelling out the $349 that it costs. It can also do miracles with clipped audio, which many audio engineers say is impossible to fix.

It’s beyond the scope of this tutorial to explain how to use iZotope, but in this case, I’ve applied the Denoiser effect, trained it to identify the noise with room tone I recorded at the location, then applied the setting to the clip to nix the HVAC. It doesn’t entirely remove the offending sound, but most of it is now gone.

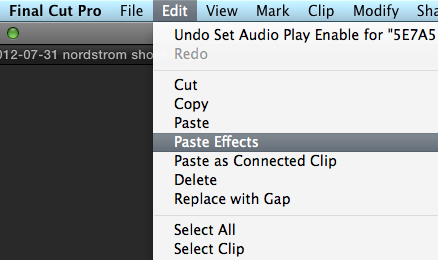
At this point I’m done fixing things. It was a lot of work, and I don’t want to have to repeat it on every clip. So we’re going to select the audio clip, copy it (which also copies the effects which have been applied to it). Now, you’ll need to open each of the remaining clips, select the audio track, and choose Paste Effects.

You can select all of the clips at once, and paste the effects to all of them. But if you have individual channels turned on or off, as I have, you will have to open each clip individually to adjust that.

Now you’re all set to start cutting with the confidence that your clips will sound great from the moment they land in your timeline.

If you had 6K to spend and didn't own any lenses, what would you buy?

A friend facebooked me this multiple-choice question this morning: If you had 6K to spend and didn’t own any lenses, what would you buy?

A) Canon 5d mk3 and used lenses from craigslist
B) Used Canon 5d mk2 and more lenses
C) 2 used canon 5d mk2 and less lenses
D) 1 canon 5d mk2 and 1 7D and lenses
E) Blackmagic Cinema Camera
F) Something else

I run everything at Visual Contact with a pair of Canon 60Ds, and quite a bit of used Nikon glass. In practice, I actually just use two things for probably 85 percent of my shooting: one Canon 60D and one Canon Zoom lens, the EF 18-55mm f/2.8. Having the second 60D body is great, and I do sometimes use it. But more often than not, it’s there just in case something breaks on my A camera. Which hasn’t ever happened. Yet.

So my snap answer, based on my experience and shooting style: I’d pick one camera and one sweet zoom that covers (in 35mm equivalent terms) the 24-70mm range (which is good for everything from establishing shots to interviews). I’d buy that lens new, because great used glass holds it resale so well, so you’re not saving much, and you’ll be able to sell it for most of what you paid for it.

Which camera to buy is a tougher question.

I’ve used the Canon 5dmkiii twice, and I really like it. In addition to being exquisitely sensitive to low light, it gives me the option to go really wide with my 20mm Nikor lens, the widest prime lens I own, which on my 60D equates to just a 32mm lens. But my favorite thing about the 5dmkiii is that Canon has fixed the moire issues that plague all first-generation DSLRs. Is it worth $3,500 just for that? Maybe.

Ever since their big announcement at NAB, I’ve been trying to figure out how to justify spending $3,000k on the Black Magic Design Cinema Camera. It’s not very much money for what you get, of course, but it’s a lot for me. I’m going to start out by renting it. It looks like an amazing camera. But with a 2.4 crop factor, finding wide glass for this camera could be a bitch. And after shooting on APS-C, I’ve got reservations about the Super 16 sensor size that I look forward to exploring when I get my hands on the camera. What’s most promising about this camera to me is the purported 13-stops of dynamic range. That’s very attractive to my style of shooting, which depends on doing a lot with minimally augmented lighting.

I quite like the APS-C sensor size of my 60Ds. It’s very close to Super 35 film size, and it gives all my glass extra reach, turning my 300mm Nikor into a far-seeing 480mm lens. And in the two and a half years that I’ve been shooting on my 60D, I’ve never once had a client complain about the image. When I compare the 5D image next to the 60D image, however, I do love the extra smoothness, color fidelity and shallow depth of field that I see. It also produces a slightly sharper image. The one Achilles heel of this camera is moire. I have to deal with it all the time and it drives me nuts.

I’m curious to see what Canon has up its sleeve with the next generation of the 60d, which some people are referring to as the 70d. Canon didn’t fix moire in the T4i, so it’s possible they won’t fix it in the new version of the 60D. If that’s the case, I won’t buy it and I’ll lean more heavily toward the BMDCC. There’s also rumors that Canon will make an entry-level full-frame camera soon, possibly in September. If they could bring the price of that down to something closer to 60D territory, and still fix the moire issues, I’ll probably buy one and use it a lot.

So there you have it. I’d spend about half of the money on a camera, and half on the best zoom lens you can afford in the 24-70mm range. And any money I had left over I’d spend on renting the specialty lenses you need only when you actually need to use them.

Overcast lighting tip: take it off the top with negative fill

A quick way to make the most out of overcast lighting is to place your subject against a darker background, add some bounce for the eyes and a bit of negative fill on one side. But why stop there? Let’s say you’re shooting an interview outdoors on a profoundly overcast day. And you don’t have any lighting to punch things up. Here’s something simple you can do to add some seriously directional quality to the light.

Let’s start with a baseline shot: overcast day, soft Seattle light raining down from above, guy with shockingly white hair (me!), shot against some foliage.

Fly a piece of 4×4 foam core up on a c-stand directly over subject’s head. Drop the flag down until you’re subtracting some light off the top of his head, and you’re seeing the light coming in primarily from the sides. You’ll have to open up a couple stops to maintain the correct exposure. Like so:

That guy’s hair isn’t so white. Really.

Now, add another a flag on the non-key side. You might need two of them (I did).

Check out the way things look now:

If this had been a real shoot, I’d have fiddled with it a bit more, bringing the flag closer to the camera-left side to block more light, and opening the camera-right side of his face to a bit more light. Also, I’d have opened the camera aperture from f/5.6 f/2.8, to throw the background more out of focus. Oh what the heck, as long as I’m talking about it, I might as well actually do it. Like so:

Regardless of how far you take it, the result is clear. Using this simple technique, light is pulled off the top, and wrapped around the side. On an overcast day, enough light will find its way past your flags to provide plenty of fill, but you’ll get this nice soft directional quality.