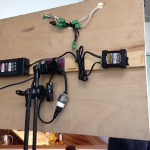
First you get a DSLR, then you get a follow focus unit. Then a bunch of stuff happens, and you end up with a pile of this on your living room floor:

Today I’m happy to report that such bandaids for dslr lenses are no longer necessary, thanks to a mechanical engineer named Sean McCurry, who is quietly revolutionizing the follow focus gear, one perfectly printed lens gear at a time. Wait, printed? But before we get into that…
I guess you could say that I’m a focus gear whore. I feel like I’ve tried just about everything on the market in hopes of finding one that worked seamlessly (so to speak) with my set of Zeiss/Contax primes. But every one I’ve tried has left me cold. To be specific:
Redrock Micro gears are nice because they give some autofocus lenses some much-needed extra throw. But with my Zeiss primes, I found the extra throw to be too much. And the ergonomics suck: too big to store in my lens case, they have to be assembled before every shoot. Major bummer. I want gears that I can buy and forget about,.
Zacuto Gears are basically thin bands of plastic that have a big awkward bump. They get the job done, but I’ve had them slip off my lenses more than once while running and gunning, because the bit that holds the two ends together gets caught on things. Oh, and they aren’t cheap.
If you want cheap, you want Jag35 zip-tie gears. But like the Zacuto, they catch on things, and they don’t add any throw diameter to your lens, either.
Genus gears are one-size-fits all, which makes them great for larger diameter lenses like my 300mm f/4 Nikon. It’s the only gear I could find to fit it. But not at all great for more standard size lenses, where the tightening screw gets right in the middle of your business. Plus, they tend to loosen up during use, and you have to remember to keep retightening them.
One thing I have never tried: Duclos cine-mod. This is the gold standard of lens gears. And by gold, I mean $105 a pop. But what’s prevented me from going Duclos is that you have to send your lens away for an unknown length of time to have the mod done. That more than anything has been the deal-breaker for me. I need my lenses.
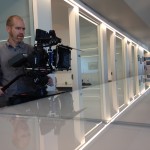
 Above: iPhone pano of my set of Zeiss primes, with Sean’s gears.
So. Is it too much to ask to have something as perfect as the Duclos mod, for a third of the price, that without any tools, I can install myself?
Enter a mechanical engineer named Sean McCurry. I accidentally discovered his brilliant work while surfing on Ebay a few weeks ago, when I was startled to see a listing for “Seamless follow focus gears” specifically made for Contax-Zeiss primes. I have a lens set that ranges in size from 25mm – 135mm, and Sean had each of my focal lengths covered. For $35, I took a chance and ordered one for my 50 f/1.7 prime. It arrived three or four days later, and with great curiosity I took it out of the box. Four pages of instructions on lens fitting were included, but were unnecessary: the gear fit PERFECTLY. I simply had to very carefully and slowly wiggle the gear on, until it seated firmly into the spot where I wanted it to stay on the focus barrel of the lens. The fit is so tight that it doesn’t slip at all, doesn’t require glue, and feels like it was made for my lens. Which, in fact, it was.
I’m not 100 percent sure how Sean is able to make such killer gears. But I’m confident it’s because he’s 3D printing them. A close examination of the gears reveals telltale patterns, strata in the plastic that are consistent with 3d printing (click image to enlarge):

One great thing about these gears is that I was able to place them at approximately the same position on 4 of my 5 lenses, so that when swapping lenses, I don’t have to adjust the focus puller position on the rails. Also, my previous gears would ride up and down the lens as they came in and out of their foam Pelican case, requiring constant readjustment, often in the middle of a shoot. These gears stay put.
Need more amazing? Beyond the great ergonomics, these gears producer smoother more predictable and repeatable pulls than I’m used to getting from my previous gears. Maybe it’s the extra gear depth, maybe it’s the precision of the printing, maybe it’s the Delrin they are made from. Whatever it is, these gears have taken my focus pulling to the next level.
Sean is currently making the gears for popular DSLR lenses that include the following:
Sigma 18-35mm f/1.8
Set for Contax Zeiss Lenses
Canon 100mm Macro lens
Nikon 105mm f1.8 AI-S Lens
Canon 24-70mm Lens L Series F2.8
Canon 70-200mm f2.8 L IS Lens
Tokina 11-16mm f2.8 IF DX II Lens
You can see the full list (currently 105 items) to see if your lenses are on it.
Don’t see your lens on the list? Sean welcomes custom orders. You can measure the circumference of your lens, and email your request to helicoptersean@gmail.com. Or contact him via his Ebay shop.
So here we are. Living in a world where the best stuff can come out of a printer. Welcome to the future.
 4. The image stabilization is really good, but it’s not a silver bullet. I found that it was possible to handhold footage up to about 35mm, maybe 50mm (in full frame mode); beyond that, it’s Movi time. And forget trying to shoot handheld with Super 35 crop mode – the rolling shutter is just too noticeable. Still, it’s the first time I’ve been able to seriously consider using a DSLR to handhold anything other than hybrid stabilized lenses like my Canon 100mm 2.8 macro IS. So that’s really something.


 With the Phantom 3, you get the ability to set the response curve of the sticks (see graphic at right) without connecting to a computer. All the configuration options are a few swipes away in the DJI Pilot app.

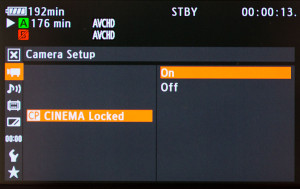 2. Set to record Canon Log. Under the Camera menu, select CP Cinema Locked and set On. This enables Canon Log, which gives you a flat file that grades beautifully in post. Using this setting preserves all the options that are available to you in post. Using this setting in combination with a


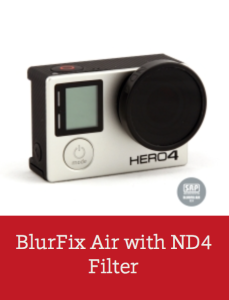 Bonus tip: Use an ND filter in front of your GoPro. This is like putting a pair of sunglasses on your lens, and reduces the amount of light coming in so that the shutter speed can come down to something more cinematic. This allows movement to blur and look natural. It also goes a long way to reducing jello shutter that is exacerbated by high shutter speeds.
