Category Archives: Tips

Connecting Zoom H4N to Sound Devices MixPre – Part II

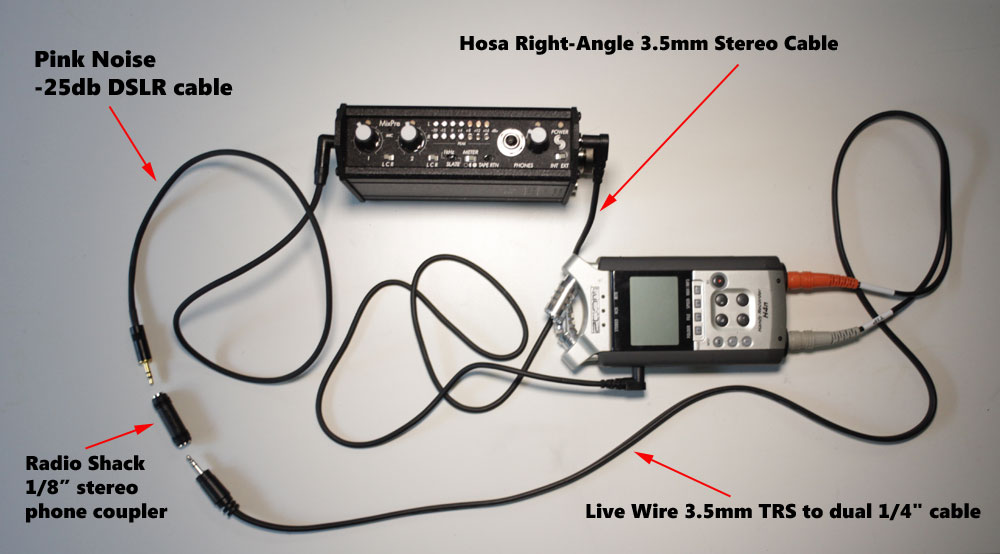
In part 1 of this post, I outlined the problem of connecting the Zoom H4N to Sound Devices MixPre. In a nutshell, the signal the MixPre sends via it’s Tape Out is too hot for the Zoom’s line in. I posted a workaround that allowed us to get by, and a proper solution using a -10db inline pad. Since then, sound recordist Lisa Cooper and I have been using this combination on an almost daily basis shooting a documentary called Beyond Naked. And we’ve hit on an even better solution that truly kicks ass and makes us smile. Here it is:

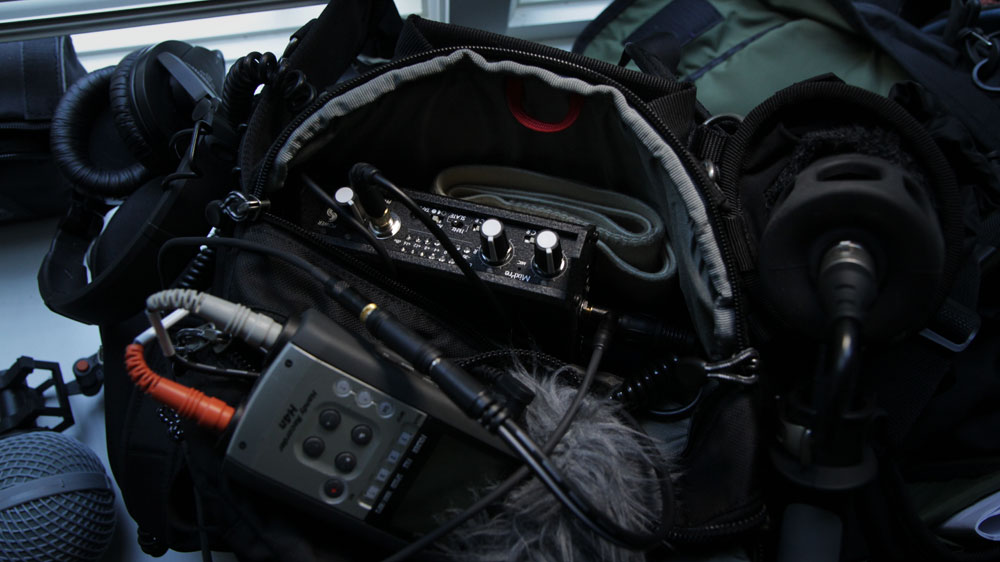
The problem with these lightweight 3.5mm jacks is that, when we used ones that go straight in, they tend to stick out and get knocked around in the sound bag (see photo below):

Because it’s coupled with the -10db pad at the critical connecting point, it tends to lever itself loose, causing static, or worse, it could break off or damage the internal jack on the MixPre. The right-angle connector, on the other hand, lies flat, which gives everything a safe, low profile in the sound bag.

The Pink Noise cable is the way to go. Because it’s -25db, you have to set the recording level on the Zoom H4N a bit higher. We’ve found the best setting is 28. (The best setting is 20 with the M-Audio -10 pad). Any higher, and it’ll start to clip on the Zoom before the MixPre limiters kick in. The best thing about the Pink Noise cable, besides the fact that it makes the tape out signal usable, is that it has a right-angle connector that allows it to connect to the MixPre without sticking out.

Here’s the parts list:

Hosa Right-Angle 3.5mm to Right-Angle 3.5mm Stereo Cable ($3.99 at B&H Photo)

1/8″ Stereo Phone Coupler ($3.99 at Radio Shack)

Pink Noise -25db DSLR Cable ($54 direct from Pink Noise Systems in UK)

Live Wire 3.5mm TRS to dual 1/4″ cable ($8.99 at Guitar Center)

If you order the Pink Noise cable, make sure you email and ask to have the VAT tax dropped (you don’t have to pay it if you’re ordering from US). They have great customer service if you ask, but you’ll get overcharged if you simply place the order via the web form, since there is no option to not pay VAT on their order form.

And finally, here’s why it’s such a big deal to have the right-angle connectors: because sound bags in real life look like this! Cable management is very important to getting the job done.

Color grading with Colorista II

I’ve been using Colorista II for pretty much all my color grading ever since it was released a few months ago. Why? Because it’s awesome, and I know it’s awesome because of Stu Maschwitz’s killer video tutorials. He posted an unusually long clip earlier this week: a full hour color correcting session with a client. To watch the tutorial is to be right there in the room, listening in on their conversations, learning the steps to get perfect color. Thanks Stu!

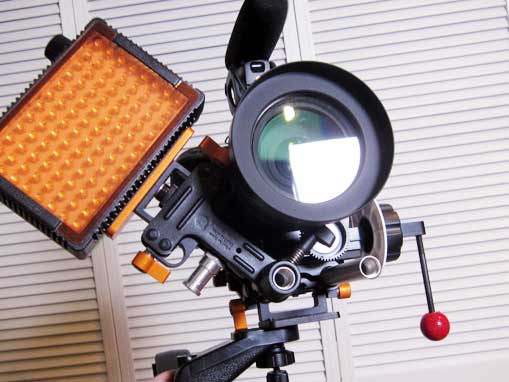
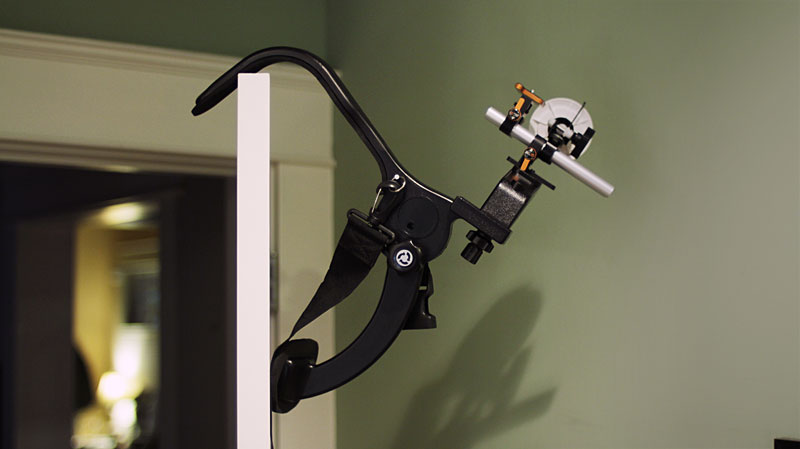
I had a chance to put everything I learned to work on Thursday, when I shot a series of series of brief interviews, called 619 Stories, for a Seattle startup called Intersect (which has posted many of the finished clips in the 619 Building Timeline). The lighting was abysmal in the venerable artists building (which I myself once briefly lived in nearly a decade ago). I knew I was going to need to augment the light with something on-camera at least for fill, and I found a decent way to configure my custom shoulder rig with LitePanels Micro Pro just to the side of the camera, off one of the rails:

What I like about this is that it’s true quick release. I can instantly remove the LitePanel just by squeezing the clamp, which grips it with plenty enough force that I don’t have to worry about it coming loose accidentally.

I used Colorista II to do the grade, and Magic Bullet Looks to drop in a vignette and spot exposure. I could have done all of this in Colorista II by stacking additional Colorista filters, but Looks and Colorista work fine in tandem.

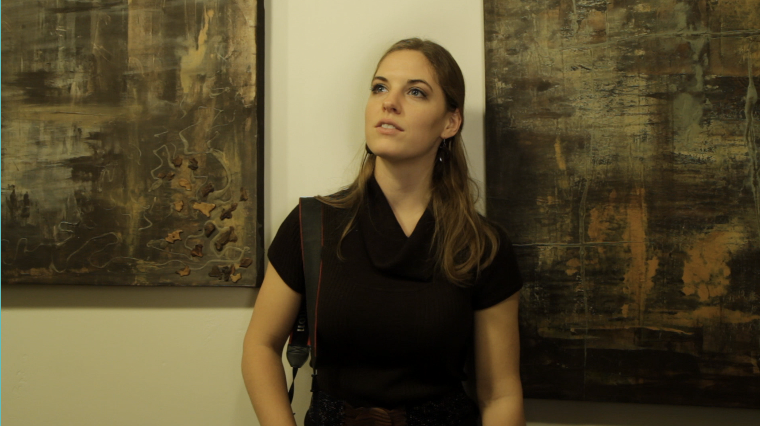
Here’s what I started with:

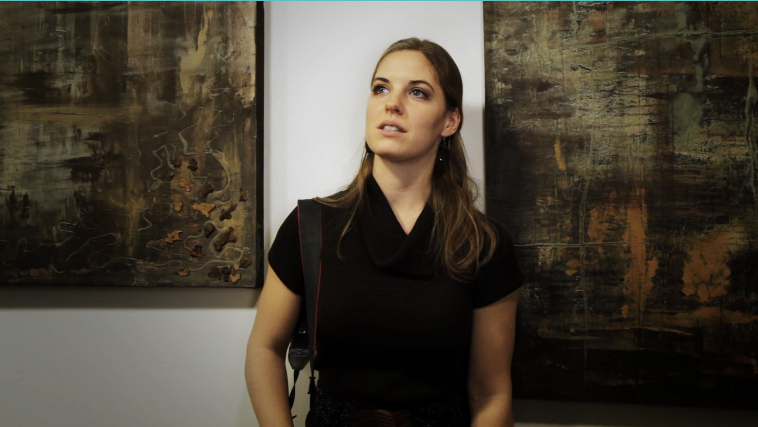
And here’s what I finished with:

I shot this interview with one knee down, which gives her the hero pose, with the lens angled slightly up at her. Shooting with a shoulder rig off one knee pretty much gives the same perspective you’d get holding a camcorder football-carry style, which was my preferred method of carry before DSLRs made me never want to touch a camcorder again.

And finally, here’s the finished video:

While editing this piece I accidentally discovered a (possibly gimmicky) solution to the dreaded jump cut problem: I inserted a cross dissolve between questions, and in Final Cut’s Motion tab, I set the clip to scale 100 percent at beginning of transition; and 200 percent at completion of it. The result: The old clip flies up at you, revealing the new clip underneath. It wouldn’t work in every interview, but I kinda like the effect.

Best DSLR shoulder rig for under $500

For nearly two years, I’ve searched in vain for a DSLR shoulder rig that does what I want it to do, at a price I’m willing to pay. But last week, I finally cracked the code. After taking a look at Ikan corp’s new Recoil XT shoulder rig (and realizing it was ergonomically and technically NOT the rig for me), I got the idea to combine affordable components from Jag-35 with an inexpensive shoulder stock that Philip Bloom once raved about from DotLine Corp. And the result is, for the first time ever, I’ve got exactly what I want. An affordable shoulder rig that:

1. Is balanced – I can completely let go with my hands without the rig falling over.
2. Is light as possible – no shoulder-numbing counter balance weights need to be added.
3. Includes follow focus for smooth cinematic focusing on the fly.
4. Is ergonomic – Z-finder is positioned in front of my right eye; I can comfortably use rig for longer than a few minutes.
5. Can be quickly reconfigured – camera can quick-release for use on tripod.

OK here’s the component parts, and how much each costs:

From Jag-35:

$59.99 DSLR tripod plate
allows mounting to stock and attachment of rails

$139.99 Quick Release Gorilla Stand attaches to rails allowing Zacuto Gorilla plate to quick-release camera on and off

$65.00 Zacuto 15mm rods 6.5″

$189.99 D|Focus follow focus V3

From B&H:

$69.95 Dot Line DL-0370 Hands-free video stabilizer

Total cost: $524.92 (see update below for how to shave almost $40, bringing total cost under $500)
Total weight: 2.5 pounds, including strap

*Also needed are the Zacuto Z-finder, mounting frame, and gorilla plate. But I won’t count that in the cost of the rig, since it’s really a separate bit of mandatory kit.

You might think that it would be hard to breathe while holding still a rig that rests partially on your lower chest, but it’s not that bad. The camera will move slightly every time you take a breath, but it’s easy to adjust your breathing pattern slightly for maximum stability (it simply involves being mindful not to push out your chest when inhaling – it’s easy to expand lungs down and sideways instead).

I was worried that the $69 stock would be cheap plastic, and it remains for me to use it awhile before the verdict is fully in. But it feels very solid. And as far as the Jag-35 components go, I’ve been very satisfied with the quality of their gear. It’s not top-of-line stuff, but it’s solid and dependable and simple, and a fraction of the price of competitors like Zacuto. That’s a winning combination for me every time.

UPDATE: Incredibly, I just found an apparently identical version of the $69 stock listed on Cowboy Studio via Amazon for $29.95. How’s that for a deal? Brings the total cost of this rig down to under $500. Sweet.

Zoom H4N with Sound Devices Mixpre: how to properly connect the two for pristine audio

Up until now, using the Zoom H4N as a standalone recorder with good mics has worked fine for me. But I’ve evolved into a stickler for good audio, and I’m fortunate to be working with an outstanding sound recordist, Lisa Cooper. Together we are finally bumping up against the limitations of using the H4N for recording: it’s hard to read the meters on the Zoom when it’s in a sound bag (where the levels are located on the wrong side to be visible); the H4N pre-amps are somewhat noisy; the limiter sucks, and you can’t quickly send signal from left to right channels or both without digging through several layers of menus. Not to mention that when powering a 48v phantom power mic, such as my Octava MK012, the batteries drain in just a few minutes. When I read Kurt Lancaster’s rave about the MixPre in his new book, DSLR Cinema, I decided it was time to ante up.

It turns out that, even in online discussion forums, there’s scant clear information about how to correctly cable the Zoom H4N to the Sound Devices Mixpre for optimum recording (that is: recording that is as hot as possible, but that won’t clip on the recorder before it hits the limiter on the MixPre). I had to wade through at least a dozen different forum conversations before I finally found most of the advice I needed. I found the rest of it today during a trip to Guitar Center in Seattle. So I’m documenting the right steps here for anyone else who is ready to reach for pristine audio while keeping the trusty Zoom H4N in your sound bag.

So here’s the scoop. You can’t just plug normal cables from the mixpre into the zoom at default settings, because the signal coming out of the professional-grade mixpre is too hot for the consumer-grade Zoom to handle. But, with the right cable and a tiny jewler phillips head screw driver, you can make it work acceptably, and by adding an in-line attenuator that costs less than $25, you can make it work perfectly. More about that in a minute. But first, the cables.

There are two options for cabling the mixpre to the zoom: You can run either from the tape out, in which case you’ll need trs-to-dual phono jacks, or, you can buy two xlr female-to-phono cables. But there’s a problem with both: The signal that is output from each of these is different, and neither is quite right for the Zoom’s line-in.

While you COULD just run xlr female-to-xlr male from mixpre to zoom, you don’t want to do that. Doing so enables the noisy preamps on the Zoom, and you damn sure don’t want that after making that big investment in the mixpre’s vastly superior, quieter preamps. You need to use phono jacks for plugging into the Zoom to bypass the preamps. (A tip for those of you who know as little about audio circuitry as possible, like me: phono jacks are those 1/4″ jacks that look like old-school headphone jacks. They plug into the same hole on the bottom of the Zoom H4N that your XLR cables do – but into the middle instead of the three pronged connector that surrounds it.)

But wait, there’s more. If you do connect the MixPre to the Zoom as described above using the xlr-to-phono option, you will need to add 15-20 db of attenuation to get the correct level into the Zoom. To achieve this, you need to buy an inline attenuator, preferably a selectable attenuator, that lets you dial in how much attenuation to apply. And, you would need to by two of them if you want to send signal to both channels independently, which you almost certainly will want to do. So, lots of stuff to buy with this option, and it’s not cheap at $45 a pop for each attenuator. And why would you want to add all that extra weight and awkwardness to your lean, mean sound bag anyway? No, you want to use the following option instead.

The way to go is by running this 3.5mm TRS to dual 1/4″ cable from the MixPre’s tape out -> line in on Zoom. This ALMOST works out of the box when you plug it in. But there’s a big problem lurking: even when you dial down the recording level on the Zoom to 1 or lower, the audio signal will clip on the Zoom before the limiter kicks in on the MixPre. Incidentally, you don’t want to dial your recording level to .9 anything below 1, trust me – I tested it and got horrible results every time. And you also don’t want to turn down the level of the tape out on the MixPre – I tried that and it still clipped on the Zoom no matter how low I turned it down.

The quick solution is to get a jewler’s phillips head screwdriver and turn the factory setting on the MixPre’s limiter 1/4 turn to the left. By default these are set at their highest gain on the MixPre. Turning the screw to the left activates the limiter at a lower gain level.

With this configuration, I found a workable setting was to set both recoding inputs on the Zoom to 5. The tradeoff is that it’s now slightly harder to monitor recording levels on the MixPre, because the LEDs, which normally go three steps into red before clipping, now clip at the second light. So you have to ride your levels down a little further into the green and use less of your LEDs than is ideal when watching your levels while recording.

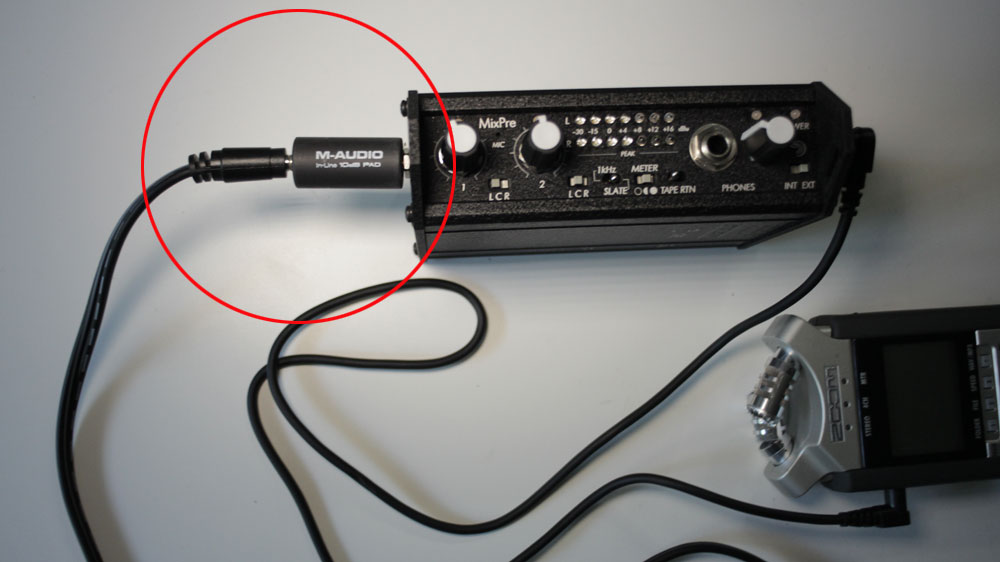
The better solution is to purchase an in-line attenuator for the 3.5mm cable, which will allow you to keep the limiter set at it’s default value, while sending a signal that is reduced by 10db to the Zoom. Then, you can up the recording level on the Zoom to compensate until it’s dialed in perfectly.

I could find only one option for a -10db TRS attenuator that will get the job done for around $25. I’m sure somebody else makes them – if you’re aware of other options, please let me know. I’d like to find something clean and simple like the Pink Noise cable made in the UK, but with less attenuation than the 25db that it has.

Incidentally, the sound bag I’m using, the Think Tank Wired Up 10 with optional mic drop in, really deserves a separate review of it’s own, which I’ll post another day. It’s killer.

UPDATE: After using the M-Audio -10db pad almost daily for a few weeks, we’ve identified a problem with this approach, and an even better solution. Check out Part II of this article for the full scoop.
640 crop mode on canon 60d: possibly useful for HD shooting. Until the GH2 ships.

When I read about the 1:1 crop mode on the soon-to-be released Panasonic GH2, my jaw about hit the floor. The possibility of turning my 50mm Nikon lens into a 500mm lens capable of shooting 1080p HD video on the GH2 by doing nothing more than flicking a switch is rather interesting. No wonder some bloggers are calling it “the best feature in a video DSLR yet.” From EOSHD.com:

1:1 crop mode is a tap directly into the sensor, it takes a 1920×1080 window from the centre of the sensor so no scaling or image processing is required. It then takes this RAW sensor data and bypasses the usual image processor completely, sending it direct & uncompressed to the encoder chip.

I mentioned this to a film industry friend of mine today, and he said “that’s cool, but your 60D can ALMOST do that already.” I was like, “oh yeah, I remember reading something about a standard-def tele setting.” But I’ll admit it: when I see SD-only when reading a manual, my eyes glaze over and I move on. I’m living in an HD world, and I expect everything around me to be living and breathing HD. So as far as I was concerned, the 640 crop mode on the 60D didn’t exist. Until today.

When I got home this evening, I decided to investigate this feature. I made this short clip with my Canon 60D, mostly to help myself understand it. It illustrates how it could come in very handy: shooting a tight close-up of something you want to frame in a window.

As this video illustrates, you would have to enlarge 1080p video to about 275 percent to get the same size as the detail captured in a window shot in 640 crop mode…and we all know what happens to any image when you try to blow any video up that much: it falls apart.

What’s more, if you apply this technique to 720p HD video, things look even better: you get from the 640 crop an image that is more than half the size of the 720p footage you might pair it with. So you could do things like side-by-side comparisons of medium and extreme close up subjects. All without leaving HD.

Of course, you could just be gobsmacked (as I suddenly am) with the fact that I can turn my 300mm lens into a 2,100mm lens, and shoot that impossibly-far-away-ship-with-heat-waves-dancing-on-it. Nevermind that it’s SD – I can shoot it. But then again…

You could just buy a GH2 and do all that and more in 1080p HD. Consider this: the GH2 is a 2x crop camera. So my 300mm Nikon lens, on the GH2 with an adapter, becomes a 600mm lens. Now hit the 1:1 crop feature, and it becomes…what? I’m not sure, actually. But I know it’s really fucking big. From what I can gather from the pre-release chatter, it’s at least as much as the 7x crop factor of the 60D. Which would transform my 300mm into a 4,200mm lens. Shooting 1080p video.

Wow. Holy crap. This really does change everything.

Going deep for film sound with Acquarian Audio hydrophone

I’m taking what feels like a once-in-a-lifetime trip to the Galapagos next month (it’s actually the third trip for my brother-in-law, so who knows). While there, I’m planning to shoot a lot of professional video. And with that of course comes recording professional sound. I anticipate extraordinary proximity to sea creatures of the kind that’s very unusual, and I want to make the most of it. So I’m gearing up, and one of the things I’ll be packing to listen below the surface is an Acquarian Audio hydrophone. I did a fair bit of research before I made this purchase, and found a lot of options, most of them from companies based in the Northwest.

On the low end (pricewise), there’s a company in Vancouver, BC, called Cold Gold that markets a full line of hydrophones, many of them around $50. Right here in Seattle there’s a company called Cetacean Research Technology that makes hydrophones. But the fact that they neither list prices online nor offer online ordering was a deterrent for me.

I decided to go with the H2a-XLR hydrophone made by an Anacortes firm called Aquarian Audio. I ordered this one despite the fact that it’s nearly $200 (with the extra cable and shipping), not just because of the fantastic info on their website (which includes a slew of real-life recording samples), but also because in my research I found that a sound recordist whose work I respect, Miguel Isaza, uses this brand. He has a post on how to record underwater sounds with a hydrophone that helped inspire me to take one of my own on the trip.

I posted a question on the Acquarian Audio website and not only did Robb, the proprietor, respond personally – he actually called me and left a message that helped me decide on the appropriate length of cable I needed. I was thinking that 20 feet of cable would be about right for dangling off the boat, but he suggested that 30′ is the minimum to get below sounds that originate in the boat, such as generators that are often running on tour boats such as the one we’re chartering. In fact, he suggested 50′ would be best, but I’m going with the 30′ length, which is one of the standard configurations available on the Aquarian Audio website, because of space considerations (I’m already taking too much filmmaking equipment).

I’ll be posting samples as soon as I’m back from the trip. One last thing: here’s the best brief primer I could find on how to make underwater recordings of sea life (includes info on how to rig microphones – good stuff): Taking a Picture of Underwater Sounds (PDF, 66 KB)

Great read: The Believer, 2010 Film Issue

I discovered a publication called The Believer recently, which features some of the most interesting and informative writing about filmmaking I’ve ever seen. The 2010 film issue, which was published in April and can be backordered on their site, has thoughtful, well-written interviews with Harmony Korine, Ilisa Barbash and Lucien Castaing-Taylor (makers of the beautiful shot Montana doc “Sweetgrass”), and Gary Hustwit.

The Believer has a welcome bias toward documentary film in their content, and an edgy editorial approach that allows them to publish hand-drawn comics alongside top-10 culture lists. And to top this issue off, there’s even a DVD of short films from the Yugoslavian Black Wave. Hours of fun.

Ship glidetrack/tripod inexpensively with military surplus plastic cases

I’m gearing up to do some serious traveling with my camera gear, and discovered that plastic shipping cases big enough to together hold my tripod and Glidetrack cost nearly as much as the equipment it’s designed to protect. So I did some digging on ebay, and hit gold: these military surplus shipping tubes costs just $34 each.

They’re are a perfect fit for a Glidetrack (with feet removed) and most HD video tripods. With shipping, which is a bit spendy for these oversize items, the total came to just under $60. Compare that to the least expensive Tuffpak case I could find on B&H, which will set you back $249.

Glidetrack as a Sidetrack for flyover shots

Love my Glidetrack. But is tracking past something as powerful as gliding over it? I often find myself wanting to aim the camera parallel with the track rather than at right angles. Can’t do it, though, because the end of the track gets into frame when the camera is angled more than about 45 degrees (with any wideish lens).

I tried mounting the camera on a Manfrotto magic arm, and quickly learned that balance really matters with these lightweight rigs: as soon as you move the camera off center of the Glidetrack, smooth moves become impossible. However, with a few parts and attention to balance, I’ve found a way to turn my Glidetrack into a Sidetrack.

To illustrate the difference, here’s two short clips filmed on my desk using Canon 60D (above) and Glidetrack. The first is shot with the camera mounted on the track conventionally, at a 45 degree angle. The second was made using my sidetrack rig, shown in the stills below.

There’s probably a simpler way to do this, and if some third party made it (affordably), I’d probably buy it. I love this kind of flyover shot.

(Note: the metal piece in middle is a speed ring for a soft box).

Sound Design for Pros – save 60 percent on workshop recordings until Oct. 25

I just finished a fantastic 6-week course, Sound Design for Pros, with legendary sound designer David Sonnenshein. What’s cool about this course is that it was taught entirely online, with about a dozen students from places like Amsterdam and Italy logging in to a live workshop in which, in addition to live lectures from David, we took turns broadcasting our own work and getting critical feedback. Today David made the recorded version of the workshop available, for a limited time, at a fraction of the cost. Here’s the trailer and info – if you’re a filmmaker looking to take your sound design to the next level, this is a screamin’ deal. David is an outstanding educator and one of the great minds on the audio side of filmmaking today.

Access your power as a sonic storyteller with the master coach David Sonnenschein, author of "Sound Design: The Expressive Power of Music, Voice and Sound Effects in Cinema." 

Webinar Recording registration HERE.

David’s book is legendary, and the interactive webinar which presents and analyzes examples of the theory, truly brings the material to life. His approach gives sound designers a framework for making informed design decisions, to the benefit of their audiences, clients, and the stories they help to tell.”

—  Nathan Moody, NoiseJockey.net

 
For a few days only, the full 12 hours of class recordings are available for you at over 60% off the live webinar cost, normally $250. Now at $95, that’s less than $8/hour for the only online master class available in theoretical and practical sound design.
 
Registrations at this discount rate begin on Wednesday Oct. 20 and go through Monday Oct. 25, at: http://www.instantpresenter.com/PIID=E059DE8982
 
Topics we cover and how they can help your sound design:

1. THE INTELLIGENT EAR – Listening Modes, Sound Qualities and Bipolarities
By deconstructing the listening experience into discrete elements, the grammar of sound design language gives you access for clear and powerful communication.
2. PLUG-IN POWER – Size, Distance, Speed and Non-Physical Reality
Understanding principles of real world acoustics and palette of subjective auditory experiences offers you enlightened use of digital processing tools.
3. RULES OF the BRAIN ROAD – Psychoacoustic Principles and Applications
When the curtain is lifted on how humans process auditory information, you master the art of sonic illusion (creating and hiding) as essential tools in sound editing.
4.  SONIC TIME-SPACE CONTINUUM – Soundscapes and Sound Spheres
Creating an effective cinematic space depends on familiarity with your physical and social environment, and the knowledge of how to psychologically orient yourself through audio.
5. AUDIO BUILDING BLOCKS – Constructing Sound Events and Sound Objects
Mastering techniques of sequencing, layering and mixing will infuse sonic fragments (sound effects, words) with meaningful messages (sound phrases, sentences).
6. PEOPLE, PLOT AND PASSION – Narrative Structure and Sound Mapping
Bottom line, how can sound help tell your story?  By understanding dramatic elements of character and emotion, the map can guide you to creative and impactful decision-making.

David’s workshops rock! His mastery of the material is clear from the first lesson. What really sets David’s workshops apart, though, is his gift for teaching, and personal interest in student’s work. He invited me to share a commercial film I was making with the class, and as a result I gained insights that helped me win quick approval of the project from my client. In that way, the class paid for itself right away.”  —  Dan McComb, filmmaker, Seattle, WA

Enjoy the webinar! Register here: http://www.instantpresenter.com/PIID=E059DE8982

David Sonnenschein
Author, “Sound Design: The Expressive Power of Music, Voice and Sound Effects in Cinema”
www.SoundDesignForPros.com