The 42-minute documentary, Ice Mermaid: Cold Resolve, that I made about Melissa Kegler’s quest to swim farther and colder than any American is now streaming on KCTS. You can watch the trailer and stream the film via the KCTS 9 Passport app.
I’m thrilled that the film has received this distribution from PBS, and what’s more, I’ve recently learned that it has been selected for a major international film festival! More details on that coming soon in a separate post.
I first met Melissa a couple of years ago, when I was teaching a cinematography workshop at Seattle Film Institute. I wanted to give my students an opportunity to work with some high-quality footage, and I thought this topic might provide us that in an accessible environment for the class. I found an open-water swimming group on Facebook, and the page owner, Oscar Brain, agreed to let us film him doing an early-morning swim at Golden Gardens. Here’s the little film we made from that:
While we were filming this, Oscar kept mentioning this person named Melissa Kegler. She’d swum the English Cannel, around Manhattan, Catalina Island, on and on. So that made me curious about her. After this short video was published on the group’s facebook page, I noticed that Melissa liked it. So I reached out to her and asked if she’d be willing to be our second subject for the last half of the class. She agreed, and we made this little video together:
It’s worth mentioning that our inspiration for the making of both of these videos was the film Nomadland. We definitely sought to mimic the use of early-morning light used so effectively in that film. Astute observers may even note the presence, in Oscar’s video, of the same lantern as the one carried by Frances McDormand in the Badlands campground scene.
While we were filming Melissa, she mentioned that she was kind of thinking about tackling the US record for ice swimming. I thought that sounded like something worth a longer project, and she agreed. So that was how the longer documentary project got started.
If there’s one video emblematic of the work I’ve done over the past 14 years, it’s probably this one, a fundraising video for cancer research. It’s work that I’m proud of. I’m lucky to have among my clients UW Medicine, an organization with a vast commitment to both treating and researching the underlying causes and possible cures for this disease. I’m a pretty empathetic guy, but always cancer has been something that happens on the other side of the camera. Until now.
My cancer diagnosis
One day at the beginning of May I noticed a lump in my throat. I’ll spare you the details, but after a month of ruling out other things, I got the word: throat cancer. Mine stems from HPV-16 infection when I was younger. I’m not alone in this – estimates are that at least 40 percent of the US population is positive for this virus, which is now preventable with a vaccine that wasn’t available in my day. I am one of about 1 percent of those infections that develop into cancer.
The good news, my doctor told me, is that if I was willing to undergo a brutal regime of chemotherapy and radiation, I had an 80 percent chance to beat it. Of course I took those odds. Most cancer patients are lucky to have 50/50 chance.
It’s now the end of August, and my last day of treatment was August 28. I’m in my first full week of recovery from treatment. Along the way, radiation in my throat took away completely my ability to taste food. Chemo made me as sick as I imagined it would, and then some. But I kept my hair. Not my beard – radiation on my throat fried that. Losing my ability to taste took the biggest emotional toll. I’m a closet foodie, and love to cook. It came as a shock to me how disgusting eating is when everything tastes like cardboard. Right now, food is like poison. Lucky, I accepted when given the option to have a stomach tube surgically implanted at the beginning of treatment, because I’ve relied on it exclusively to get the calories my body desperately needs to survive this treatment. I’ve lost about 15 pounds, and it could have been far worse. They say I’ll get my ability to taste back in about a month.
My commitment
Cancer changes you. After all this suffering, I now know that I’m alive for a reason. Before cancer, I had a keen interest in making videos to support organizations in search of cures. But now, it’s different. Now, it comes from inside me. And it’s time for me to give it a voice.
After spending the past 15 years delivering projects in this space, I’m at the top of my game. And now, I’m doubling down. So if you work at a cancer research organization, hospital, or health care system that wants to unleash the power of storytelling, I want to partner with you. It’s personal for me now. And I can’t wait to see what we’d be capable of producing.
Let’s work together
I’m available and ready for assignments starting mid October, 2023. For the video above, I traveled to Texas, and I’m happy to travel anywhere. I also speak decent Spanish. Please pass this post along to anyone you know who works in a cancer field.
I recently celebrated my 57th birthday. And the older and more experienced I get with a camera, the more attracted I am to shooting interviews in natural light. Maybe it’s just because I’m tired of all the work involved in setting up lights, grip and everything required to impose your vision on a scene. But I think it’s because, after all these years, I’ve finally realized that nature does it best.
Examples of natural light interviews
A couple months ago I shot for a wonderful organization called Friendship Circle (not my client, but I was hired by the New York based agency to DP most of the Seattle-based production). Take a look at these interview frames:
If I had this shot to do over, I’d add more negative fill to the camera-right side of her face, to giver her face a little more dimensionality. It’s a little flat this way, but I love how creamy soft the natural light is.
The two images above are a mother and her daughter, who were interviewed in the same room. I simply reversed the camera angle between shots, to get a different look. By opening and partially closing the blinds, I was able to control the light enough to make it work.
The setup for the daughter’s interview
But shooting without lights doesn’t mean shooting without anything. If you examine the frame above, note the diffuse reflection in the upper camera-left side of her glasses. See that soft white glow? That’s the 4×4 bounce, shiny side up, that I placed to try and make that camera-left side of her face a little brighter, to get a bit of wrap.
On her mom’s frame, I needed to use the bounce on the camera left (shadow) side of her face, because the shadow side of her face would have been too dark without it. So depending on the situation, I’m either wanting to add a little or take away a little light. And this can be achieved without light fixtures, just by carefully placing the subjects in the frame.
Natural light (with a little help)
The edge light on this frame is a little too hot. The correct intensity is in the frame below.
In the two-shot of the couple, I’ve placed them so that they are lit by a large bank of windows in their living room, with the kitchen behind them. There are some lovely small lights in the background that add interest and the window in the kitchen provides motivation for a light (but in this case, does not provide the amount of light I needed to separate them from the background). So this is a case where I added one small light, an edge light as it’s called, to just make them pop off that background. So this is a case where the shot isn’t entirely naturally lit. However, the shot would have worked fine without it. Adding it felt like a nice extra touch.
Because it wasn’t the key light, setting up this edge light (a Dedo DLED-7) was super easy – I just placed it on the floor, aimed upward with a parallel beam adapter. On a c-stand with a boom arm, I placed a #3 Cine Reflect Lighting System panel into the beam, which gives a nice soft light that is easy to focus without needing to set any flags. Done.
Naturally wrapping window light
I love this face. The way the natural light wraps around it in this shot, it’s like a painting. I would have had to set up a very large source (with a lot of flags to control the light spill) to achieve this look artificially. But with natural window light, with a little cutting and bouncing, it just works.
On another project, for UW Medicine, I shot a doctor interview last week in a conference room that had a long row of windows along a southern exposure (see frame above). Luckily for me, the interview was shot during the day when the sun was at a high enough angle that it wasn’t reaching too far into the room, which allowed me to use the windows as soft key sources of light (sky blue). Note, that if the weather had been mixed, as so often is the case here in Seattle, with partial clouds and sun breaks, this wouldn’t have worked. The exposure would have fluctuated with the cloud movement.
The setup for frame above, using blinds to control light entering the conference room with bounced light on the fill side.
To make this shot work, I used a 4×4 floppy to darken the background to get good separation, and a 4×4 bounce on the shadow side of his face to lower the contrast. I also had to warm the shot a lot in post, as that sky blue is very cool light, and I wanted a warm vibe.
How might this same shot have looked in artificial light? I just happen to have a comparison, because I interviewed another doctor in the same conference room a year ago. Here’s how that looked:
Same location, virtually same camera angle, but with artificial light. Feels artificial and “sourcy” to me.
At the end of the day, working with naturally light is all about seeing the light, and realizing what you can do with it with just a little shaping.
Finally, here’s the finished Friendship Circle piece:
Look what Oscar-winning documentarian Alex Gibney has been up to! I’m thrilled to have contributed quite a few clips from my Covid Nurse story to this film. Many clips appear near the end of the film, and 4 were also used in the trailer and in promotional materials.
As usual, Gibney’s timing was impeccable with this project, landing as it did just before the US presidential election. And given the result, who knows, maybe my footage played a small part in bringing science back to the White House. I’d sure like to think so.
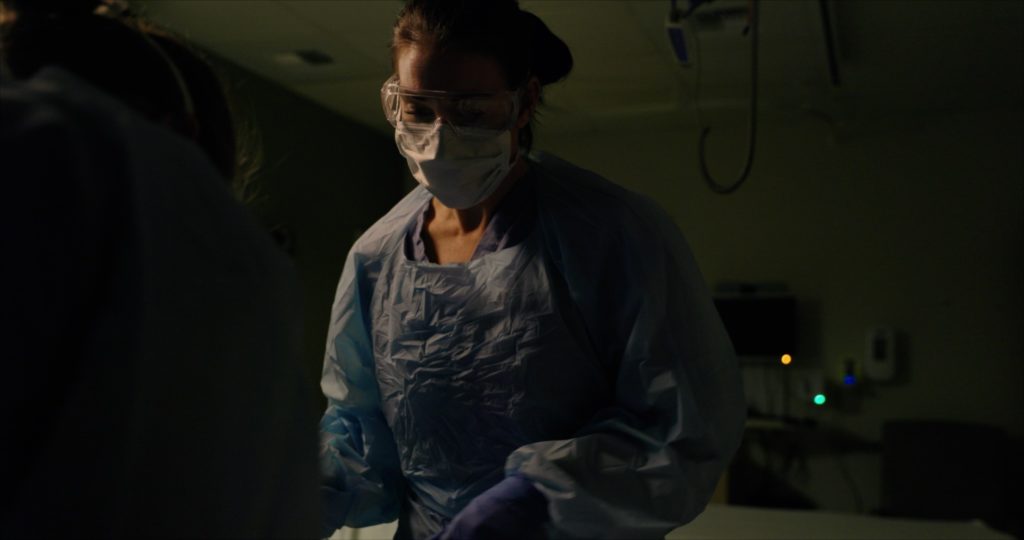
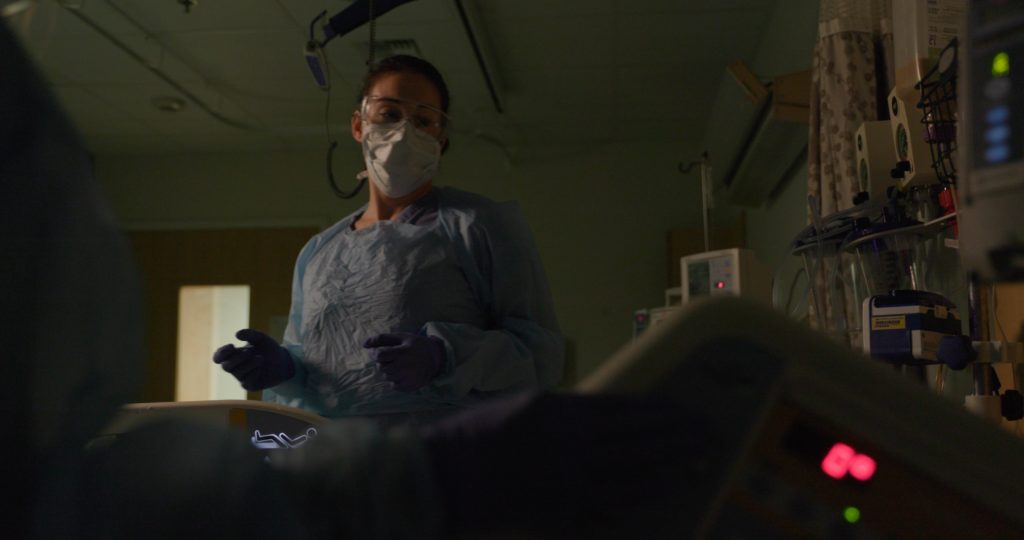
The nurse pushed open the door and stepped into the patient’s room, waiting for me to follow. Beyond her lay an unconscious man, sedated, tied down, and fighting for his life.
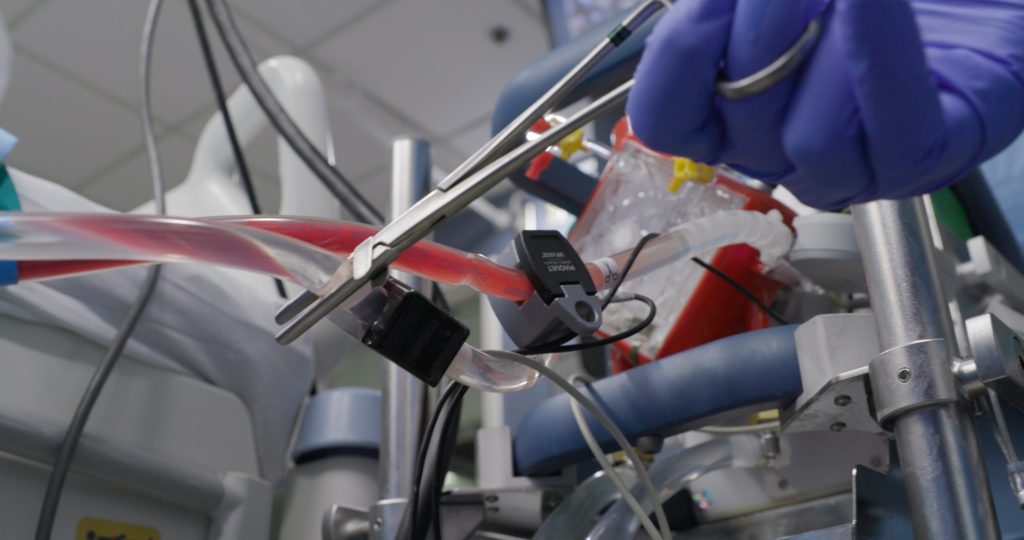
When a COVID victim’s oxygen levels are falling, and nothing else works, their blood can be pumped out, oxygenated, and returned to their body in a medical procedure called ECMO. It is a complicated ballet involving specialists, doctors, and most of all, nurses.
I hit the record button on my camera, took a breath of hood-filtered air, and stepped into the room. This is what I saw (see video below).
Backstory
Since COVID-19 arrived in the US, I’ve been mostly idle, doing my part to flatten the curve by staying home. But as a documentary filmmaker, I’ve been profoundly curious about what’s happening on the front lines. Would anyone get a chance to record it up close?
I’ve been making films for UW Medicine for 5 years. So I figured if anyone could get a chance, it might be me. When the COVID wave hit Seattle in early March, I sent an email to everyone inside the organization I could think of, begging them to help me get in.
The result: crickets. No one replied. They were, without a doubt, beyond busy.
Then on April 8, it happened. I got an email from the chief nursing officer at Harborview Medical Center. I’d never met him before, and he wasn’t one of the people I’d contacted. Turns out he’d seen a Harborview montage video I made for a fundraising event last fall, and…
“I am reaching out to you to see and possibly get a quote for a project I have in mind for nurses week. I’d like to work on a video that we can highlight the Harborview nurse, especially in this COVID-19 situation, and what it means to be a nurse an HMC.”
The initial ask
After speaking with him, it became clear he was asking for another montage video featuring nurses at work, which would be b-roll for a thank-you message he planned to deliver for Nurse’s Week.
I’ve observed that sometimes, what clients ask for, and what they actually want, can be different. And you have to step carefully to lead them from their initial idea to something bigger. I felt very strongly that the opportunity to film in the Covid ICU could lead to a powerful story, one that would resonate with a general audience.
The initial idea was to focus on three nurses. The client wanted all of them in the video. I find stories are typically strongest when they are told from a singular perspective. So how to find the best story? And how best to tell it?
Light and shadow are among the most powerful tools we filmmakers have to evoke drama. And when I think of COVID 19, I think shadows. So I just knew we had to shoot this at night. I put together a quick mood board based on images I pulled from Google searches. The client took a look and agreed.
Audio-only interview as casting
A few days later I sat down with each of the three nurses for a one-hour audio-only recorded conversation. I intentionally skipped filming these interviews, and I’ll explain why shortly. All were interesting in different ways. One of them worked in the emergency department. Another had actually contracted COVID-19 herself, and brought it home to her son and parents. Luckily for them, they all had mild cases, and she was back to work three weeks later.
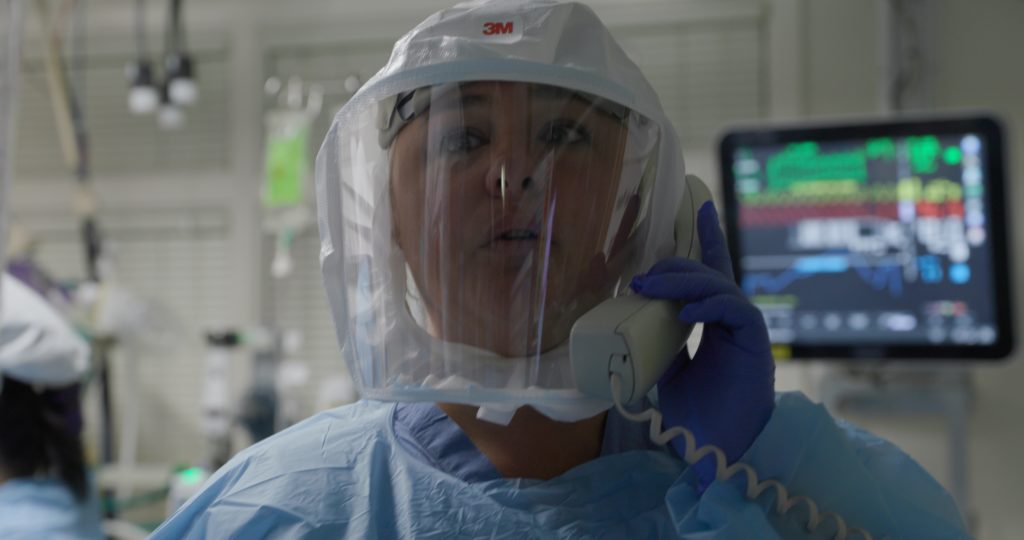
But the nurse who really caught my attention was named Breazy. She is a Covid ICU nurse, and a natural storyteller. When this all began, she had to send her son away to keep him safe, so she could emotionally focus on her job. She explained that family members sometimes have to say good-bye to their loved ones via iPad, because they can no longer visit them in the hospital. And how when she loses a patient, she takes a bunch of flowers to a beach near her home and floats it into the sea, to say good-bye. When I heard that, I knew exactly how the film was going to end.
But to get to the beginning and middle parts, I had to sell my client on this story idea.
Selling the story with a radio edit
To do that, I created a “radio edit.” Without having shot a frame of video, I brought Breazy’s interview audio into Final Cut Pro X, after cleaning it up in Adobe Audition and iZotope RX. My first stringout was 17 minutes long. I kept cutting until it felt right, adding breathing room for pacing, and finally, music sourced from MusicBed. My goal was to make something that would be right at home on This American Life.
Here’s what that sounded like:
Covid Nurse “Radio Edit 1”
The client replied: “I like it.” But, what about that thank-you message, he asked. Could we fit that in somewhere? Definitely, I replied. And… maybe the perfect place for it would be in a separate video? One that I’d be willing to do for no extra charge if we could capture his message in a single take? Sold.
I’ve developed this no-camera approach to interviews over the last 5 years of working with large medical clients. A litany of good things happens when your first deliverable to a client makes them close their eyes and IMAGINE what they are going to be seeing, rather than what they ARE seeing. It invites them into the story creation process. It’s like dating before getting married. And the result is almost always the same: they like it, and they can’t wait to see what it looks like with video. Usually there are few changes. And the changes are very simple to make – the only thing that requires retiming is the music.
Planning the shoot
A night shift for nurses begins at 7pm and ends at 7:30am. Not only did I want to shoot the entire shift, but because I wanted to shoot Breazy on the beach afterward, it would mean a 14-hour day.
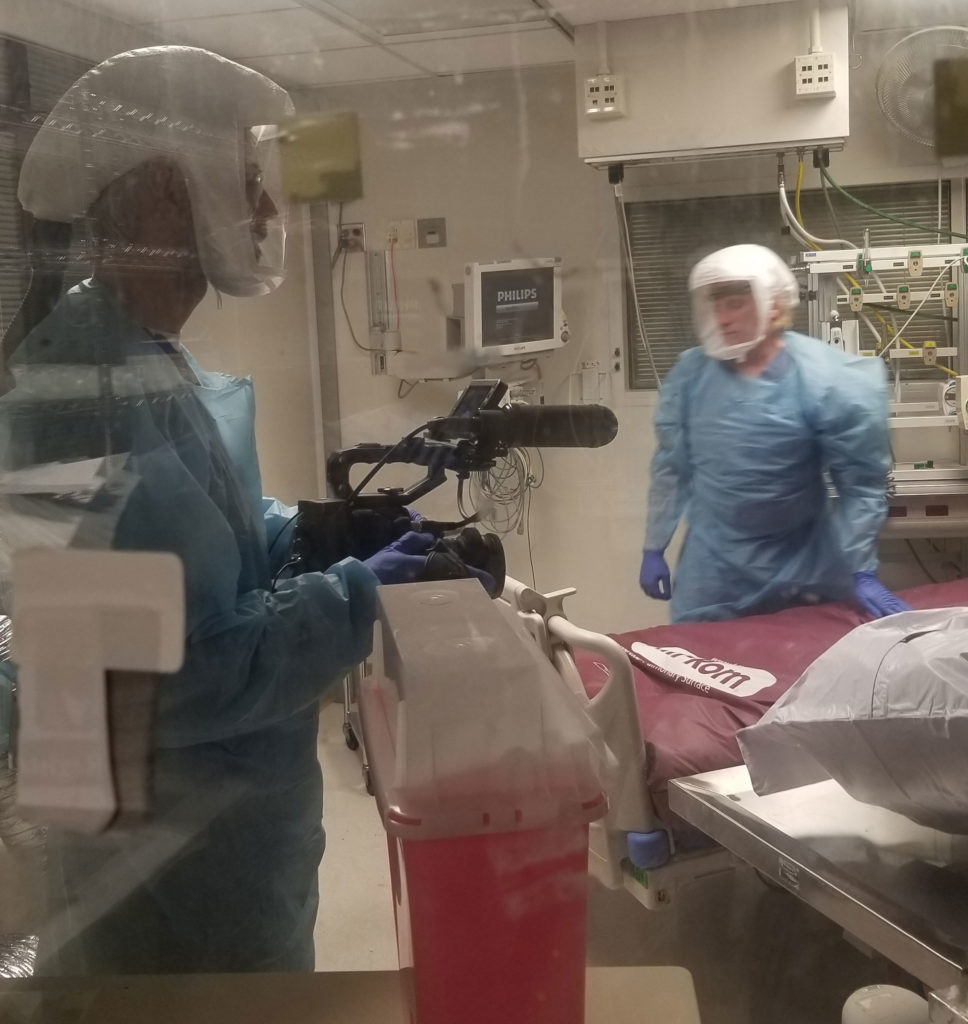
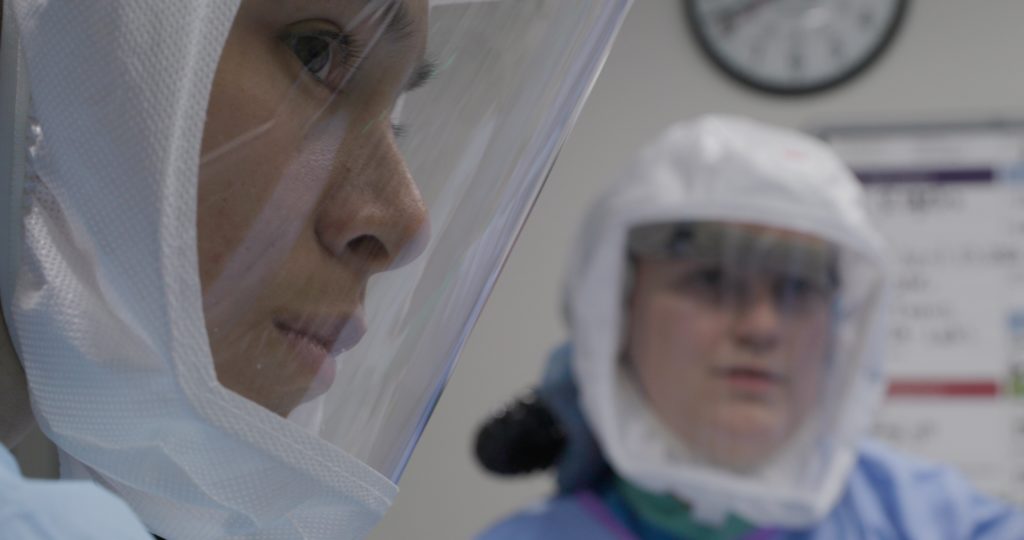
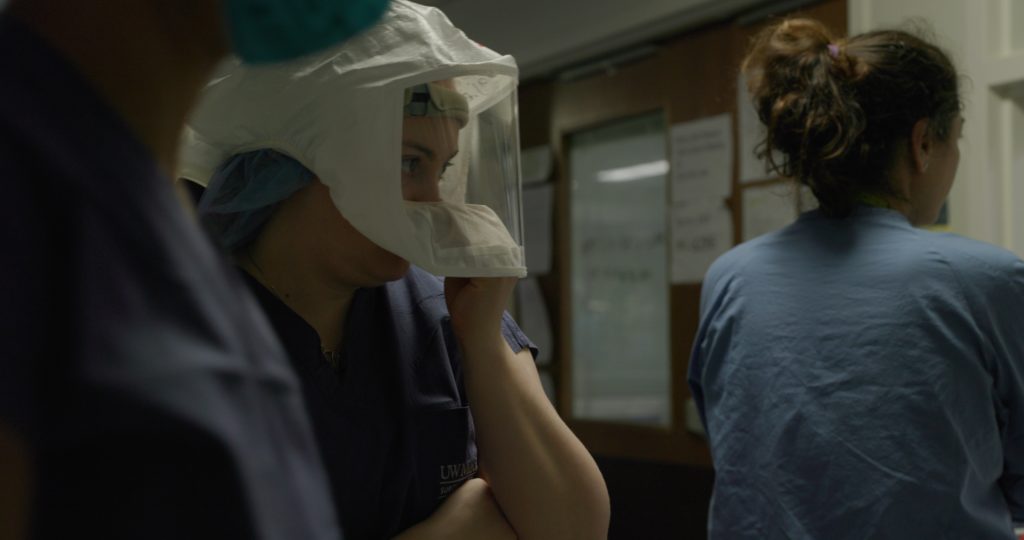
What is the right filmmaking equipment to take into a Covid ICU? I learned that going in and out of the negative-pressure rooms was a time-consuming process. A person called a “dofficer” observes and assists you donning and doffing the personal protective equipment required. Every item has to be wiped down with a cloth dripping with alcohol when it exits the room. So I would definitely need a weather sealed camera.
What’s more, I would be shooting while wearing a papr hood, double layers of latex gloves, and a plastic pancho that doesn’t breathe. That made me nervous about focus. I like to think my 54-year-old photojournalist’s eye is pretty good. But I’d never had to nail focus in conditions quite like that before.
I realized that I was going to have whatever I could carry in one hand, and that’s it. No tripod, no extra lenses, just commit to handheld and go for it.
Choosing the Canon C500mkii
Back in January, after a lot of research, I’d purchased a Canon C500mkii. My previous camera, a Sony FS5, was a real workhorse. But when the new crop of full frame cameras came out, I knew it was time to go back to the big-sensor look that was my first love. The 5dmkii is what lured me into video from still photography in the first place. For years I wondered if Canon would ever make a camera that gave us everything the 5dmkii had, in a body designed for video. This felt like that camera to me.
Apart from it’s full frame sensor and monster 5.9k raw recording capabilities, I chose this camera over the Sony FX9 because it does something very special with autofocus. First of all, it works with a lot of lenses that I already own. Secondly, instead of snapping into focus, it can be configured, with the right EF lenses, to gently arrive in focus, to breathe into focus.
Configuring autofocus
This organic focusing is controlled via a menu that gives you control over the speed from +2 to -7. It works great with the newer Mkii lenses, but does not work with older EF glass such as the original EF 35mm f/1.4. I set the autofocus speed to -1 and sometimes to -2, for this film.
For this project, because I would have just one lens, I chose the Canon EF 24-70 f/2.8 mkii. This lens is great optically, and pretty fast for a zoom. But one thing has kept me from using it much for handheld in the past: it lacks image stabilization. And the fact is, when I’m handheld, I need IS.
C500mkii image stabilization: on
The C500mkii is the first professional digital cinema camera that Canon has made that features IS built right into the camera body. In testing, I found it works very well when you are trying to keep the camera still, but it’s less effective when you’re intentionally moving the camera. It does a great job smoothing out footage you want to keep steady, but a poor job of smoothing out footage you want to keep in motion.
For the Covid story, I chose XF-AVC DCI 4k. Shooting raw would have been nice, but I’d fill a half-terrabyte cf express card in 30 minutes of shooting. Additionally, the built-in image stabilization is disabled in RAW.
I enabled the pre-roll feature on the camera, and boy, I am glad I did! There are at least half a dozen shots in the final film that I would have missed without it.
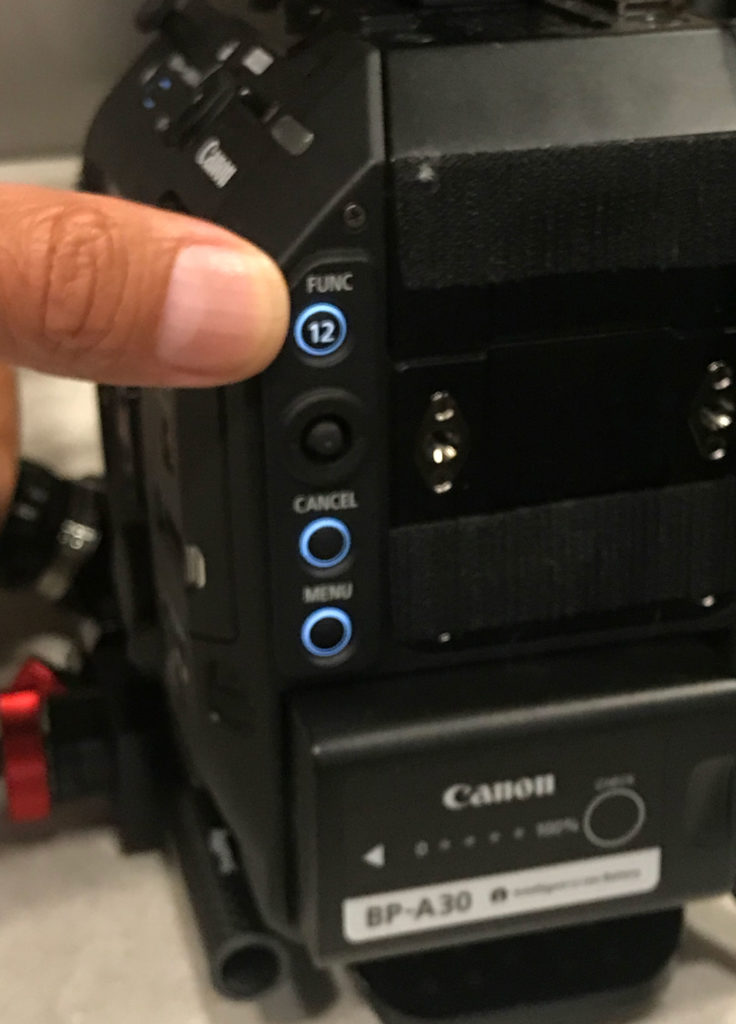
Custom menu settings
A killer feature on the C500mkii is the option to make a custom menu, which you can load with your frequently accessed settings. I mapped mine to button 12. Pressing that lets me access all the menus I need to without digging.
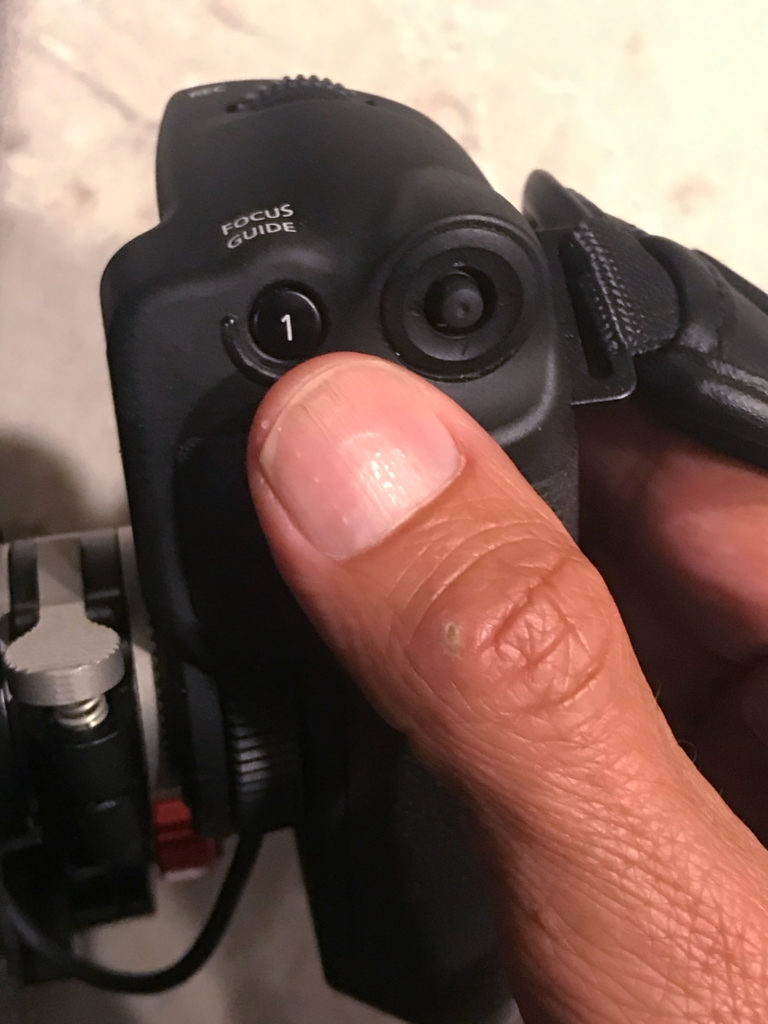
I also remapped several of the buttons for more ergonomic response. For example, the one-shot autofocus button is located on the front of the camera in a place that difficult to reach. I like to keep three points of contact while I’m shooting and focusing, so I mapped it to the #1 button under my thumb on the right handgrip. Squeeze and shoot.
I also remapped the iris wheel to go in the opposite direction from default. I like to roll it DOWN to darken the image (stop down), and UP to lighten it (open up).
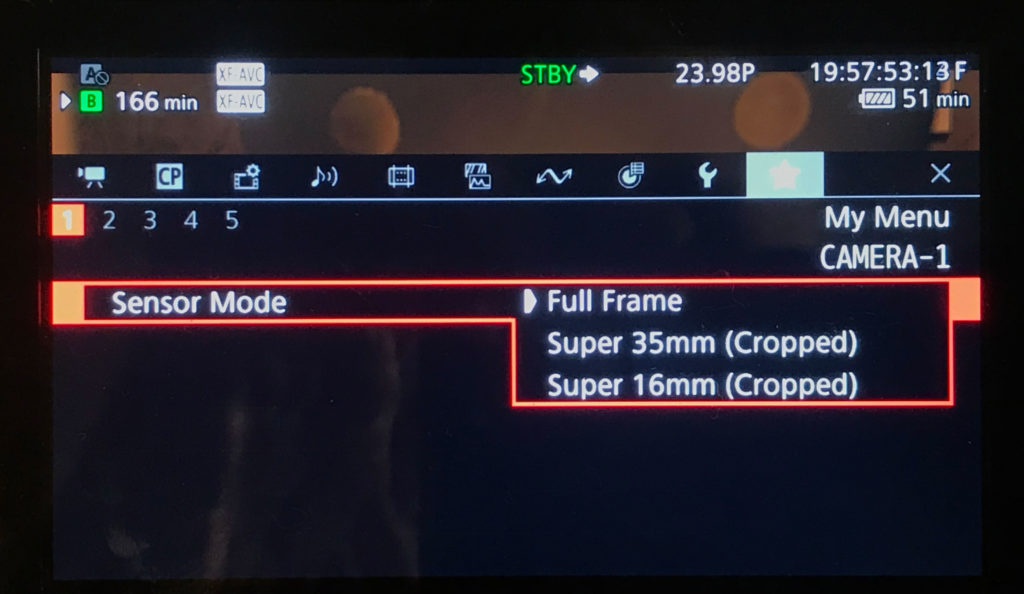
The sensor size is something I also like to change on the fly, switching between full frame and super35 to turn the 24-70 into an effective 36-105mm field of view. It is very handy for a little extra reach, and switching the sensor while in XF-AVC 4k leaves your format settings untouched. You get beautiful 4K both ways.
Two person crew
I never work a paid gig without a sound recordist. Sound is way too important to take into my own hands when those hands are holding a camera. Phil Gorman, whom I’ve been training for the past several years, is one of those rare sound recordists who has no problem wearing more than one hat during a shoot.
And for this one, I asked him to to use lavs, and put a light on the end of his boom pole, instead of a shotgun mic. So whenever I needed it, he could fly the light in for some fill or a little scratch light. That gave me the ability to pick up shots like this one:
The shoot
The nice thing about doing a shoot after you’ve done a radio edit is that you know exactly what you need to shoot. It’s almost like having a script.
I had imagined opening this film with a blue-hour drone shot of Harborview Medical Center. So I planned to return a few days later to pick that up after sunset. So I started this night rolling camera at roll call.
DJI no-fly zones
As an aside, when I returned to the hospital for that drone shot, my rented DJI Phantom 4 v2 would not take off. Even though I had received permissions from 3 different hospital department heads to fly it, because the area contains a helipad and is a designated first-responder area, the DJI geofence see is as a no-fly zone. I tried following their protocol to get an override from DJI, but no one responded to my repeated emails for 24 hours. Grounded, I had to settle for exterior views of the hospital in blue hour. And with the strangely deserted streets due to Coronavirus, it worked out great to open the film. And that sunrise drone shot three-quarters of the way through? I pulled it from another shoot I’d done at the same hospital 6 months previously, before DJI geofenced it.
Virtually the whole night was handheld. I think there was just one shot on sticks inside the hospital that made it into the film. My biceps were burnt by the end of the night, but holding the camera tucked into my waist like a football was a winning strategy. It meant I was able to give the nurses a heroic camera angle, while being immersed in the action.
Autofocus just works
The C500mkii’s AF touch screen works with latex gloves, a big surprise to me. Pulling focus was as simple as supporting the camera on my waist, touching the screen, and punching the focus button under my right thumb.
Shooting handheld with C500mkii
It was a very long night.
The next morning, after her shift ended, Breazy met me in West Seattle with a wreath of red and yellow tulips. Both of us were bone tired. I knew I wasn’t going to get multiple takes of anything. So I again relied on autofocus to track her walking across the beach (this on sticks with a 70-200 zoom). Then back to handheld as she waded into the waves and tossed the flowers, then back onto sticks as she exited camera left. I let the camera roll for a long time to accommodate credits. And I forgot to get the insert shot that I needed of the flowers floating to cover her last lines. I came back to the same beach two days later with my own flowers to pick that up.
The edit
When I sat down with the footage, the question on my mind was, did I get the shot? There’s always some percentage of shots that for one reason or another, are unusable. Usually it’s I because I missed the focus, or because the shot is too shaky. But I had to look very, very deeply into the C500mkii footage to find shots that were unusable. Virtually all of the shots I really wanted to be sharp, were sharp. The ones I needed to be stable, were stable.
Reviewing the footage reminded of my days as a newspaper photojournalist in the mid 90s, when we began making the transition from manual focus cameras. There came a day when it just became clear that AF could do a better job than you could. So we switched, slowly at first, and then all at once.
The edit came together in a couple of days. Having a radio edit to cut to makes it clear what footage you need, and where you need it, in the edit. Getting the rough cut approved by the client was easy. The hard part, it turned out, was getting it past the legal department. That took about two weeks. And by the time we were done, some pivotal audio was removed and every inch of patient skin had to be blurred out. That made me sad. A nurse’s story needs patients as supporting characters, and the film loses some of its humanity without them. But the law is the law. And at the end of the day, it’s still a powerful story. It has received well over 100k views last time I checked, making it the most viewed film I’ve ever made.
Conclusion
The Canon C500mkii is the first digital cinema camera I’ve used that can focus better and faster than I can. It’s like having a super power. This project, and this camera, has changed how I approach documentary cinematography. Instead of fretting about focus, I’m now free to think more about what I’m shooting than how I’m shooting it. Attention moves from the mechanics, to the moment. It’s made me a better storyteller. And that’s all I can ask for from a camera.
I’m thrilled to share this short video, which I made in collaboration with the amazing story team at UW Medicine Advancement. I’m truly honored to work with people so profoundly dedicated to healing.
NOV. 22, 2019 UPDATE: This video is the Bronze winner in the Council for Advancement and Support of Education (CASE) awards 2020, in the short video category.
The story reveals how Mary Larson, a nurse for 23 years at UW Medicine’s Pioneer Square Clinic, has found a very special way to truly see her homeless patients.
For this project, we set 3 GoPros running over a 2-month period to capture Mary’s artwork taking shape. Everything else was shot on a Sony FS5. Nothing fancy, just SLOG0-2 8-bit 4K internal, graded with Alister Chapman’s lovely Venice Look LUT pack.
This is another in a long line of projects that uses my never shoot interviews methodology (for the primary story subject, at least). For the rest, we had an exceptional fine space to film our interviews in – the empty top floor of the Pioneer Square Clinic.
Here’s a sample frame from that interview. Looks almost naturally lit, doesn’t it?
Interview frame
But no! Any time you have a large window in the background of a frame, you know you need to bring a big gun to bring up your subject to match those background levels. Here’s the setup:
UW Medicine shoot w/ Mary Larson and subjects. Photo by Doug Plummer.
This technique is called “carrying the light,” which results in a very natural, almost imperceptibly lit look. We used a single Aputure 300d bounced into a 4×4 foam core, over which we draped a 1/4 grid cloth 8×8 fabric. We had to flag it off aggressively to keep the light off the background with a piece of black foam core that you can see tight against the side of the diffusion. But that’s it – one big light for one beautiful result.
It’s also another example of a framing technique I teach my students: For a pleasing frame, it’s often a good idea to frame your subject in a corner. Not literally – best to give them plenty of distance from the corner – but by lining up the corner behind them in the frame. This adds depth and dimension to the composition. And when you have a window, it’s frame naturally cuts the light off the wall, giving a pleasing light fall-off.
Big, naturally lit locations help make food pop in Nordstrom restaurant recruiting video
Nordstrom has released a restaurant recruiting video that I had the pleasure of shooting for director Kent Worthington a few months back in Seattle and LA.
For this project we shot documentary style, moving quickly. Almost all of the shots used available lighting, which in our LA locations was absolutely beautiful, north-facing window light. Whoever designed the two LA restaurants was obviously thinking about light, and it shows in the clips.
I used a Sony FS5 with Atomos Inferno to shoot in SLOG-2 at 4K DCI.
Lenses were vintage Zeiss primes, with the 100mm Planar Makro seeing a lot of action.
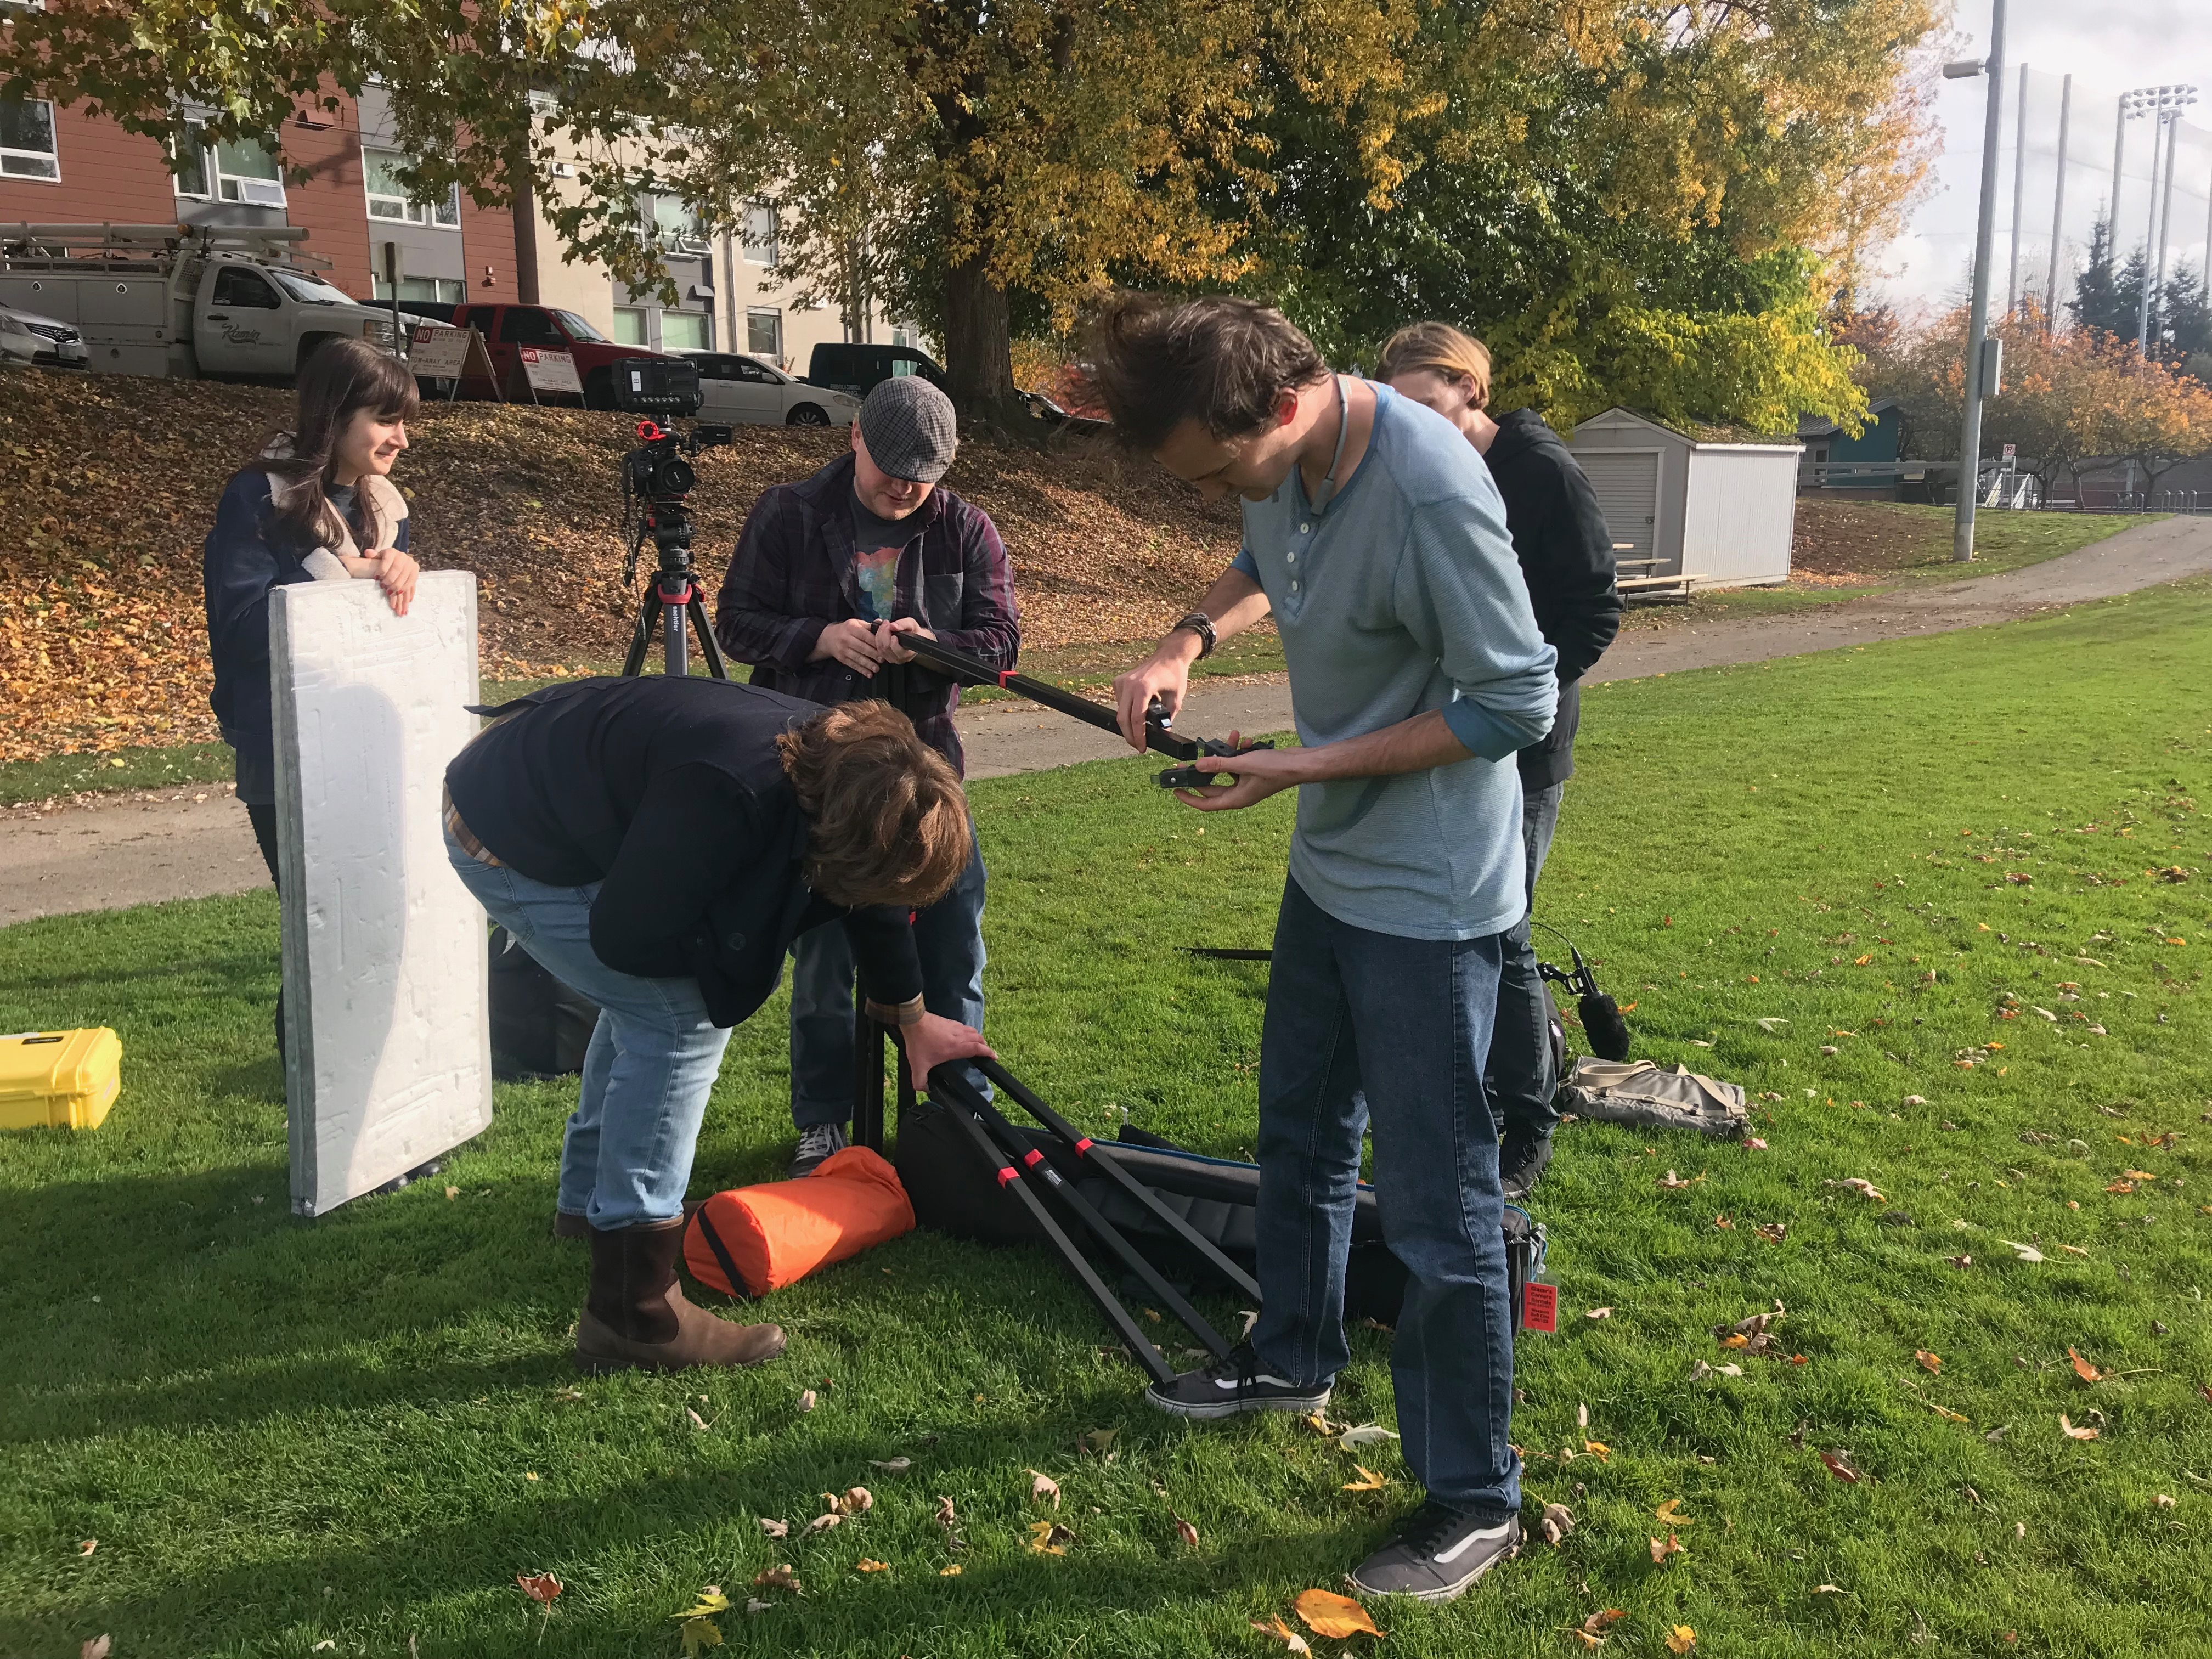
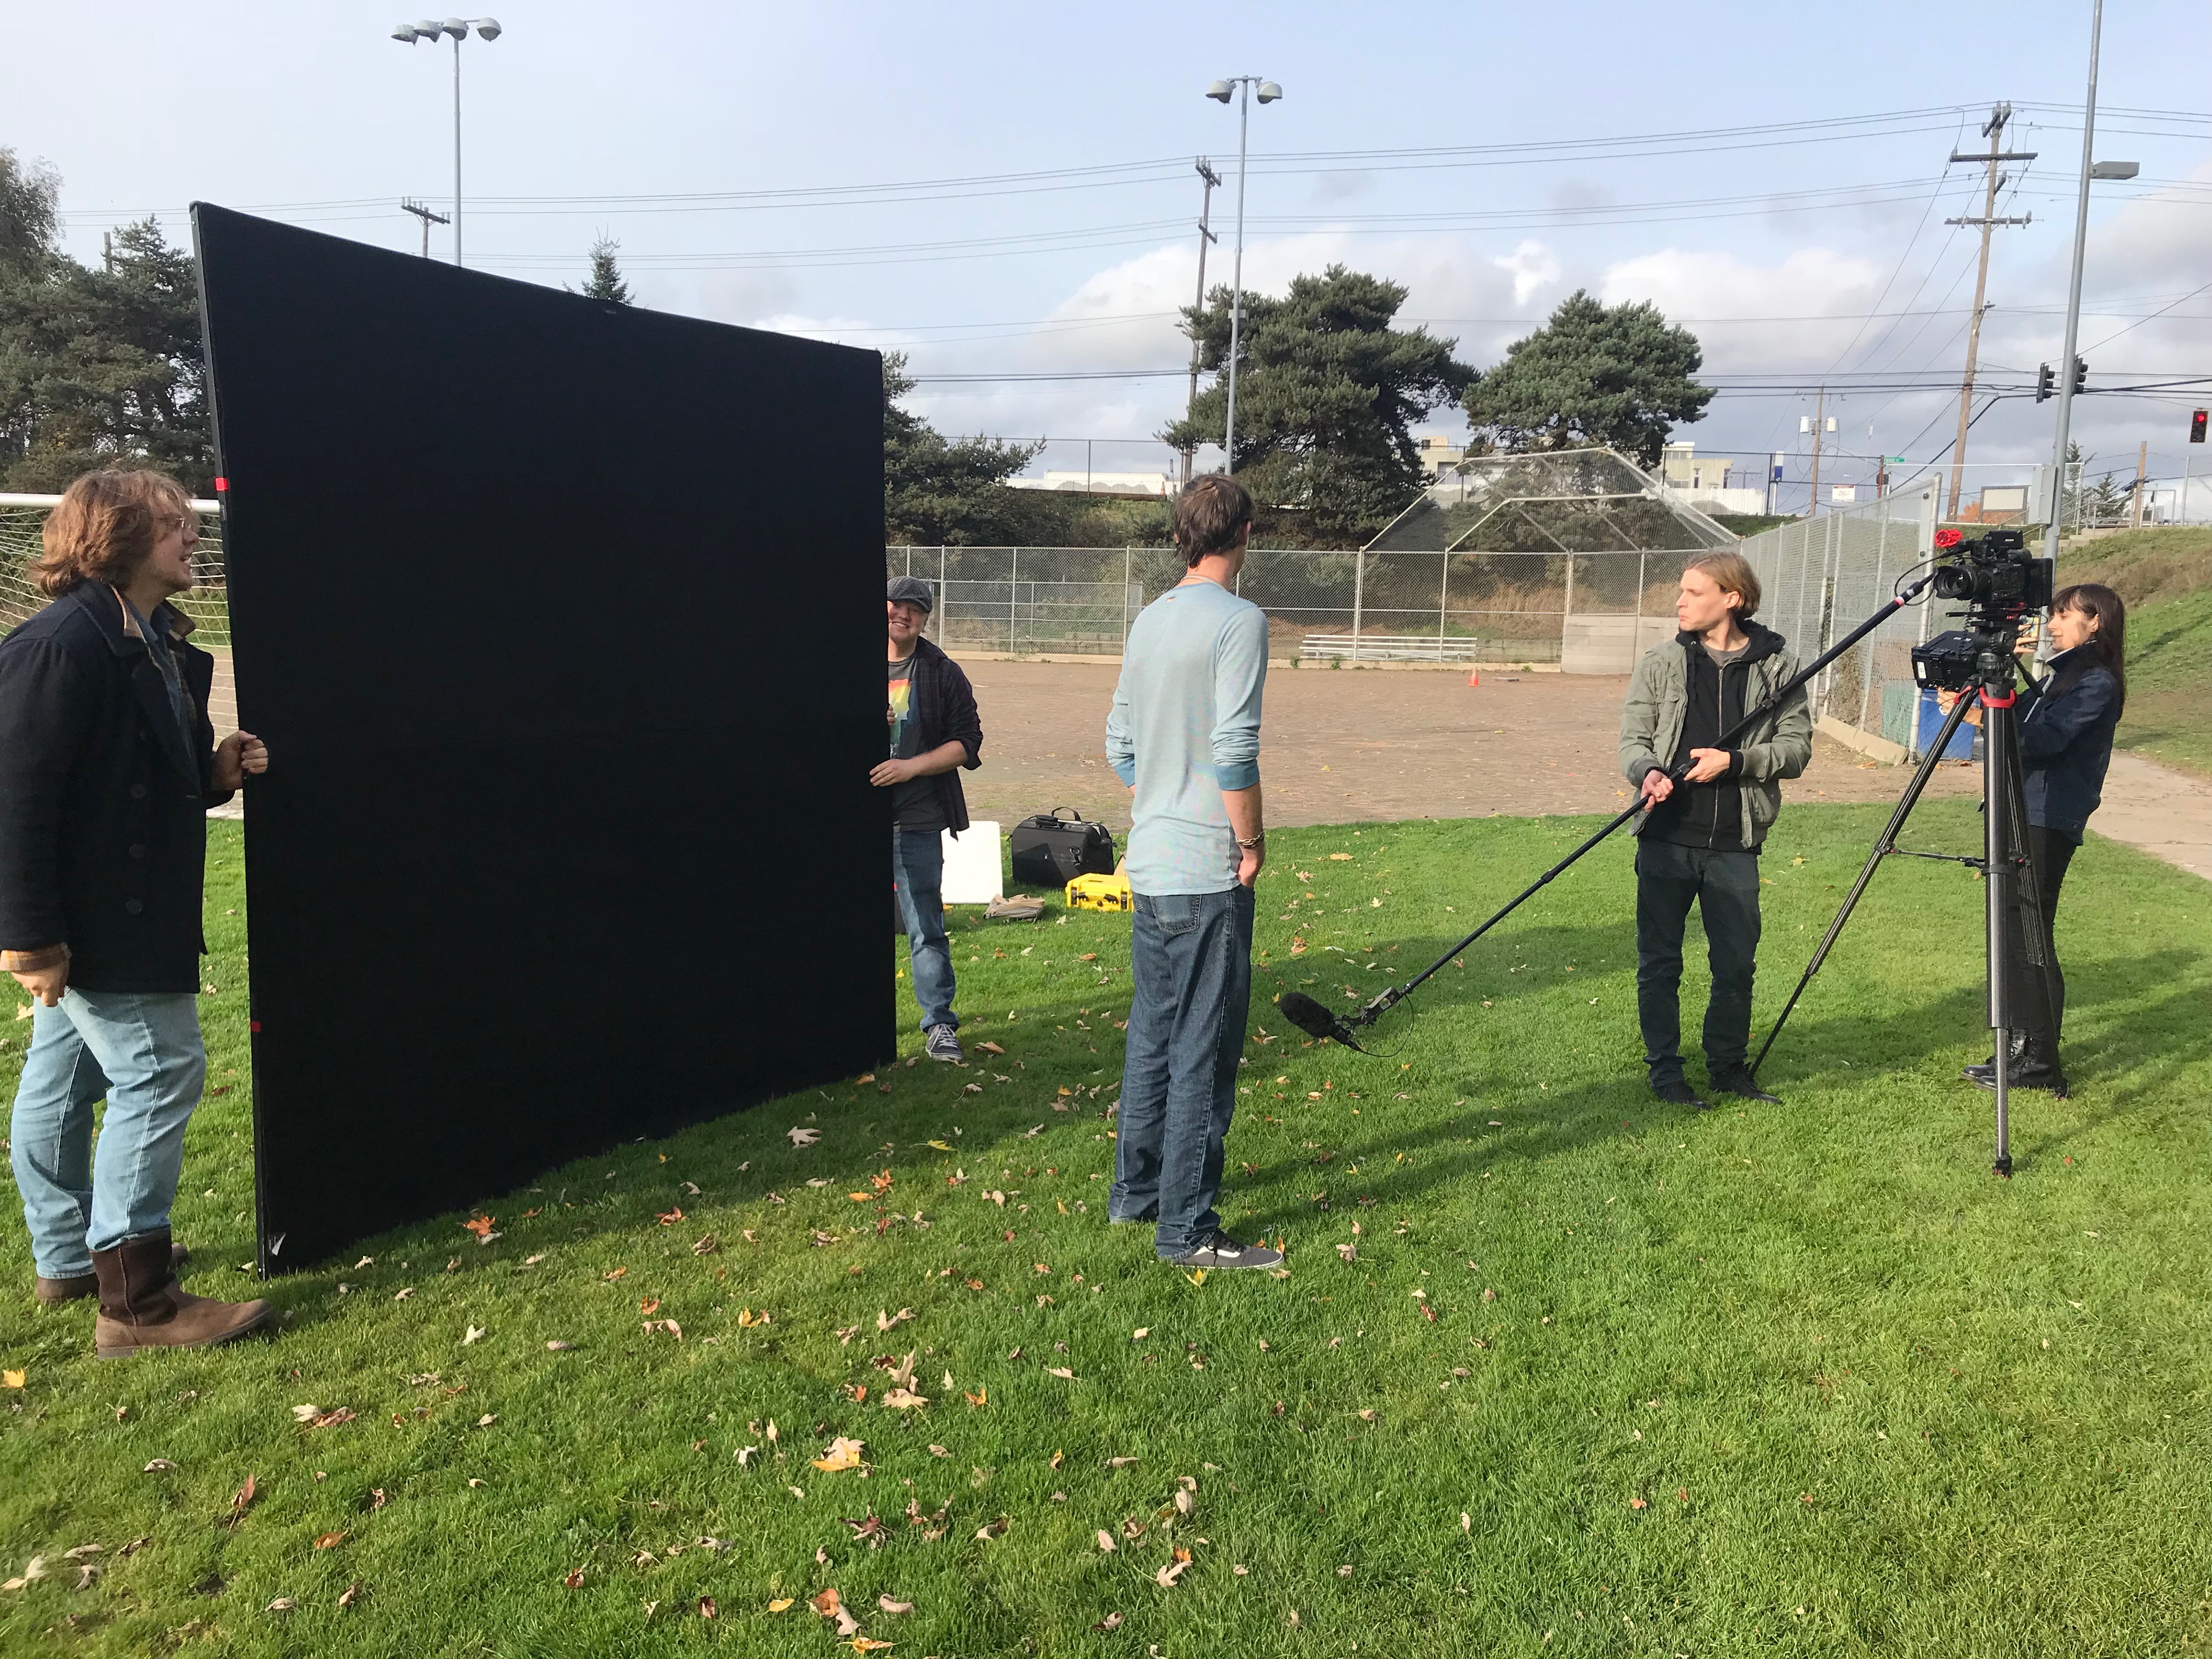
“Lighting is a subtle craft,” I told my students yesterday. Then we headed to a baseball field to see what that looks like. Our assignment: To shape natural light into something cinematic for an outdoor interview using only two pieces of grip. A 4×4 foam core bounce, and a Scrim Jim Cine Frame (8 x 8′).
Our first challenge was to choose a background. We placed our subject on the edge of the field, and slowly walked in a circle around him to observe how the light fell on him in relationship to the background.
People rarely look good in direct sunlight. It makes them squint. So we placed our subject with the sun behind him, as you can see from the shadows below.
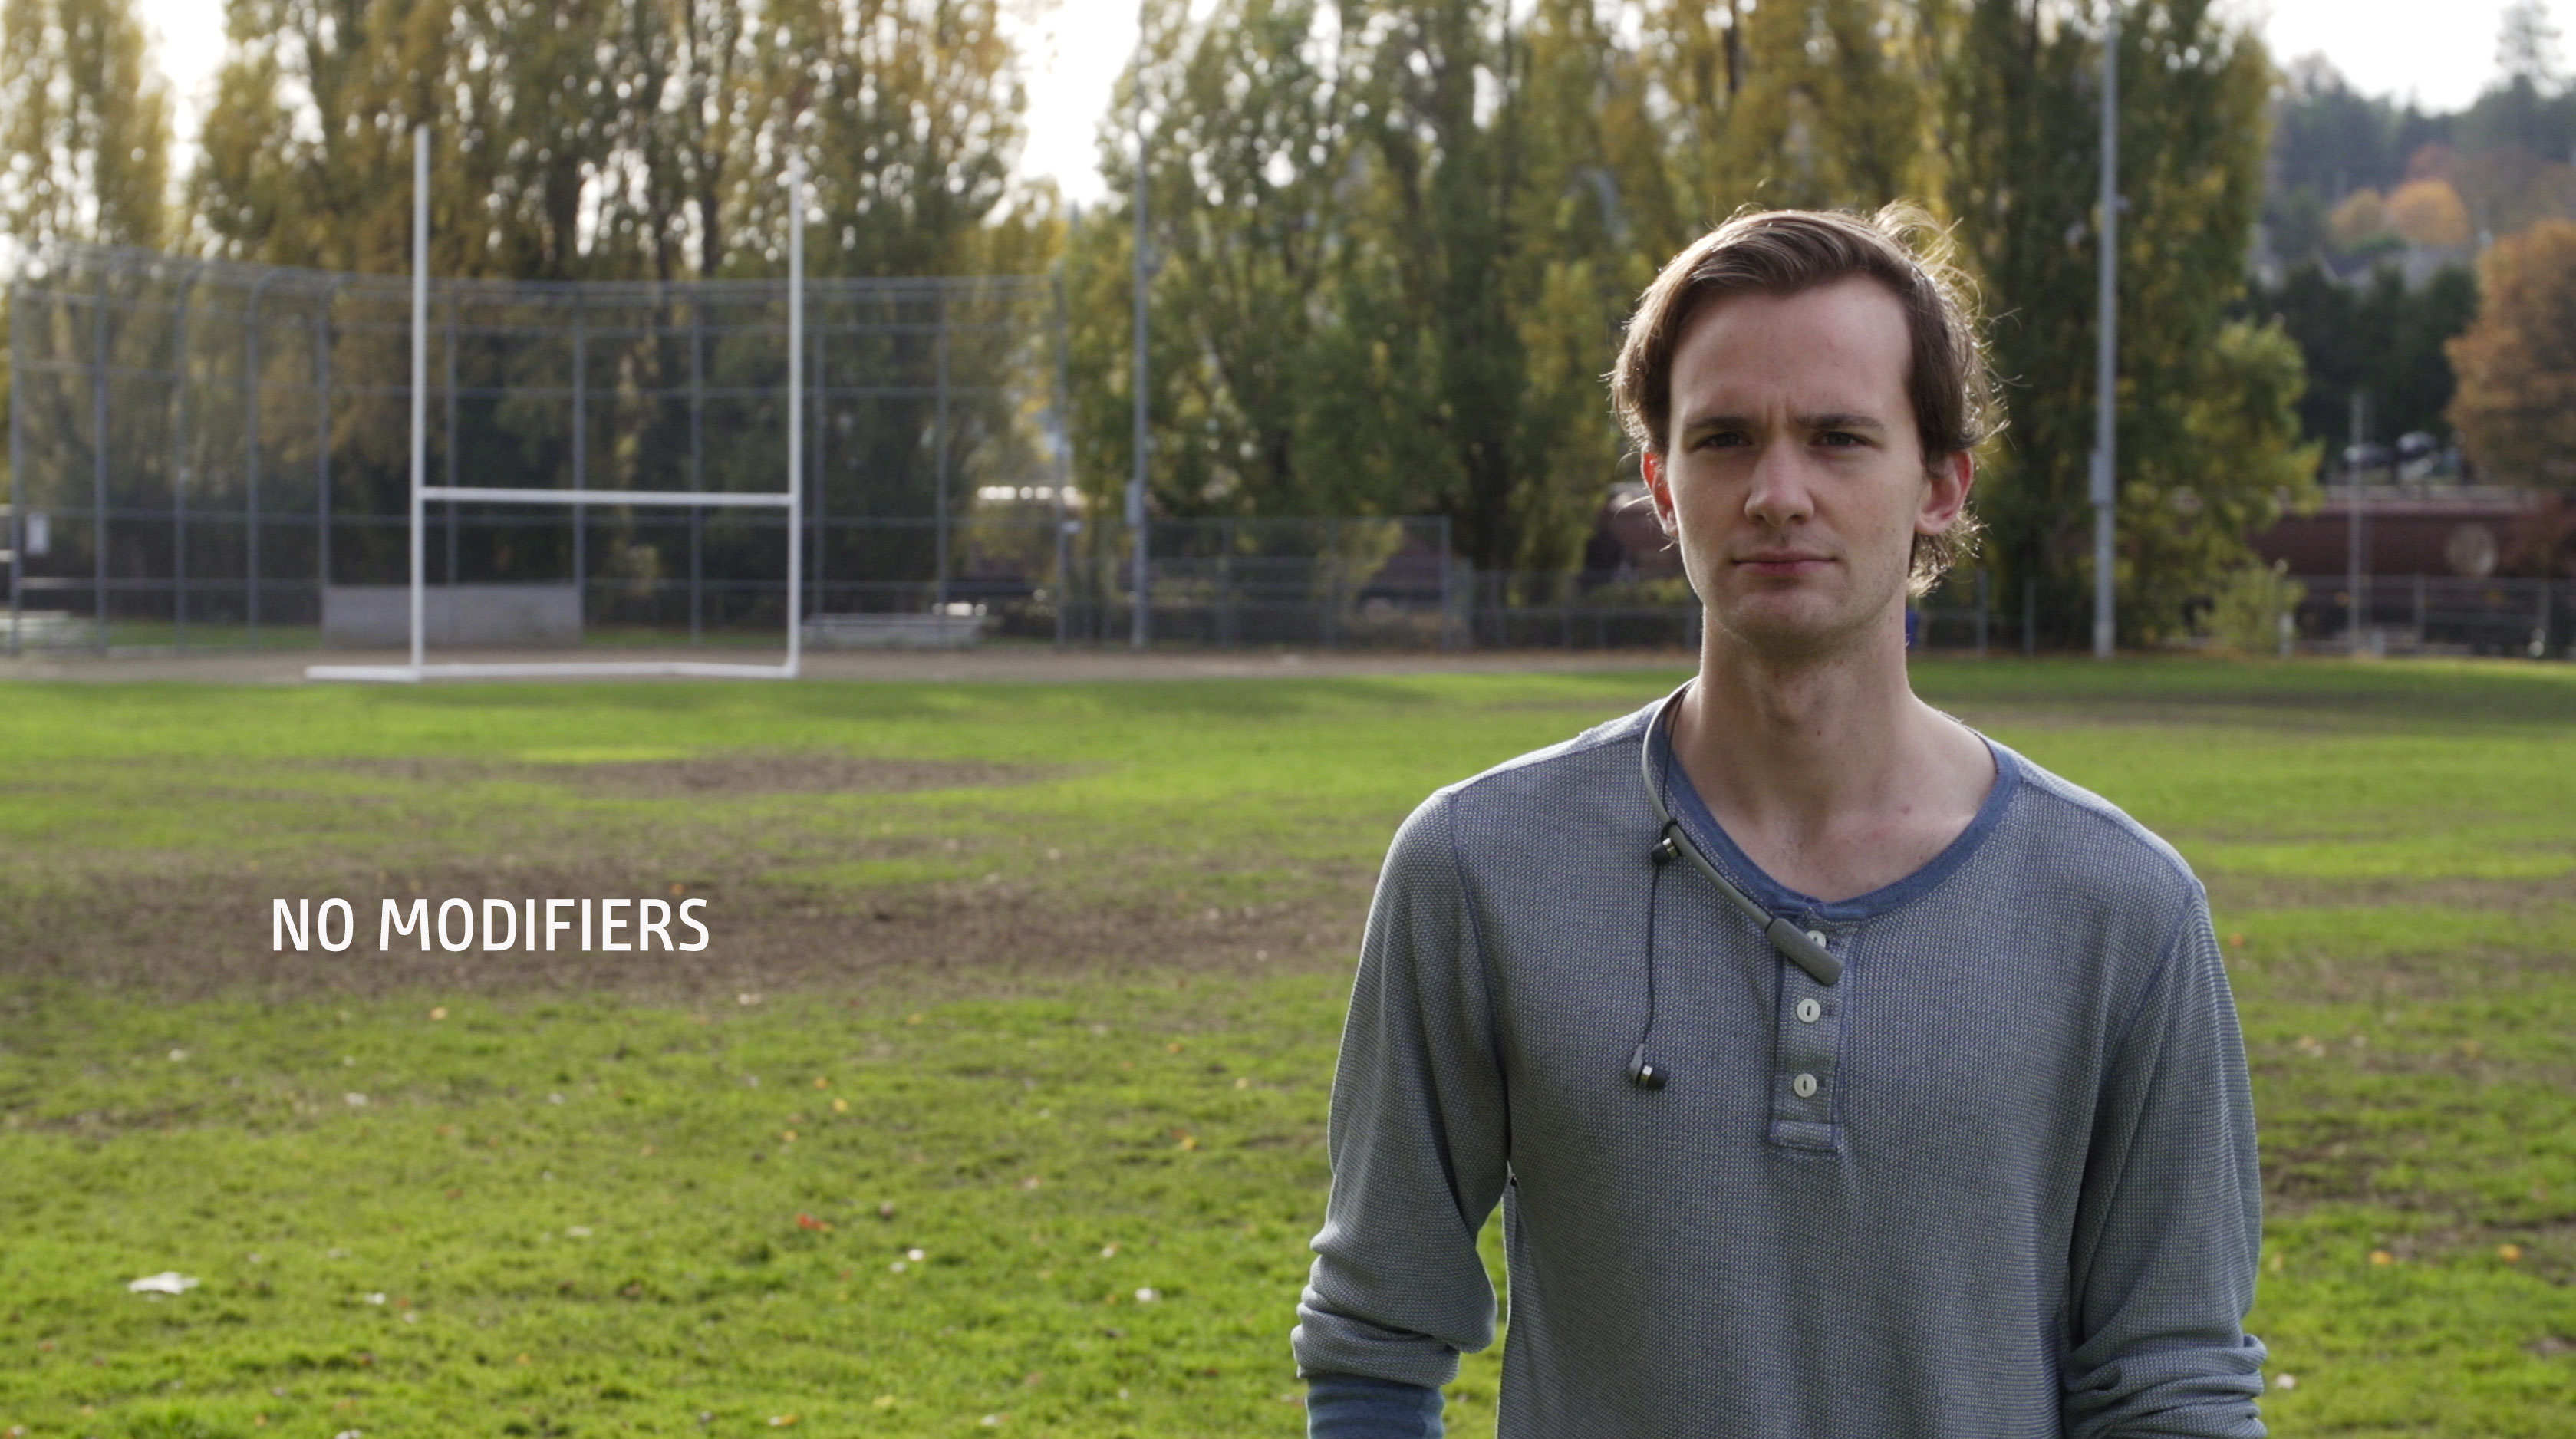
By doing this, we penciled him out from the background with natural rim light. This works best when you can find a background that is at least a stop darker than your subject. In this case, we could do that very easily, because there were lots of trees. Trees absorb light. So here’s our starting frame:
1. The camera left side of his face is visibly darker because there is a line of trees off camera in front of him on that side, and open field on the other.
This first frame shows the importance of considering how nearby objects will impact your subject. If he had been standing in the middle of the field, his face would have been evenly illuminated. But because there is a line of trees behind us and camera left, the light is wrapping in from camera right which is exposed to open field.
Our goal here is to make the most of the tools we have to create a naturally lit interview that feels organic and makes our subject look great. So let’s start playing with our toys and see what each does for our shot.
2. Bounce 3/4 on camera left.
Our first setup is to bounce light on the same side as the sun, 3/4 angle camera left. This evens out the light on his face, eliminating the dark areas created by the trees in front of him. But it’s pretty flat. Let’s move the bounce a little farther to the right…
3. Bounce under lens
Placing the bounce directly under the lens is a pretty common sight on film sets. It’s a great way to get a nearly invisible fill up into the eye sockets of your talent. But in this case, it still feels pretty flat.
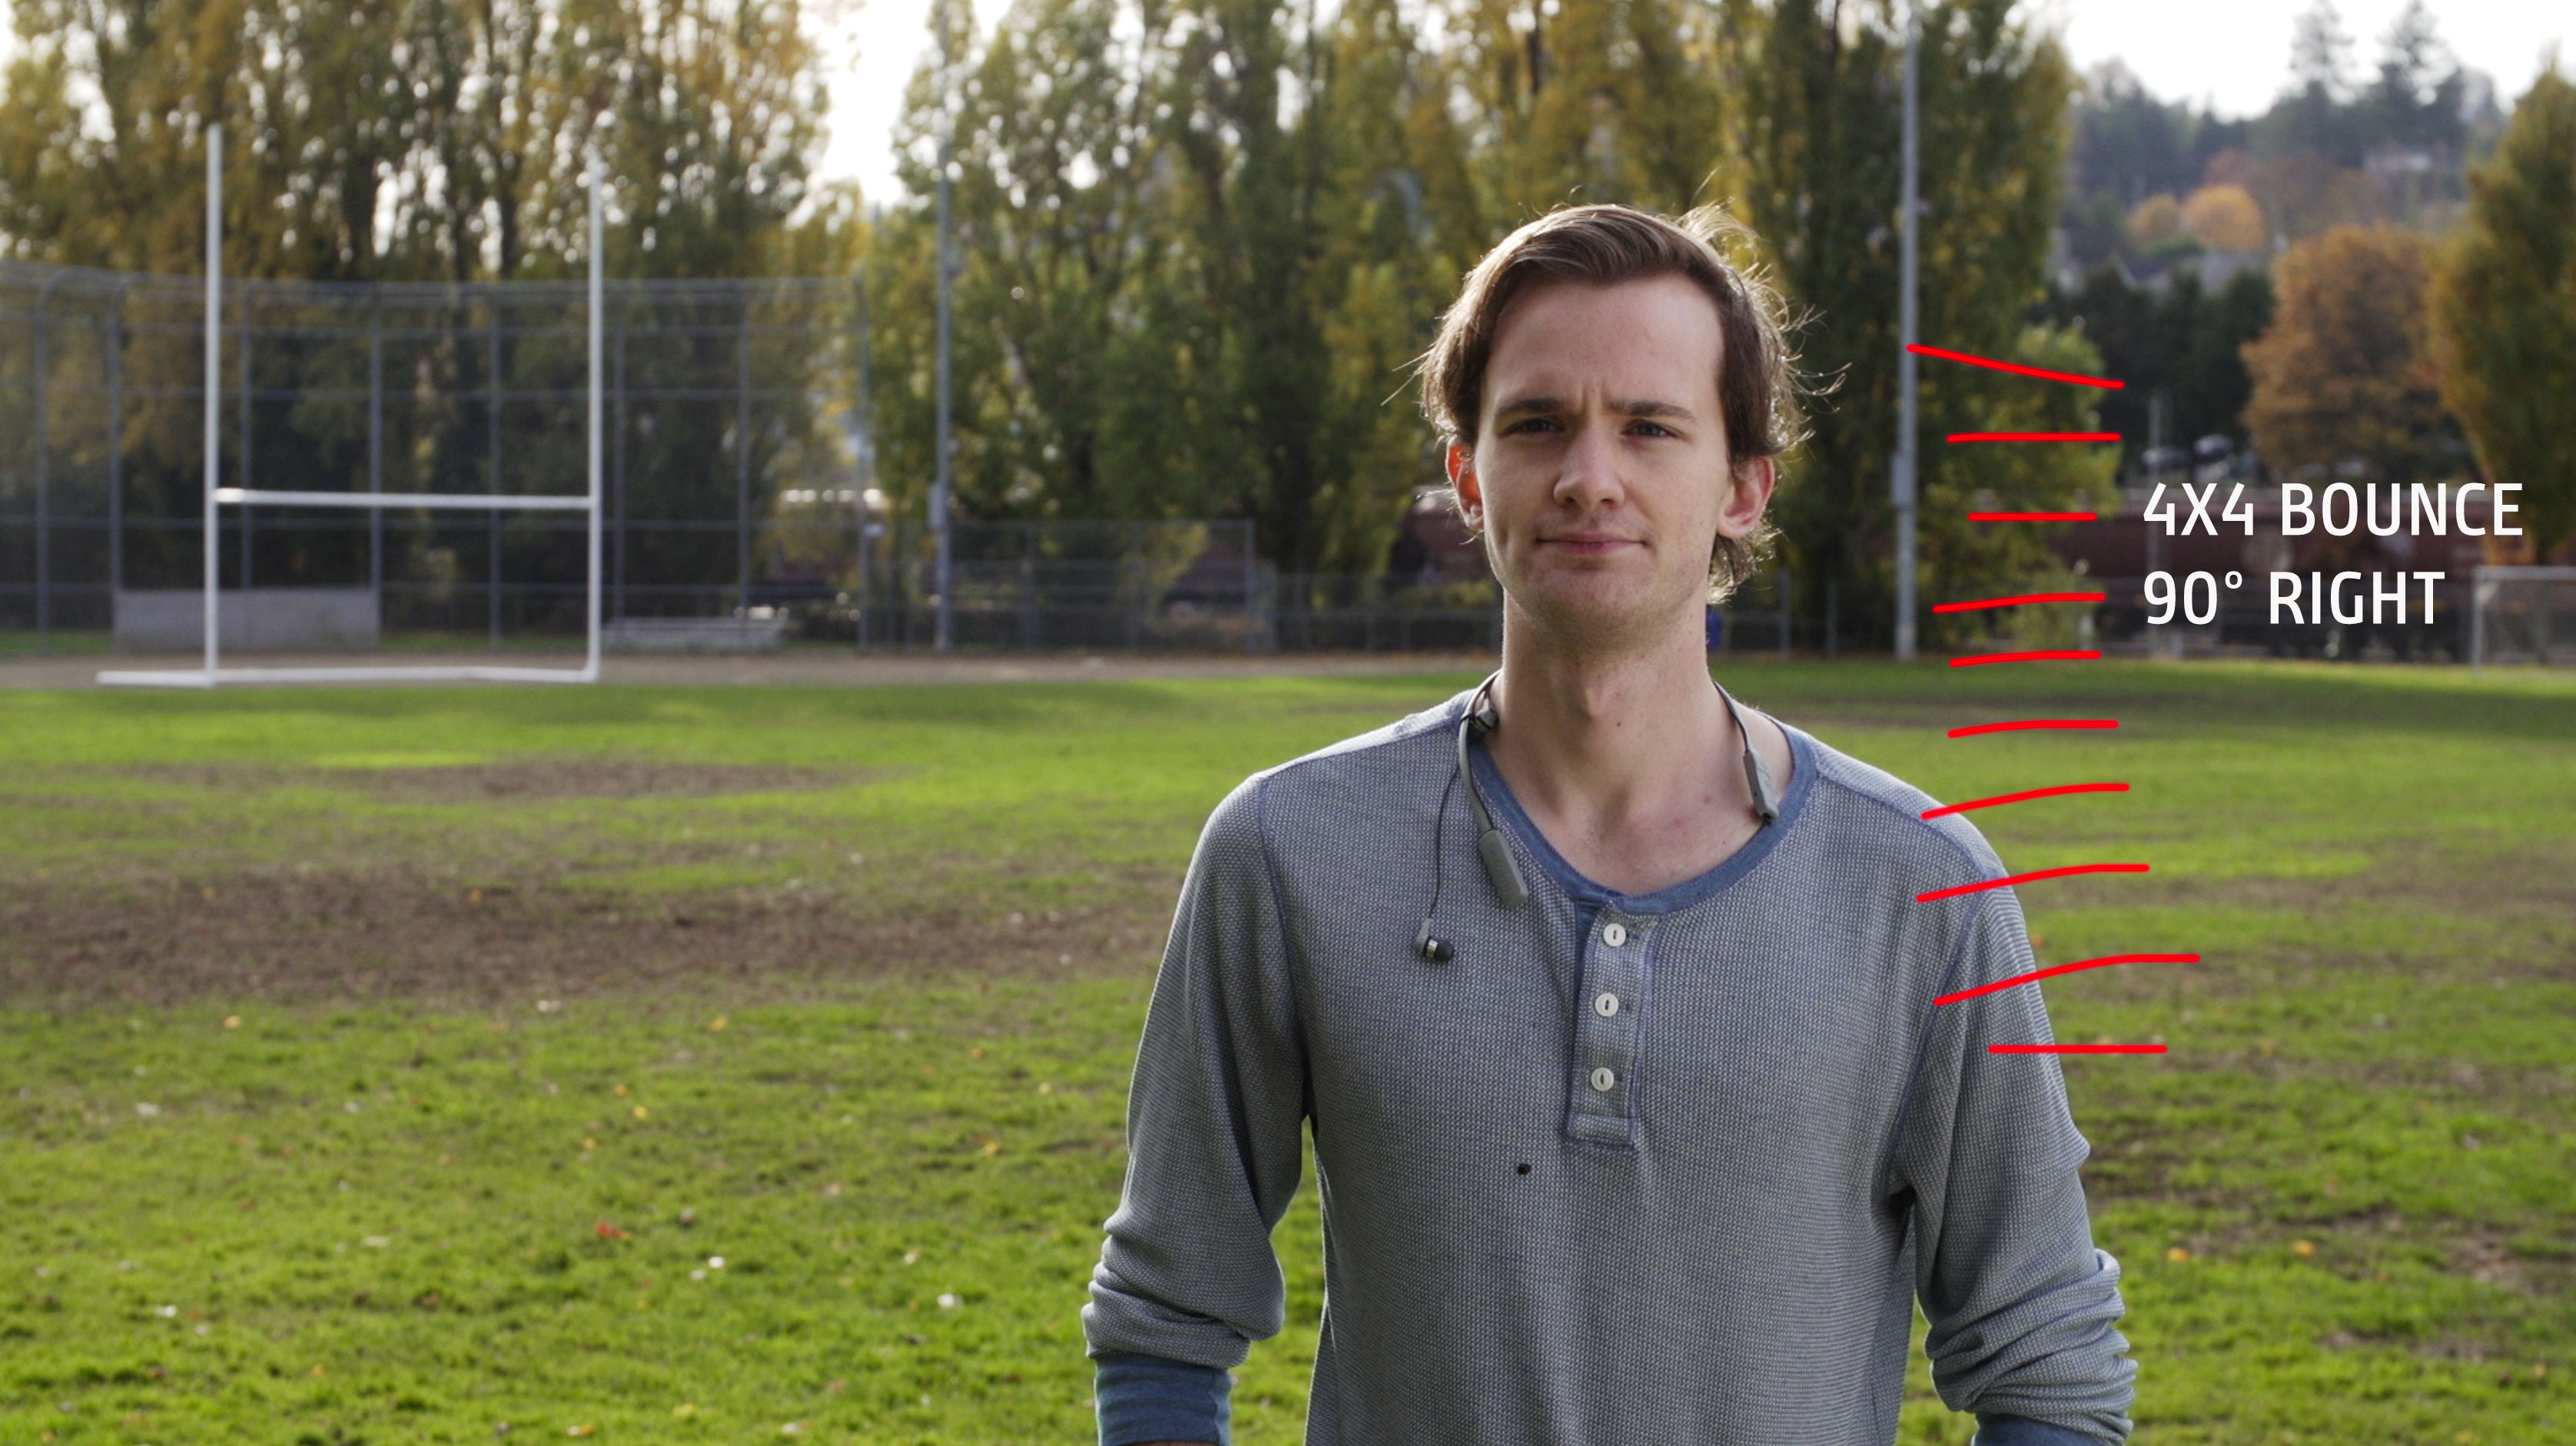
4. Bounce 90° camera right
Placing the bounce on the camera right side gives us a nice dimensionality, but it doesn’t look organic, because the sun is coming from behind and to camera left. So it looks lit. No good. Let’s put down our bounce for a minute and see how the negative fill affects our shot.
5. Neg only
The neg by itself does a nice job of evening out the light on his face, but he’s now too dark overall. If we raise our exposure to compensate, the background will get too hot, and we want to leave it alone at a stop under. So let’s bring back our bounce, on the same side as the sun (called “same-side fill”) and see what happens.
7. All in – bounce camera left and neg camera right.
Wow! This looks pretty good. Adding the bounce wraps the light of the sun around his face very naturally, and the neg on the other side gives us the 3-dimensionality that we’re always striving for in cinematic shooting.
If anything, I’d say we could have raised the 4×4 bounce a little higher to do something about the shadow that’s forming a triangle between his camera right cheek and eye.
What techniques do you use to shape available light for cinematic outdoor interviews?
One of my students at Seattle Film Institute asked me a question the other day: “How do you choose hard drives for 4K video?”
Most beginning filmmakers are on tight budgets. So my short answer was: “Buy the cheapest drives you can afford to store your media, and the most expensive drive you can afford to edit it.”
Let’s unpack what that means in today’s technology landscape.
When I get a new 4K project, I buy two hard drives big enough to hold all project media. In my case, that’s generally 1 to 2 terabyte drives. At the end of each day of production, I’ll lay off the files to both simultaneously. I use Hedge which enables me to have two backups of the media from the get-go.
Drives I recommend
The drive I have most frequently chosen for this is the 2TB Backup Plus Slim Portable External USB 3.0 Hard Drive. It currently costs $65. Black Magic Speed Test clocks it at 75 MB/s. That’s way too slow to edit 4K video on, of course, but we only need it for storage. The nice thing about USB3 is that it’s compatible with just about any computer out there, both Windows and Mac. So if your client wants the files at any point, you can simply hand them the drive.
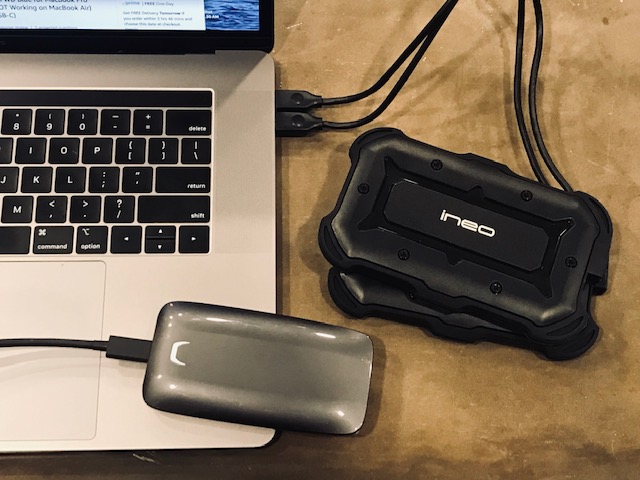
If you have a computer with USB-C, however, I recommend the aPrime ineo rugged waterproof IP-66 certified drives. For $95, you’re getting a drive you can drop in the water, with rubber bumpers to break its fall, and a built-in USB-C cable. These drives clock for me at around 110 MB/s read and write speeds. So for a little more money, you get drives that are a LOT more rugged and a little bit faster.
Both the above drives are about the size of a typical iPhone. And that matters to me – they will (hopefully) live out their lives in a drawer. I like that they won’t take up much space.
Small is the new big
So now let’s talk about the fun stuff – speedy editing drives. I used to rely on toaster-sized RAID drives to get the speed and reliability I needed for editing. But with SSD, that’s no longer the case. With solid state media, I have found speed, reliability AND the benefit of being able to take entire projects with me wherever I go. With this freedom, I find the only time I’m cutting at a desk is when I’m doing audio passes with studio monitors. I’ll connect my laptop to a larger monitor at various stages of the project. But even then, I tend to park myself all over the house. For example, the kitchen table, or on the coffee table in the living room.
My tried-and-true favorite 4K editing drive is currently the 1TB T5 Portable Solid-State Drive (Black). I get read-write tests to about 300 MB/s which is more than fast enough to edit 4K video. This drive is the size of a business card (and only a little thicker). It is now available in a 2TB size for under $500, which seems like a bargain to me. But the landscape is changing.
Here comes Thunderbolt 3
Most new Macs now support Thunderbolt 3. If you are one of the fortunate people who has one, I invite you to behold the 2TB X5 Portable SSD.
I hesitate to call it affordable at $1,400, but it gives wings to your 4K projects. I recently retired my late 2013 MacBook Pro and made the leap to a late 2018 MacBook Pro, so I finally have a computer than can keep up with such a beast.
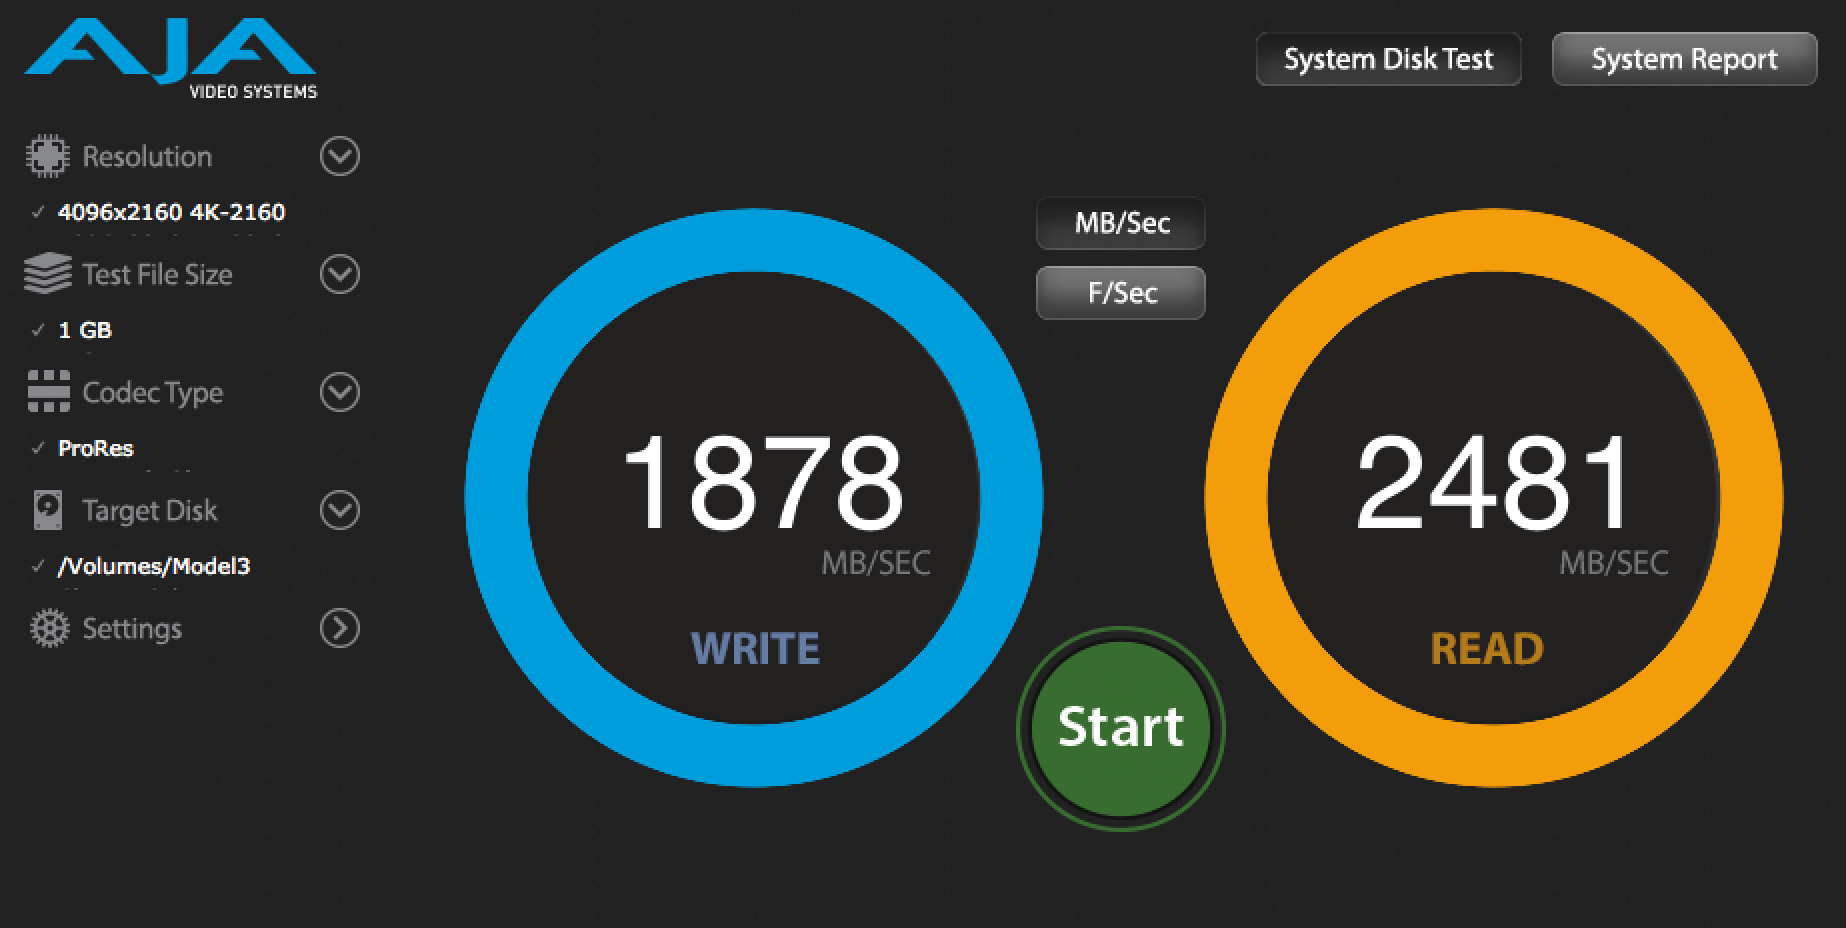
I’ve been putting the X5 through its paces by editing multiple streams of ProRes RAW 4K DCI on a project that weighs in at 1.7 TB. With everything loaded on the drive, here’s how the X5 performs:
X5 Write/Read times with drive 3/4 fullThe X5 clocks even faster read and write times with Black Magic Speed Test
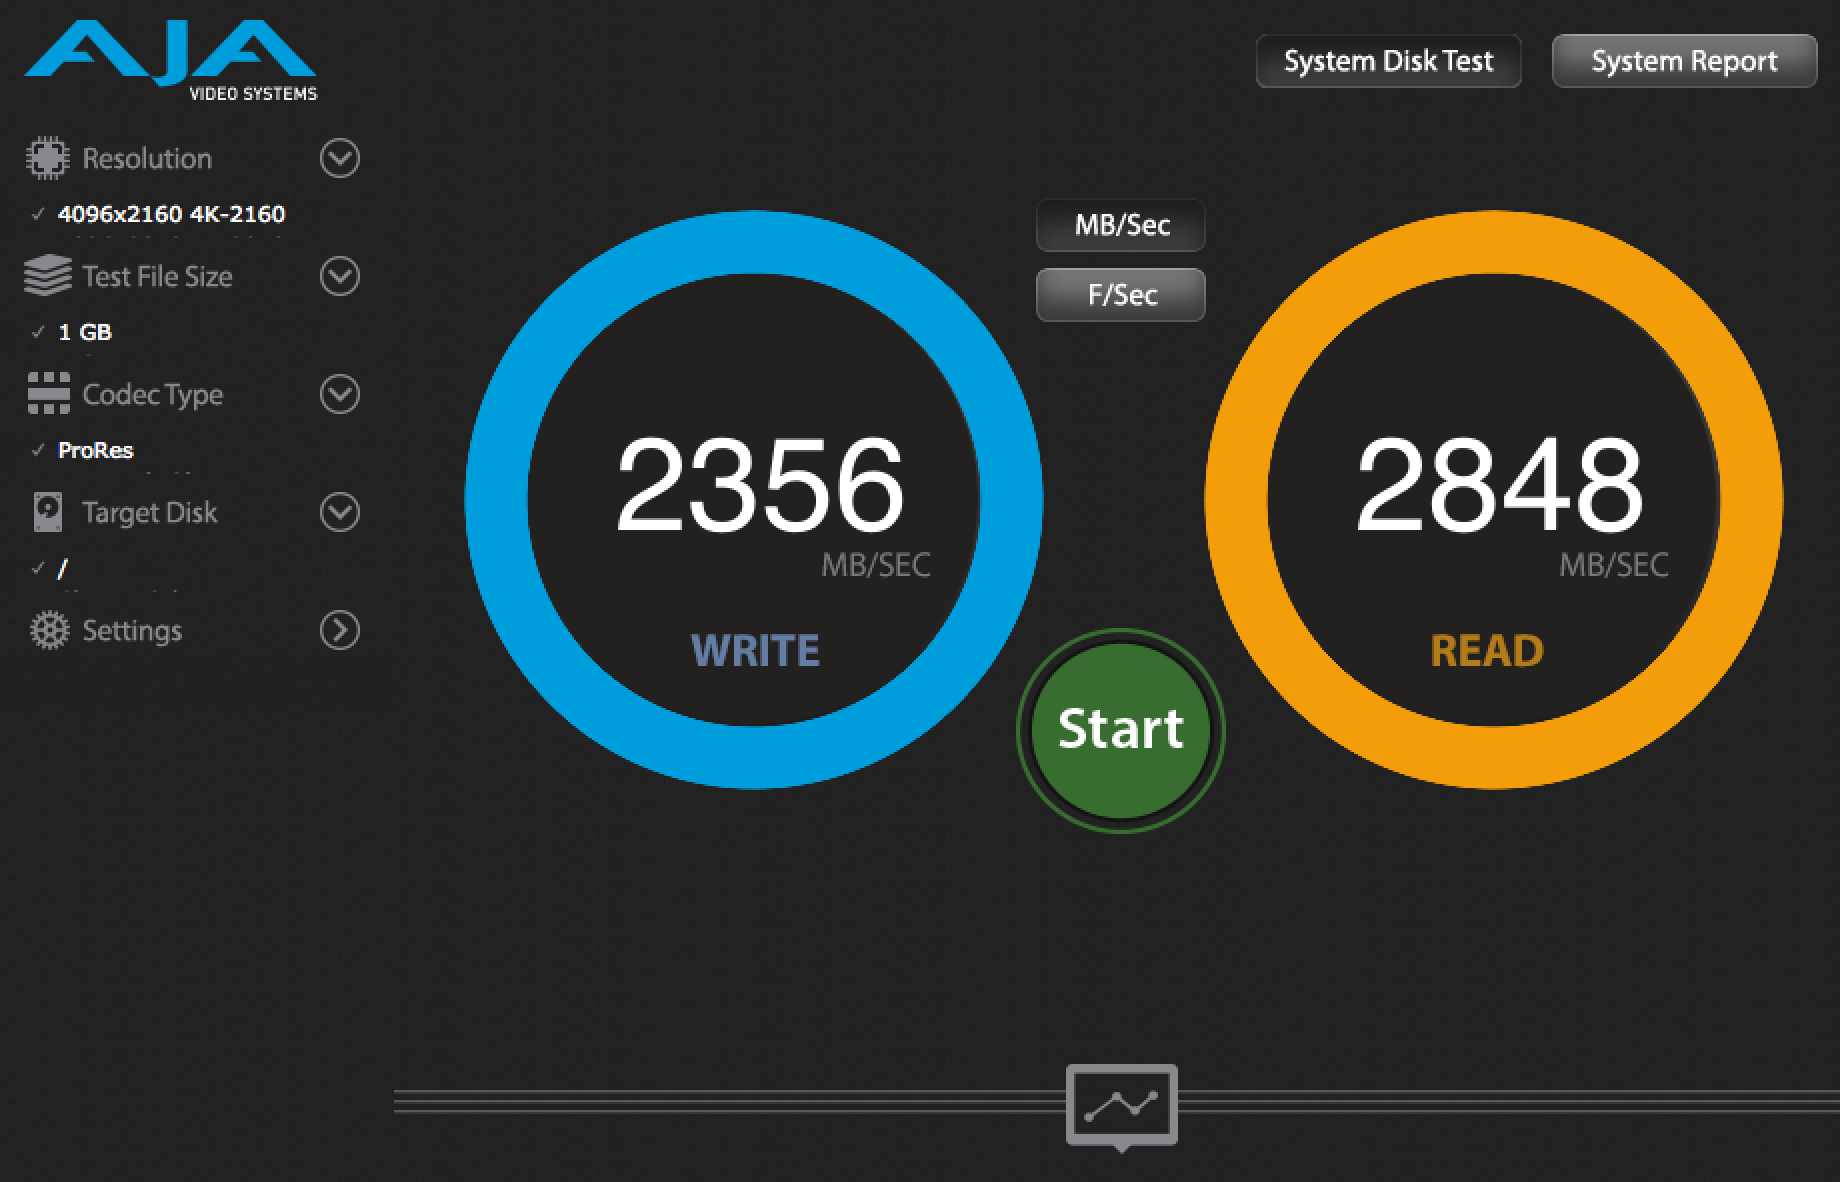
It’s interesting to note that even though this drive is lightning quick, it’s still not nearly as fast the internal drive of the 2018 MacBook Pro:
Late 2018 Macbook Pro internal drive speed test
Putting it all together
What these numbers tell me is that to get the absolute best performance from Final Cut Pro X, you want to keep your FCPX Library file on your local hard drive. Then, store all of your media on the X5. Beyond speed, this has the added benefit of allowing automatic backups of your FCPX project files. To get near real-time backups, use an automatic cloud-based backup service like BackBlaze. Because it runs in the background, BackBlaze won’t slow you down at all and you won’t have to remember to back up your project. Note, however, that BackBlaze is not an efficient way to back up your media drives. But you’ve already got yourself covered there with those cheap backup drives.
For longer 4K projects like feature-length films, you’re of course still going to be living in the land of RAID when choosing hard drives for 4K video. But for the small projects, I find this 3-drive system, in which you back up your media on 2 cheap drives, and edit it on a single fast one, is a winning formula.