Last evening I was in Pioneer Square with a few minutes to kill before I could get into a studio for a shoot. I noticed the exquisite moving shadows cast by the rush hour traffic, so I grabbed my Canon 60d with 35mm Nikkor, and shot two clips. I’m posting them to show how BAD brick buildings can look filmed with a dslr, alongside the second clip to show how GOOD they can look. (Tip: you really need to view this clip at full screen size to appreciate it).
Key takeaways: you CAN shoot brick buildings with these cameras. You just have to be very, very careful.
First, don’t move the camera if your shot is full of complex lines.
Second, if your shot is full of complex lines, reduce the complexity by changing your angle or distance.
Third, soften the shot a little by shooting on the open side of your aperture ring, rather than the closed side.
Finally, go ahead – soften the image further by blowing it up in post if you need to. I distorted the upper edges of the second clip to make the lines more vertical. Normally this introduces a bit of unwanted softness, but in this case, it’s a good thing.
Check this out: a simple shot of a lamp in my back yard, at different apertures on open end of my prized Nikon 35mm 1.4 lens. This is the lens that Nikon made during the 70s using radioactive glass (really) and as a result, today the lens has a very warm cast caused by the decaying isotopes. It’s the perfect lens to warm up those cool cloudy days in Seattle.
But that’s not what caught my eye about this sequence. What I’m blown away by is how very, very different the image looks at each of these apertures. Check out the huge difference between 1.4 and 2.0, for example. All the way open, the background almost looks painterly, like you can see brush strokes. But the detail in the foreground is noticeably less sharp. That cleans up instantly at 2.0. The background strokes are still there – just a hint. This is pretty much the sweet spot of this lens.
Anyway, no reason for sharing this today except that it’s good to remember exactly what your lenses can do, and shooting a series like this really makes it startlingly clear.
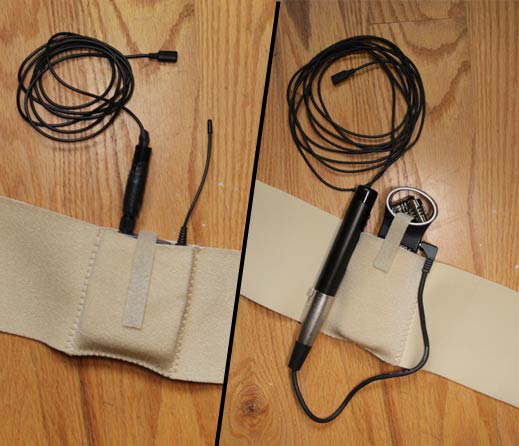
I’m going to make this a really brief post and let these images do most of the talking. Here’s two configurations that I’m now using for attaching a professional Tram TR50 lavalier mic on subjects for recording dialog. The first is with my Sennheiser G3 wireless system, which I love. But it costs $1,157.
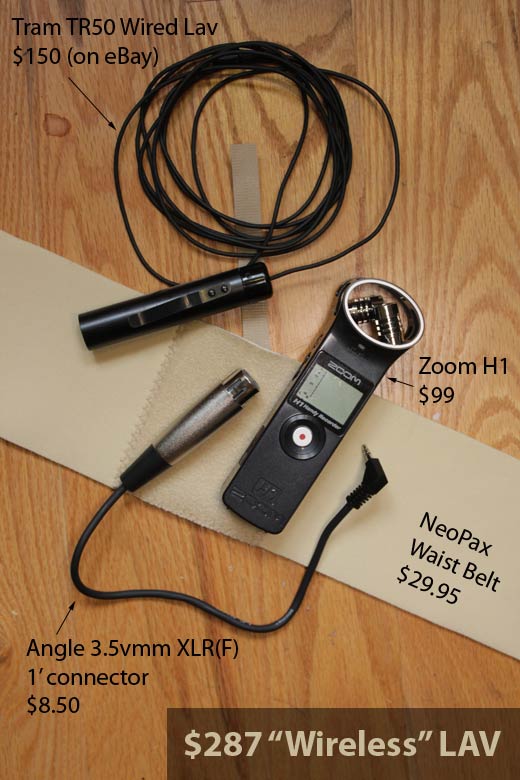
Compare this with a system I’ve put together using Zoom H1 and a hardwired version of the Tram, which I found on eBay for $150 bucks. (Granted, this isn’t strictly an apples-to-apples comparison, or I’d have listed the full price of the Tram in each configuration. But I’ve found it easier to find the hardwired version of the TR50 on ebay, and harder to find the same mic wired for Sennheiser there.)
The image above shows what each configuration looks like when it’s hooked up and ready to roll. As you can see, the Sennheiser wireless wins hands-down in terms of compact size. But the wired version is surprisingly compact, and will hide under a shirt easily (unless it’s a tight t-shirt, in which case it’s a bit bumpy). Another drawback to the Zoom H1 is that there is no way to monitor recording. And if the subject sits down, leans back and accidentally presses the big red “on/off” button against the couch, for example, you may not be recording at all. I wish the Zoom H1 had a lock button for this reason. Update: Dmitry posted a comment explaining that there IS a lock function on the H1 (and also on the H4N) – to activate it, simply push the on/off switch toward the “hold” position – voilas – keys are all locked. Awesome.
Despite these few limitations, here’s the bottom line: The Zoom H1 used as a “wireless” lav is 4 times cheaper than the Zoom H4N configured with Sennheiser wireless. The audio quality that both systems produce is comparable, as I’ve pointed out in my H1 vs. H4N sound test previously.
There are also some advantages to using a wired lav – namely, you don’t have to worry about getting too far away from the subject, or interference from others using same frequencies, which can be a hassle in crowded news gathering situations such as a trade show floor.
I just signed up for what looks like a killer 6-week workshop, Sound Design for Pros, by accomplished sound designer and filmmaker David Sonnenshein. If you’re wondering whether this is worth the $250 bucks, check out this free one-hour overview webinar which gives an outline of the topics he’ll be covering and the assignments he’ll be giving. Here’s the scoop:
This free Intro Webinar will give you an overview of topics essential for the creative, professional sound designer that will be covered in detail in the upcoming six-week webinar series beginning Sept. 8. You will see and hear audiovisual demonstrations that will stimulate your auditory mind and sharpen your abilities to produce powerful soundtracks. We will also have an open chat for your questions related to sound design.
* Master theory and application of your audio craft to become an in-demand professional
* Discover tools and tricks to find an expressive voice and maximize your creativity
* Impact the audience effectively on intellectual, emotional and visceral levels
* Build successful communication skills with job-hiring producers and the post team
WEBINAR TOPICS
1. THE INTELLIGENT EAR – Listening Modes, Sound Qualities and Bipolarities
By deconstructing the listening experience into discrete elements, the grammar of sound design language gives you access for clear and powerful communication.
2. PLUG-IN POWER – Size, Distance, Speed and Non-Physical Reality
Understanding principles of real world acoustics and palette of subjective auditory experiences offers you enlightened use of digital processing tools.
3. RULES OF the BRAIN ROAD – Psychoacoustic Principles and Applications
When the curtain is lifted on how humans process auditory information, you master the art of sonic illusion (creating and hiding) as essential tools in sound editing.
4. SONIC TIME-SPACE CONTINUUM – Soundscapes and Sound Spheres
Creating an effective cinematic space depends on familiarity with your physical and social environment, and the knowledge of how to psychologically orient yourself through audio.
5. AUDIO BUILDING BLOCKS – Constructing Sound Events and Sound Objects
Mastering techniques of sequencing, layering and mixing will infuse sonic fragments (sound effects, words) with meaningful messages (sound phrases, sentences).
6. PEOPLE, PLOT AND PASSION – Narrative Structure and Sound Mapping
Bottom line, how can sound help tell your story? By understanding dramatic elements of character and emotion, the map can guide you to creative and impactful decision-making.
———————-
David Sonnenschein’s book is legendary, and the interactive webinar which presents and analyzes examples of the theory, truly brings the material to life. – Nathan Moody, NoiseJockey.net
David gives a lot of fantastic theory and examples about the emotional and technical side of sound design with detailed explanations, presentations and audiovisual material. If you enjoyed David’s book you will love his webinars. – Miguel Isaza, DesigningSound.org
David Sonnenschein is without a doubt an expert on sound design for film, television, and multimedia projects. His impressive knowledge and easy-going personality make his classes both informative and enjoyable. – Joel Krantz, Sound Editor/Mixer and Author, Pro Tools Post Production Techniques
———————–
If you can’t make it to the live event, you can watch the recording anytime after August 24. Registration is the same for the live and recorded webinar.
This free event is an intro to a six-week webinar series that will begin on Sept. 8. For more info go to sounddesignforpros.com.
I picked up a Rode VideoMic a few months ago, and I tried using it on some shoots. However, I noticed a horrible amount of handling noise whenever I used it, which I attributed (mistakenly, it turns out) to the mic being very sensitive to my fingers on the camera controls. I even bought the expensive Rode VideoMic handle, to try it handheld, and that didn’t help. So I stopped using it, because I couldn’t get any clean audio whenever I used it. But today, I discovered that it’s NOT my ham-handed fingers: there’s a problem with the shock mount.
Here’s how I figured it out. Today I was testing my iPhone with a mic adapter, the KM-IPHONE-MIC from KVconnection.com, which makes it possible to use external, self-powered mics with the iPhone. Just for grins I thought I’d test it out with my idle Rode VideoMic. Guess what I discovered? I got the same horrible handling noise as before, only this time, I had the mic in a controlled environment.
So where is all the handling noise coming from? From the shock mount. All those tiny rubber bands emit audible creaks. And it’s bad. Worse than useless, in my opinion: the Rode VideoMic introduces unwanted noise that otherwise wouldn’t be there.
Listen for yourself:
Am I the only person in the DSLR universe who has this problem? Is it possible that my unit is defective? Does the rubber on the feet age quickly and need to be replaced? How’s your Rode VideoMic working out?
**Update: I ordered a set of new silicon bands for the shock mount, and after replacing them, the mic is blessedly quiet. But I’m still not crazy about the fact that they had to be replaced inside of a year of very light use. That feels like a design flaw to me. The VideoMic should come with the following disclaimer: note that you will need to replace the bands frequently.
Last week there were some spectacular sunsets around Puget Sound caused by smoke drifting south from forest fires in British Columbia. I seized the opportunity to try out some timelapse shots. I got out my Nikon 300mm f/4, put a 1.4 teleconverter, and with a fotodiox adapter, mounted it on my Canon T2i. Here’s the results from two subsequent days, following two different approaches:
The first shot was made at 1080p, 24p and speeded up 600 percent in Final Cut. The second was shot the following evening, when the smoke had mostly cleared (notice how much less red there is). For this one, I shot stills, at the rate of a frame every second, and later assembled them for editing with Quicktime following these instructions from Phillip Bloom, who is a real timelapse junkie.
The nice thing about the second approach is that the much higher resolution of the image allows you to crop in and increase the magnification without losing quality. Because there was a lot less filtration of the sun on the second day, the sun is much brighter, though, and that definitely detracts from the magic of the first day.
If you look very closely to the first shot, you can pick out two sunspots that are hardly larger than specks.
For doing timelapse with the Canon T2i, you need an electronic interval timer. The official Canon part for this is listed as “temporarily unavailable” at B&H, so I picked up a really inexpensive one on Ebay, the Aputure AP-TR1C, for about $40. It worked great, once I replaced the old hearing aid-type battery it ships with which died within 15 minutes of use.
Interesting to note: the photo was taken facing due west (of course), and if you look closely, you can see how far the sun is moving south in a single day. In the first photo, its trajectory takes it north of the big tree – in the second it’s path intersects the tree, setting enough further south that we lost we lost 3 minutes of daylight from the previous day.
This screamin’ deal I just learned about via Planet 5d: this weekend only you can purchase Lock and Load X for $79. That’s 47 percent off the $149 I paid for it. Next to Red Giant’s amazing suit of plugin’s, this one tops my list of most-useful plugins. I routinely apply this bad boy to get the jitters out of my handheld footage, and it works like magic most of the time. The controls are intuitive and it’s FAST. And speed is often the difference between using and not using a plugin.
Here’s an example of just how effective it can be:
Last weekend I was shooting a documentary about a band on tour, and they spent the night at an interstate hotel. We were returning to the hotel after eating fast food, so I wasn’t lugging my tripod – and I saw these great ambience shots. To film them, I just reached into my shoulder bag for my 35mm nikon 1.4 lens, and grabbed these available-light shots handheld on my Canon T2i (using Novoflex lens adapter to get the Nikon glass on the Canon). If I hadn’t known in advance just how well these shots would clean up because of Lock and Load X, I probably wouldn’t have even tried to shoot them handheld.
Notice the before and after difference. Especially note the lens flare on the hotel shot, which shows how jittery the shot really is. After Lock and Load X is applied, you still see the lens flare bouncing around – but the background is solid.
One limitation of Lock and Load X: it doesn’t work with footage in which you’ve changed the frame rate. So if you’ve shot something at 60p and used Cinema Tools to convert it into slow motion 24p, you’ll have to use Lock and Load (the non X version, which is included with your purchase) instead. It’s much slower than X, and has to be re-rendered whenever you make changes in the timeline, but it works great if you’re patient.
I’m slightly red-green color blind. Yet at this stage of my career, I have to do all my own color correction. Impossible? Well, maybe if I were REALLY color blind it would be. I can eyeball most colors just fine, but the ones I have a hard time with are flesh tones. That’s why I’m so excited about the latest update to Red Giant’s amazing Colorista cool. Because hidden within the interface is a secret weapon that Colorista II inherits from Magic Bullet Mojo called “show skin overlay.” When enabled, it literally lays a grid over your clip’s flesh tones, telling you when you’ve got it right. Here’s how it works.
Earlier this week there was an excellent post from one of the clever guys at dslrhd.com, explaining a technique that can be used to disable automatic gain control (AGC) on a Canon 7d or T2i:
Only problem is, I followed the steps, and it didn’t work for me and my t2i. So I started tinkering. After a bunch of trips to Radio Shack, I figured out how to make it work, and if you got what I got, it’ll work for you too.
So, here’s what I got: a Rode VideoMic and a T2i. I’ve found the VideoMic to be almost useless, because of Canon’s AGC. In fact, the tiny built-in mic on the camera sounds better than the VideoMic, which is ridiculous. Anyway, when I hooked up the VideoMic to the splitter as outlined in the above tip, I got nothing but a lot of static and hiss on the line.
It turns out the problem is because the VideoMic outputs a stereo signal (which doesn’t make very much sense, because it’s a mono mic, but it does). Plugging a stereo jack into a mono jack doesn’t cut it. You need a 1/8″ stereo plug to 1/8″ mono jack adapter (part number 274-882 at Radio Shack). Plug the VideoMic into that, then plug that into the Y described in the video. Bingo, you’ve got audio. Note: for playing the tone from your iPod, you’ll need either a mono 1/8th cable OR another one of the aforementioned stereo to mono adapters plus stereo cable. In the picture above, I’m using a mono cable to connect to the iphone, but these only come in 6′ length at Radio Shack, so I’m going to switch to using a 12″ stereo cable with an adapter to make it more manageable.
The volume slider on my iPhone is what you use to control the sensitivity of your mic (that is, the amount of reduction of the AGC). I find that setting it at 1/3 volume works best for recording someone speaking at a distance of 3-5 feet directly in front of the camera. Sliding the volume up increases the tone and thus reduces the gain, and vice versa. Pretty slick. Using this setup, my Rode VideoMic is finally useful to me.
Gotcha alert: This splitter is just slightly too big to fit in the T2i’s mic jack socket, and as a result, tends to work itself slightly disconnected with normal handling during a shoot. And, since you can’t monitor the sound going into the camera, there’s no way to tell for sure whether it’s come lose, except to physically grab the thing and push it in every so often during shooting. It’s always something with these DSLRs, hey? But in a year or two, when all of these problems are solved in a $2,000 ergonomically-correct, fat-sensor proper video camera body, I got a feeling we’ll remember these days fondly.
To generate the tone: Fire up Final Cut Pro and an empty timeline. Use the Generator > Bars and Tone to generate 20 minutes of something like NTSC bars and tone. Export it. Open it in Quicktime 7. Export again, only this time uncheck video, and choose to save the audio only as an AIF file. Drop that into iTunes. Create a playlist called “film utilities.” Drop it in there, and you’re all set.
The more I use the Zoom H4N, the more I love it and discover new uses for it. My latest find: it can work as an audio interface. I’ve been doing a lot of voiceover work lately, and was on the verge of purchasing a USB audio interface such as the Fastrack so that I could use a quality mic like my Octava MK0-12, to record directly into Soundtrack Pro. The Zoom H4N is supposed to work as a USB audio interface – but it doesn’t. I did a ton of testing, and all the voiceovers I recorded via the USB connection to the Zoom were distorted – not only tonally, but they had weird random snapping and crackling and occasional skipped sections of sound. Very bad. But there’s a workaround…
As I was on the verge of placing an order for the Fastrack, it occurred to me: why not simply use a 3.5mm male-to-male cable (which I already own) and connect the Zoom from its line out to the Mac using the Mac’s 3.5mm input jack? I tried it out, and it works great! That’s about $120 saved, and one less piece of equipment to clutter up my editing table.
Configured like this, the Zoom does not have to itself be recording for this to work – I simply press the record button once (not twice, which would cause it to record onto the sd card), which puts it in standby mode, passing the signal through the line out and into the Mac, which handles the actual recording in Soundtrack.
Soundtrack’s right pane is set as follows (see graphic to right):
Input – set to Built-in Input and Mono selected for voiceover work.
It’s best to leave the monitor set to None, or else you’re likely to have feedback issues while recording.
Finally, arm the track you want to record to, press the record button and away you go.