 The C100 mkii is an amazing documentary camera. It’s capable of 12 stops of dynamic range and it gives you everything you need (ND filters, EVF, phantom power, etc.) without additional rigging. But to get the most cinematic performance out of it, it’s important to set it up correctly, and remap one of the buttons. Here’s how I configure my camera before a big shoot.
First of all, do an auto black balance. Canon recommends you do this every time you change the ISO. It’s especially important to do this if you’ll be shooting with high ISOs. From Camera Setup menu, select ABB. Make sure a lens cap is on. Press OK to perform the balance.
Auto Focus
1. Reassign One-Shot Autofocus to button #7. Button 15, the default, is in a very awkward location if you plan to use autofocus regularly, like I do.
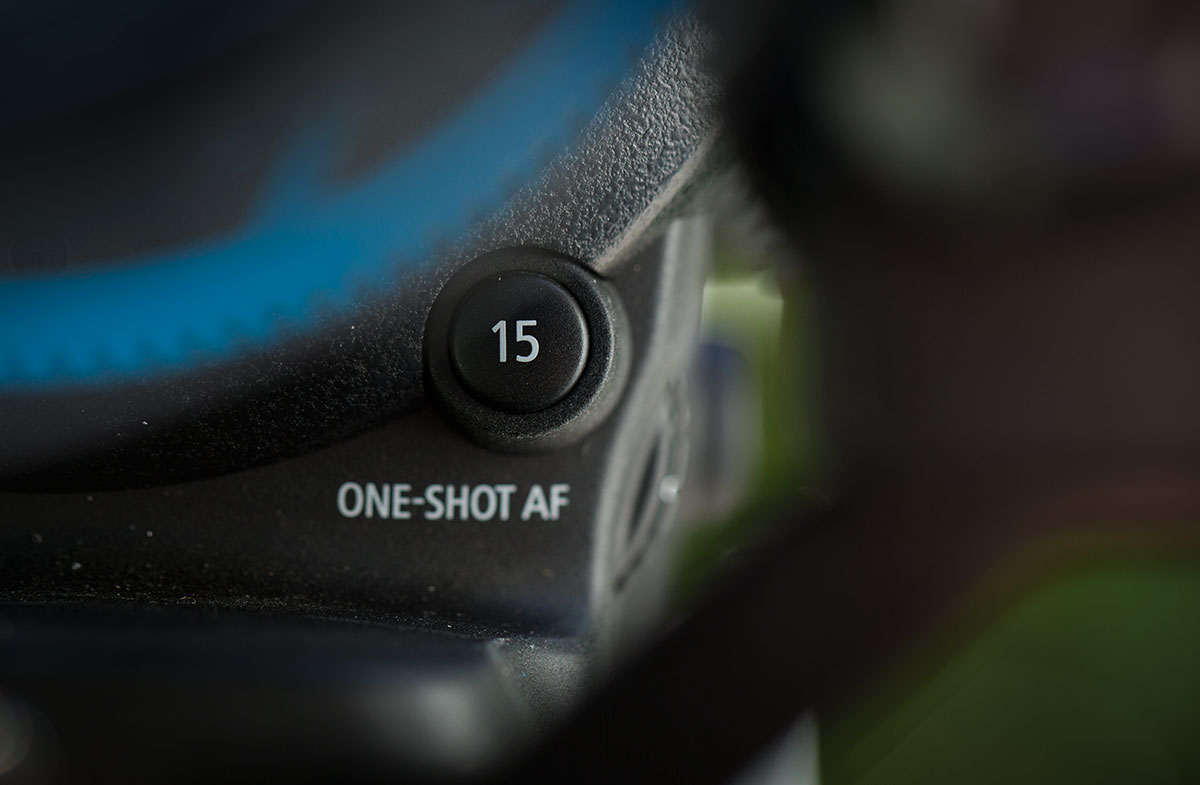
This is an awkward button location for routine focus grabbing. So we’ll remap it.
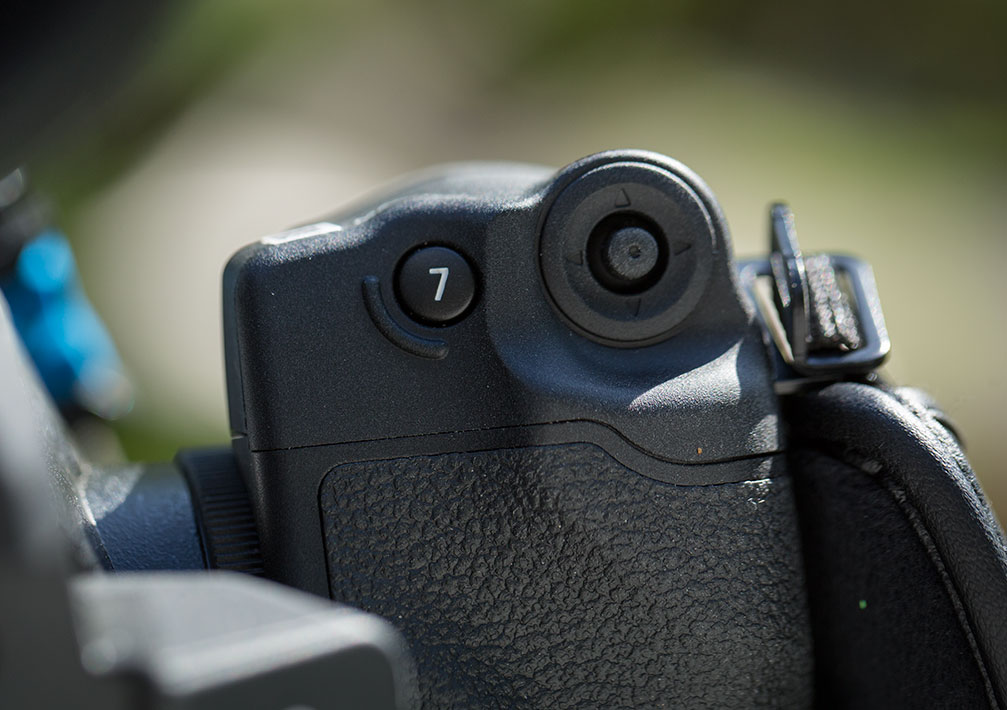
Button 7 is a great choice for one-shot autofocus, especially if you’re used to working with DSLR autofocus, which places it in the same spot as the autofocus button on pro Canon DSLRs
To remap the button, select Other Functions > Assignable Buttons. Then choose button 7.
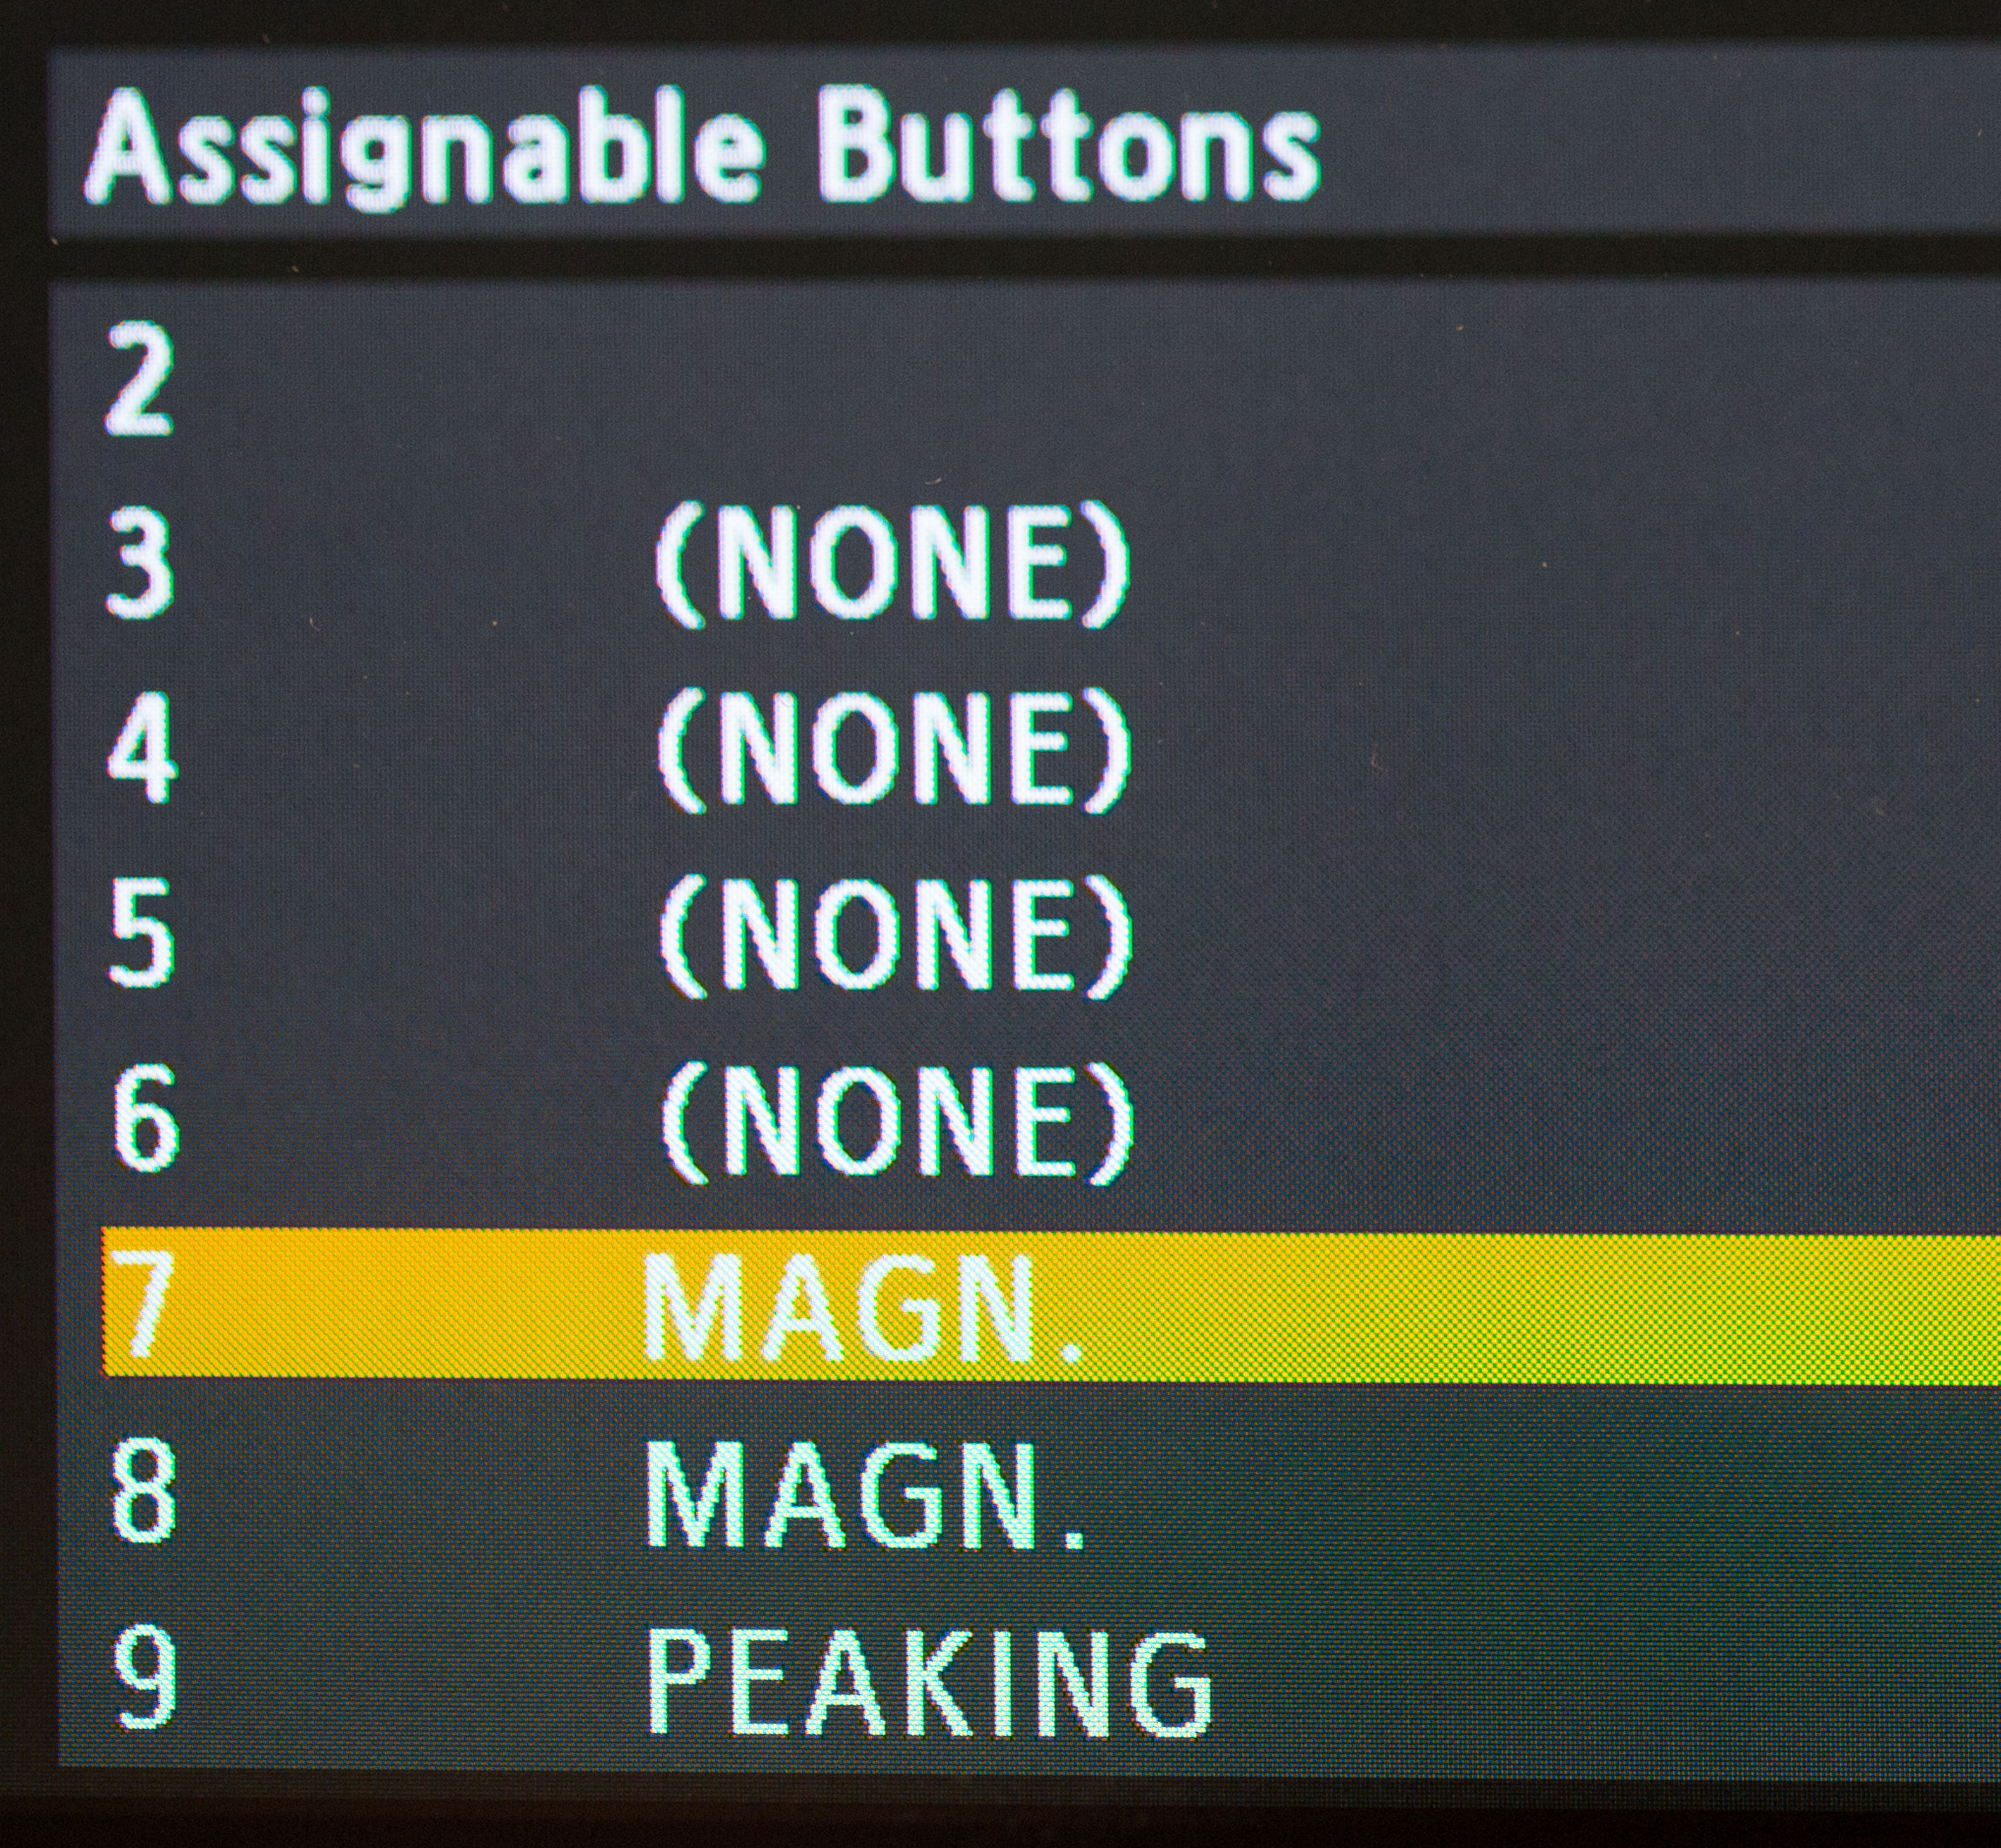
Button 7 is set to Magnify by default.

Press the joystick and scroll to select One-Shot AF
Picture Style
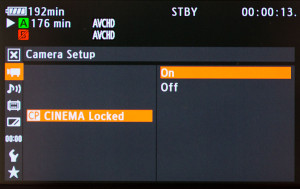 2. Set to record Canon Log. Under the Camera menu, select CP Cinema Locked and set On. This enables Canon Log, which gives you a flat file that grades beautifully in post. Using this setting preserves all the options that are available to you in post. Using this setting in combination with a C100 lookup tables supplied from Able Cine is a speedy way to get amazing looking footage.
Monitor
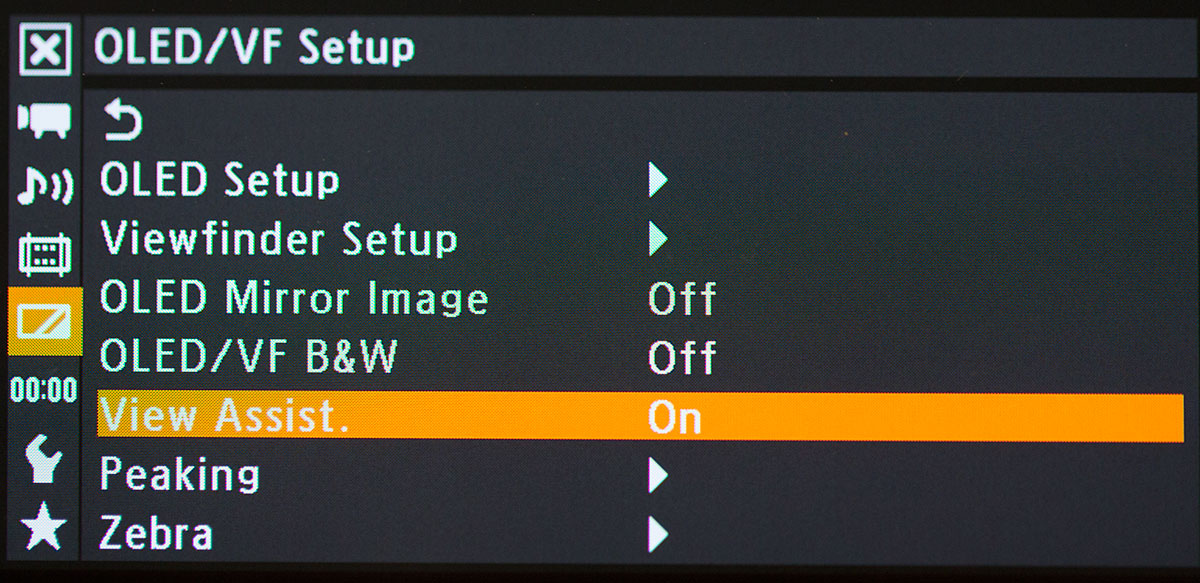 3. Enable View Assist. Under OLED/VF Setup menu, select View Assist and set to On. This makes what you see on screen look more like what the contrast and exposure settings will look like after the image is graded. If you don’t enable this, the image on screen will look very flat, making it difficult to judge exposure by eye.
ISO
4. ISO [850]. To get the maximum dynamic range out of this camera, set the ISO at 850. If you set a lower ISO, you will be losing information in the highlights.
Auto lens compensation
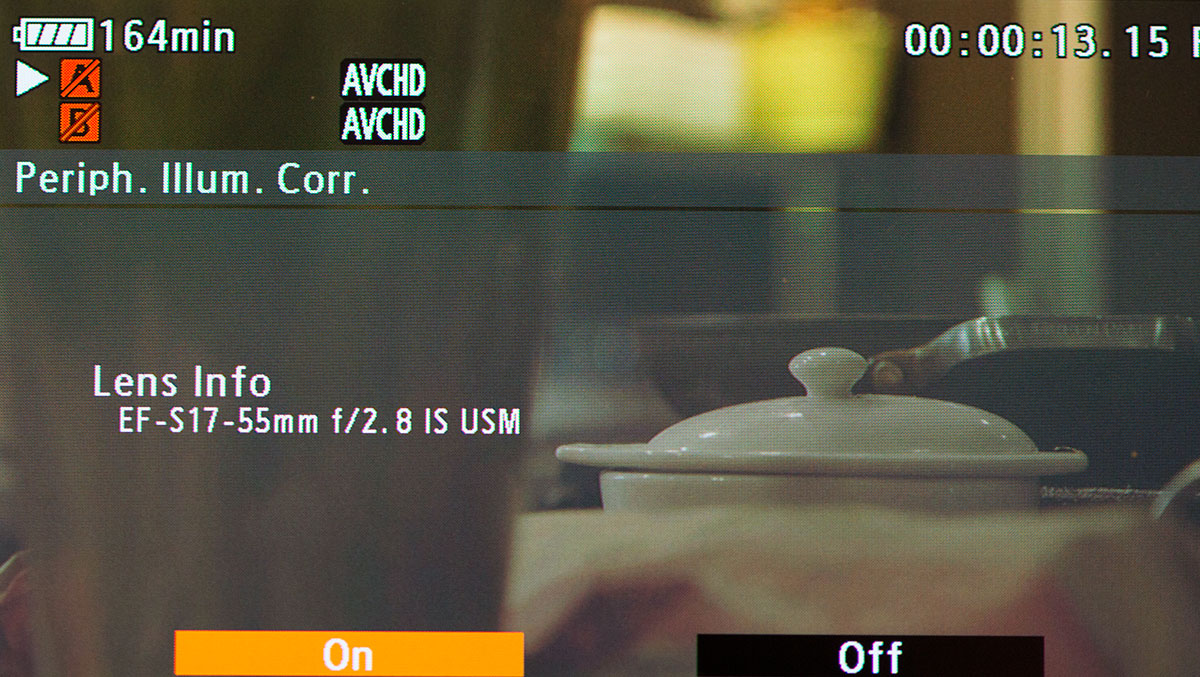
5. Peripheral illumination Correction. Under Camera Setup, set Peripheral Illumination Correction to On (if available for your lens). This will automatically fix vignetting and barrel distortion issues on supported Canon lenses. It works like magic!
Codec
6. Select AVCHD 24mbps. Under Other Functions menu, select Movie Format and choose AVCHD. Then, under AVCHD menu, select Bit Rate 24 Mbps LPCM (LPCM allows you to record uncompressed audio – the best quality). AVCHD is slightly better than MP4 in terms of quality.
With these settings, you can rest assured that your footage will live up to the amazing potential that this camera is capable of. Have a great shoot!
This is great! I literally just pulled a Mark II out of the shipping box and thought, “uh… I have no idea where to start.” So. Many. Buttons.
Hi
I feel with you,because got the camera on Saturday, has been working with other cameras
like Sony, Panasonic, All canon DSLR… but man, when I open the meny on C100 MK2, I felt lost.
Thanks for the guiding… i will now manage a great setup to use.
i have not buy the camera yet, still use the canon 5d mark ii , bit scare of the change . After reading your experience I think I’m going to do the change
I am a photographer and cinematographer. So was she with the 5D Mark III The camera is an incredible camera for video and skills. But this year I invest in the cannon C100 Mark 11. This camera is a game changer Well worth every penny. Next year I want to invest another camera and completely stop using my DSL are for she next year I want to invest another camera and completely stop using my DSL for Cinema photography shoots. The C100 Mark two was my wises camera decision. I absolutely love it
Thank you for these settings! I’m more of a beginner in video settings as opposed to photography but I was wondering whether you could explain more about the ISO setting. I’d been under the impression that I should shoot at lower ISO settings to reduce noise. Is there any benefit to shooting at an ISO that’s lower than 850? My end goal is to to have footage that I have the ability to convert to DCP (if necessary) for work to submit to film festivals. Do you have insight? (I don’t have an Atomos Ninja, but I’m considering getting one)
Hi Ann,
On a still camera, using a low ISO is a great idea for reducing noise. But Unlike still cameras, video cameras are often tuned to a “base” ISO that gives “best” results, the “base” iso. In the case of the C100mkii, 850 is the base iso as set by Canon. Using a lower ISO won’t cause more noise, but will result in less dynamic range, in particular in the highlights. Instead of using a lower ISO, use an ND filter. Also, to reduce noise, I recommend overexposing by about a half stop. Canon doesn’t recommend this, but Shane Hurlbut does and my testing has confirmed that this camera needs a little extra light to keep the noise down.
Hi Dan.
Quick question. Just picked up the C100 Mark ii. I was able to use the autofocus feature with my 24-70mm L 2.8 lens, but without taking the lens off (realized this after the fact), I did a ‘Reset All’ with the menu in the camera to get the camera back to factory defaults, and I have no idea how to get this lens to work with the Autofocus feature again. (Note: It DOES autofocus when I hold in the One-Shot AF button)…just won’t continuously auto-focus like it did a few hours ago before I upgraded the firmware, put the memory card back in and did the ‘Reset All.’ I haven’t been able to find any info online to restore the lens or menu settings to get it back to full auto…
If you happen to have a moment and have any thoughts, that would be great. Thanks!
-Jason
Hi Jason,
To get the camera back in continuous autofocus, Camera Setup menu, and choose AF Mode. Then, select “continuous” instead of “one shot.” Good to go. Here’s a full tutorial: https://vimeo.com/115299320
Thanks for that Dan – worked like a charm. Thanks for taking a moment to reply…I appreciate that and a belated Merry Christmas to you and your family!
Cheers,
Jason
it’ impossible to use this lens to have AF. the lens is not compatible for it!
Hi Dan can’t express enough on the value of your feedback. When using the [850] ISO base for best dynamic range does this also apply to shooting green screen. Or will the higher ISO introduce noise when pulling a key.
Hi Kinya,
Definitely, 850 is the best option also for green screen, assuming you want the most dynamic range the camera is capable of.
This is the best, and easiest to use, set of instructions I’ve seen online. Thanks a million Dan! Just got my C100 mkII and am now set to rock & roll. Have a great day!
Your quick setup is extremely helpful.
I have been shooting professional video for 6 years with Canon DSLRs.
5D, 7D and most recently 6D. I had been dreaming of the C300 for a while, but the cost was prohibitive.
Recording audio externally was always a huge pain, especially when filming testimonials solo.
My biggest fear was that my final productions would not be that much better than the DSLR, and that I would be paying for XLR inputs and functionality. But my initial side by side tests blew me away, especially recording to the Ninja 2.
I have to edit a lot of 4K footage from other DPs, and it’s a huge pain.
4K is 4 times everything, time, cost, etc.
For online video production, the C100 MK2 with quality Canon lenses is a game changer for me.
Totally disagree with the remapping of the magnification button. With both hands on the camera you have you right to control stop/start, iris and magn. Then hand holding with the left under the camera you have your thumb for auto iris to make big adjustments quickly and then one shot for focus. Even without hand holding its in a natural place for quick access.
Hey that’s why Canon makes it easy to remap! Use the button that works best for you.
True, great points made.
Thank you for such useful and concise instructions. Also, I had the same question as Ann and your response to her was helpful. I am also deciding whether to take the leap from a DSLR to a C100 Mark II and your article definitely helps sway me in that direction. Thanks for the informative and well-written article!
Hi Dan, thanks so much for all of this info, it’s INVALUABLE! I have a question for you…what are your thoughts on recording externally to get the 4:2:2 color space? Have you tried it, and if so, is it worth the expense? I was informed that if I want to view the recording with the installed canon LUT via hdmi to the atomos ninja, that LUT will unfortunately be baked in, which is the last thing I want to do. That being said, I was told that the Odyssey 7+ WILL in fact solve this problem, but we’re looking at an investment of another $2300, ouch! Thoughts?????
Hi Jason, I have tried it, and frankly I can’t see the difference just by looking at the image. And using an external recorder is a pain in the ass for most documentary work. I’d only bother with it for green screen work, where it’ll help you pull a key better.
Someone who knows a lot more than I do about the topic basically concluded that if you’re shooting 1080p HD, the differences aren’t as significant as they were in the old days of standard def. Here’s the link: http://dgarygrady.com/2011/08/10/video-how-critical-is-422-color/
You made my day, bro! with the answer!
Thanks, Dan. I do want to shoot AVCHD but I see that in the 24 mps LPCM, if I want to shoot 59.94 (to create slo mo in post) I have to shoot interlaced. Is this an issue in post?
Thanks so much for your time!
No problem. In post, you just conform the footage to your 23.98p timeline. Good to go.
(In most modern NLEs this is very simple – in FCPX, for example, you just drop the footage into your timeline, then click Retime menu and select “automatic speed”)
Hi Dan, I have been reading and reading about this and couldn’t find a proper answer. My 60fps clips would always appear with a lag when exported. So let’s say I have a 60fps clip, I should drop it onto my 23.98fps timeline and click automatic speed (is it the same on Premiere CC??) Really apreciate your input 🙂
Hi Guillaume,
Not sure what you mean by “lag.” Sounds like you are wanting to edit 60fps clips in a 23.98 timeline as slow motion? By clicking “automatic speed” it will render your 60fps as slow motion in a 23.98 timeline.
Thank you very much
Just got a C100 mk II (with the $1k instant rebate – yay!)- coming from shooting with a Canon XF300. I will be using an Atomos Shogun along with it (always on a tripod with the big monitor) – LOVE the big, calibrated display (with their puck) to get a more WYSIWYG experience in shooting.
Anyway – went with the C100 Mk II because of its low light abilities (vs the 1/3 chip XF300) and want to shoot with the extended range Clog profiles. I notice that the Abelcine profiles you link to are for the C100 – will they work with the mk II? I see also that Shane Hurlbut, whom you link to, sells some profiles for the mk II – have you tried them? Any others you can recommend? I’m exploring getting them to work with the Shogun and Adobe Premiere Pro CC 2015. Thanks!
Hi Larry, you are in for a treat moving to the c100mkii coming from the XF300! Once you go big sensor, you never go back. Regarding your question about C-log LUTs, I find the Abelcine ones work equally well with the c100mkii as with the c100. The sensors may not be perfectly identical, but the output of both cameras is essentially the same to my eye. I haven’t used any of Shane’s profiles, because I prefer to work in c-log for everything except low light situations. One other small tip for you: I’ve found the difference between the internal 8-bit and externally recorded footage to be indistinguishable to the naked eye. When Canon says they have “the right 8 bits,” they mean it. So unless you’re doing green screen work, or need it for workflow reasons, you may find the external recorder doesn’t really buy you much, especially if you find yourself shooting in situations where the added bulk is a hinderance.
Thanks so much for your reply, Dan – I didn’t see a response and got busy with some other work issues… sorry. This is very helpful! I really appreciate your advice. I’ve since shot a bit with the C100mkii in C-Log and fount it a little frustrating to get the footage where I needed it to be, but eventually got there. Part of the issue is that I’m also just starting to work with Final Cut Pro X AND Macs – I’m a pc guy and a Premiere Pro user for several years – it’s, um, different. Using Color Finale and their LUT manager, I have tried several LUTS and am having a good time with it. I DID take a one-on-one class on the C100MkII at Canon’s Hollywood center – VERY helpful!
Hi. Thanks for all the help. You say that you don’t use C-Log in low-light situations. What do you use in low-light?
I had some banding problems while using C-Log in low light and I want to avoid them in the future.
Thanks!
Hi Kaveh, for low light use any of the profiles other than c-log, because log footage allocates most of the data into the midtowns and highlights, leaving the shadows noisier.
Hey,
Great site! any idea why my c100 mark ii images are not very flat? I set cp locked however when shooting MP4 they seem to have a ton of color and contrast in them?
thanks,
Frnak
Hi Frank,
Canon log isn’t as flat as Sony log. So if you’re used to looking at SLOG images, you will indeed find them to have more color and contrast. It’s not a bad thing, it’s just the different approach that Canon takes to log than Sony does. You have to grade them differently, for sure.
Why do you recommend using 24mbps rather than 28mbps? I would assume that the higher the bitrate the better the image..?
Assuming you want cinematic playback, you would need to shoot in 24p. The higher bitrate is for 60p footage, which would play back more like TV.
Dan –
Thanks for taking the time to put this config together. This was incredibly helpful for me, I just picked up my C100MKii today and was looking for something exactly like this.
Thanks!
Glad it was helpful Bill. Enjoy your new camera!
Thanks for the great info Dan. What are your thoughts on using shuttle angle instead of speed? I’m assuming the angle should be set to 180 degrees as a standard setting. Thanks!
Hi John,
I come from a still photography background, so am more comfortable with shutter speed than I am with shutter angle. If I used shutter angle, I would have to do the math in my head back to shutter speed to understand it, so it’s one less calculation for my brain to avoid it. But if you’re comfortable with it, why not? And to your question about 180 degrees, you are correct – for normal shooting at 24 frames per second, you would want to set a 180 degree shutter angle.
FWIW, shutter angle is great because you can essentially leave it at 180 degrees all the time (if you want the standard doubling of your shutter speed). So it doesn’t matter what your frame rate, you can always leave your shutter angle at 180. I shoot Blackmagic cameras and leave it on 180 degrees all the time unless I have some weird flicker from fluorescent lighting to deal with. Once I got used to it, I learned to love shutter angle.
That makes great sense Steve. I do a similar thing with my Sony FS5 with ISO – I change it to display Db instead of ISO. By leaving at 0db, I’m ensured of having best possible quality and don’t have to remember what ISO to set depending on whether I’m shooting slog or standard gamma picture profiles.
Hey Dan,
Thanks for the helpful info! I am a new Canon C100 mii user (having been using Canon 5D M3 and 2, mainly) and I am also new to using LUTs. Something I’m still trying to grasp. So, do the LUTs supplied by Able Cine have to applied in camera or is there a simple way to just do it in post? I use PP CC. And if I want to apply a LUT in post (if I use Canon Log) how do I do it? I’ve searched the web for literally hours and apparently tutorials on how to do this don’t exist! Thanks for your help.
Hi Sean! Great question. I struggled with this at first too. LUTs are generally applied in post, but they can also be used in monitoring (using third-party monitors), so that what you see on the monitor is the same thing you start with in post. For your purpose, just enable View Assist in the Canon menu (which in effect applies a monitor LUT). Then, add your own LUT in post. There’s no way to natively apply a LUT in FCPX, so you have to use a third-party plugin. On FCPX, the one I use is a $29 plugin called LUT Utility. For Premiere, it’s even easier. You can apply LUTs natively in Premiere using the built-in Lumetri color controls. Just follow these steps.
Hi Dan, thanks for taking the time to write this up. Just curious about your comments on external recording being indistinguishable. Did you by chance see if you could push the footage farther in post with the external recording? I’d like to know if i’d have a little more latitude with the 4:2:2 footage when dealing with color correction, etc. THx!
If you can see the difference, you have better eyes than I do! But yes, technically, on paper, you will have better results. But in practice, unless you’re doing green screen work and looking to pull best key possible, I don’t think you’d notice much difference.
Thanks! I just did some testing with the Blackmagic Video Assist and C100 mk II and felt it was indistinguishable too. I tried pushing highlights way up on externally recorded ProRes vs. internal AVCHD and pullling the shadows way down, even zooming in I saw little difference. I will likely still record external when filming for broadcast, and probably most of the time as fcpx loves the prores and the blackmagic recorder screen is really nice. Loving canon log and to answer a few others questions on LUTS, the 3rd party app FilmConvert has their luts converted for the mark II and the wordflow is a cinch. I like to grade a clip, and then save as a preset, so super easy to apply to the other clips and tweak from there. Thanks for info and answering questions.
Yeah that sounds like a solid approach Clay. I’m looking forward to trying the Atomos Inferno with the 1500nit bright screen for shooting with monitor in sunlight without sun shade. And Filmconvert works like magic. It’s a great workflow.
Thanks for the tips. I like putting the push focus to button 7, that worked really well. I tried using the ISO 850 setting in conjunction with CP1 but I felt it degraded the image and spoil flesh tones.
350 is best whenever possible.
Hi Dan,
Thank you for this great article. I’ve been using C100 for a while now but on a standard profile. I think I’m ready to jump into c-log and apply LUT. I did it but the images came too over blown highlights, too much saturation so my question is how do you expose your clip? Any feedback is greatly appreciated. Thank you so much.
Hi Rual,
You will want to expose your clips slightly on the hot side when shooting C-log, but not much. I recommend overexposing about half a stop.
Why do my ACVHD Canon HFG-30 movies suddenly begin turning into MPEG-4 movies when I process them from i-Movie to Vimeo?
I just checked my Canon G-30 camcorder settings and it is still set on 24 mbps LPCM, so can’t figure out how I end up with MPEG-4 movies when exported to an externa hard disk as the last step in processing to upload to VIMEO.
Hi Gene, I haven’t used iMovie in awhile, but I suspect it has to do with the preset defaults of iMovie. Here’s a brief instructional movie that Vimeo has created that shows their recommended settings to sharing to Vimeo from iMovie: https://vimeo.com/blog/post/video-101-exporting-sharing-to-vimeo-with-imovie
Any tips on matching Canon G30 and Canon C100 MKII? I use the G30 for wide shots and the C100 for the A-shot medium to close up shot in interviews. Thanks!
Using latest FCPX for post, btw.
I’ve never shot with a C30, but in my experience with other Canon cameras, it shouldn’t be too hard to match, as Canon color science is pretty consistent.
Thanks, Dan!
Hi Dan, why use 24 Mbps LPCM over 28 Mbps LPCM? Thanks for the great info.
Josh, pick the highest data rate you can at 24p, for the cinematic look. I believe it only kicks up to 28 Mbps at frame rates above 24p.
I just realized that… sorry got the camera yesterday! Thank you for the reply! One more question if I can. With the settings you described above, what do you use for a middle gray and white skin tone IRE setting for the zebras (if that is the tool you use for setting exposure)? Much Thanks!
I generally overexpose by half a stop when shooting Canon Log. That will give you a nice gradeable image with less noise in shadows while still giving you plenty of headroom in the highlights in an average scene. So, on this camera, that would be in vicinity of 38-40 percent IRE for 18 percent neutral gray.
Some information for anyone using the C100 MKII or MKI when using AVCHD recording at 25p the camera saves it in an interlaced wrapper.
After having the camera for three months I have been trying to figure out why my shots at 25p in AVCHD had jagged lines in the footage. After doing some more research last night I found out that shooting 25p in AVCHD the files get saved as interlaced even though the are progressive. As soon as I changed my footage settings in FCPX to progressive the jagged lines disappeared 🙂 well almost completely.
So now I shoot at 25p in MP4 format with chick this doesn’t occur. In the manual it either says 25fp or 25pf can’t remember off the top of my head lol
So if your seeing Jagged lines in your footage you now know why. Can’t see any reason why Canon would do this though ?
Yeah you definitely don’t want to have those interlaced lines in your footage, for any reason that I can think of. It’s a holdover from the old days of broadcast where they had to split up the frames into smaller file packets for broadcast. So unless you’re working for a TV station that demands it, skip the interlaced and stick with progressive.
thank you very much , very useful
Hi there!
I’ve had my C100 mkii for a year or so now and still love working with it. The big issue right now is matching the footage with my colleagues new Sony FS5. I’m wondering if you have any experience with matching Canon and Sony cameras? For certain colours it seems a nightmare.
In addition to this, I would like to have a camera profile on my c100 mkii that is baked in for commercial shoots when dynamic range isn’t really going to be the priority, and I can get away with using the footage straight from the camera instead of worrying about grading. WideDR is nice but I still feel like it needs a bit more colour after if you ask me. Similarly, I have been using MP4 for that kind of stuff as well as it’s quicker and easier to manage the files. Do you really notice much difference? I’ve never really used AVCHD on this camera. Do you transcode the AVCHD or just edit straight away?
Many thanks for your input
Liam
Hi Liam,
That’s a great question. I’ve used both cameras a lot, but I’ve never tried to match the footage. The Sony look is much more neutral than Canon’s warm, glowing image. I would start by punching up the saturation of the FS5 footage, and desaturating the Canon until they are something in the same ballpark. Use DaVinci Resolve and when you get a look that’s dialed in, save it as a LUT. Then, you can apply the LUT to all the footage you want to match to jump start your grades. Good luck.
Re: baked-in looks – as long as you don’t care about getting the most DR from your shots, then yes, you can pretty much pick whatever profile you like and knock yourself out. I prefer to have as much DR as possible myself, but if you’re doing fast turns and delivering to the web, why not?
I always transcode into prores, because it’s trivial for me to do so using FCPX (it does the transcoding automatically in the background on import). Transcoding simply speeds up editing, that’s all. If you have a very fast computer, you may be fine to skip transcoding.
Liam, for matching c100 and Sony footage, try this DaVinci Resolve tutorial by Alex Jordan: http://www.learncolorgrading.com/966-2/
Sorry, this may seem a naive question. In still photography there seems to be more flexibility of how the exposure is varied, without affecting the final image aesthetic, namely by varying shutter speed. By this I mean, unless you are freezing motion or purposely wanting blurred movement of background, moving objects etc., most of the time, e.g., 1/60 vs. 1/500 would go unnoticed. This generally is different in video. In video I usually aim to keep shutter about 2X the frame rate of 24 or 30 FPS for reasons well documented, except for certain types of effect. And also, for me at least, generally the aperture is something I want to set and keep set for the kind of end result I want to achieve – i.e., shallow or deep DOF. Therefore. given that 800 ISO is optimal – perhaps increasing to 3200 if needed (which is only +2 stops) – and given the ND filter attenuates the light in large increments of 2 stop chunks, it seems there is not much latitude for varying exposure in a very controlled or nuanced way on the C100 MkII. So what do you do? – I guess for any given aperture you get the ND into the ball park and, keeping the ISO fairly optimum, but certainly not below 800 (from what I’ve read about the C100), I would think you have to throw the “ideal” shutter speed ball out of the window in many instances (since it has the least obvious visual effect in low movement scenarios) and use that to control exposure? Not ideal. Please enlighten me anyone. Bottom line: I’m tempted by the price-dropped C100 MkII in matters of colour rendering and dual pixel AF, but pulled towards the Sony FS5 with its continuously variable (and now automated) ND filter over a 10 stop range – which in one swoop cancels out all of the complications I have just outlined. I am very conflicted as you can see! PS: I have no need for 4K.
Terence, you make a great observation. Most camera with built-in ND filters are going to give you that 2-stop selector, which isn’t a very precise way of controlling exposure.
There are a couple of tools you can use:
1. Variable ND filter. If you don’t mind the polarization (which can drain the life out of skin tones in sunlight, among other possibly unwanted effects), a variable nd offers a fairly precise way of controlling exposure by dialing the ring until you get what you’re looking for.
2. Use a set of 1-stop ND filters, such as the ones I own, which Tiffen makes: https://www.bhphotovideo.com/c/product/729107-REG/Tiffen_W77INDNDKT_77mm_Indie_Neutral_Density.html/?gclid=CPW-0qT15c4CFYFofgoduuILMQ&c3api=0980%2C110369296493. The problem with these is that you need to stop and change the ND filter on your lens every time you want to change the exposure, which really slows you down. Also you have to use adapter rings to get them to work with lenses of various filter sizes, which will further slow you down.
But as you point out, there is a better way. It’s called the Sony FS5. It’s been my camera of choice since December. I can’t say enough good things about this camera’s continuously variable ND. It really works like magic, allowing you to dial in exactly the amount of ND you need. Someday soon, all professional cameras are going to have this, it’s that good.
Hi Dan – Thanks for trawling though all of that (it was late and I had a lot questions going though my mind!) and giving me your thoughts. I think you’ve provided the final push towards the FS5. I’m taking quite a major step up, so want to make the right choice. It’s very reassuring to get your hands-on feed back and a big thumbs-up. I think the variable ND has to be a mega feature.
I was looking at comparisons of AF speed and, yes, the C100 MKII does have the edge, but I didn’t think it was that big an issue as long as you are aware of its limitations. Same goes with the colour science – I’ve seen some very nice examples of FS5 footage with only minimal grading. Anyway, you always find a way to work with the tools you have and the FS5 looks like a great little movie camera to cut some new teeth on.
Cheers,
Terence
I agree Terence, the FS5 is a mighty fine camera. Color looks better out of the box on the C100, but you can learn to grade the FS5 without too much trouble. Go Sony!
Hi Dan,
Just got my new C100 Mii today and I’m blown away. I took it for a test run before I got very far in the manual and already the footage looks amazing.
One quick question: I really love that slo motion look you get at 60fps. But won’t I get better slo mo at 60p than at 60i? I thought the 60 interlaced, when played back at 24 (or 23.97) fps, was basically going to look bad, as opposed to progressive, since it’s half the number of lines per frame. And of course, to get 60p, you have to go up to 28 Mbps.
I noticed you said 24 Mbps is better for a cinematic look- does that hold true for slow mo, even if it’s interlaced?
Sorry if you answered this earlier and I missed it. Thanks!
Chris
Hi Chris,
For slow motion as with anything else, it’s always desirable to shoot progressive rather than interlaced. So choose the highest supported option. With slow motion, you achieve the cinematic look of 24p by conforming the slow motion (60p) footage into a 24p timeline. This is why it’s slow – because 60 frames per second, when played back at 24 frames a second, appears to run in slow motion. Make sense?
Hi Dan,
Thank you for your response! Yes, the part about 60p conforming to 24p makes sense. I guess where I was confused was that you seemed to indicate that we should avoid shooting at a bitrate of 28 Mbps and stick to 24 Mbps; however, if I want to shoot 60p and not 60i, I would have to go up to a bitrate of 28Mbps. So, just for 60p “overcranking”, it seems that going with the higher 28 bitrate would be necessary. Since it’s slo-mo, sound wouldn’t be an issue.
I hope I’m not overcomplicating things.
You use the highest bit rate possible for the frame rate you select. For 24p that’s 24Mbps. For 60p, that’s 28 Mbps. Hope that helps!
Great article, just been setting up a rental C100 to try for the weekend. Two quick questions, System Frequency, what is it and where should it be set (for 24fps and 30fps)? and if recording at 30fps, 28mbps bitrate the best option (I’ve only seen you mention 24 and 60fps)?
Hi Daniel,
Re: System Frequency, select 59.94 Hz for USA (NTSC), and 50 Hz for Europe (PAL).
Re: Bitrate, you want to select the highest bitrate possible for the frame rate you have chosen. You will only have the option for 28mbps when selecting 60i. For 24p, you’ll be choosing 24mbps.
Have a great shoot!
Hi, I have a field trip coming up in Malawi, I’ve shot all over East Africa in the past with Canon XF family and am wondering if the C100 Mk ii will deal with bright sunlight!
Should I really leave the camera set to ISO 859? I’ve resorted to variable NDs for the XFs in the past but find they give a slightly chocolatey tone to pictures. I’m hoping to shoot daylight interviews around f/2.8 to 3.2. Thanks 🙂
Hugh, the C100mkii will be just fine in bright sun. Excellent choice, actually. Leave it at the base ISO 850, and use the built-in ND to allow you to shoot at shallow apertures like f/2.8. I do that all the time and it works great. You won’t have any issues with discolored images using the Canon ND – they are flawless.
Hello Dan, why CP Locked over the Cinema log profile ?!
Hi Rui,
They are the same thing. CP Locked is how you select the Canon Log in the menu.
Hi Dan,
As many others have already stated, this post and subsequent Q&A is incredibly helpful. I run a small video production shop focusing mostly on web videos for non-profits and philanthropic organizations. Most of what I do is quick turn and I’ve been filming with a Canon 5d Mark III for a while now. Thanks to a decent 2016, I just purchased and un-boxed the Canon C100 Mark II and can’t wait to get started. Reading through all of the posts have raised a couple questions for me:
1) The terms grading, dynamic range, and LUTs are foreign to me as they have never been a part of my workflow. Will I really be missing out by using a standard profile and just importing directly in to FCPX for editing?
2) Have you made any preference adjustments in FCPX for importing, and/or do you need to convert footage from the camera prior to import? My current settings copy raw files to the FCPX library, but I don’t create proxy or optimized media. I’ve seen several articles about possible compatibility/performance issues with the AVCHD file format.
My first shoot is scheduled for this Friday (1/6). I’ll be filming a university president in the style of Vogue’s “73 Questions” interview as he promotes an upcoming donor challenge. I think the low-light capabilities and auto-focus features are going to be clutch!
Thanks again for all of your advice and expertise.
-Gino
Hi Gino,
I started out the same way – doing work for nonprofits with a 5d. Great camera! But the c100mkii is definitely a step up in terms of ergonomics and ease of use.
Don’t worry about not understanding those terms – they are easy to learn. And you certainly can continue using the C100mkii with standard profile the same way you were shooting with your 5d. However, if you do that, you won’t be getting the best image from your new camera. Here’s what you need to know in a nutshell:
Dynamic range: This is the camera’s ability to record detail, in a range from shadows to highlights. Your 5d can capture maybe 8 stops of dynamic range – that is, 8 stops between the darkest shadow detail and the brightest highlight detail – everything under or over that is lost. Your C100mkii with c-log can capture 11 stops. In practice what this means is that you can hold onto highlight detail better while still retaining the same shadow detail. So for example, if you were shooting an interview with an outside window visible in the background, it would probably be blown out on your 5d. But with 3 more stops of dynamic range, you might very well be able to hold onto some highlight detail in that same window. Make sense?
If you shoot with the camera’s standard profile, it just throws away the potential dynamic range and behaves pretty much like the 5d. To unlock this potential dynamic range, you have to grade your footage.
Grading is manipulating the footage in post production to get the look you want. You’re probably already doing simple grading. To get those 11 stops of dynamic range, you need to shoot c-log (locked) and bring the footage (which will appear a little flat) into an editor such as Premiere, FCPX or Resolve, where you can make contrast adjustments and color tweaks. The simplest way to do this is to use a LUT.
A LUT is basically a text file that contains a set of instructions for your editing software, which saves you a lot of work. Instead of having to know what you’re doing, you just drop a LUT on your footage, and boom! Your work is nearly done. In theory at least. You’ll probably want to make manual tweaks here and there – for example, if your footage is slightly overexposed (which it should be when shooting c-log) you may need to adjust for that by pulling down the highlights a bit.
You can drop the LUT on your footage in FCPX. If you do it that way, you’ll probably want to cut your piece with the ungraded (flat looking) footage, and then drop the LUT in at the end, when you have locked picture. But I prefer to cut footage that already looks good, and if you’re used to working with standard profile footage, you probably do to. In that case, I’d recommend using Davinci Resolve to generate good-looking footage (called dailies) as a first step in your workflow. To do that, you open the footage in Resolve, apply the LUT to your timeline, make any minor tweaks, and then export the footage, which should look very good, and have 11 stops of dynamic range. Then you import that footage into FCPX, and cut your piece. If you need to, you can send it back to Resolve for a final grading pass when it’s finished, but I rarely do that – I just make final color tweaks in FCPX, because there usually isn’t much you need to do to it.
Regarding your second question, if you create dailies in Resolve and export them as 422 ProRes, you won’t have to make optimized footage in FCPX, because it will already be optimized. But if you don’t use resolve, then yes, I would optimize your footage in FCPX unless you have a very fast computer, because your computer has to unpack the files every time you skim over them and that makes it work very hard and slows things down. Optimizing speeds everything up.
Good luck with your shoot!
Hi Dan,
I truly appreciate your responsiveness. I can’t tell you how helpful this has been. If you don’t mind, I’ve come up with a few follow up questions:
1) Rather than jumping in to Davinci Resolve, do you think I can get by with an FCPX LUT Utility to start out (http://www.colorgradingcentral.com/lututility)? If I do go down the Resolve path, do I need the entire studio package, or will the free version be sufficient for grading?
2) Are there specific c100 mark II LUTS I should be aware of? The LUT Utility comes with a “Canon C Log” profile built in, but are there other variations worth experimenting with?
3) In an earlier response you mention that C Log is not ideal for “low light” situations. What exactly defines “low light?”
4) On a slightly unrelated note, when following a subject around through differently lit portions of a home (in a single take), is it best to stick with AWB and occasionally leverage the Auto Iris to account for the variations? Most of my 5D shoots have been sit down interviews where it is much easier to control the lighting and use custom WB.
Thanks again!
-Gino
Any suggestions on matching a canon 6D with the c100 mkii? I’m having no luck. I shoot mostly on my 6d and 80D, just got the c100 mkii and can’t match worth a dime yet.
Any suggestions?
Hi Shaun,
If your only goal is to get footage that matches, then set the 6d and 80d into Standard picture profile, and set the C100mkii to [EOS Std] in Picture Settings. You won’t get the best dynamic range from either camera, but your images will look as close to having come from the same camera as possible directly from Canon.
Hello Dan,
Thanks for your posts. They are great!
Do you see any substantial advantages to use an external recorder (for ProRes) with the C100 markII?
I have been debating this recently, and there are different opinions out there.
Some say that the internal AVCHD codec is very solid, and even with color grading and correction does well its job. Others say that only ProResHQ will be good for post production.
(By the way, so just you know, I am shooting a video art project/documentary to be shown in large projections in art venues).
Thank you! I look forward to your opinion.
Hi Jose,
Great question. The simple answer is, “no.” My eye can’t perceive any visible difference between the internally recorded file and an externally recorded ProRes file on the C100. There’s only one scenario in which I would say “yes,” and that’s if you’re doing green screen work. In that case, shooting 10-bit will help you pull a clean key.
Thank you, Dan!
Not having to worry about a Ninja Blade, for example, attached to the camera… is good.
So, even for larger projections, the AVCHD will work well? I am not doing work for the web.
I will surely be doing color correction and grading in post, and was concerned about the quality of the internal codec: will it break down? Will it give me enough room for alterations without loss of quality? (Many people are strongly against the highly compressed codec, defending ProResHQ as the professional way to go in terms of editing and post-production – and I started having doubts).
Your advice would be to shoot everything internally, and then transcoding my footage to ProRes for Premiere Pro?
Again, many thanks for all the input – highly appreciated!
J
Hi Dan, just wondered if you ever use the Zebra % on the C100mk II for whites exposure. If so where do you find the ideal highlight/white point in c-log and where do you suggest it should lay on the waveform for best results? Many thanks Chris
Dan,
I am using the Atomos Ninja with the C100 MII. Is it possible to create 2.35 Log files with this setup?
Thanks, Ed
Hi Ed, by 2.35 are you referring to aspect ratio? You would need to crop in post to achieve that ratio. As for log, yes, you can capture the canon log straight to prores with the Ninja, so no problem there.
Thanks Dan. Another question…can I use the C100 with Atomos Ninja to shoot in PAL at 25fps, in LOG?
You’ve got a super helpful thread here. Much appreciated.
I’m shooting cinematic weddings and indie films. I am shooting clog…24fps…..auto white balance…. standard monitor lighting….24-105mm lens….mp4…..am I missing any valuable setting?
Hi Stephen, I’d change two things. 1, I’d avoid auto white balance, because it’s very hard to correct in post, since the value is constantly changing. Instead, pick a manual white balance (5600 for daylight, 3200k for tungsten, etc) or white balance manually. 2, I would shoot AVCHD rather than mp4 for best quality codec.
Thanks for putting all this together and lending your expertise. Very helpful.
Hey Dan
First of all, i should say: the page is the best, thank you for the time and energy that you surf on it.
i wanna ask something:
if i want to make cinematic videos with fluency , witch one is better?
24 fps
30 fps
or 60 fps?
Of course in AVCHD format in normal shots and sm.
Thanks in advance, bro!
Thank you for sharing your expertise here Dan.
I bought a C100 MK 2 over a year ago, and have hardly used it as it looked so complicated. You have given me inspiration!
That’s a really nice camera to leave collecting dust, Neil! I’d say get out there and shoot something pretty. Don’t be intimidated – the C100 MK2 is actually very easy to get great results with. A LOT easier then shooting with a DSLR, that’s for sure.
Hi Dan
Some really useful insights here… thank you.
One thing I’m missing… I cannot seem to change the CP CINEMA Locked sexting – it’s greyed out and set to “Off”.
Likewise, View Assist, in the OLED/AF Setup menu is greyed out too and set to “Off”.
Clearly, I’m missing something here – any thoughts?
Regards
James
Seems I’ve sorted it – a Firmware update did the trick!
Hi James,
I’ve heard that sometimes when you enable pre-roll there’s a bug that can lock you out of some picture profile settings. Try resetting that if it’s enabled. If that doesn’t work, try resetting the camera defaults (Other Settings > Reset > All Settings), restart, and you should be good to go.
Thanks for that, I have a Canon C100 MII and was shooting in CINEMA locked for the past month loving the results. Then I noticed on my last shoot it wasn’t on. I must have put it in PreRecord, turned off and I’m back up and running…
Hey Dan,
Your posts are so SO helpful. I just bought the C100 MkII and I’m thrilled. I work with Premiere Pro, and have used your configuration guide to set up. I’m happy with this, but need to sort the workflow. Is best practice to simply take the SD and drop into a Premiere timeline? Seems to work fine… But is this best for gradability, file size and processor efficiency?
Thanks,
Josh
Hi Josh,
I usually transcode into ProRes as a first step, because I cut on a laptop that is a few years old, and that speeds things up for me. If you have a fast computer you can probably just drop your files directly into the timeline without significant penalty.
Hi Dan
Great post – thanks.
Can you please explain how to correctly expose the c100 Mkii? I’ve heard in multiple places to overexpose 1/2 a stop, but that would only be possible if you know how to get the initial exposure from which to increase it.
Can you please explain the process / in-camera tools for getting that exposure right?
Much appreciated.
Hi Matt,
Great question. In a nutshell, setting exposure is both a technical and an aesthetic choice.
Technically, the correct exposure is set when the total light falling in your frame averages to 18 percent neutral grey. Most of the time you’ll probably use the light meter in your camera to measure this, but there are several other ways. You an hold a grey card in front of your lens in the same light as your subject, and then set your light meter so that it shows the correct exposure. You could also use an ambient light meter, hold it on your subject pointing back toward the camera, and take a reading. There are may other tools you can use as well. Waveform monitors are a common one which is supported in Canon Cinema cameras and third party monitors. A waveform shows you how bright each element in your scene is. Another tool is a histogram, which shows the distribution of pixels in your frame from darkest to brightest.
Aesthetically, you may have a technically correct exposure but the exposure is still incorrect if you are shooting a horror scene, for example, in which you want your characters to be in shadows. So your aesthetically correct exposure would be a couple of stops under what the meter tells you. On the other hand, you might be shooting a ski commercial with a white woman in a white parka on a white ski hill. Your correct exposure would likely fall a couple of stops over what the exposure reads.
Hope that helps!
Hi Dan.
Thanks for your reply.
That definitely helps.
Picking up my c100 Mkii in a couple of weeks.
Thanks for your great contribution to the community!!
Hi Dan,
I’m finding this threat very informative – thank you.
I’m new to the C100 Mark 2. Upgraded from the 70D and am feeling overwhelmed by all the settings I suddenly keep track of.
I have tons of questions but here are a few of the most urgent:
1. Color fidelity – My test shoots outdoors so far haven’t really wowed me in terms of colour. The fall leaves don’t ‘pop’ very much How can I get the richest outdoor colour fidelity without resorting to complex tweaking and colour grading in Adobe in post? Or is the only way out through that? I’m using Canon’s 24-105mm L-series lens and am just getting comfortable with the basics of editing in PP.
2. Outdoor interviews – I find I have trouble keeping the exposure adjusted correctly with the appearance and disappearance of clouds. Doe the camera have a continuous ISO function that can help? My 24-105mm is one of the ones that won’t allow it.
3. Bit and frame rates – what settings would you recommend for interview settings and web-based promotional videos?
Thank you! A
Hi Adrian,
If you want to match the look of your 70d video, with minimal grading, you can get pretty close by selecting the EOS Standard color profile. But if it were me, and I wanted colors to really pop, I shoot in WideDR and then grade the footage in post. In PP, you can use the included Lumetri color tool to increase the contrast and saturation until you see what you’re looking for.
Re: Exterior interviews, you can set your camera to automatically adjust the iris under camera settings > Iris, but I don’t believe there’s a way to do that with ISO, which is a bit of an oversight with this camera.
Re: frame rates – I shoot everything in 24p for cinematic look. I only use 30p if it’s intended for broadcast, or if I’m going to get a wee bit of slow mo effect out of it by conforming to 24p in post. So for you, I’d recommend sticking with 24p for normal shooting. And re: codec, AVCHD all the way.
I like what you said about the Monitor, enabling view assist so the screen won’t look as flat. Do you think it’s important to use the eyepiece, that’s been so heavily upgraded from the C100 first version? When I’m juggling multiple cams from a switcher or capture card, I don’t get that close to a camera for corporate. Wonder if that EVF is more useful for documentary or commercial work.
When do you think it’s most important to use the EVF viewer, rather than the screen with View Assist?
Great blog, man. I appreciate all the work you put into these articles and commenting everybody back.
Hi BT,
I use the EVF when I’m shooting outside in brighter light. It’s difficult to gauge exposure on the LCD or other external monitor in sunlight – it’s very easy to overexpose if you do that. So it’s shooting in bright sunlight where the EVF is extremely useful.
Excellent. Thanks, Dan!
Hi Dan. I wanted to thank you for your insights into this wonderful video camera. I looked at some of your work on Vimeo and on your Visual Contact website. I really enjoy your work. I am considering getting into doing some work with local non-profits. What suggestions would you ave for a budding videographer who is very passionate about this genre. Let me know please. Take care.
Hi Paul,
Great question. First thing I’d say is, you’ll have to find a way to do some great work before you get hired by the great clients. In my case, my mother in law started a Montessori school so it was a natural for me to start out by doing some videos for the school. But the thing that really got things going for me was when I decided to make some short videos about people who make things by hand. I found a coffin maker, and a metal smith, a doll maker, and approached them about making films. No one paid me for these – I just did it so I could keep improving my skills and to do interesting work. The result was two Vimeo staff picks, and that exposure started my phone ringing with potential clients. So my biggest piece of advice is: find work that interests you and start doing it, and keep doing it. Approach non-profits that you believe in, and offer to do a project for them. And be careful what you say yes to – because you’ll get more work like that!
Hi dan, thank you for sharing your knowledge, I’ve learned a lot of detailed info through this thread that I would never find through YouTube. I’m new to the Canon C100 Mark II and just getting started in videography. I have a few questions I hope you could help me with. I plan on shooting live events and eventually short documentaries. I will generally be alone and I understand that it can be a very difficult task for that reason, especially with live events and doc filmmaking.
1) I’d like to get the best cinematic look possible, however the amount of work in post with color grading is kind of intimidating. So until I get familiar with shooting and editing a little more, I’m wondering if I should follow all the instructions for best cinematic image but use wide dynamic range (c8) rather than cinema (c9) to make it a little easier in post?
2) When following a subject around when working on documentary filmmaking for example, the light will obviously change rather rapidly. How do you recommend working around this in a continuous shot to get the smoothest transitions?
3) what settings would you personally recommend for a beginning filmmaker who intends to film live events and documentaries but still wants to obtain the cinematic look ?
Hope to hear from you soon thank you for helping all of us rookies out here on our journey to becoming great film makers such as yourself 🙂
HI Estevan,
Great questions. I think you’re on the right track by shooting Wide DR. It really is more work to grade in locked (c-log). So I’d shoot wide DR, and grade lightly to get the results you want. When following a subject, it’s usually not as hard as it seems – often the light they are in is similar, and you don’t need to chase your exposure – just set it a little under if anything when shooting wide DR, and stay the course. If it’s changing a lot, explore shooting with an auto function to give yourself a chance of holding the exposure.
thread still active?
Yes.
thanks for your help! One thing im a little confused about is the difference between cinema locked or not locked. If i shoot in (c9) cinema, and not have cinema locked, would it still require tons of color grading in post? And if i shoot in wide dr (c8) with cinema locked, what kind of problems should i be on the look out for?
Estevan,
Cinema Locked simply means that you are shooting in Canon Log, which gives you get the widest dynamic range possible, but requires you to grade in post to achieve normal contrast. So it’s more work in post. If you shoot with WideDR, you get a little less dynamic range, but it looks pretty good without doing significant work in post. So there’s no problems you have to be looking out for. It’s more a question of – which is the right choice for your project?
Generally speaking, if I had a fast-turn project, I’d choose WideDR. But if I had a more relaxed post-production schedule, I’d choose to shoot log.
Hi, Dan,
I am seriously considering investing in a camera and the C100 MKII seems ideal. Undeniable quality/price ratio in 2018.
I wish to realize a personal project, a small series of webdoc, profiles of artists. Episode of about 5mn.
The only embarrassing thing is that you can’t shoot in 4K!
The C200 is really off budget.
What other alternative to the C100 MKII would be possible?
In 2018, investing in a camera not filming in 4K is this wise?
The FS5? I don’t like the Sony image rendering.
Thank you in advance for your answer
Sincerely.
Tom
Hi Tom,
I was in same situation that you are in a couple years ago, and decided to go with the Sony FS5 over the C100. I too prefer Canon color right out of the camera. But if you are willing to invest a little effort, you can get a very nice look out of the Sony FS5. Especially now that you can shoot 12-bit raw with the FS5 and an Atomos Inferno, you can really dial in the color you are looking for. Further, the new Sony FS5 mkii has the new Venice look option, and the Venice look is designed to address people like you and me who prefer the warmer, richer Canon colors. So I’d say – rent a Sony FS5 mkii and give it a second chance!
I just found your site through a google search, I’m about to try clog with my c100 M2, for the first time. What a great site, and I love how responsive and helpful you are. Are there other ways to follow you as well.
Hi Jeffrey,
I’ve pretty much tapped out of social media so the blog is it, apart from taking one of my classes at Seattle Film Institute! You’re welcome to ping me with any question directly as well to dan@visualcontact.com.
Thanks very much for this super helpful post! I’ve been using it on and off for the couple of years I’ve had my camera and I still keep coming back to the post.
Glad it’s helpful Dom!
Hi Dan,
First, thank you for all of your posts and responses. Super useful info.
Just watched a Brandon Li video on frame rates. (https://youtu.be/dR7B8uKc0JU) In it, he says that each camera has its own “best frame rate.” That is the frame rate that produces the highest quality image (not taking into account special circumstances like action subjects, etc.).
So my question is, “What is the best frame rate for the C100mk2? As you have delved into the C100mk2 perhaps more than anyone else I’ve come across, that’s why I’m addressing this question to you. I just called Canon Pro Cine support, and they didn’t have an answer, other than some general reference to Page 55 of the manual.
Thank you for considering this question.
Len Kaufman
Hi Len,
I wouldn’t agree that each camera has its own best frame rate. A more accurate descriptor would be that each project has its own best frame rate. In the US, for cinematic projects that merit the film look, that frame rate will be 24p. For broadcast tv, 30p or 60p, depending on the requirements of the network. It’s pretty much that simple.
I don’t know if you still monitor this thread, but wanted to say thank you for the great config. I just bought my first true Cinema camera, the C100 Mii and have been playing with it for a week. I just ran across this article this morning and found it and the comments very helpful. thank you.
Glad it’s still helpful! I just switched back to Canon myself, actually. I was shooting Sony for about 4-5 years when the FS5 lured me away, but when the C500mkii was announced, it was homecoming time for me! I’m really loving it.
I have a question re frame rate for social media. I am filming publicity for non-profits for social media, and it seems that the only frame rate that conforms to all of them is 30p (some accept lower, some higher – this is the middle ground). So the question is, if I am going to be posting on Youtube as well as social media, can I film at 24p for Youtube and change it for the social sites, or will this look rubbish (I assume it will)?
Probably shooting at 30p is the way to go in your situation, and don’t worry about conforming to 24p unless someone specifically wants it. It’s better to have more frames a second than fewer if you have multiple framerate deliverables.