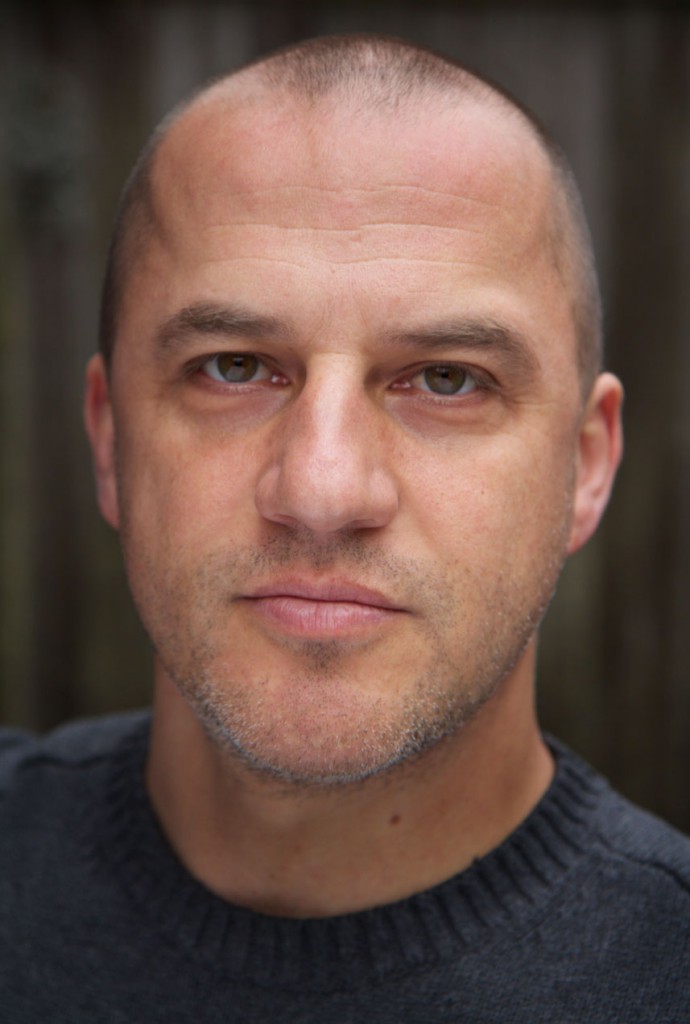
It’s grey in Seattle most of the time. I actually like it that way: it’s the world’s softest light, at your fingertips, and you don’t have to set up a single soft box. But it has its drawbacks when it comes to lighting head shots. With a head shot, I want light that is soft BUT has some modeling and one side darker than the other, to bring out the shape of a face. How to achieve that without adding any lights? You need just two things: a piece of black foam core, and piece of white foam core (or as I used in this case, a collapsible reflective fabric disc).
For this photo, I had the subject, my friend Vanya, balance the black foam core on his right shoulder, which shielded the right side of his face from the grey sky, making it slightly darker than the other side (the technical term for this is “adding negative fill” which is a fancy way of saying you are blocking light from reaching this side of his face. I used a 32″x40″ foam core that sells at University Bookstore for about $6). You have to get it pretty close to the subject’s face for this trick to work – like about 16″ away.
This alone would do the trick for many people, but Vanya’s got deep set Montenegro eyes that will pierce your soul (and go dark without fill). So that’s where the bounce comes into play. I simply had him hold it in his arm, so that it angled light up at him from below. This has the same effect that happens with “butterfly” lighting, which is to hide lines in faces and generally make the person look awesome. They say this works best for women, but I disagree: when is the last time you heard a middle aged man say “hey, can you light me so that the lines in my face look more prominent?” Using fill from below camera that is close to the subjects face is guaranteed to flatter.
In this case, it sent a little too much light up under his chin, so I had to darken that in Photoshop to bring the attention immediately to where it belongs: his face. I also slightly darkened his forehead, and a tiny bit on his sweater, and that’s it. A simple shot with available light, that looks fantastic.
Camera: Canon 60D
Lens: Canon EF 17-55mm f2.8 zoom (set at 55mm and f2.8).
Background: wooden fence in my back yard

Great advice, Dan. Seattle sounds like London 🙂
I bought a couple collapsible reflectors on eBay for so little money I can’t remember. Maybe £10/$10! There is a white side and a black side. Poorly made, but more than worth every penny.
eBay search:
http://bit.ly/wIrR7I
Hey Dan,
Beautiful shot, Would have been nice to also see the same/similar shot without the foam core – before/after sort of thing. Too late.
But also, would be nice to see you pre-Photoshopped version beside the finished product. Do you still have that?
Hi Jim, yes, you’re absolutely correct, if I’m going make posts like this I should do a better job of documenting the entire process. I didn’t save any copies except the final version, so it’ll have to be for next time. Which will be soon: I’ve already completed a post the details how we lit my latest short film, and it’ll be up as soon as my client publishes the piece, hopefully later this week.
Hey James, I was cleaning up my files today and found the file you’re looking for, the uncorrected version of the photo, exactly as it was shot, without any cropping or color adjustments. Here it is:
http://www.danmccomb.com/wp-content/uploads/2012/03/Screen-Shot-2012-03-22-at-1.58.24-PM.png
Pingback: Overcast lighting tip: take it off the top with negative fill | Dan McComb