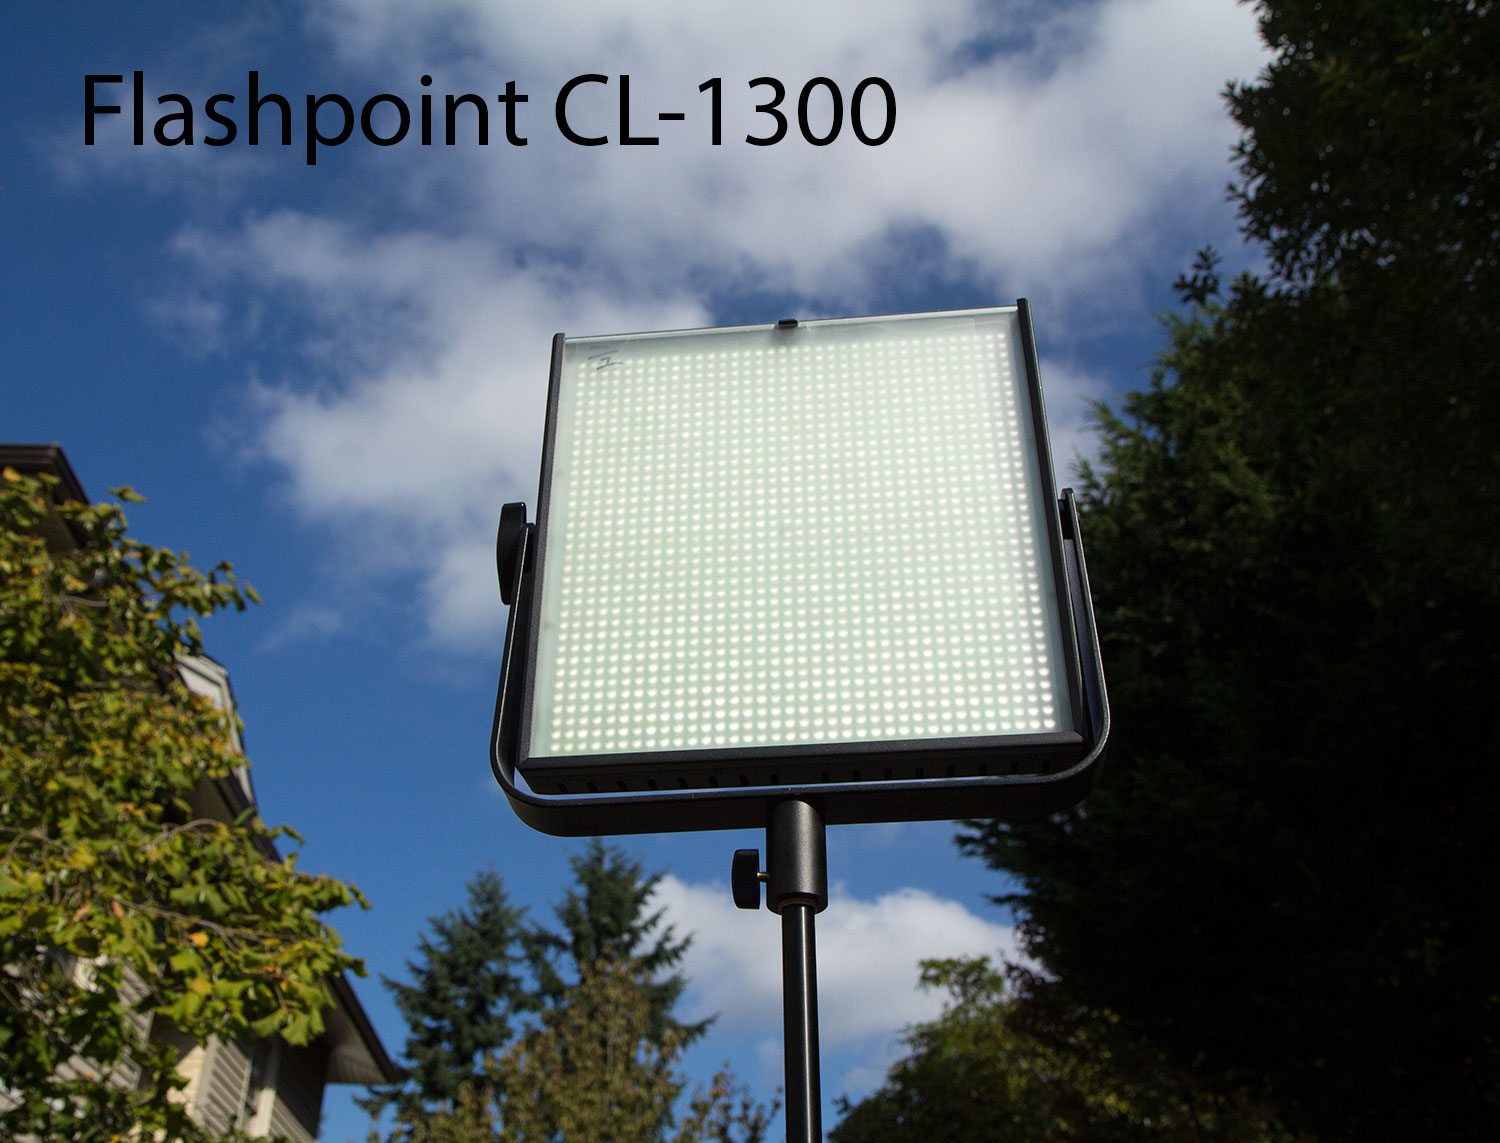
As someone who shoots a ton of interviews on location, I am on a never-ending quest to find a powerful lighting kit that will pack down into a carry-on sized bag. So when I was asked to review the Flashpoint CL-1300 LED panels, I got a little excited.
On paper, these lights look amazing: weighing just 4 pounds each, they are as small as LitePanels, but MUCH brighter; feature a built-in v-lock battery plate for cordless operation, and are priced just over $400. They come in two flavors: a 5600K daylight version, and a bi-color 3200K-5600K rated model. And they are made by Adorama, a brand with a lot more cred than the Chinese knockoffs I bought a few years back.
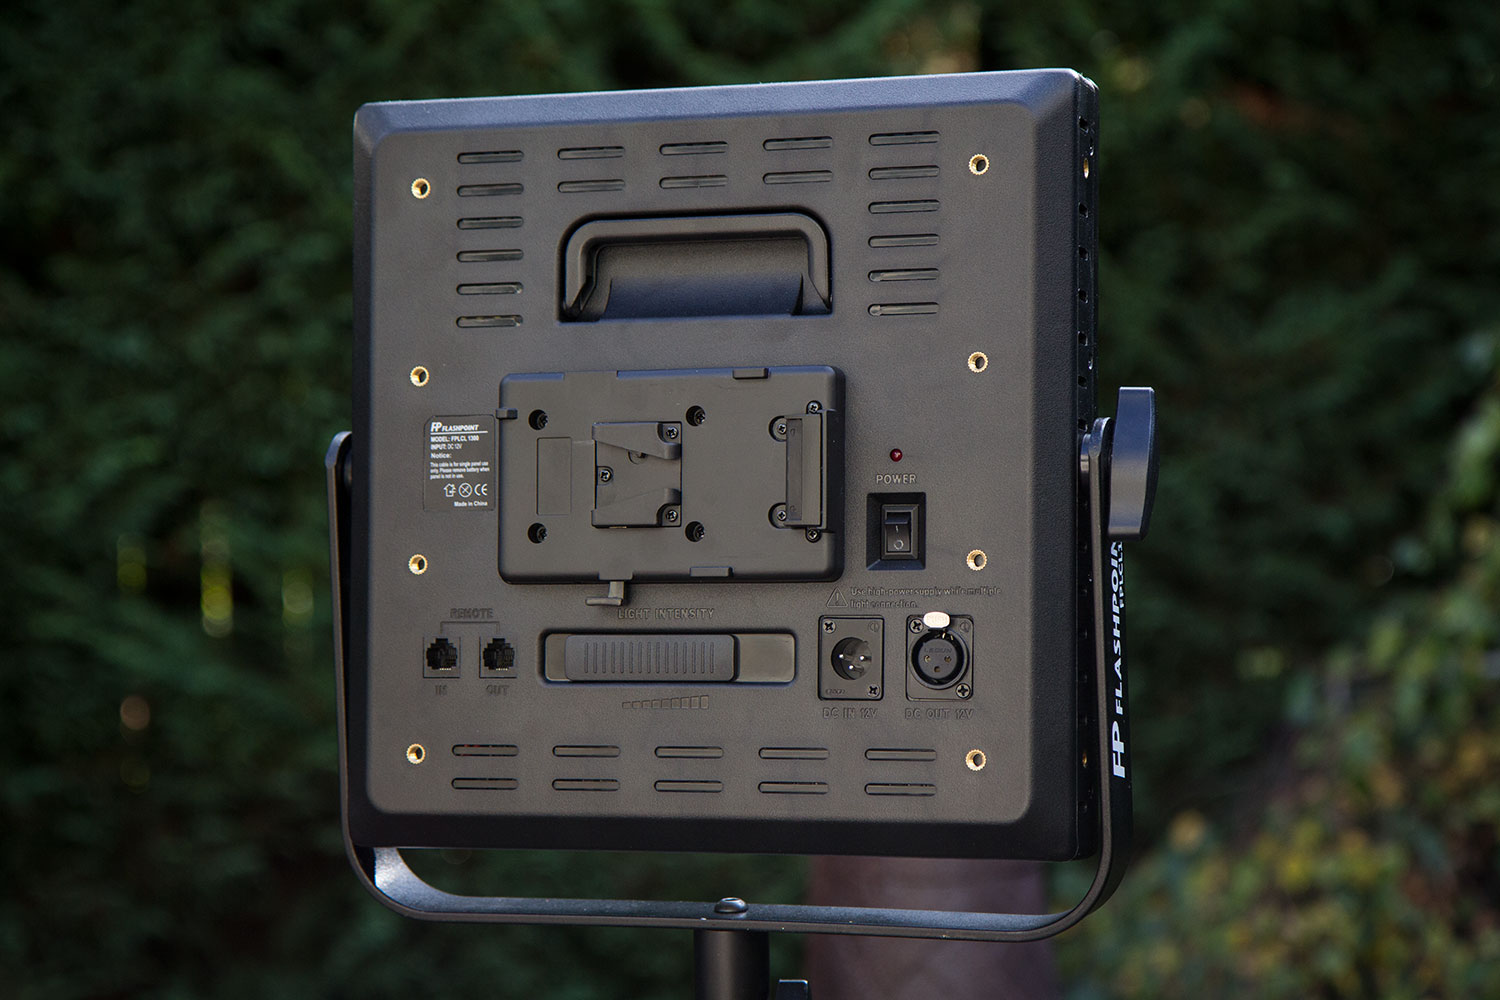
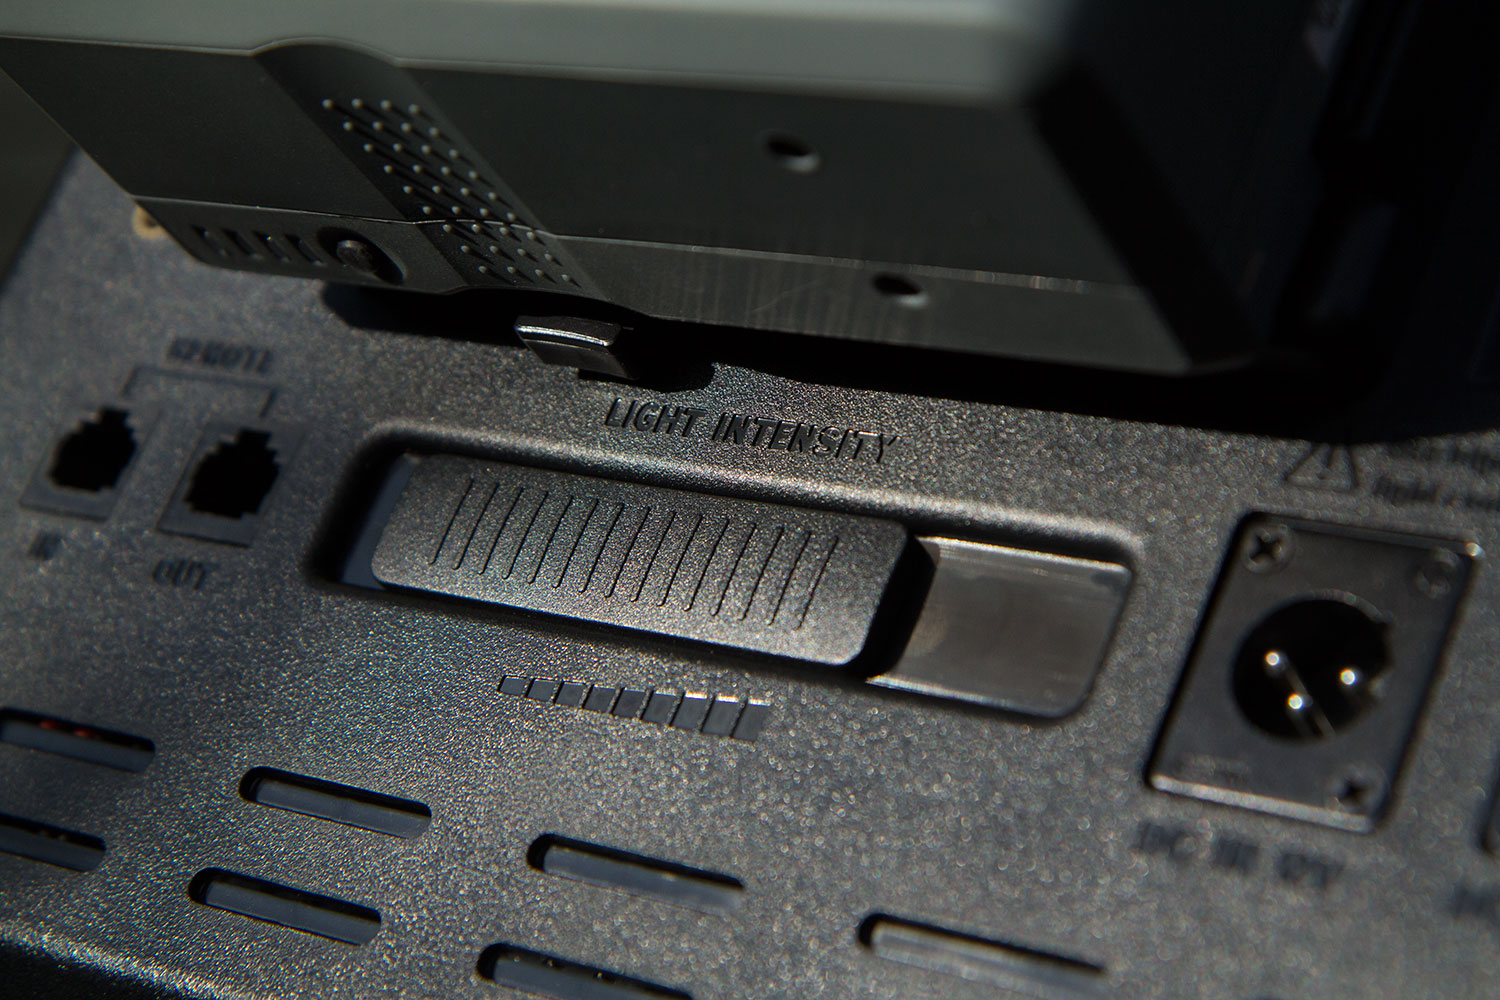
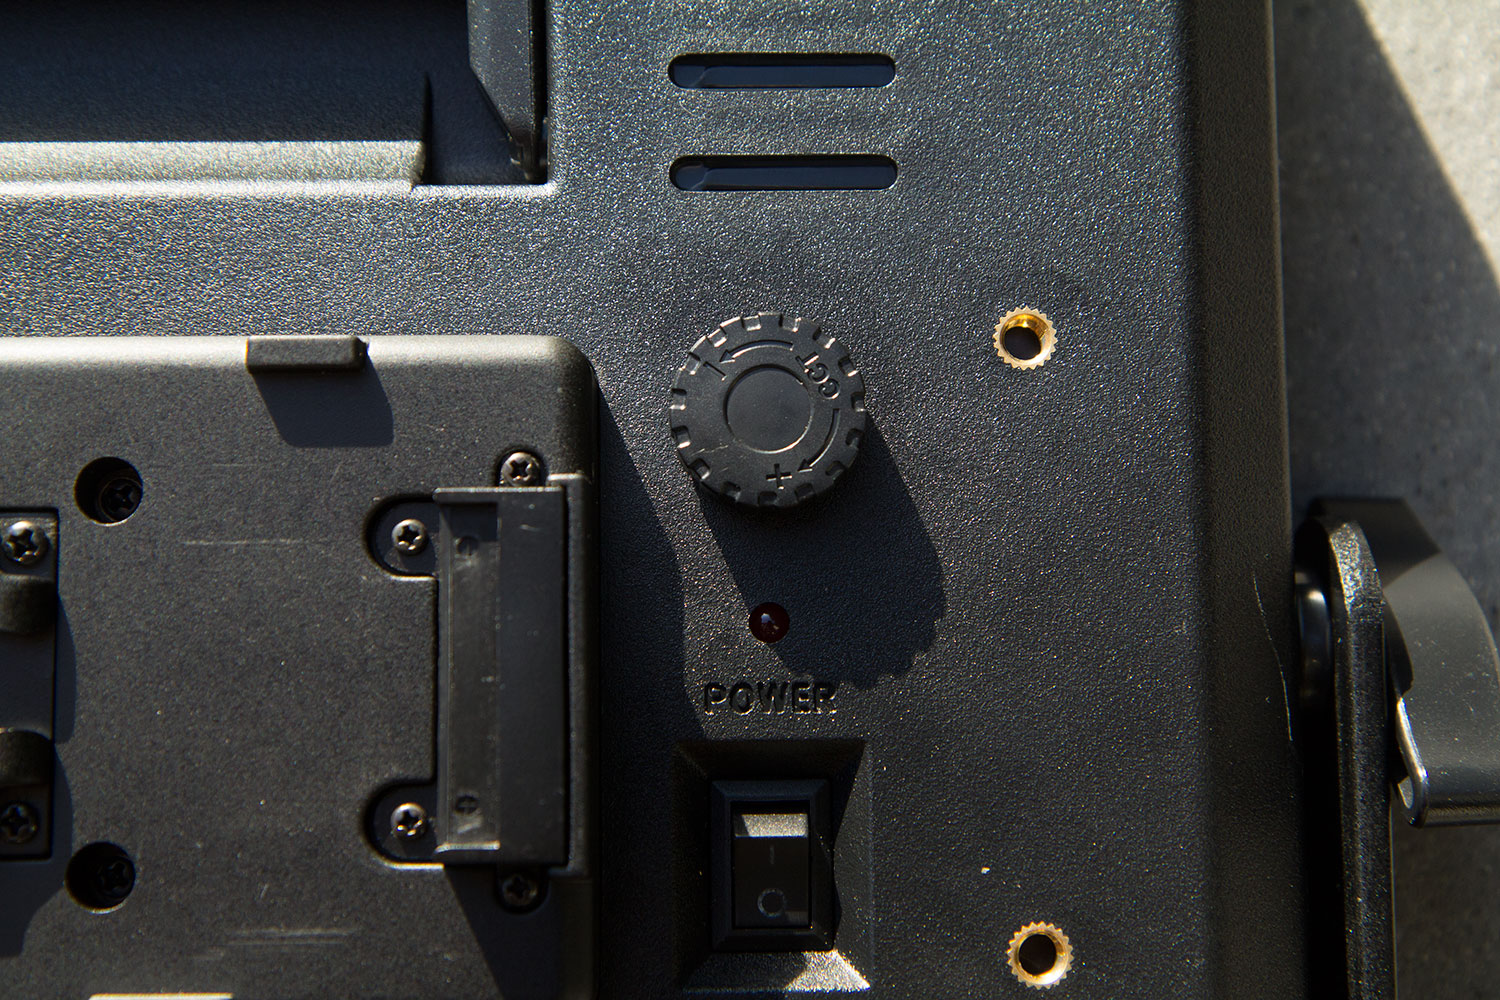
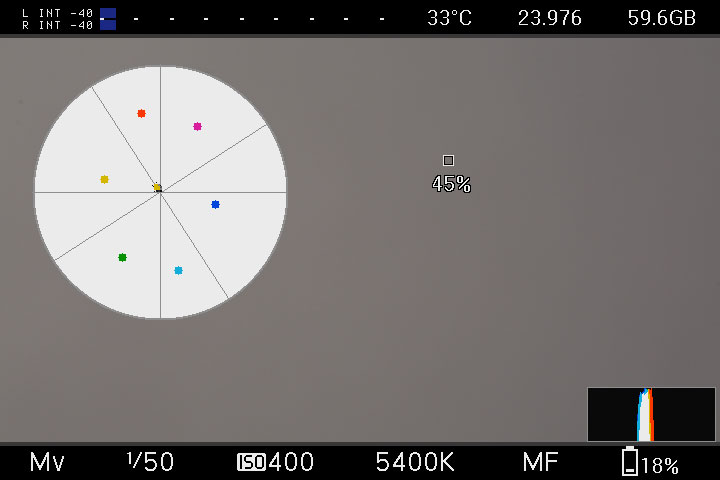
Dimming is controlled from 10 percent to 100 percent via a slider.
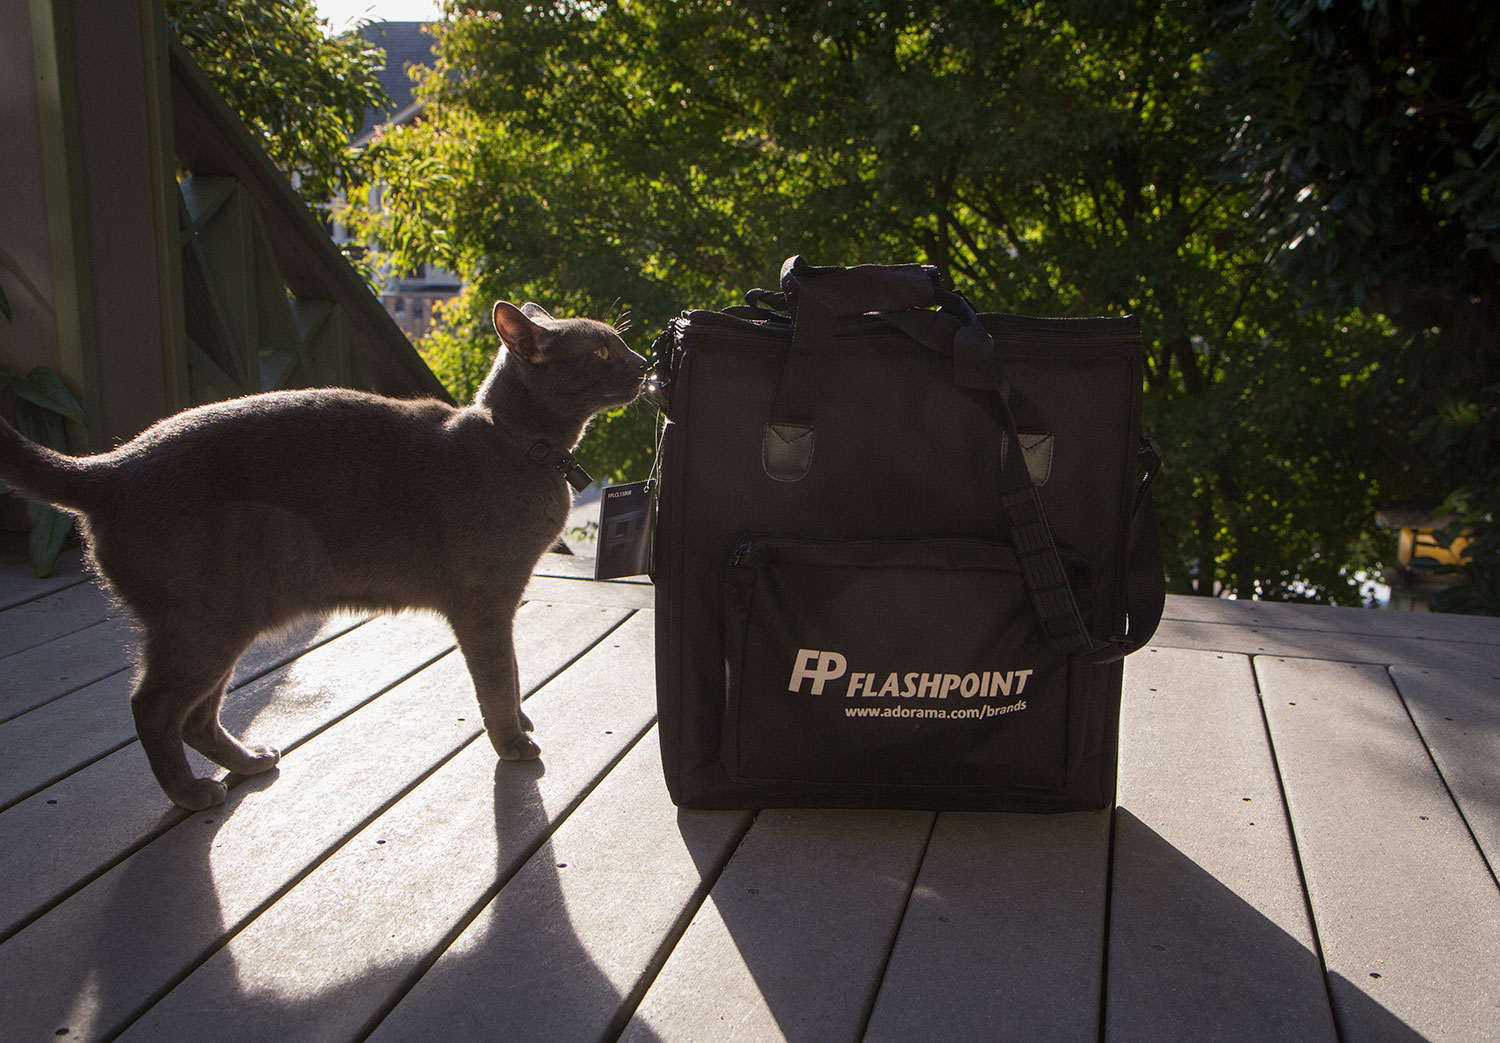
When my test unit arrived, the first thing my cat, Dolce, and I noticed was the handsome bag that was included. It is lightly padded for protection, features a shoulder strap, a pocket for the gels, and a front zipped pocket for the power cord, with room left over for a v-lock battery.
The CL-1300 ships with two plastic gels, one a diffuser, and the other an orange-yellow color that I assumed (incorrectly, as we’ll see in a minute) would get me in the ballpark of 3200K. Also included was a very nice, very long, 16′ power cord, which terminates in a 3-pin female XLR for attaching to the light. With that cord length, it’s almost possible to skip lugging an extension cord!

This is a huge step up from the TRS jack that my old knockoff lights are powered with. The XLR locks into place, so it will never fall out during operation, and you don’t have to worry about the weight of the cable bending anything on the unit.
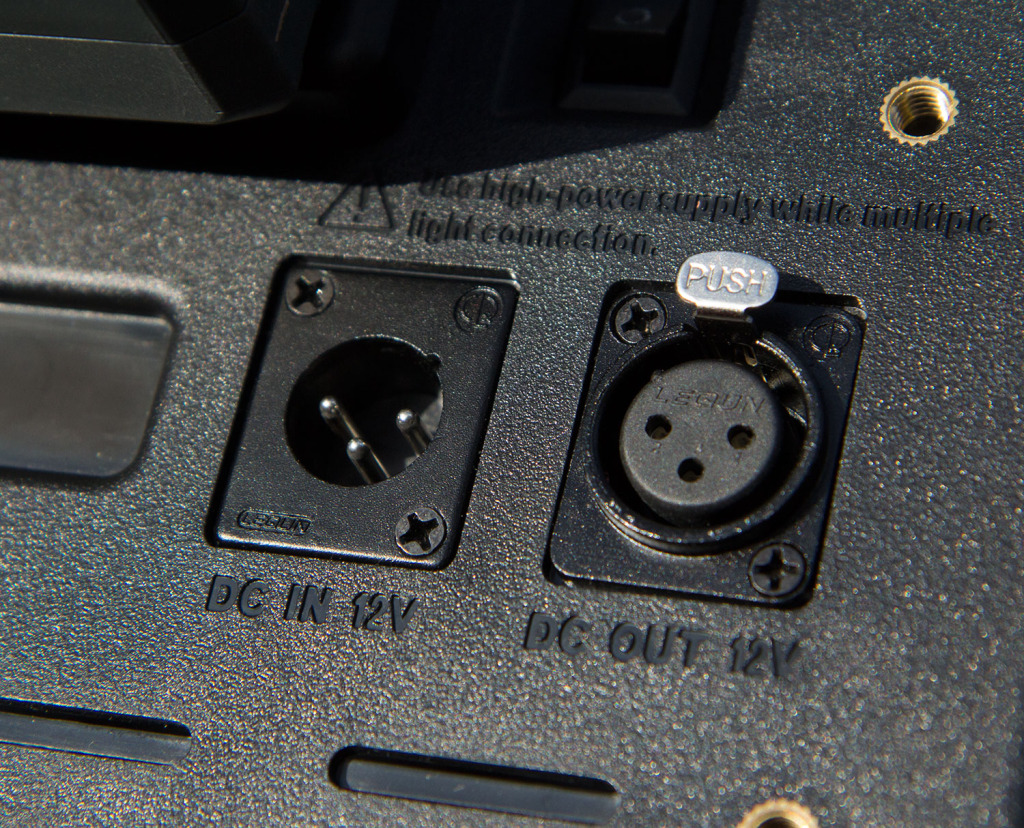
There’s even a DC-out port, which allows you to daisy-chain several units together to create a larger panel, and control the dimming simultaneously using a dimmer attached via a RJ45 remote. I did not test this feature.

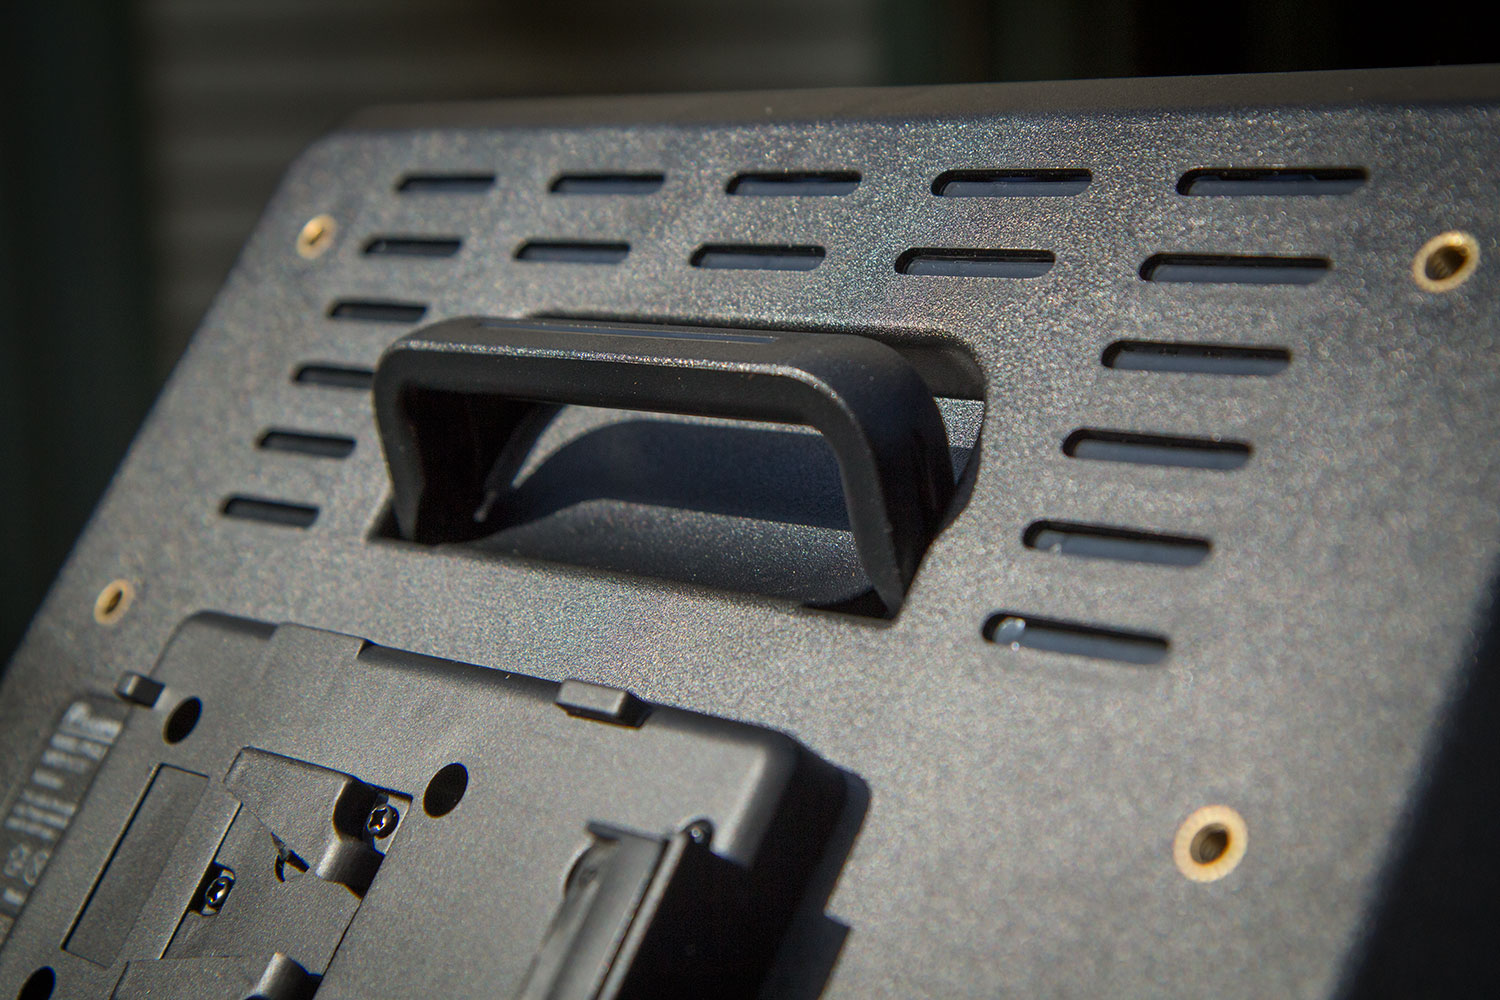
The plastic folding handle on top assists with hand-holding the light when needed.
The first thing I wanted to test was how powerful this light is, in a real-world situation. For sit-down interviews, I generally place my key light no more than 8 feet from my subject. So I placed the light 8 feet from my light meter, and took the following readings @24fps (48th sec. shutter):
Without diffusion or filter 8′ from subject = f/5.6.4 at iso 400.
With included diffusion gel (which I definitely recommend to eliminate the multiple shadow effect of bare LED panels): f/5.6.1, about a third of a stop light loss.
Battery life. Using my Switronix 14.8 volt v-lock battery on the light, I was able to get an average of 2 hours and 30 minutes with the light set at half brightness. Going to full brightness drains it in under an hour. Because the unit is so bright, it’s totally feasible to work in the half-dimmer position for all but the longest of interviews, without interruption. Sweet! One thing to note: when the power dies, it dies suddenly. It goes from being fully bright, to being out, just like that. I’m glad it does that rather than slowly dip, because this way as long as the light is on, you know you’re getting a consistent level of output.
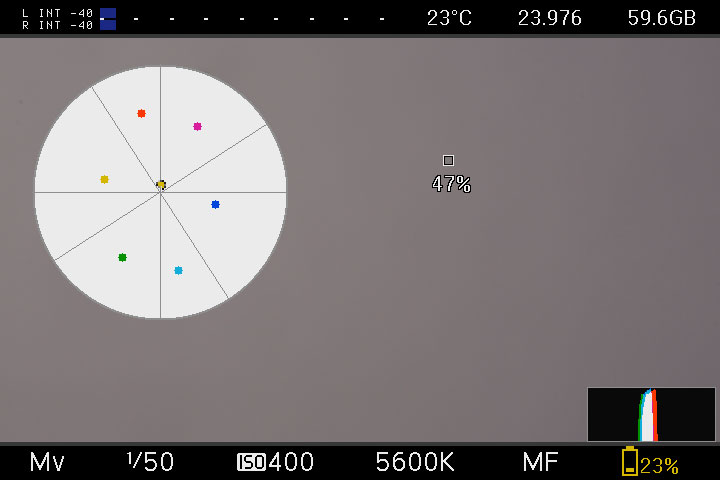
So this is a very bright little light. But is it, as advertised, 5600K?
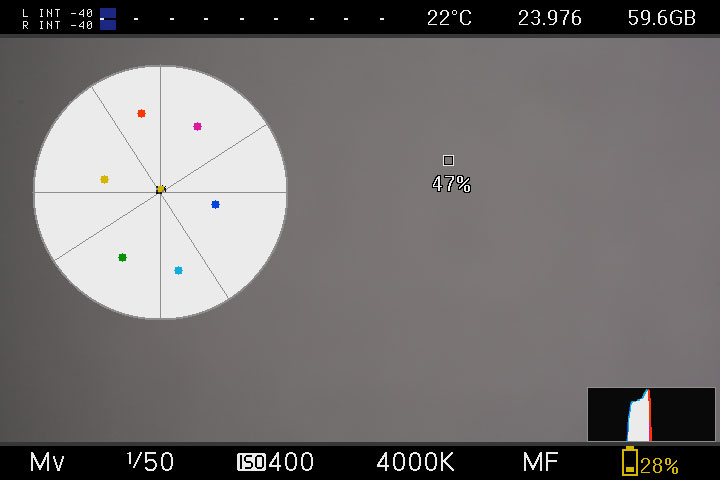
To determine color temperature, I clipped a Kodak 18 percent gray card to a stand, in a gray room with gray carpet, and pointed my 5dmkiii running Magic Lantern at it, with vectorscope enabled. I set the camera’s white balance manually to 5600K, and I SHOULD have seen a tight dot in the very center crosshairs of the scope. But this is what I saw instead:
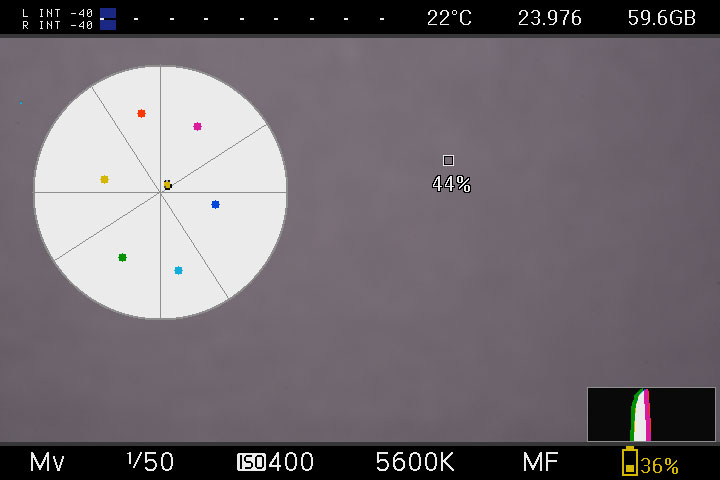
Way too much magenta! To correct this, I added a 1/4 +green gel, and a 1/8 +green gel, which took us to here:

It’s too warm now, but adding 1/8 blue took us too far toward blue, to about 6000K. So I settled for rating this light at 5400K, which yields this result on the scope:

It’s still a tad on the warm side, but I prefer a little warmth in my daylight balanced lights. With a little filtration, and some tweaking of the advertised color temp, we’re good to go.
You can assume that this is a step you would need to perform for every light you purchase in the CL-1300 series – getting the temp spot-on at the factory clearly wasn’t a top priority with these units.
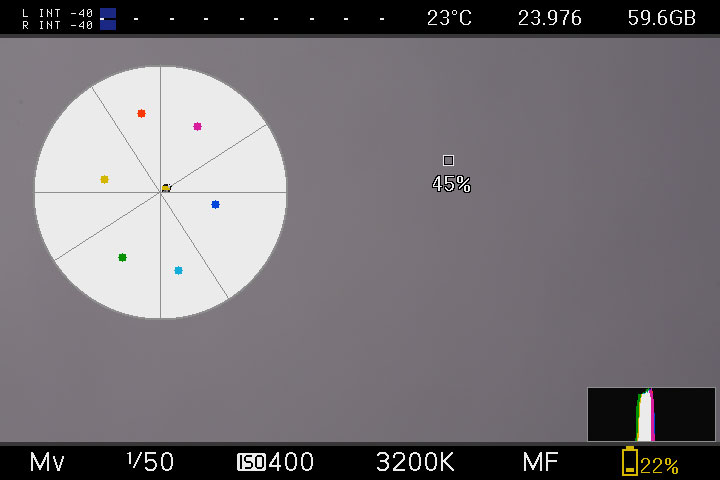
Now that we’ve dialed in our daylight setting, what about 3200K? You might think that it would be as simple as sliding on the included orange plastic gel into the second slot provided (a very nice design touch).
But that turns out not to be the case. Adding the orange gel takes us only to 4000K:
We’ve got some more gels to add…and perhaps take away…to reach 3200K. With a little trial and error, I discovered that the formula is: remove the 1/8 +green, and add 1/8 CTO, and 1/4 CTO, which gets us close to the mark as possible, with just a bit of extra warmth:
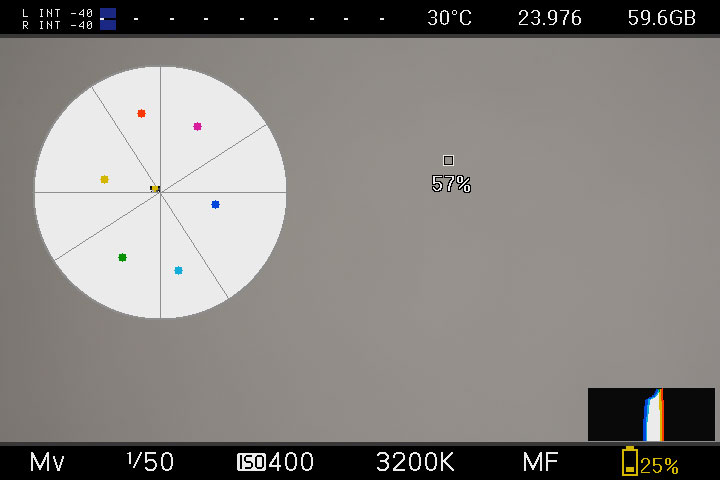
(Note: dialing my color temp on the camera to 3100K put the dot squarely in the crosshairs, so technically the light gelled thusly should be rated 3100K. But as I said above, I prefer that slight bit of warmth so this is how I will rate the light and it matches well with my 5400K setting above).
Recommended additional filtration to carry with this light:
1/2 Plus Green – stacking this with the included 4000K filter gets you a ballpark fluorescent balance.
ND gels – the light is advertised as dimming to 10 percent of power. That turns out to be a lot of light – sometimes too much if you’re looking for subtle fill. Adding at .6 or .9 ND gives you the ability to dim the light further.
Size to cut: 11.5 x 11 3/8. It would be much simpler to cut these if the filter trays were actually square, but they’re not quite.
So we’ve found the formula to make THIS individual CL-1300 look good in tungsten, fluorescent and daylight. But…
In practice, this is a royal pain. Fiddling with adding multiple CTO gels, while remembering to take out 1/8 +green… you can see how complicated this could get on location. If you wanted to add the equivalent of 1/4 CTO, what would you do?
This is the accusation that DPs and gaffers have been hurling at LEDs since the beginning: that they don’t play well with the other lights on set. You can gel any tungsten light, and it will produce a predictable result that will match with other manufacturers tungsten lights, as long as the color temps are the same. But try that with inexpensive LEDs, and you get these weird color shifts that have to be individually corrected for.
So this got me wondering. Would the bi-color version of this light solve this problem?
There are so many things to like about this light, that I decided to put down my money and take a chance on it. The dream of compact, inexpensive, powerful, finger-tip adjustable lighting just won’t die in my head. So I ordered a 1300B unit, and awaited delivery.
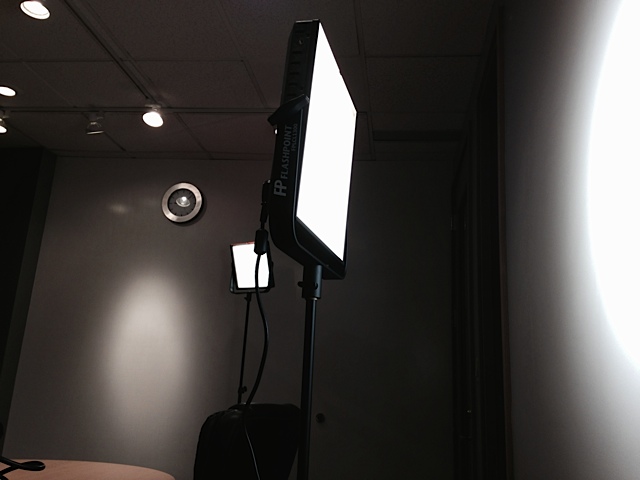
Meanwhile, I had already ordered an additional CL-1300 for use on a documentary shoot with L.A. based director Michael King on his latest film, Intrepid. The film explores what happens to soldiers returning from combat and the challenges they face with post traumatic stress. For this shoot, we had two days of back-to-back interviews, and very little time to set up, very little budget, and very little crew. Here’s a couple iPhone snaps I was able to grab during production:
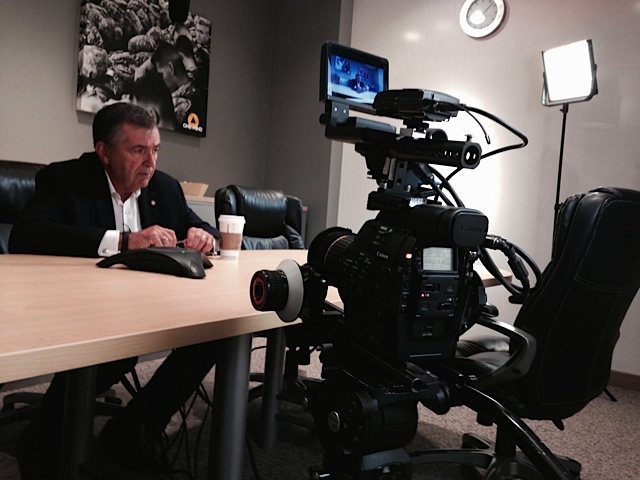
This interview with a former general is an example of where these lights shine: quick setups with busy people who can’t grant time for more elaborate setups.
This was our setup: two CL-1300s, one bounced into the neutral gray wall to provide strong fill, and the other keying the general from the side. The resulting wrap-around light looks great and takes almost no time to set up. The lights are gelled for tungsten using the formula I outlined previously in this post.
Unfortunately, the unit I received suffered from a serious issue: it had a noticeable flicker when dimmed below 50 percent. I limped through the shoot with it, and returned it immediately thereafter. Probably just a defective unit, right?
A few days later, the 1300B arrived.
The first thing I noticed after unboxing this light and turning it on? The dreaded flicker. Again. Similar to the previous unit, this one flickers in the low end of the daylight channel. But it also flickers subtly at top end of the tungsten channel. See this video clip:
Another issue: it emits a faint pitched whine that goes from high to low when dialed from daylight to tungsten. It disappears at either end of the scale, but select anything in between, and your sound guy may be ripping his headphones off in protest of your new purchase.
Of course I’m returning it. It’s obviously defective. And I’d like to wait until the replacement unit arrives to post this review. But after having to return two out of three lights that I’ve tested from flicker issues, I think it’s something I have to talk about. Even if the replacement is flicker-free, that will only bring the average to 50 percent. I’ll let you be the judge of whether that’s good enough for lighting gear you rely on.
OK, so flicker aside…
Bi-color is a killer feature. Think about it. If you’re standing on location, and the client is waiting, and you can dial in the color temp, instead of digging through your filter roll, getting out your c-47s and trying one then adding another…Having a light that you can adjust the color instantly is just a huge deal. Especially when you’re working with small crew or one-man mode.
And with LED panels, gelling is more of a pain than with fresnels. You need to either have a bunch of pre-cut pieces which you, or you need the accessory barn doors.
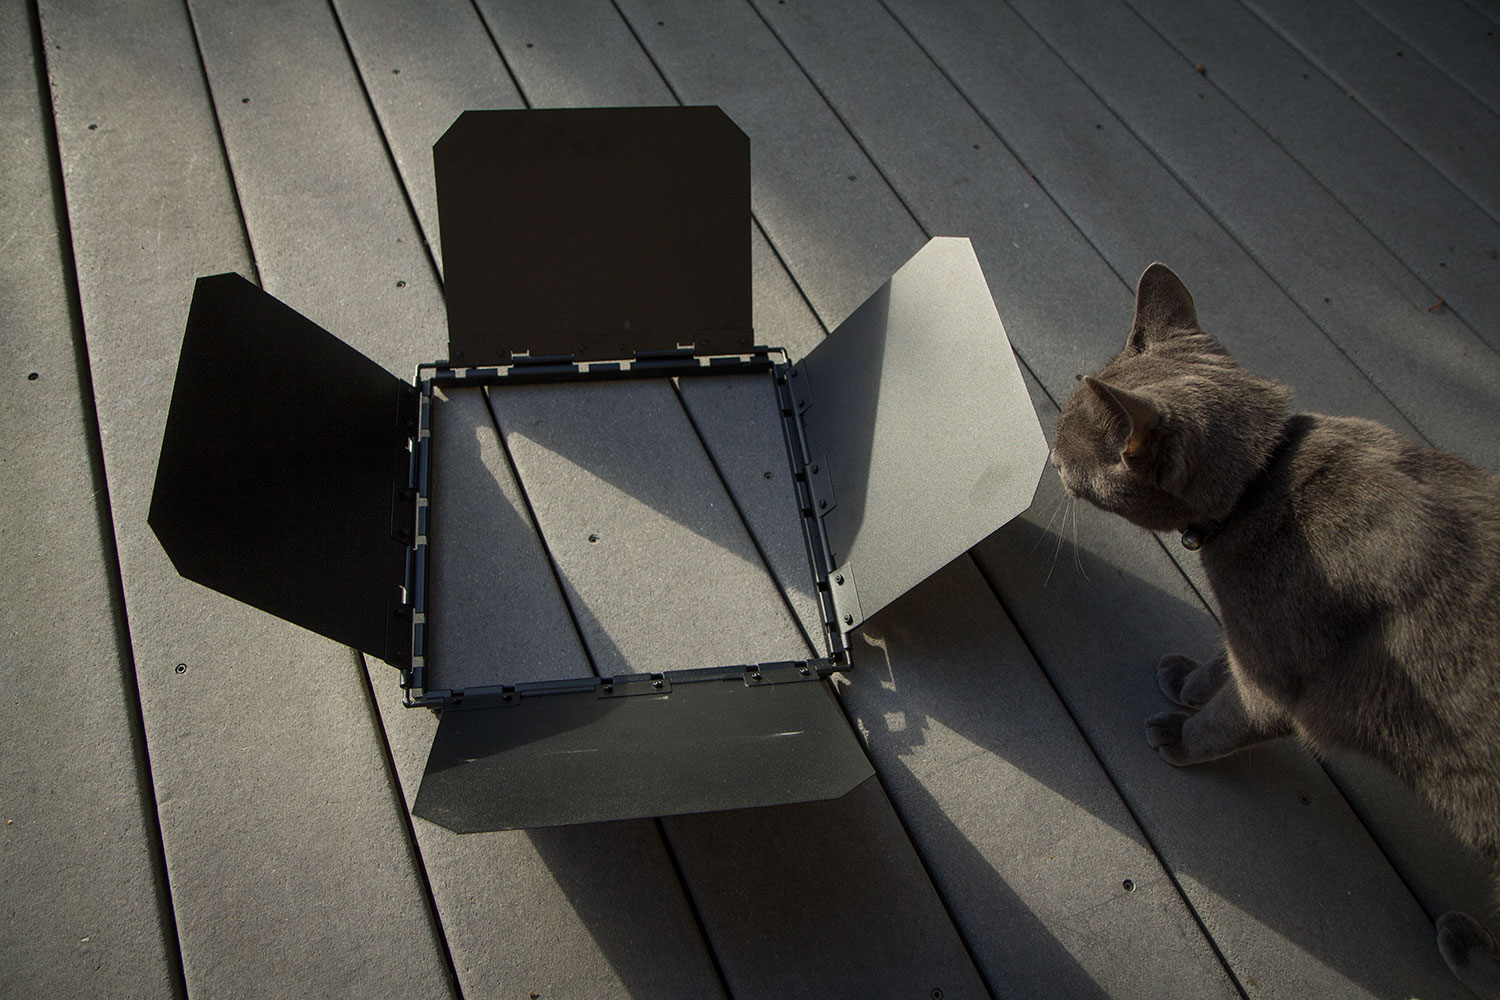
The barn doors do allow you to easily clip gels or diffusion to the light. However, the Adorama CL-1300 barn doors are very, VERY heavy – 3 pounds! The light itself only weighs 4 pounds. But no one can accuse them of being cheaply built – these bar doors are built like a weapon.
One thing I like about the 1300B is that you can dial the color temp independently of the intensity. So it’s easy to find a temperature setting, and then work the dimmer up and down without changing it, an important convenience during a shoot.
The main thing to keep in mind when considering whether to go with the bi-color or daylight version of this light, is brightness. The bi-color unit is half as bright as the daylight, because half the LEDs are tungsten, and half are daylight. Dialing the temperature control wheel sends power into one while subtracting it from the other. Predictably, when I gave the same brightness test as above to the CL-1300B, here’s what I got:
At 8’, light without diffusion or filters yields f/4.0.5 at iso 400 @24fps (48th sec. shutter)
With included diffusion: f/4.0.2, or about a third of a stop light loss.
What about the color temp of the bi-color model? Does it require gelling too?
The bi-color unit is closer than the previous light, but still needs some correction. 1/4 +green, to be precise. Uncorrected, here’s how it looks to the vectorscope:
As the light is dialed from daylight to tungsten, it gets more magenta. My compromise fix: Adding a 1/8th +green, and rating the daylight to 5400 instead of 5600k. This yields almost the same correction as the CL-1300 did, resulting in a pleasantly warm daylight balance:
So what’s the bottom line? There are many things to love about these lights. They pack nice, sip battery power, weigh next to nothing, and are well designed. They are full of promise. But until the flicker issues are addressed, and the color temperatures more precisely match those advertised, my recommendation is “watch, ” not “buy.”
Thanks for the great review! Interested in your thoughts on the F&V R-300’s for interview lighting. Been hearing moderately good stuff about them as cheap but effective replacements for 1×1 LEDs and was thinking of getting a few.
Hi Ty,
I haven’t had a chance to try the V&V lights. Another brand I’ve been hearing good things about are the Dracast LED lights, which are more expensive but supposedly 95 CRI equivalent, so great light quality. But I was in B&H last week and the display copy they had wasn’t working correctly, and he told me that’s the problem – quality control isn’t very good in manufacturing.
Pingback: Light the Way: A Beginner's Guide to Video Lighting on a Budget
Are you still using these lights or have you moved on to something else? I’ve been looking at LED lights for studio product photography and video and I’m wondering how they’ve held up. They are much more affordable than a lot of other options and since my setup will be, for the most part, permanent, the color issues can be dialed in and then left alone. Would you recommend these lights for a studio setup?
Hi John, I still own the light and use it occasionally, but my go-to light is now the LiteGear LiteMat2, which I’ve reviewed here: http://www.danmccomb.com/product-reviews/litegears-litemat-is-an-impressively-versatile-location-led/
For a studio setup, I’d really recommend a light that has a higher CRI value than the Flashpoint. One that immediately comes to mind as being a better choice and also very affordable would be the Aputure Storm LED lights. Check out this review: http://www.newsshooter.com/2015/04/20/nab-2015-aputure-light-storm-led-soft-lights/
Thanks Dan. This was really helpful. Ever worked with Generay LEDs? I’m assuming that they might be similar to these Flashpoints…you kind of get what you pay for!
Yes, I’ve got a Generay light tube, and I really like it as a small problem-solving light. Color isn’t too bad if you test and gel to calibrate. I wrote about mine here: http://www.danmccomb.com/product-reviews/genaray-gesplr-spectroled-sp-lr-review/
I have a chance to pick up a series of 4 of these, barely used. Can you tell me if your 1300B was, indeed, defective, and that this was finally remedied?